

As finals are impending and the holiday is approaching, bring a little cheer by making your own electronic circuit that lights up LEDs and jingles a holiday tune.
For this project, we will use a Texas Instruments (TI) LaunchPad™ development kit and the versatile Sidekick Basic kit for TI LaunchPad kit. The TI LaunchPad kit is our programmable processor that is capable of very complex to very simple embedded computing. The Sidekick is a handy breadboard kit that contains common components to make a wide variety of circuits. The Sidekick comes with 10 example circuits which you can look at in detail at www.energia.nu/sidekick.
-----
Fun fact this holiday season: You can use the coupon code NewMSP430LP to order the newest LaunchPad kit (MSP-EXP430FR2433) for $4.30 (the regular price is $9.99) through Dec. 31, 2017. There is a limit of two kits per coupon and quantities are limited. (Click here to order the MSP-EXP430FR2433)
----
We will be modifying the circuit concepts we learned from the Sidekick examples to create a custom Jingle Bells audio circuit and LED array. The example concepts we pulled from are Example 1: RGB LED, Example 3: Multiple LED, and Example 5: Piezo Buzzer.
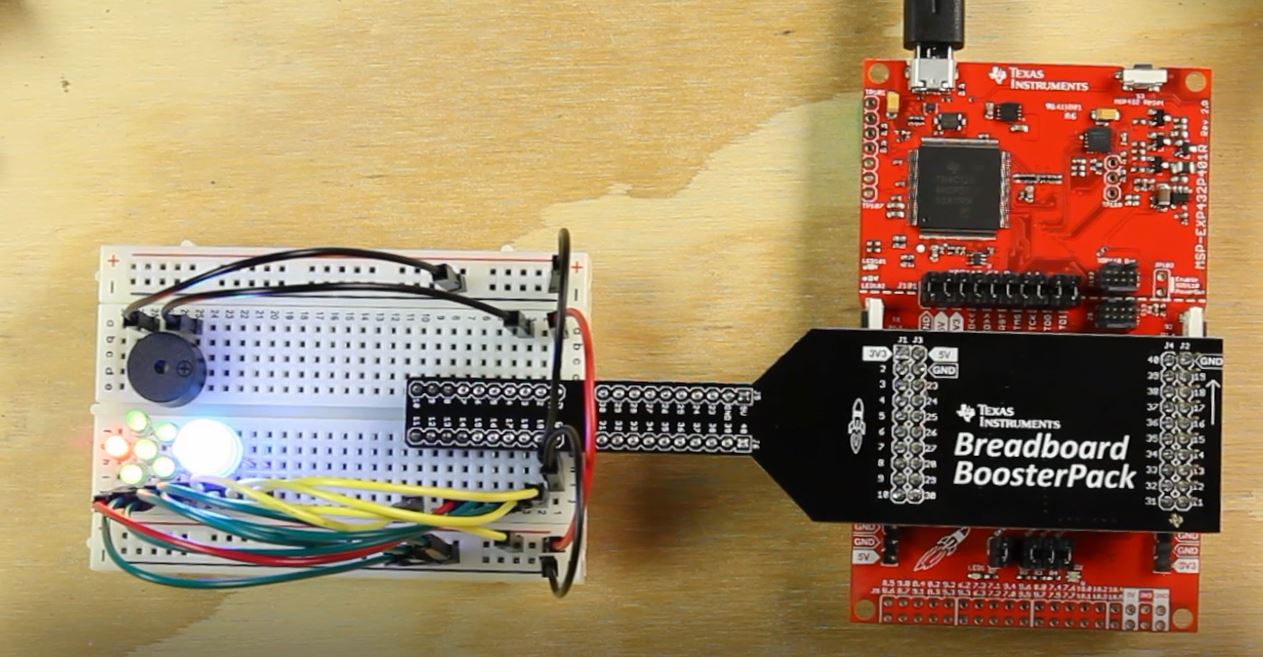
To see the circuit in action and how it is assembled, check out our video tutorial!
https://e2e.ti.com:443/ http://www.youtube.com/watch?v=E1xIZZgXIYM
Make sure you have the Energia IDE and drivers (if needed) so you can program the LaunchPad kit. If you don’t have it, go to www.energia.nu/download.
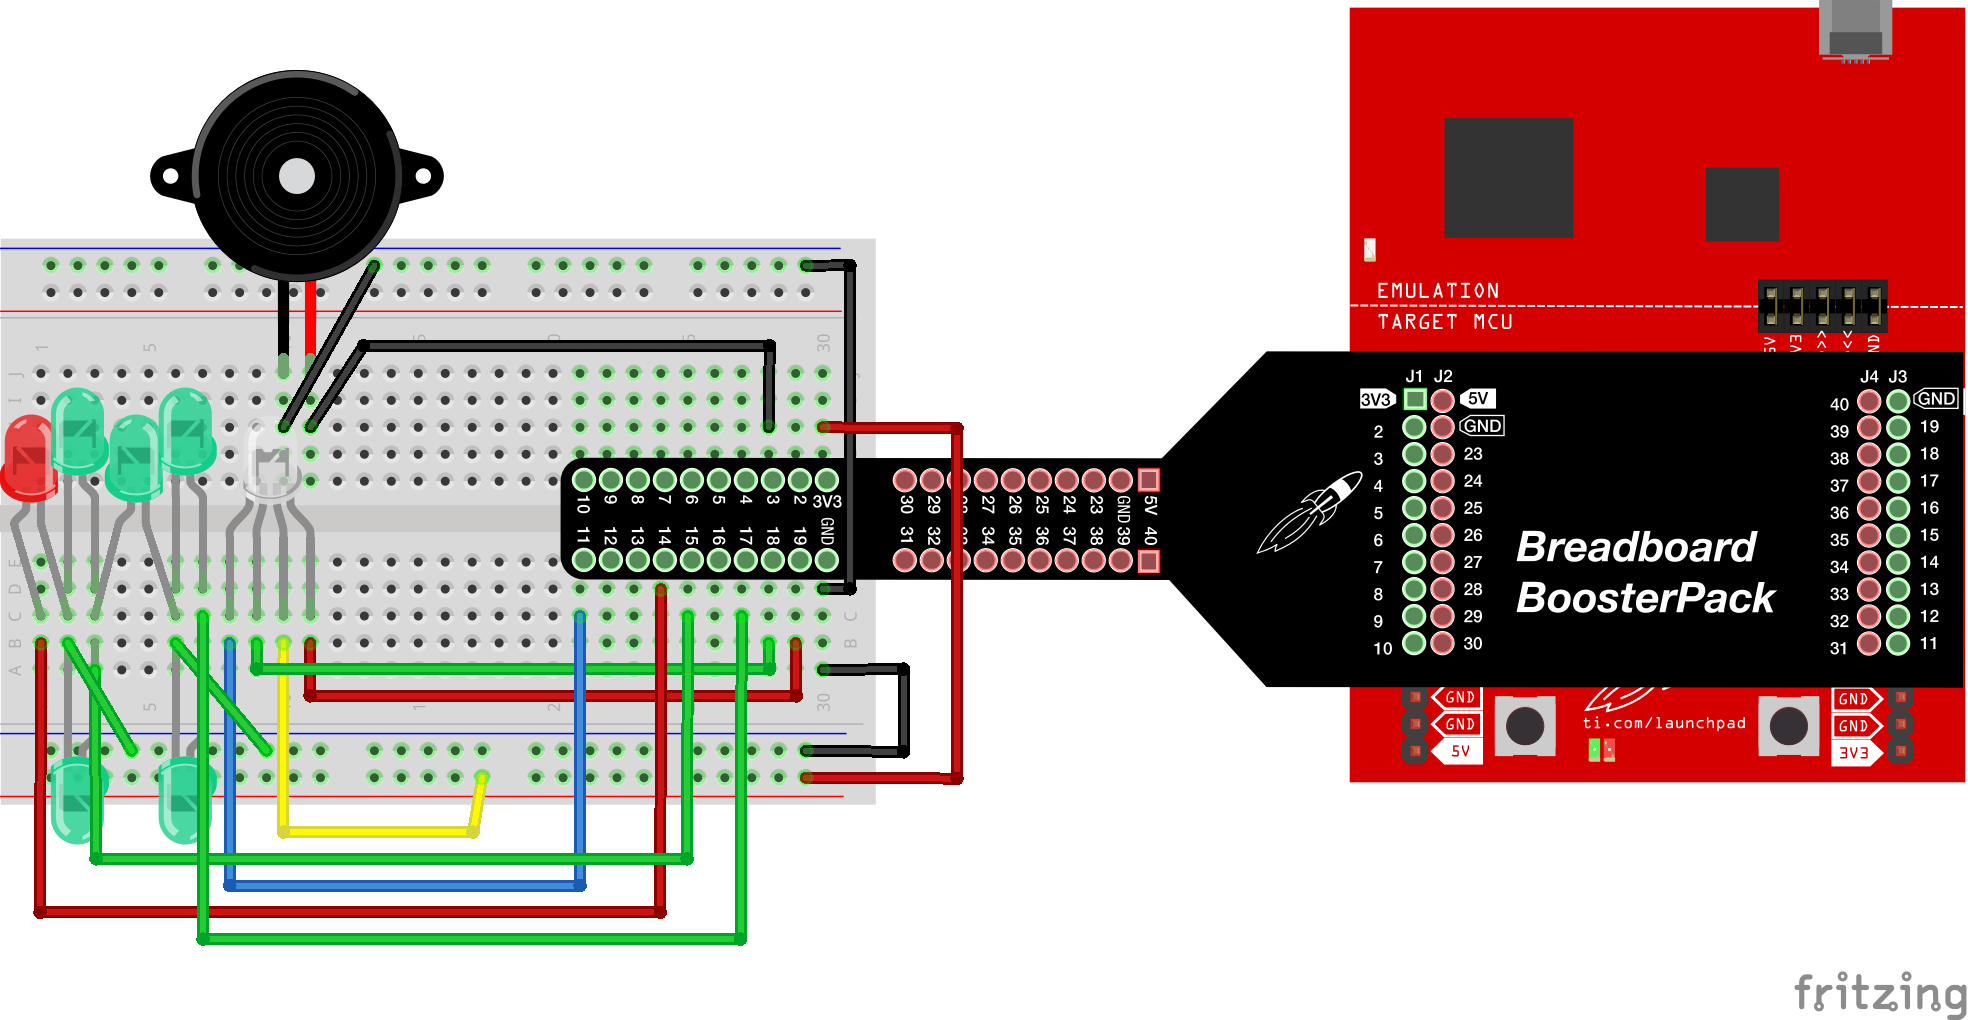
Step 1:
Construct your circuit. (Refer to the diagram below. Click on image to enlarge for pin numbers.)
Step 2:
Open up the Energia IDE. We are going to paste in our code into a blank sketch (what we call an Energia program).
Use this sample code:
#define RED 19
#define GREEN 11
#define BLUE 18
#define tree1 17
#define tree2 15
#define tree3 14
#define NOTE_B0 31
#define NOTE_C1 33
#define NOTE_CS1 35
#define NOTE_D1 37
#define NOTE_DS1 39
#define NOTE_E1 41
#define NOTE_F1 44
#define NOTE_FS1 46
#define NOTE_G1 49
#define NOTE_GS1 52
#define NOTE_A1 55
#define NOTE_AS1 58
#define NOTE_B1 62
#define NOTE_C2 65
#define NOTE_CS2 69
#define NOTE_D2 73
#define NOTE_DS2 78
#define NOTE_E2 82
#define NOTE_F2 87
#define NOTE_FS2 93
#define NOTE_G2 98
#define NOTE_GS2 104
#define NOTE_A2 110
#define NOTE_AS2 117
#define NOTE_B2 123
#define NOTE_C3 131
#define NOTE_CS3 139
#define NOTE_D3 147
#define NOTE_DS3 156
#define NOTE_E3 165
#define NOTE_F3 175
#define NOTE_FS3 185
#define NOTE_G3 196
#define NOTE_GS3 208
#define NOTE_A3 220
#define NOTE_AS3 233
#define NOTE_B3 247
#define NOTE_C4_1 260
#define NOTE_C4 262
#define NOTE_CS4 277
#define NOTE_D4 294
#define NOTE_DS4 311
#define NOTE_E4 330
#define NOTE_F4 349
#define NOTE_FS4 370
#define NOTE_G4 392
#define NOTE_GS4 415
#define NOTE_A4 440
#define NOTE_AS4 466
#define NOTE_B4 494
#define NOTE_C5 523
#define NOTE_CS5 554
#define NOTE_D5 587
#define NOTE_DS5 622
#define NOTE_E5 659
#define NOTE_F5 698
#define NOTE_FS5 740
#define NOTE_G5 784
#define NOTE_GS5 831
#define NOTE_A5 880
#define NOTE_AS5 932
#define NOTE_B5 988
#define NOTE_C6 1047
#define NOTE_CS6 1109
#define NOTE_D6 1175
#define NOTE_DS6 1245
#define NOTE_E6 1319
#define NOTE_F6 1397
#define NOTE_FS6 1480
#define NOTE_G6 1568
#define NOTE_GS6 1661
#define NOTE_A6 1760
#define NOTE_AS6 1865
#define NOTE_B6 1976
#define NOTE_C7 2093
#define NOTE_CS7 2217
#define NOTE_D7 2349
#define NOTE_DS7 2489
#define NOTE_E7 2637
#define NOTE_F7 2794
#define NOTE_FS7 2960
#define NOTE_G7 3136
#define NOTE_GS7 3322
#define NOTE_A7 3520
#define NOTE_AS7 3729
#define NOTE_B7 3951
#define NOTE_C8 4186
#define NOTE_CS8 4435
#define NOTE_D8 4699
#define NOTE_DS8 4978
int redVal;
int greenVal;
int blueVal;
int buzzerPin = 3;
int melody[] = {
NOTE_E4, NOTE_E4, NOTE_E4, NOTE_E4, NOTE_E4, NOTE_E4,
NOTE_E4, NOTE_G4, NOTE_C4, NOTE_D4, NOTE_E4, NOTE_F4,
NOTE_F4, NOTE_F4, NOTE_F4, NOTE_F4, NOTE_E4, NOTE_E4,
NOTE_E4, NOTE_E4, NOTE_E4, NOTE_D4, NOTE_D4, NOTE_E4,
NOTE_D4, NOTE_G4, NOTE_E4, NOTE_E4, NOTE_E4, NOTE_E4,
NOTE_E4, NOTE_E4, NOTE_E4, NOTE_G4, NOTE_C4, NOTE_D4,
NOTE_E4, NOTE_F4, NOTE_F4, NOTE_F4, NOTE_F4, NOTE_F4,
NOTE_E4, NOTE_E4, NOTE_E4, NOTE_E4, NOTE_G4, NOTE_G4,
NOTE_F4, NOTE_D4, NOTE_C4};
int noteDurations[] = {
4, 4, 2, 4, 4, 2,
4, 4, 3, 8, 1, 4,
4, 3, 8, 4, 4, 4,
8, 8, 4, 4, 4, 4,
2, 2, 4, 4, 2, 4,
4, 2, 4, 4, 3, 8,
1, 4, 4, 4, 4, 4,
4, 4, 8, 8, 4, 4,
4, 4, 1};
void setup() {
pinMode (buzzerPin, OUTPUT);
pinMode (RED, OUTPUT);
pinMode (GREEN, OUTPUT);
pinMode (BLUE, OUTPUT);
pinMode (tree1, OUTPUT);
pinMode (tree2, OUTPUT);
pinMode (tree3, OUTPUT);
}
void loop() {
digitalWrite (RED, LOW);
digitalWrite (GREEN, HIGH);
digitalWrite (BLUE, LOW);
digitalWrite (tree1, HIGH);
digitalWrite (tree2, HIGH);
digitalWrite (tree3, HIGH);
for (int thisNote = 0; thisNote < 51; thisNote++) {
int noteDuration = 1000/noteDurations[thisNote];
tone(buzzerPin, melody[thisNote], noteDuration);
int pauseBetweenNotes = noteDuration + 50; // delay between pulse
delay(pauseBetweenNotes);
noTone(buzzerPin);
}
}
Before we upload the code, make sure you have your LaunchPad kit connected to your computer with the USB cable. You will also want to select the right type of LaunchPad kit by clicking Tools > Board and select your LaunchPad kit version from the menu. If your board is not listed, be sure to go to the Boards Manager option and add your board package to Energia.
Lastly, make sure you select your LaunchPad port under Tools > Port. If no ports are available and this is your first time programming the LaunchPad kit, you might have not installed the drivers. Make sure to follow the instructions for your operating system on the Energia download page.

Step 3:
Click the upload button, which is the right facing arrow in the upper left corner of the IDE window.

Now your code should run and you will hear Jingle Bells playing through the speaker. If you run into trouble, make sure you follow the steps correctly when wiring the circuit and copying the sample code.
Anything can be crafted with the right tools and technology to celebrate any season or reason. Enjoy the holidays!
__________________________________________________________________________________________________________________________________________________
Buy the TI LaunchPad kit at TI.com: www.ti.com/launchpad
You can purchase the Sidekick Basic kit for TI LaunchPad development kit through Digi-key, Mouser, or Seeedstudio.
Have questions about this tutorial? Be sure to ask via the comments section below.
