

The TI SimpleLink™ Sub-1 GHz CC1310 device is a wireless microcontroller (MCU) that combines an ARM® Cortex®-M3 microprocessor with a Sub-1 GHz radio transceiver on a single chip. The CC1310 device has a very-low power consumption combined with very good range properties. Using Sub-1 GHz connectivity brings several benefits to your application:
- Better range than 2.4 GHz
- Less interference from Wi-Fi® – and, conversely, does not affect Wi-Fi networks
What makes the CC1310 wireless MCU specifically nice is that it is available in an accessible and easy-to-use format, in the form of a $30 LaunchPad ™ development kit.
Today we are going to use the CC1310 LaunchPad kit to build a prototype of a soil moisture monitor. We will build it with the Thingsquare Internet of Things (IoT) system, which gives us several advantages out-of-the-box:
- A smartphone application, directly from the start
- A self-healing mesh system that allow us to easily deploy many hundreds of sensors in a single network
- Built-in installation support
- Data history and a REST API
We will use two CC1310 LaunchPad kits in our system: One to act as the sensor, and one as a gateway that securely connects the wireless mesh to the Internet and provides remote access to the sensor.
The problem: We are solving the problem of plants dying because of the lack of water they receive. Both farmers and home owners face this issue. Homeowners often have house plants, but tend to forget to water them. If we can solve this problem, there is potential to save a lot of beautiful flowers. Farmers need to understand when to irrigate crops to maximize yields and minimize water costs and wastage. The long range and low power offered by Sub-1 GHz makes it especially applicable to agricultural applications when sensors are not located close to power or network signal sources.
The solution: a soil moisture sensor with a smartphone app that connects to the soil moisture sensor.
With the Thingsquare platform, we already have an app that we can use for our prototype. All we need to do is to put together the hardware.

The soil moisture monitor should be accessible anywhere our users go, not just when they are near their plants.
The Prototype:
To build the prototype, we are going to connect a $5 soil moisture sensor to the CC1310 LaunchPad development kit.
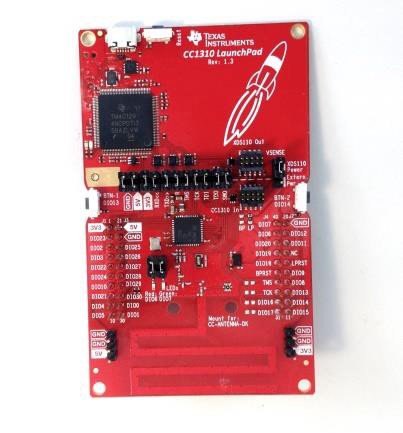
A TI CC1310 LaunchPad kit
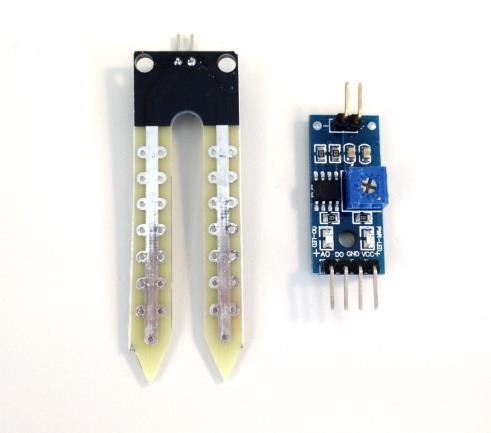
A soil moisture sensor
We connect the signal of the moisture sensors to the DIO23 pin of the LaunchPad board and the VCC and GND pins from the sensor to the 3V3 and GND pins on the LaunchPad kit.
After connecting the sensor to the LaunchPad kit, we have something that looks like this:

A TI CC1310 LaunchPad kit with the sensor connected to it
Next up, we need to load the software onto the chip.
-
Download the Thingsquare client for the CC1310 LaunchPad kit from the Thingsquare firmware download page. Make sure to select the frequency band that applies to your region: 915 MHz in the US and Australia and 868 in Europe.
-
Burn the downloaded .bin file to the LaunchPad kit
After downloading the software, keep the LaunchPad kit connected to USB power. The red LED should blink to indicate that the board is waiting to be connected to a gateway.
Don’t insert the soil moisture sensor into the flower pot just yet. We need to connect it to the gateway first.
The Gateway
Now we need to connect the plan monitor to the Internet so we can check on our plant even when we’re not near it.
To connect, we need a gateway that lets the radio chip on the LaunchPad kit talk to the Internet. If you have a Thingsquare starter kit, a Weptech gateway is already included. But if you’re building this from scratch, we’ll build a gateway our of another LaunchPad board.
To build the gateway, we need a second $30 LaunchPad kit, a $16 Ethernet module, and six more of those jumper cables. These are a little trickier to connect, but instructions can be found here. Again, we need to upload the right software to the chip – the link has instructions for how to do that too.

Our self-built gateway
Plug a USB cable with power to the gateway and an Ethernet cable from the gateway to your Wi-Fi router. The red LED on the gateway should blink for a few seconds. When the blinking stops, the gateway is up and running.
Connect
Now the hardware is running and ready to roll. Install the Thingsquare device viewer app, available for iOS and Android, on your smartphone. Make sure the smartphone is on the same Wi-Fi as the gateway.
We are going to connect the sensor and the gateway. Place the LaunchPad kit with the sensor close to the gateway and open the Thingsquare app. Tap the Networkbutton and the gateway should appear. You may need to tap the Scanbutton once. Then tap the gateway, and the InviteDevicesbutton on the page that appears.
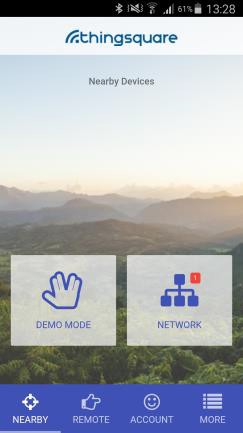
Tap the network

Tap the gateway

Tap Invite Devices
The red LED of the LaunchPad kit should now stop blinking with its red LED and instead blink its green LED. This indicates that it is working with its secure setup, which may take a minute.
When it is ready, it will stop blinking. The LaunchPad kit will then appear in the app.
Tap the LaunchPad kit in the Network view, tap Pin Configuration, and set DIO 23 as the analog input pin. This is the pin that we connected the sensor to. Tap Apply Configuration to instruct the LaunchPad kit to use pin DIO 23 to read data from the sensor.

Tap the LaunchPad kit
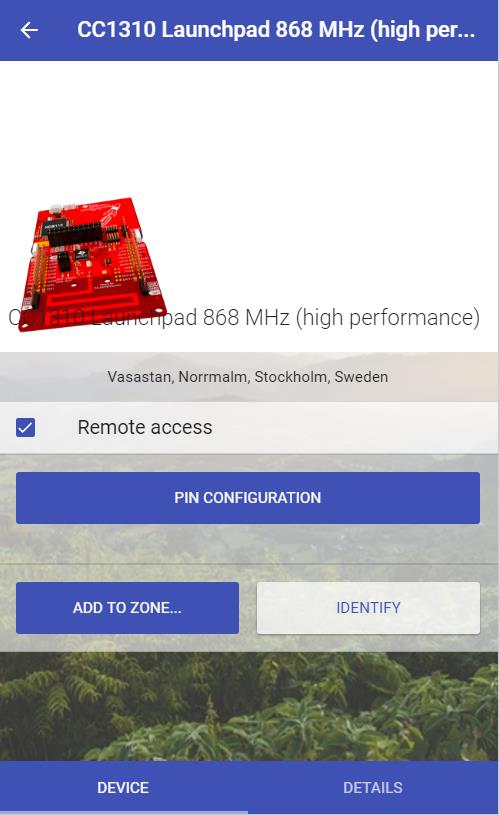
Tap Pin Configuration
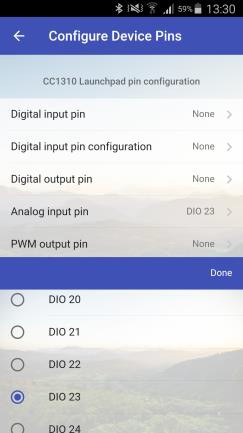
Select DIO 23 as analog input pin
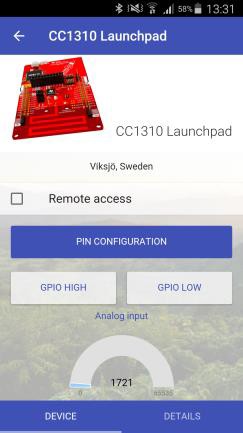
Now go back to the LaunchPad kit view and you’ll see an Analog Input meter that has appeared. This shows what the sensor measures – that is, the moisture in the flower pot.
Let this run for a few hours and you will have a nice history of the humidity of the soil in the flower pot. Water the flower, and you’ll see it in the graph.
Tap the Analog Input meter
After a while, there’ll be plenty of data.
Finally, if you enable the Remote Access button in the app, you’ll be able to see the humidity of your plant, wherever you are.
Conclusion


Congratulations! You’ve built your first prototype. It doesn’t look exactly like those early conceptual ideas, but it is now possible to demonstrate your idea for people to get them excited about your product.
The Parts
This is a list of hardware that is needed to build this, with links to Digikey where it can be bought.
- Two TI CC1310 LaunchPad kits: $29 each
- One Olimex Ethernet module: $16
- One 10 pack jumper cables: $4.50
- One Moisture sensor: $4.90
Total cost: $86
Optionally, you may want to add two USB power supplies like this or this for $5 each.
Learn more about TI's Sub-1 GHz technology!

