This thread has been locked.

If you have a related question, please click the "Ask a related question" button in the top right corner. The newly created question will be automatically linked to this question.

DLPDLCR2000EVM: EVM with Raspberry pi4

Part Number: DLPDLCR2000EVM

Beagle bone black performance when playing a video is very slow. It is moving bit by bit. I thought of integrating EVM with Raspberry pi4, so I followed many tutorial in online, including the below:

https://e2e.ti.com/support/dlp/f/94/p/651931/2395243

http://frederickvandenbosch.be/?p=2948

https://www.mickmake.com/post/build-a-pi-zero-w-pocket-projector-project

What I am seeing when I do i2cdetect :

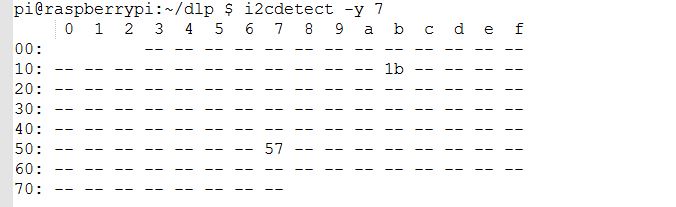
EVM hardware is found at 7, but the document says 3:

sudo i2cset -y 3 0x1b 0x0c 0x00 0x00 0x00 0x13 i

sudo i2cset -y 3 0x1b 0x0b 0x00 0x00 0x00 0x00 i
So it is failing:
Error: Could not open file `/dev/i2c-3' or `/dev/i2c/3': No such file or directory
How do I proceed to debug in order to see Raspberry desktop.
Raspberry Version: "Raspbian GNU/Linux 10 (buster)"
  • Hello Gopinathan,

    Have you tried adjusting the I2C commands to reference 7 instead of 3? I'm not sure if someone has gotten this working with the Raspberry Pi 4 yet but I think it should be possible just like the Pi 3.

    Thanks,

    Kyle

  • Gopinathan,

    The commands you are referencing were written for a different platform. Since your Raspberry Pi 4 platform is detecting the module on Bus 7, you need to change your commands to reference bus 7 instead.

    Regards,

    Philippe Dollo

  • Just changing the i2cset -y 7 is not working. I mean the display is not switching to EVM.

    Can you please suggest, anything else on the address that I need to change?

  • Gopinathan,

    From the above, it sounds like you are saying that the i2cset commands are working now, but the EVM is not displaying the Raspberry Pi video output after issuing said commands. Is this correct?

    Can you share your Raspberry Pi config.txt file?

  • Yes you are right.

    Please find the attached Raspberry Pi 4B config.txt file and cmdline.txt.

    config.txt
    # For more options and information see
    # http://rpf.io/configtxt
    # Some settings may impact device functionality. See link above for details
    
    # uncomment if you get no picture on HDMI for a default "safe" mode
    #hdmi_safe=1
    
    # uncomment this if your display has a black border of unused pixels visible
    # and your display can output without overscan
    #disable_overscan=1
    
    # uncomment the following to adjust overscan. Use positive numbers if console
    # goes off screen, and negative if there is too much border
    #overscan_left=16
    #overscan_right=16
    #overscan_top=16
    #overscan_bottom=16
    
    # uncomment to force a console size. By default it will be display's size minus
    # overscan.
    #framebuffer_width=1280
    #framebuffer_height=720
    
    # uncomment if hdmi display is not detected and composite is being output
    hdmi_force_hotplug=1
    
    # uncomment to force a specific HDMI mode (this will force VGA)
    hdmi_group=2
    hdmi_mode=35
    
    # uncomment to force a HDMI mode rather than DVI. This can make audio work in
    # DMT (computer monitor) modes
    #hdmi_drive=2
    
    # uncomment to increase signal to HDMI, if you have interference, blanking, or
    # no display
    #config_hdmi_boost=4
    
    # uncomment for composite PAL
    #sdtv_mode=2
    
    #uncomment to overclock the arm. 700 MHz is the default.
    #arm_freq=800
    
    # Uncomment some or all of these to enable the optional hardware interfaces
    dtparam=i2c_arm=on
    dtparam=i2s=on
    dtparam=spi=on
    
    dtparam=i2c1=on
    
    # Uncomment this to enable the lirc-rpi module
    #dtoverlay=lirc-rpi
    
    # Additional overlays and parameters are documented /boot/overlays/README
    
    # Enable audio (loads snd_bcm2835)
    dtparam=audio=on
    
    [pi4]
    # Enable DRM VC4 V3D driver on top of the dispmanx display stack
    dtoverlay=vc4-fkms-v3d
    max_framebuffers=2
    
    [all]
    #dtoverlay=vc4-fkms-v3d
    enable_uart=1
    dtoverlay=w1-gpio
    gpu_mem=512


    # EVM


    # Add support for software i2c on gpio pins
    dtoverlay=i2c-gpio,i2c_gpio_sda=23,i2c_gpio_scl=24,i2c_gpio_delay_us=2
     
    # DPI Video Setup
    dtoverlay=dpi18
    overscan_left=0
    overscan_right=0
    overscan_top=0
    overscan_bottom=0
    framebuffer_width=854
    framebuffer_height=480
    enable_dpi_lcd=1
    display_default_lcd=1
    dpi_group=2
    dpi_mode=87
     
    dpi_output_format=458773
    hdmi_timings=854 0 14 4 12 480 0 2 3 9 0 0 0 60 0 32000000 3


    cmdline.txt
    dwc_otg.lpm_enable=0 console=serial0,115200 console=tty1 root=PARTUUID=5f56b305-02 rootfstype=ext4 elevator=deadline fsck.repair=yes rootwait quiet splash plymouth.ignore-serial-consoles
    bcm2708.vc_i2c_override=1
    

  • Gopinathan,

    It looks like you have some additional overlays enabled in your config.txt for the Pi4 (VC4-fkms-v3d and w1-gpio). Do either of these overlays use pins that might conflict with the dpi18 overlay? You might want to disable them to confirm they aren't preventing your video stream from working.

    Regards,

    Philippe Dollo

  • 4377.config.txt
    # For more options and information see
    # http://rpf.io/configtxt
    # Some settings may impact device functionality. See link above for details
    
    # uncomment if you get no picture on HDMI for a default "safe" mode
    #hdmi_safe=1
    
    # uncomment this if your display has a black border of unused pixels visible
    # and your display can output without overscan
    #disable_overscan=1
    
    # uncomment the following to adjust overscan. Use positive numbers if console
    # goes off screen, and negative if there is too much border
    #overscan_left=16
    #overscan_right=16
    #overscan_top=16
    #overscan_bottom=16
    
    # uncomment to force a console size. By default it will be display's size minus
    # overscan.
    #framebuffer_width=1280
    #framebuffer_height=720
    
    # uncomment if hdmi display is not detected and composite is being output
    hdmi_force_hotplug=1
    
    # uncomment to force a specific HDMI mode (this will force VGA)
    hdmi_group=2
    hdmi_mode=35
    
    # uncomment to force a HDMI mode rather than DVI. This can make audio work in
    # DMT (computer monitor) modes
    #hdmi_drive=2
    
    # uncomment to increase signal to HDMI, if you have interference, blanking, or
    # no display
    #config_hdmi_boost=4
    
    # uncomment for composite PAL
    #sdtv_mode=2
    
    #uncomment to overclock the arm. 700 MHz is the default.
    #arm_freq=800
    
    # Uncomment some or all of these to enable the optional hardware interfaces
    dtparam=i2c_arm=on
    dtparam=i2s=on
    dtparam=spi=on
    
    dtparam=i2c1=on
    
    # Uncomment this to enable the lirc-rpi module
    #dtoverlay=lirc-rpi
    
    # Additional overlays and parameters are documented /boot/overlays/README
    
    # Enable audio (loads snd_bcm2835)
    dtparam=audio=on
    
    [pi4]
    # Enable DRM VC4 V3D driver on top of the dispmanx display stack
    #dtoverlay=vc4-fkms-v3d
    max_framebuffers=2
    
    [all]
    enable_uart=1
    #dtoverlay=w1-gpio
    gpu_mem=512


    # EVM


    # Add support for software i2c on gpio pins
    dtoverlay=i2c-gpio,i2c_gpio_sda=23,i2c_gpio_scl=24,i2c_gpio_delay_us=2
     
    # DPI Video Setup
    dtoverlay=dpi18
    overscan_left=0
    overscan_right=0
    overscan_top=0
    overscan_bottom=0
    framebuffer_width=854
    framebuffer_height=480
    enable_dpi_lcd=1
    display_default_lcd=1
    dpi_group=2
    dpi_mode=87
     
    dpi_output_format=458773
    hdmi_timings=854 0 14 4 12 480 0 2 3 9 0 0 0 60 0 32000000 3
    
    # hdmi_enable_4kp60=1
    

    I have removed dtoverlay for w1-gpio and vc4-fkms-v3d, but still the same problem. 

    I suspect the EVM pins are not working, so this time I also tried by connecting Male - to - Male connector (Jumper wires) on top of the EVM female side to Raspberry Pi (using GPIO extension cable). My bad luck that was also failed.

    If this EVM (DLPDLCR2000EVM) equipped with HDMI port, that will be easy. I would suggest TI to include HDMI video input as a source in future. 

    Is there any other EVM has HDMI input, to connect any type of input source (Laptop, Raspberry even Amazon FireTV Stick)? GPIO pinout connection is really annoying and unable to troubleshoot what is going on?

    I tried with Raspberry Pi 3B+ and 4B (4GB RAM). Nothing is working. I did replacing pins to and from EVM and Raspberry devices, now few pins are slightly bend on the corners. Now I am unable to add my Beagle Bone black.

    Sometimes when I do i2cdetect command all the address are shown. That is the reason I tried connecting EVM on the top using Male - Male Jumper wires.

  • Gopinathan,

    Thanks for your feedback.

    We have other EVMs which do support HDMI input. You can review them here:

    http://www.ti.com/tool/DLPDLCR2010EVM

    http://www.ti.com/tool/DLPDLCR3010EVM-G2

    The connection between the EVM and Raspberry Pi should work regardless of whether you use the top female header or bottom male header. Are you using the same config file with the Raspberry Pi 3B?

  • Gopinathan,

    Any updates on this issue? It sounds like you may need to review your config file further. The tutorial provided is for the Raspberry Pi 3B.

    Regards,

    Philippe Dollo

  • Thanks for the update. I have a problem on the EVM itself, need to check the warranty with helpline. You can close this for now.

  • Gopinathan,

    Thanks. I hope you are able to resolve your issue with support.

    Regards,

    Philippe Dollo