This thread has been locked.

If you have a related question, please click the "Ask a related question" button in the top right corner. The newly created question will be automatically linked to this question.

SCI communication between two DSPs-F28335

Other Parts Discussed in Thread: MAX232, MAX3221, CONTROLSUITE

Hi

I am looking forward to establish communication between F28335 control card and F28069 control stick.

Can anyone suggest how do I move ahead?

I am not very clear with the hardware connection too.Would that be connecting F28335 Tx and Rx pins through Rs-232 to PC and enter the value on hyperterminal and then to F28069.

Or i have to connect Tx and Rx pins of two dsp's together?

Kindly help

thanks

Sneha

  • Hi Sneha,

    Sneha Thakur said:

    Can anyone suggest how do I move ahead?

    I am not very clear with the hardware connection too.Would that be connecting F28335 Tx and Rx pins through Rs-232 to PC and enter the value on hyperterminal and then to F28069.

    Or i have to connect Tx and Rx pins of two dsp's together?

    You can connect both the controllers directly with each other without any interfacing hardware in between. At the max you can use an isolator hardware (to be frank not required)

    The most important part here is the configuration of SCI peripheral & baudrate.

    Regards,

    Gautam

  • Hi Gautam

    As suggested by you, after matching the baud rates for both the controllers i have moved ahead with the SCI communication between the two,by connecting their Tx and Rx pins together (F28069 and F28335).

    The baud rates for both is 9600.I can see the TxBUF in the watch windowchanging values but no change in RxBUF.The code is as follows.I am missing something very important in it.Can you please help.

    1. Tx code for F28069

    7026.28069-Tx.txt
    // TI File $Revision: /main/2 $ 
    // Checkin $Date: January 4, 2011   10:03:22 $ 
    //###########################################################################
    //
    // FILE:    Example_2806xSci_Echoback.c
    //
    // TITLE:   F2806x Device SCI Echoback.
    //
    // ASSUMPTIONS:
    //
    //    This program requires the F2806x header files.
    //    As supplied, this project is configured for "boot to SARAM" operation.
    //
    //    Connect the SCI-A port to a PC via a transciever and cable.
    //    The PC application 'hypterterminal' can be used to view the data
    //    from the SCI and to send information to the SCI.  Characters recieved
    //    by the SCI port are sent back to the host.
    //
    //    As supplied, this project is configured for "boot to SARAM"
    //    operation.  The F2806x Boot Mode table is shown below.
    //    $Boot_Table:
    //
    //    While an emulator is connected to your device, the TRSTn pin = 1,
    //    which sets the device into EMU_BOOT boot mode. In this mode, the
    //    peripheral boot modes are as follows:
    //
    //      Boot Mode:       EMU_KEY        EMU_BMODE
    //                       (0xD00)	     (0xD01)
    //      ---------------------------------------
    //      Wait             !=0x55AA        X
    //      I/O              0x55AA	         0x0000
    //      SCI              0x55AA	         0x0001
    //      Wait             0x55AA	         0x0002
    //      Get_Mode         0x55AA	         0x0003
    //      SPI              0x55AA	         0x0004
    //      I2C              0x55AA	         0x0005
    //      OTP              0x55AA	         0x0006
    //      ECANA            0x55AA	         0x0007 
    //      SARAM            0x55AA	         0x000A	  <-- "Boot to SARAM"
    //      Flash            0x55AA	         0x000B
    //      Wait             0x55AA          Other
    //
    //   Write EMU_KEY to 0xD00 and EMU_BMODE to 0xD01 via the debugger
    //   according to the Boot Mode Table above. Build/Load project,
    //   Reset the device, and Run example
    //
    //   $End_Boot_Table
    //
    //
    // Description:
    //
    //
    //    This test recieves and echo-backs data through the SCI-A port.
    //
    //    1) Configure hyperterminal:
    //       Use the included hyperterminal configuration file SCI_96.ht.
    //       To load this configuration in hyperterminal: file->open
    //       and then select the SCI_96.ht file.
    //    2) Check the COM port.
    //       The configuration file is currently setup for COM1.
    //       If this is not correct, disconnect Call->Disconnect
    //       Open the File-Properties dialog and select the correct COM port.
    //    3) Connect hyperterminal Call->Call
    //       and then start the F2806x SCI echoback program execution.
    //    4) The program will print out a greeting and then ask you to
    //       enter a character which it will echo back to hyperterminal.
    //
    //
    //    Watch Variables:
    //       LoopCount for the number of characters sent
    //       ErrorCount
    //
    //
    //###########################################################################
    // $TI Release: 2806x C/C++ Header Files and Peripheral Examples V1.00 $ 
    // $Release Date: January 11, 2011 $ 
    //###########################################################################
    
    #include "DSP28x_Project.h"     // Device Headerfile and Examples Include File
    
    // Prototype statements for functions found within this file.
    void scia_echoback_init(void);
    void scia_fifo_init(void);
    void scia_xmit(int a);
    void scia_msg(char *msg);
    
    // Global counts used in this example
    Uint16 LoopCount;
    Uint16 ErrorCount;
    
    void main(void)
    {
    
        Uint16 ReceivedChar;
        char *msg;
    
    // Step 1. Initialize System Control:
    // PLL, WatchDog, enable Peripheral Clocks
    // This example function is found in the F2806x_SysCtrl.c file.
       InitSysCtrl();
    
    // Step 2. Initalize GPIO:
    // This example function is found in the F2806x_Gpio.c file and
    // illustrates how to set the GPIO to it's default state.
       // InitGpio(); Skipped for this example
    
    // For this example, only init the pins for the SCI-A port.
    // This function is found in the F2806x_Sci.c file.
       InitSciaGpio();
    
    // Step 3. Clear all interrupts and initialize PIE vector table:
    // Disable CPU interrupts
       DINT;
    
    // Initialize PIE control registers to their default state.
    // The default state is all PIE interrupts disabled and flags
    // are cleared.
    // This function is found in the F2806x_PieCtrl.c file.
       InitPieCtrl();
    
    // Disable CPU interrupts and clear all CPU interrupt flags:
       IER = 0x0000;
       IFR = 0x0000;
    
    // Initialize the PIE vector table with pointers to the shell Interrupt
    // Service Routines (ISR).
    // This will populate the entire table, even if the interrupt
    // is not used in this example.  This is useful for debug purposes.
    // The shell ISR routines are found in F2806x_DefaultIsr.c.
    // This function is found in F2806x_PieVect.c.
       InitPieVectTable();
    
    // Step 4. Initialize all the Device Peripherals:
    // This function is found in F2806x_InitPeripherals.c
    // InitPeripherals(); // Not required for this example
    
    // Step 5. User specific code:
    
        LoopCount = 0;
        ErrorCount = 0;
    
        scia_fifo_init();	   // Initialize the SCI FIFO
        scia_echoback_init();  // Initalize SCI for echoback
    
        msg = "\r\n\n\nHello World!\0";
        scia_msg(msg);
    
        msg = "\r\nYou will enter a character, and the DSP will echo it back! \n\0";
        scia_msg(msg);
    
    	for(;;)
        {
           msg = "\r\nEnter a character: \0";
           scia_msg(msg);
    
           // Wait for inc character
          // while(SciaRegs.SCIFFRX.bit.RXFFST !=1) { } // wait for XRDY =1 for empty state
    
           // Get character
          // ReceivedChar = SciaRegs.SCIRXBUF.all;
    
           // Echo character back
         //  msg = "  You sent: \0";
          // scia_msg(msg);
          // scia_xmit(ReceivedChar);
    
           LoopCount++;
        }
    
    }
    
    // Test 1,SCIA  DLB, 8-bit word, baud rate 0x000F, default, 1 STOP bit, no parity
    void scia_echoback_init()
    {
        // Note: Clocks were turned on to the SCIA peripheral
        // in the InitSysCtrl() function
    
     	SciaRegs.SCICCR.all =0x0007;   // 1 stop bit,  No loopback
                                       // No parity,8 char bits,
                                       // async mode, idle-line protocol
    	SciaRegs.SCICTL1.all =0x0002;  // enable TX, RX, internal SCICLK,0003
                                       // Disable RX ERR, SLEEP, TXWAKE
    	SciaRegs.SCICTL2.all =0x0001;//0003
    	SciaRegs.SCICTL2.bit.TXINTENA =1;
    	//SciaRegs.SCICTL2.bit.RXBKINTENA =1;
    
    	SciaRegs.SCIHBAUD    =0x01;  // 9600 baud @LSPCLK = 20MHz (80 MHz SYSCLK).
        SciaRegs.SCILBAUD    =0x03;
    
    	SciaRegs.SCICTL1.all =0x0022;  // Relinquish SCI from Reset0023
    }
    
    // Transmit a character from the SCI
    void scia_xmit(int a)
    {
        while (SciaRegs.SCIFFTX.bit.TXFFST != 0) {}
        SciaRegs.SCITXBUF=a;
    
    }
    
    void scia_msg(char * msg)
    {
        int i;
        i = 0;
        while(msg[i] != '\0')
        {
            scia_xmit(msg[i]);
            i++;
        }
    }
    
    // Initalize the SCI FIFO
    void scia_fifo_init()
    {
        SciaRegs.SCIFFTX.all=0xE040;
        //SciaRegs.SCIFFRX.all=0x2044;
        SciaRegs.SCIFFCT.all=0x0;
    
    }
    
    //===========================================================================
    // No more.
    //===========================================================================


    2.Rx code for F28335

    7532.Example_2833xSci_Echoback.c
    // TI File $Revision: /main/2 $
    // Checkin $Date: July 30, 2009   18:45:31 $
    //###########################################################################
    //
    // FILE:    Example_2833xSci_Echoback.c
    //
    // TITLE:   DSP2833x Device SCI Echoback.
    //
    // ASSUMPTIONS:
    //
    //    This program requires the DSP2833x header files.
    //    As supplied, this project is configured for "boot to SARAM" operation.
    //
    //    Connect the SCI-A port to a PC via a transciever and cable.
    //    The PC application 'hypterterminal' can be used to view the data
    //    from the SCI and to send information to the SCI.  Characters recieved
    //    by the SCI port are sent back to the host.
    //
    //    As supplied, this project is configured for "boot to SARAM"
    //    operation.  The 2833x Boot Mode table is shown below.
    //    For information on configuring the boot mode of an eZdsp,
    //    please refer to the documentation included with the eZdsp,
    //
    //       $Boot_Table:
    //
    //         GPIO87   GPIO86     GPIO85   GPIO84
    //          XA15     XA14       XA13     XA12
    //           PU       PU         PU       PU
    //        ==========================================
    //            1        1          1        1    Jump to Flash
    //            1        1          1        0    SCI-A boot
    //            1        1          0        1    SPI-A boot
    //            1        1          0        0    I2C-A boot
    //            1        0          1        1    eCAN-A boot
    //            1        0          1        0    McBSP-A boot
    //            1        0          0        1    Jump to XINTF x16
    //            1        0          0        0    Jump to XINTF x32
    //            0        1          1        1    Jump to OTP
    //            0        1          1        0    Parallel GPIO I/O boot
    //            0        1          0        1    Parallel XINTF boot
    //            0        1          0        0    Jump to SARAM	    <- "boot to SARAM"
    //            0        0          1        1    Branch to check boot mode
    //            0        0          1        0    Boot to flash, bypass ADC cal
    //            0        0          0        1    Boot to SARAM, bypass ADC cal
    //            0        0          0        0    Boot to SCI-A, bypass ADC cal
    //                                              Boot_Table_End$
    //
    // DESCRIPTION:
    //
    //
    //    This test recieves and echo-backs data through the SCI-A port.
    //
    //    1) Configure hyperterminal:
    //       Use the included hyperterminal configuration file SCI_96.ht.
    //       To load this configuration in hyperterminal: file->open
    //       and then select the SCI_96.ht file.
    //    2) Check the COM port.
    //       The configuration file is currently setup for COM1.
    //       If this is not correct, disconnect Call->Disconnect
    //       Open the File-Properties dialog and select the correct COM port.
    //    3) Connect hyperterminal Call->Call
    //       and then start the 2833x SCI echoback program execution.
    //    4) The program will print out a greeting and then ask you to
    //       enter a character which it will echo back to hyperterminal.
    //
    //    As is, the program configures SCI-A for 9600 baud with
    //    SYSCLKOUT = 150MHz and LSPCLK = 37.5 MHz
    //    SYSCLKOUT = 100MHz and LSPCLK = 25.0 Mhz
    //
    //
    //    Watch Variables:
    //       LoopCount for the number of characters sent
    //       ErrorCount
    //
    //
    //###########################################################################
    // $TI Release: 2833x/2823x Header Files V1.32 $
    // $Release Date: June 28, 2010 $
    //###########################################################################
    
    #include "DSP28x_Project.h"     // Device Headerfile and Examples Include File
    
    // Prototype statements for functions found within this file.
    void scia_echoback_init(void);
    void scia_fifo_init(void);
    //void scia_xmit(int a);
    //void scia_msg(char *msg);
    
    // Global counts used in this example
    Uint16 LoopCount;
    Uint16 ErrorCount;
    
    void main(void)
    {
    
        Uint16 ReceivedChar;
        char *msg;
    
    // Step 1. Initialize System Control:
    // PLL, WatchDog, enable Peripheral Clocks
    // This example function is found in the DSP2833x_SysCtrl.c file.
       InitSysCtrl();
    
    // Step 2. Initalize GPIO:
    // This example function is found in the DSP2833x_Gpio.c file and
    // illustrates how to set the GPIO to it's default state.
       // InitGpio(); Skipped for this example
    
    // For this example, only init the pins for the SCI-A port.
    // This function is found in the DSP2833x_Sci.c file.
       InitSciaGpio();
    
    // Step 3. Clear all interrupts and initialize PIE vector table:
    // Disable CPU interrupts
    
       DINT;
    
    // Initialize PIE control registers to their default state.
    // The default state is all PIE interrupts disabled and flags
    // are cleared.
    // This function is found in the DSP2833x_PieCtrl.c file.
       InitPieCtrl();
    
    // Disable CPU interrupts and clear all CPU interrupt flags:
       IER = 0x0000;
       IFR = 0x0000;
    
    // Initialize the PIE vector table with pointers to the shell Interrupt
    // Service Routines (ISR).
    // This will populate the entire table, even if the interrupt
    // is not used in this example.  This is useful for debug purposes.
    // The shell ISR routines are found in DSP2833x_DefaultIsr.c.
    // This function is found in DSP2833x_PieVect.c.
       InitPieVectTable();
    
    // Step 4. Initialize all the Device Peripherals:
    // This function is found in DSP2833x_InitPeripherals.c
    // InitPeripherals(); // Not required for this example
    
    // Step 5. User specific code:
    
        LoopCount = 0;
        ErrorCount = 0;
    
        scia_fifo_init();	   // Initialize the SCI FIFO
        scia_echoback_init();  // Initalize SCI for echoback
    
      //  msg = "\r\n\n\nHello World!\0";
        //scia_msg(msg);
    
      //  msg = "\r\nYou will enter a character, and the DSP will echo it back! \n\0";
      //  scia_msg(msg);
    
    	//for(;;)
        //{
          // msg = "\r\nEnter a character: \0";
          // scia_msg(msg);
    
           // Wait for inc character
           while(SciaRegs.SCIFFRX.bit.RXFFST !=1) { } // wait for XRDY =1 for empty state,i.e until FIFO has one word
    
           // Get character
          ReceivedChar = SciaRegs.SCIRXBUF.all;
    
           // Echo character back
          msg = "  You sent: \0";
          //scia_msg(msg);
        //  scia_xmit(ReceivedChar);
    
           LoopCount++;
       // }
    
    }
    
    
    // Test 1,SCIA  DLB, 8-bit word, baud rate 0x000F, default, 1 STOP bit, no parity
    void scia_echoback_init()
    {
        // Note: Clocks were turned on to the SCIA peripheral
        // in the InitSysCtrl() function
    
     	SciaRegs.SCICCR.all =0x0007;   // 1 stop bit,  No loopback
                                       // No parity,8 char bits,
                                       // async mode, idle-line protocol
    	SciaRegs.SCICTL1.all =0x0001;  // disable TX, enable RX, internal SCICLK,(earlier 0003 correct one)
                                       // Disable RX ERR, SLEEP, TXWAKE
    	SciaRegs.SCICTL2.all =0x0002;    // initially the correct oneis 0003
    	//SciaRegs.SCICTL2.bit.TXINTENA =1;
    	SciaRegs.SCICTL2.bit.RXBKINTENA =1;
    
    	#if (CPU_FRQ_150MHZ)
    	    SciaRegs.SCIHBAUD    =0x0001;  // 9600 baud @LSPCLK = 37.5MHz.
    	     SciaRegs.SCILBAUD    =0x00E7;
    	#endif
    
    	     #if (CPU_FRQ_100MHZ)
          SciaRegs.SCIHBAUD    =0x0001;  // 9600 baud @LSPCLK = 20MHz.
          SciaRegs.SCILBAUD    =0x0044;
    	#endif
          SciaRegs.SCICTL1.all =0x0021;  // Relinquish SCI from Reset(initially 0023)
    }
    
    // Transmit a character from the SCI
    //void scia_xmit(int a)
    //{
      //  while (SciaRegs.SCIFFTX.bit.TXFFST != 0) {}
       // SciaRegs.SCITXBUF=a;
    
    //}
    
    //void scia_msg(char * msg)
    //{
    //    int i;
     //   i = 0;
     //   while(msg[i] != '\0')
     //   {
    //        scia_xmit(msg[i]);
    //        i++;
     //   }
    //}
    
    // Initalize the SCI FIFO
    void scia_fifo_init()
    {
       // SciaRegs.SCIFFTX.all=0xE040;
        SciaRegs.SCIFFRX.all=0x204f;
        SciaRegs.SCIFFCT.all=0x0;
    
    }


    //===========================================================================
    // No more.
    //===========================================================================


  • Sneha, I checked your transmit routine. Please try sending a single numeric value using scia_xmit function instead of using sci_msg. As simple as:

    for(;;)
    {
     scia_xmit(a);    //where a=0x23
     some_delay();
    }


    Receiver routine seems fine,  check the SCIRXBUF register of F28335 for data while in debug mode.

    Regards,

    Gautam

  • Hi gautam

    Transmiter routinue seems to work fine.I could see the value 0x23 in SCITxBUF of 28069.

    But I am not recieving anything on 28335.Its buffer SCIRxBUF is 0000.

    The connection is as follows:

    F28069(Tx)                                F28335(Rx)

    Gpio12(Tx)                               Gpio28/19(Rx)

    Pin32 Gnd                                      Gnd

    Thanks

    Sneha

  • Sneha Thakur said:
    But I am not recieving anything on 28335.Its buffer SCIRxBUF is 0000.

    That's weird. Anything in SCIRXEMU ??

    Regards,

    Gautam

  • Hi Gautam

    Nothing in SCIRXEMU too = 0000

    I am using a simple wired connection between two controllers.Should there be some isolator in between or maybe some other hardware?

    Thanks

    Sneha

  • Sneha Thakur said:
    I am using a simple wired connection between two controllers.Should there be some isolator in between or maybe some other hardware?

    As both of the controllers are 3.3V logic based, they should work with simple wires but you can once try with drivers like max3221 or max232 (just for trial). But as far as I remember I interfaced F28335 & F28027 directly without any hardware in between and they worked as charm.

    Regards,

    Gautam

  • HI Gautam

    I again tried running the programs and establishing communication between two controllers.

    3326.Rx28335.txt
    // TI File $Revision: /main/2 $
    // Checkin $Date: July 30, 2009   18:45:31 $
    //###########################################################################
    //
    // FILE:    Example_2833xSci_Echoback.c
    //
    // TITLE:   DSP2833x Device SCI Echoback.
    //
    // ASSUMPTIONS:
    //
    //    This program requires the DSP2833x header files.
    //    As supplied, this project is configured for "boot to SARAM" operation.
    //
    //    Connect the SCI-A port to a PC via a transciever and cable.
    //    The PC application 'hypterterminal' can be used to view the data
    //    from the SCI and to send information to the SCI.  Characters recieved
    //    by the SCI port are sent back to the host.
    //
    //    As supplied, this project is configured for "boot to SARAM"
    //    operation.  The 2833x Boot Mode table is shown below.
    //    For information on configuring the boot mode of an eZdsp,
    //    please refer to the documentation included with the eZdsp,
    //
    //       $Boot_Table:
    //
    //         GPIO87   GPIO86     GPIO85   GPIO84
    //          XA15     XA14       XA13     XA12
    //           PU       PU         PU       PU
    //        ==========================================
    //            1        1          1        1    Jump to Flash
    //            1        1          1        0    SCI-A boot
    //            1        1          0        1    SPI-A boot
    //            1        1          0        0    I2C-A boot
    //            1        0          1        1    eCAN-A boot
    //            1        0          1        0    McBSP-A boot
    //            1        0          0        1    Jump to XINTF x16
    //            1        0          0        0    Jump to XINTF x32
    //            0        1          1        1    Jump to OTP
    //            0        1          1        0    Parallel GPIO I/O boot
    //            0        1          0        1    Parallel XINTF boot
    //            0        1          0        0    Jump to SARAM	    <- "boot to SARAM"
    //            0        0          1        1    Branch to check boot mode
    //            0        0          1        0    Boot to flash, bypass ADC cal
    //            0        0          0        1    Boot to SARAM, bypass ADC cal
    //            0        0          0        0    Boot to SCI-A, bypass ADC cal
    //                                              Boot_Table_End$
    //
    // DESCRIPTION:
    //
    //
    //    This test recieves and echo-backs data through the SCI-A port.
    //
    //    1) Configure hyperterminal:
    //       Use the included hyperterminal configuration file SCI_96.ht.
    //       To load this configuration in hyperterminal: file->open
    //       and then select the SCI_96.ht file.
    //    2) Check the COM port.
    //       The configuration file is currently setup for COM1.
    //       If this is not correct, disconnect Call->Disconnect
    //       Open the File-Properties dialog and select the correct COM port.
    //    3) Connect hyperterminal Call->Call
    //       and then start the 2833x SCI echoback program execution.
    //    4) The program will print out a greeting and then ask you to
    //       enter a character which it will echo back to hyperterminal.
    //
    //    As is, the program configures SCI-A for 9600 baud with
    //    SYSCLKOUT = 150MHz and LSPCLK = 37.5 MHz
    //    SYSCLKOUT = 100MHz and LSPCLK = 25.0 Mhz
    //
    //
    //    Watch Variables:
    //       LoopCount for the number of characters sent
    //       ErrorCount
    //
    //
    //###########################################################################
    // $TI Release: 2833x/2823x Header Files V1.32 $
    // $Release Date: June 28, 2010 $
    //###########################################################################
    
    #include "DSP28x_Project.h"     // Device Headerfile and Examples Include File
    
    // Prototype statements for functions found within this file.
    void scib_echoback_init(void);
    void scib_fifo_init(void);
    //void scib_xmit(int a);
    //void scib_msg(char *msg);
    
    // Global counts used in this example
    Uint16 LoopCount;
    Uint16 ErrorCount;
    
    void main(void)
    {
    
        Uint16 ReceivedChar;
        //char *msg;
    
    // Step 1. Initialize System Control:
    // PLL, WatchDog, enable Peripheral Clocks
    // This example function is found in the DSP2833x_SysCtrl.c file.
       InitSysCtrl();
    
    // Step 2. Initalize GPIO:
    // This example function is found in the DSP2833x_Gpio.c file and
    // illustrates how to set the GPIO to it's default state.
       // InitGpio(); Skipped for this example
    
    // For this example, only init the pins for the SCI-A port.
    // This function is found in the DSP2833x_Sci.c file.
       InitScibGpio();
    
    // Step 3. Clear all interrupts and initialize PIE vector table:
    // Disable CPU interrupts
    
       DINT;
    
    // Initialize PIE control registers to their default state.
    // The default state is all PIE interrupts disabled and flags
    // are cleared.
    // This function is found in the DSP2833x_PieCtrl.c file.
       InitPieCtrl();
    
    // Disable CPU interrupts and clear all CPU interrupt flags:
       IER = 0x0000;
       IFR = 0x0000;
    
    // Initialize the PIE vector table with pointers to the shell Interrupt
    // Service Routines (ISR).
    // This will populate the entire table, even if the interrupt
    // is not used in this example.  This is useful for debug purposes.
    // The shell ISR routines are found in DSP2833x_DefaultIsr.c.
    // This function is found in DSP2833x_PieVect.c.
       InitPieVectTable();
    
    // Step 4. Initialize all the Device Peripherals:
    // This function is found in DSP2833x_InitPeripherals.c
    // InitPeripherals(); // Not required for this example
    
    // Step 5. User specific code:
    
        LoopCount = 0;
        ErrorCount = 0;
    
        scib_fifo_init();	   // Initialize the SCI FIFO
        scib_echoback_init();  // Initalize SCI for echoback
    
      //  msg = "\r\n\n\nHello World!\0";
        //scib_msg(msg);
    
      //  msg = "\r\nYou will enter a character, and the DSP will echo it back! \n\0";
      //  scib_msg(msg);
    
    	//for(;;)
        //{
          // msg = "\r\nEnter a character: \0";
          // scib_msg(msg);
    
           // Wait for inc character
           while(ScibRegs.SCIFFRX.bit.RXFFST !=1) { } // wait for XRDY =1 for empty state,i.e until FIFO has one word
    
           // Get character
          ReceivedChar = ScibRegs.SCIRXBUF.all;
    
           // Echo character back
          //msg = "  You sent: \0";
        //  scib_msg(msg);
        //  scia_xmit(ReceivedChar);
    
           LoopCount++;
       // }
    
    }
    
    
    // Test 1,SCIA  DLB, 8-bit word, baud rate 0x000F, default, 1 STOP bit, no parity
    void scib_echoback_init()
    {
        // Note: Clocks were turned on to the SCIA peripheral
        // in the InitSysCtrl() function
    
     	ScibRegs.SCICCR.all =0x0007;   // 1 stop bit,  No loopback
                                       // No parity,8 char bits,
                                       // async mode, idle-line protocol
    	ScibRegs.SCICTL1.all =0x0001;  // disable TX, enable RX, internal SCICLK,(earlier 0003 correct one)
                                       // Disable RX ERR, SLEEP, TXWAKE
    	ScibRegs.SCICTL2.all =0x0002;    // initially the correct oneis 0003
    	//ScibRegs.SCICTL2.bit.TXINTENA =1;
    	ScibRegs.SCICTL2.bit.RXBKINTENA =1;
    
    	#if (CPU_FRQ_150MHZ)
    	    ScibRegs.SCIHBAUD    =0x0001;  // 9600 baud @LSPCLK = 37.5MHz.
    	     ScibRegs.SCILBAUD    =0x00E7;
    	#endif
    
    	     #if (CPU_FRQ_100MHZ)
          ScibRegs.SCIHBAUD    =0x0001;  // 9600 baud @LSPCLK = 20MHz.
          ScibRegs.SCILBAUD    =0x0044;
    	#endif
          ScibRegs.SCICTL1.all =0x0021;  // Relinquish SCI from Reset(initially 0023)
    }
    
    // Transmit a character from the SCI
    //void scib_xmit(int a)
    //{
      //  while (SciaRegs.SCIFFTX.bit.TXFFST != 0) {}
       // ScibRegs.SCITXBUF=a;
    
    //}
    
    //void scib_msg(char * msg)
    //{
    //    int i;
     //   i = 0;
     //   while(msg[i] != '\0')
     //   {
    //        scib_xmit(msg[i]);
    //        i++;
     //   }
    //}
    
    // Initalize the SCI FIFO
    void scib_fifo_init()
    {
       // ScibRegs.SCIFFTX.all=0xE040;
        ScibRegs.SCIFFRX.all=0x204f;
        ScibRegs.SCIFFCT.all=0x0;
    
    }


    //===========================================================================
    // No more.
    //===========================================================================


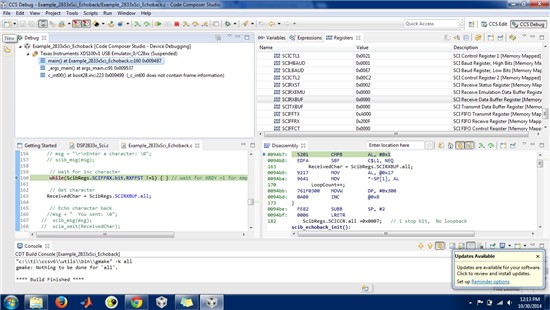
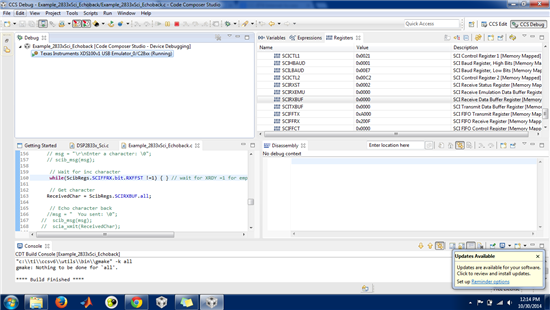
    This is the code being run for reciever on other end,.But when we run ,I guess its not executing at all.The screenshots of the screen before and after running the program are below:

    I am running Tx code for 28069 on one PC and then its is wired to 28335 which is connected to other PC.The Rx program for 28335 is being run on the other PC.Ground pins of both controllers are connected and TX-Rx pins too.Am I missing something?

    Please reply.

    Thanks

    Sneha

  • Sneha Thakur said:
    I am running Tx code for 28069 on one PC and then its is wired to 28335 which is connected to other PC

    I guess you're following these steps:

    1. No need to connect F28069 kit for debugging. Let the power be off.

    2. F28335 kit should be in debug mode and waiting for the data.

    3. Switch on the F28069 kit which has only single data transmission (don't use continuous polling of data as of now)

    4. Monitor Rx interrupt flag & SCIRXEMU for data on the watch window.

    I checked your Rx routine - keep the same in a for ever loop. It seems to be commented as of now. Also,

    there's no  EnableInterrupts(); function. This is exactly why Rx interrupt is not getting triggered.

    Refer Example_2833xScia_FFDLB.c example.

    Regards,

    Gautam

  • Hi Gautam

    I tried working the steps recommended by you.Enabled RxInterrupt function for Rx routinue and tried out few if else loops inside.I am gettting data in Tx BUF but not in Rx BUF.

    I tried step by step execution,but the program does not enter in the while loop,as it is not recieving any data and stops there.

     i again checked the original echoback program and its working fine,this means pins are working finr.

    Can this be the compatibility issue?Different Controllers...??

    thanks

    Sneha

  • Sneha Thakur said:
    Can this be the compatibility issue?Different Controllers...??

    There shouldn't be a compatibility issue here as both belong to C2000 family. I've personally tried and implemented this last year and also I've interfaced C2000 with MSP430 & PIC too. They all work fine!

    Just one last suggestion, try referring SCI_Loopback for both the controllers with the given settings:

    C:\ti\controlSUITE\device_support\f2833x\v133\DSP2833x_examples_ccsv4\scia_loopback

    Regards,

    Gautam

  • Hi Gautam

    The problem is resolved.I was doing few silly mistakes.

    1. In Tx routinue i had not relinquised SCI from reset.I had commented it.

    2.I was calling ISR for SCIA while i was working with SCIB.

    And while observing the variables on watch window,SCIRXST =00FA...Bit 5= BRKDT = 1.

    SCI break-detect flag. The SCI sets this bit when a break condition occurs. A break condition
    occurs when the SCI receiver data line (SCIRXD) remains continuously low for at least ten bits,
    beginning after a missing first stop bit. The occurrence of a break causes a receiver interrupt to be
    generated if the RX/BK INT ENA bit is a 1, but it does not cause the receiver buffer to be loaded. A
    BRKDT interrupt can occur even if the receiver SLEEP bit is set to 1. BRKDT is cleared by an
    active SW RESET or by a system reset. It is not cleared by receipt of a character after the break is
    detected. In order to receive more characters, the SCI must be reset by toggling the SW RESET bit
    or by a system reset.

    So I just  switched on the Tx first and then the reciever.Hope What I am thinking is right?

    Now I will have to transmit a message or string of characters. And then also Tx back from F28335 to F28069

    Thanks alot Gautam.

    Sneha

  • Hi Gautam

    The problem is resolved.I was doing few silly mistakes.

    1. In Tx routinue i had not relinquised SCI from reset.I had commented it.

    2.I was calling ISR for SCIA while i was working with SCIB.

    And while observing the variables on watch window,SCIRXST =00FA...Bit 5= BRKDT = 1.

    SCI break-detect flag. The SCI sets this bit when a break condition occurs. A break condition
    occurs when the SCI receiver data line (SCIRXD) remains continuously low for at least ten bits,
    beginning after a missing first stop bit. The occurrence of a break causes a receiver interrupt to be
    generated if the RX/BK INT ENA bit is a 1, but it does not cause the receiver buffer to be loaded. A
    BRKDT interrupt can occur even if the receiver SLEEP bit is set to 1. BRKDT is cleared by an
    active SW RESET or by a system reset. It is not cleared by receipt of a character after the break is
    detected. In order to receive more characters, the SCI must be reset by toggling the SW RESET bit
    or by a system reset.

    So I just switched on the Tx first and then the reciever.Hope What I am thinking is right?

    Now I will have to transmit a message or string of characters. And then also Tx back from F28335 to F28069

    Thanks alot Gautam.

    Sneha

  • Sneha Thakur said:
    The problem is resolved.I was doing few silly mistakes.

    That's Great! Silly mistakes happen... but need to be resolved by user himself/herself as I might've no clue :)

    Sneha Thakur said:
    So I just switched on the Tx first and then the reciever.Hope What I am thinking is right?

    As far as the routines work and your result is as expected, this should not matter. I prefer the other way, where my Rx is waiting and then I poll the data.

    Sneha Thakur said:
    Now I will have to transmit a message or string of characters. And then also Tx back from F28335 to F28069

    Way to go, Sneha!

    Sneha Thakur said:
    Thanks alot Gautam.

    You're Welcome! Please close the thread.

    Regards,

    Gautam