This thread has been locked.

If you have a related question, please click the "Ask a related question" button in the top right corner. The newly created question will be automatically linked to this question.

[FAQ] Compiler/LAUNCHXL-F28379D: Updating default SCI echoback example developed for control card to work with Launchpad

Part Number: LAUNCHXL-F28379D
Other Parts Discussed in Thread: C2000WARE

Tool/software: TI C/C++ Compiler

Hello All,

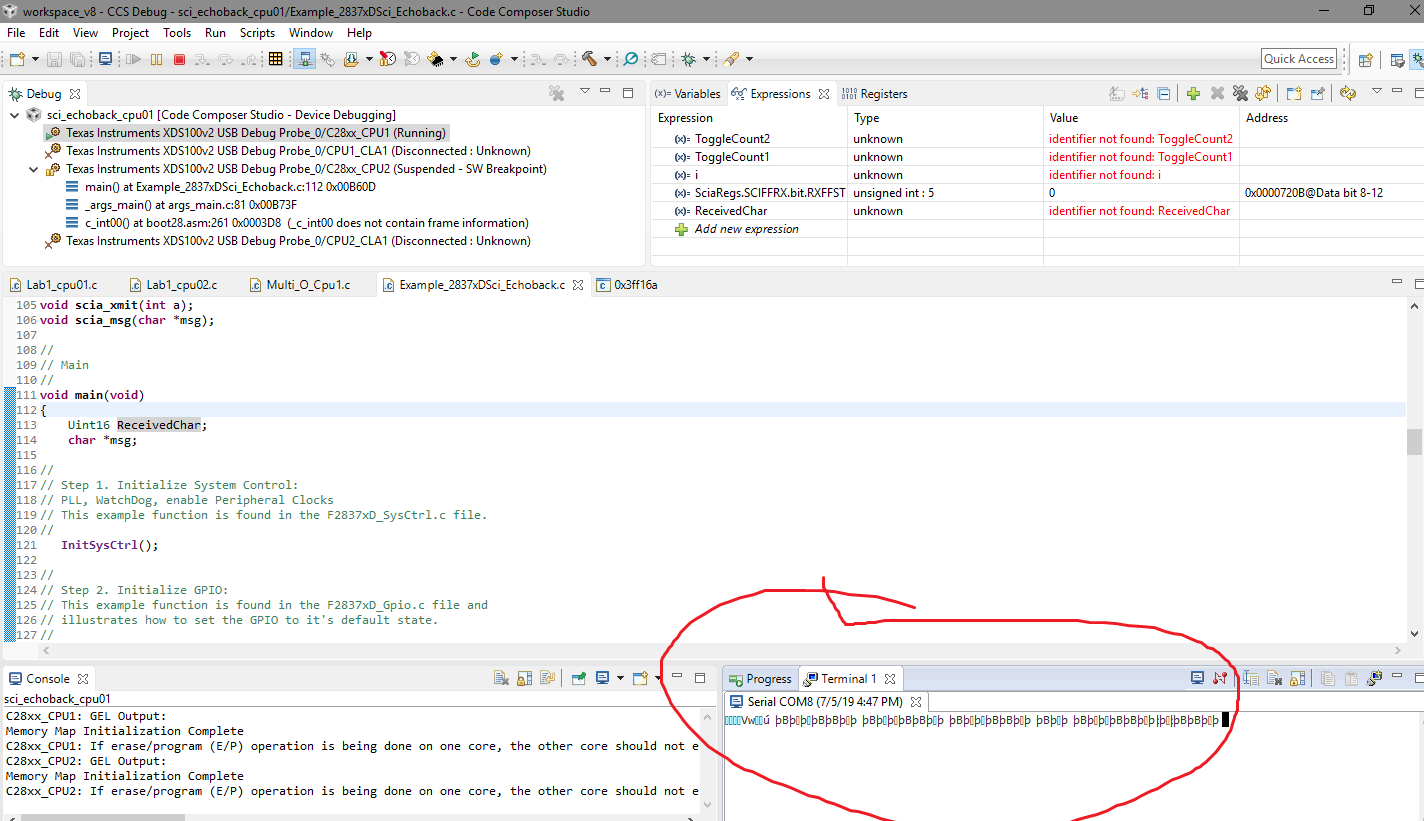
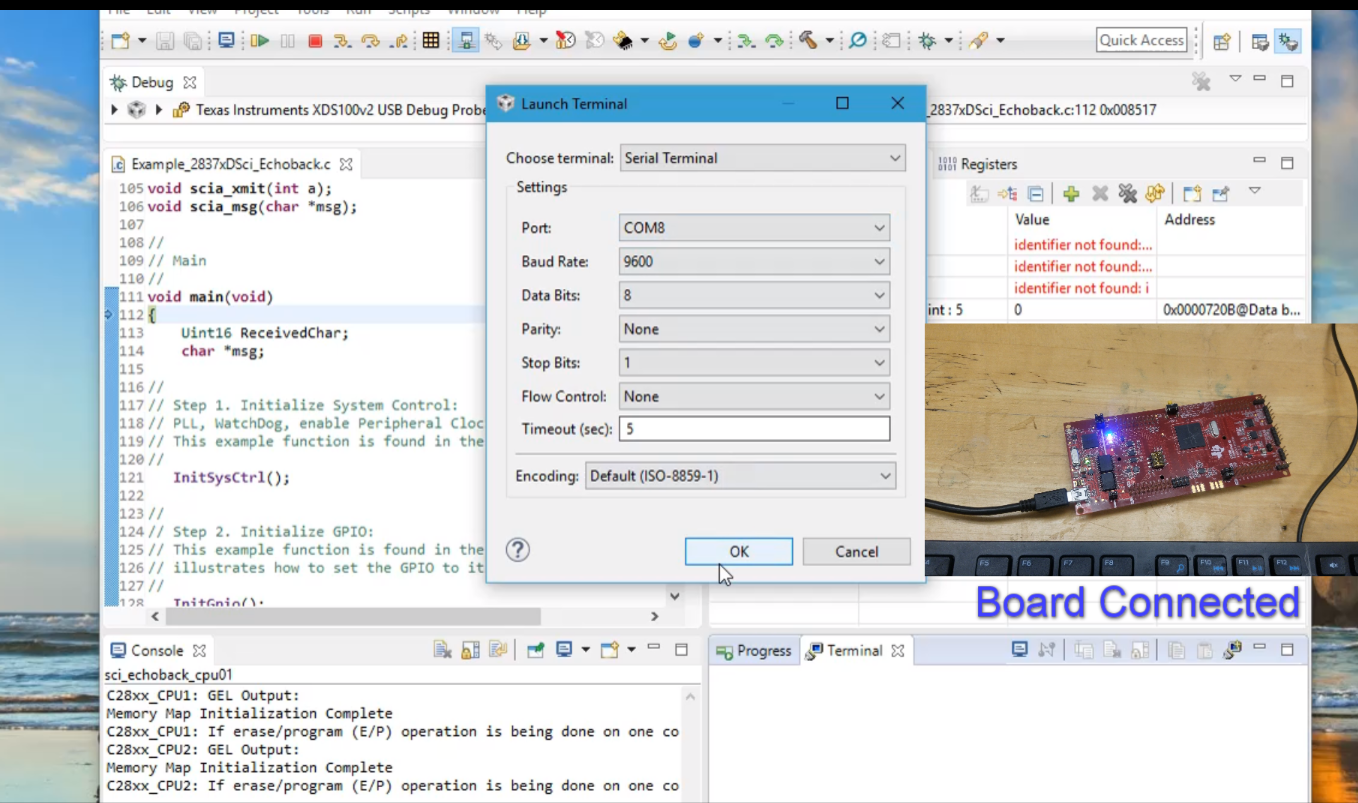
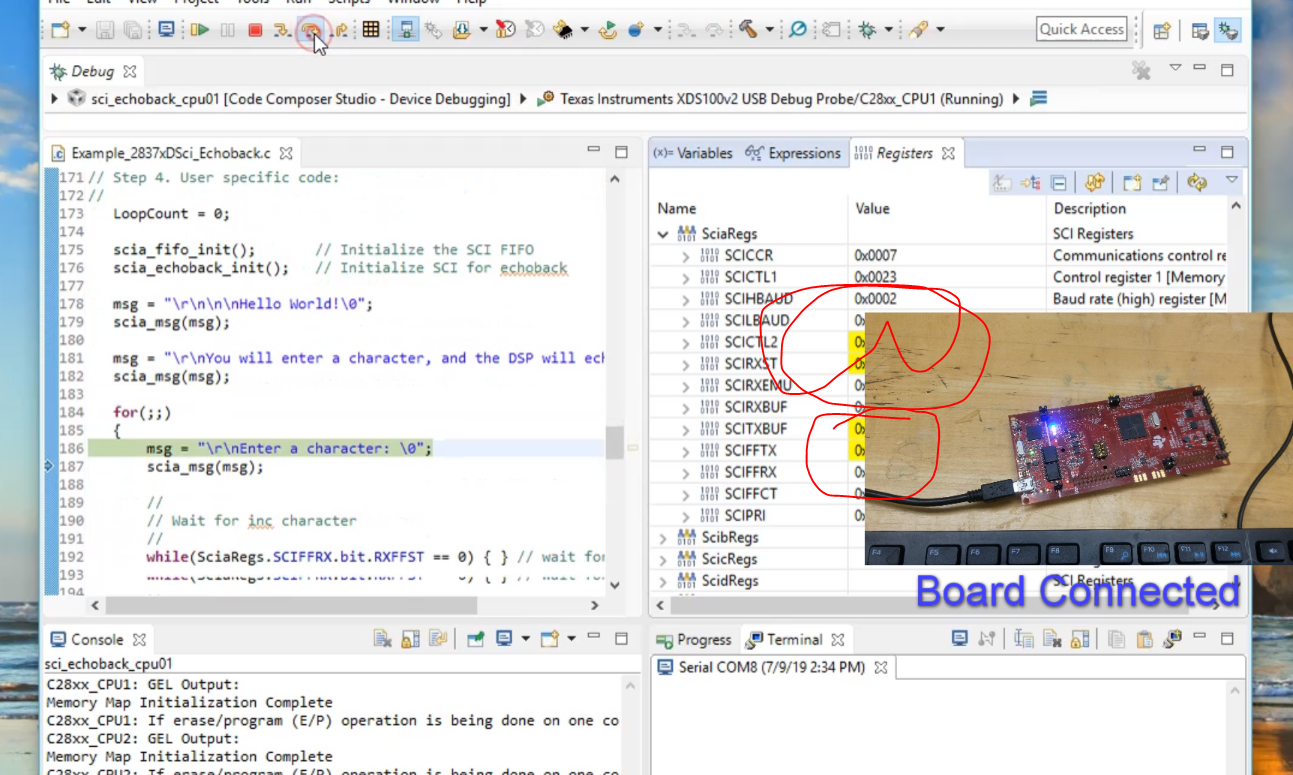
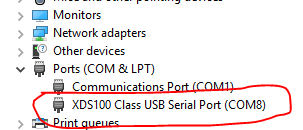
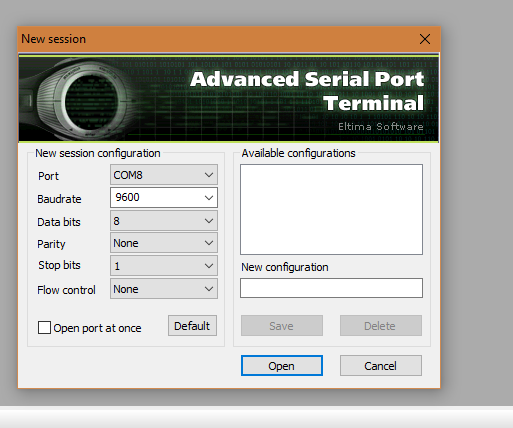
I am trying the Sci echo-back example on the LAUNCHXL-F28379D. I built the program and started the debug session. I opened the serial port according to the description

-

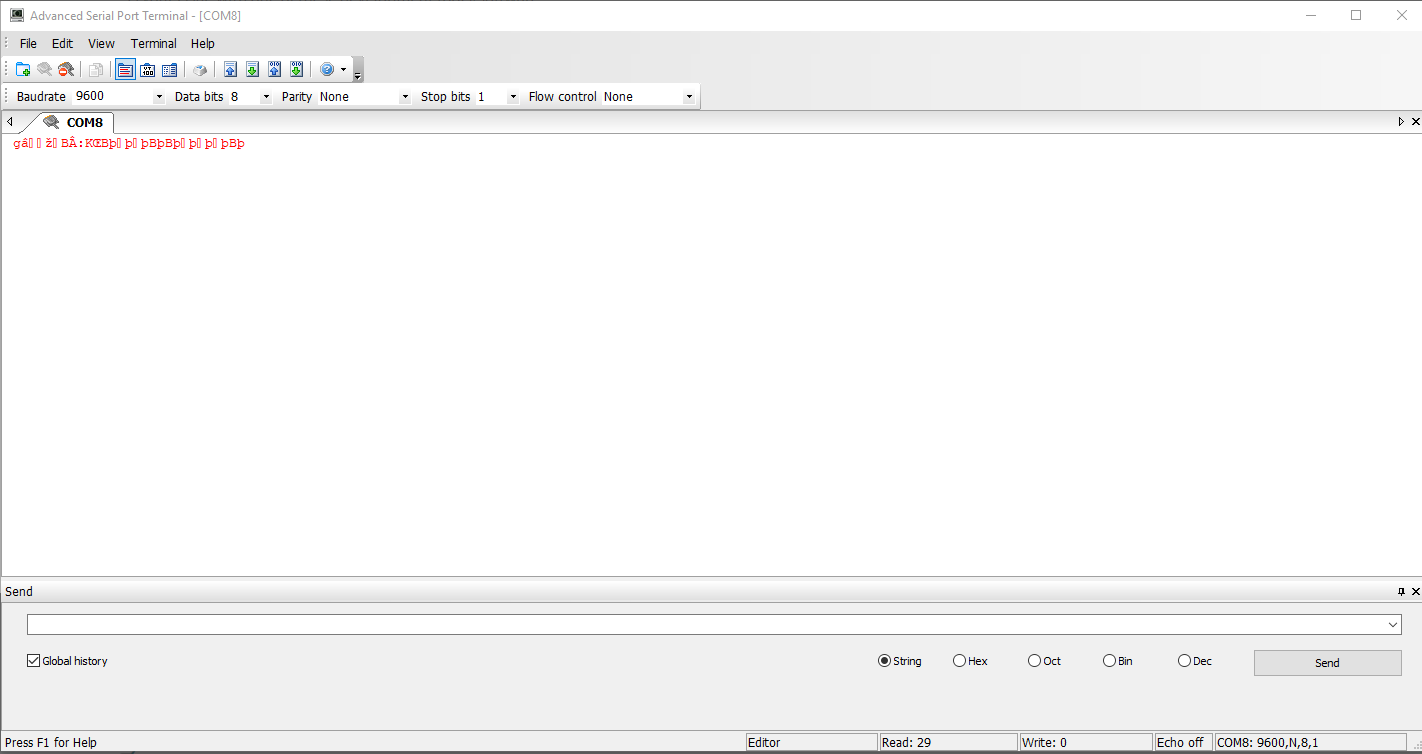
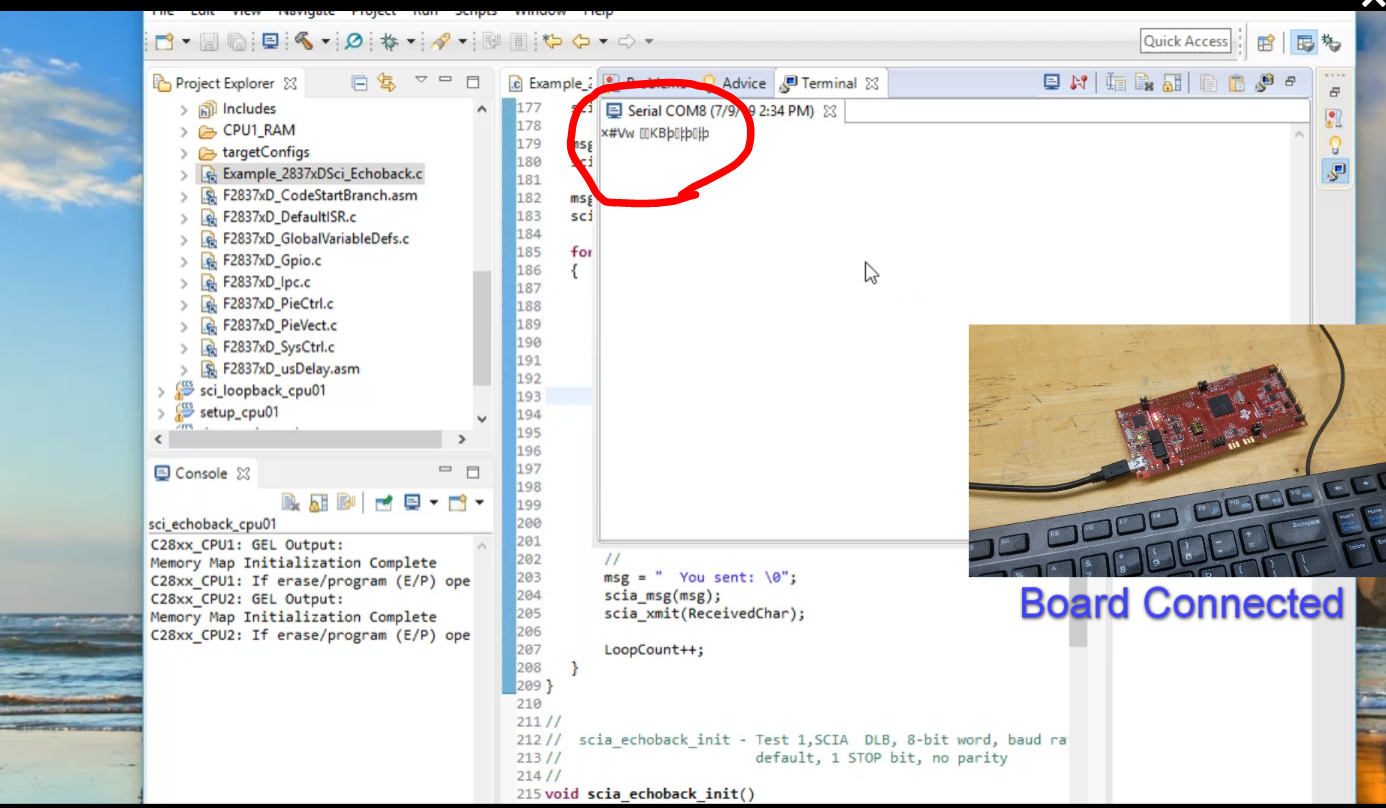
But I am getting this junk values.

I would really appreciate help solving this issue.

Thank you.

  • Hi Arindam ,

    It seems that the baud rate is not getting set correctly causing incorrect data to appear on the terminal.

    The examples in the C2000ware are mostly developed for the controlcard unless specified in the example or the project properties.

    If we want to use it with the Launchpad we would need to make some updates to the project configurations .

    Please check the section on "Getting Started and Troubleshooting " of the  C2000Ware_2_00_00_02\device_support\f2837xd\docs\F2837xD_DEV_USER_GUIDE.pdf

    If using a Launchpad, add a pre-define NAME called "_LAUNCHXL_F28379D". This is required to setup the proper device clocking.

    Regards.

  • Hello Meghana,

    Thank you for your response. As you suggested I have noticed that the Pre-define name was not declared. I changed it and rebuilt the program and started a debug session. The weird thing is during the debug session if I run the program I could not see anything on the terminal window ( though it was same earlier too). If I reset the board I started observing the same junk values still on the terminal happening at a certain frequency ~1 Hz. So it didn't solve the issue.

    I am a little bit confused as the same serial port is used to debug and as terminal too. Now is this supposed to create any issue?  Moreover, once I run the code am I supposed to see a working serial com between the board and terminal?

    Thank you. I really appreciate your help.

  • hi Arindam ,

    Have you looked at the GPIOs used for the terminal connections ? I guess the GPIO 42/ 43 are used in launchpad but the basic example uses some other pins.

    They might need an update to satisfy those needed by the launchpad.

    Regards.

  • Hello Meghana,

    Again thank you so much for your response. Now, let me describe my intended hardware functionality. I might be very wrong in the approach. 

    For this program, I am trying to write something in a serial terminal software ( To be transferred to the launchpad) (i.e. 'X') and expecting the same 'X' to be seen in the serial monitor (As an echo from the board) (Link between board and computer through same serial port /debug serial interface). Like an Arduino Serial feedback. 

    I might be very wrong as the Sci loopback might be written to transmit the data to one of its other serial port pins(not the one communicating to the computer/debug serial interface). In which case these serial port pin needs to be connected to the pc using another USB-Serial device. 

    Could you please clarify my understanding? Can I do the intended function  (Serial print as Arduino) with these board or I need external hardware connected to a USB serial converter which will be connected to a PC?

    I have changed the GPIO pins as per your advice but it's still the same.

    Thank you so much for answering.

  • hi ,

    Yes what you described is what happens in the  Sci echo-back example.

    The SCI loopback example sends to the TX and then there is an internal loopback ( without coming to the gpios / no PC connections ) , then put into the RX .

    No external hardware is needed.

    Can you reiterate what all you modified and where ? Paste the code if needed...

    I grabbed a F28377S launchpad to try the example and all i did is add the predefine and change the gpio pin muxing to map to the right sci pins.

    Regards.

  • Hello Meghana,


    Listed is the step by step description that I followed-


    1. I uninstalled the c2000 ware just to have it reinstalled and a fresh copy of the example.
    2. I installed c2000 and imported the Sci_loopback_cpu1 example

    3. I added _LAUNCHXL_F28379D as predefined symbols.

    4. I changed the pins Rx->43 and Tx->42. Can be seen in the figure.

    5. I built the program and started debugging.
    6. I have opened a terminal on CCS terminal window.

    7. During debug the sci register change was observed but no output on the terminal while hitting keyboard flashed the onboard red Rx led but nothing on the terminal.

    8. Then I got frustrated and reset the board and saw some junk on the terminal and after it just keep sending junk.

     The whole process can be seen in the video.

    Thank you for your help. Please let me know what I am doing wrong.

  • Here is the main code-

    //###########################################################################
    //
    // FILE: Example_2837xDSci_Echoback.c
    //
    // TITLE: SCI Echoback.
    //
    //! \addtogroup cpu01_example_list
    //! <h1>SCI Echoback (sci_echoback)</h1>
    //!
    //! This test receives and echo-backs data through the SCI-A port.
    //!
    //! The PC application 'hyperterminal' or another terminal
    //! such as 'putty' can be used to view the data from the SCI and
    //! to send information to the SCI. Characters received
    //! by the SCI port are sent back to the host.
    //!
    //! \b Running \b the \b Application
    //! -# Configure hyperterminal or another terminal such as putty:
    //!
    //! For hyperterminal you can use the included hyperterminal configuration
    //! file SCI_96.ht.
    //! To load this configuration in hyperterminal
    //! -# Open hyperterminal
    //! -# Go to file->open
    //! -# Browse to the location of the project and
    //! select the SCI_96.ht file.
    //! -# Check the COM port.
    //! The configuration file is currently setup for COM1.
    //! If this is not correct, disconnect (Call->Disconnect)
    //! Open the File-Properties dialogue and select the correct COM port.
    //! -# Connect hyperterminal Call->Call
    //! and then start the 2837xD SCI echoback program execution.
    //! -# The program will print out a greeting and then ask you to
    //! enter a character which it will echo back to hyperterminal.
    //!
    //! \note If you are unable to open the .ht file, or you are using
    //! a different terminal, you can open a COM port with the following settings
    //! - Find correct COM port
    //! - Bits per second = 9600
    //! - Date Bits = 8
    //! - Parity = None
    //! - Stop Bits = 1
    //! - Hardware Control = None
    //!
    //! \b Watch \b Variables \n
    //! - LoopCount - the number of characters sent
    //!
    //! \b External \b Connections \n
    //! Connect the SCI-A port to a PC via a transceiver and cable.
    //! - GPIO28 is SCI_A-RXD (Connect to Pin3, PC-TX, of serial DB9 cable)
    //! - GPIO29 is SCI_A-TXD (Connect to Pin2, PC-RX, of serial DB9 cable)
    //!
    //
    //###########################################################################
    // $TI Release: F2837xD Support Library v3.05.00.00 $
    // $Release Date: Thu Oct 18 15:48:42 CDT 2018 $
    // $Copyright:
    // Copyright (C) 2013-2018 Texas Instruments Incorporated - http://www.ti.com/
    //
    // Redistribution and use in source and binary forms, with or without
    // modification, are permitted provided that the following conditions
    // are met:
    //
    // Redistributions of source code must retain the above copyright
    // notice, this list of conditions and the following disclaimer.
    //
    // Redistributions in binary form must reproduce the above copyright
    // notice, this list of conditions and the following disclaimer in the
    // documentation and/or other materials provided with the
    // distribution.
    //
    // Neither the name of Texas Instruments Incorporated nor the names of
    // its contributors may be used to endorse or promote products derived
    // from this software without specific prior written permission.
    //
    // THIS SOFTWARE IS PROVIDED BY THE COPYRIGHT HOLDERS AND CONTRIBUTORS
    // "AS IS" AND ANY EXPRESS OR IMPLIED WARRANTIES, INCLUDING, BUT NOT
    // LIMITED TO, THE IMPLIED WARRANTIES OF MERCHANTABILITY AND FITNESS FOR
    // A PARTICULAR PURPOSE ARE DISCLAIMED. IN NO EVENT SHALL THE COPYRIGHT
    // OWNER OR CONTRIBUTORS BE LIABLE FOR ANY DIRECT, INDIRECT, INCIDENTAL,
    // SPECIAL, EXEMPLARY, OR CONSEQUENTIAL DAMAGES (INCLUDING, BUT NOT
    // LIMITED TO, PROCUREMENT OF SUBSTITUTE GOODS OR SERVICES; LOSS OF USE,
    // DATA, OR PROFITS; OR BUSINESS INTERRUPTION) HOWEVER CAUSED AND ON ANY
    // THEORY OF LIABILITY, WHETHER IN CONTRACT, STRICT LIABILITY, OR TORT
    // (INCLUDING NEGLIGENCE OR OTHERWISE) ARISING IN ANY WAY OUT OF THE USE
    // OF THIS SOFTWARE, EVEN IF ADVISED OF THE POSSIBILITY OF SUCH DAMAGE.
    // $
    //###########################################################################
    
    //
    // Included Files
    //
    #include "F28x_Project.h"
    
    //
    // Globals
    //
    Uint16 LoopCount;
    
    //
    // Function Prototypes
    //
    void scia_echoback_init(void);
    void scia_fifo_init(void);
    void scia_xmit(int a);
    void scia_msg(char *msg);
    
    //
    // Main
    //
    void main(void)
    {
    Uint16 ReceivedChar;
    char *msg;
    
    //
    // Step 1. Initialize System Control:
    // PLL, WatchDog, enable Peripheral Clocks
    // This example function is found in the F2837xD_SysCtrl.c file.
    //
    InitSysCtrl();
    
    //
    // Step 2. Initialize GPIO:
    // This example function is found in the F2837xD_Gpio.c file and
    // illustrates how to set the GPIO to it's default state.
    //
    InitGpio();
    
    //
    // For this example, only init the pins for the SCI-A port.
    // GPIO_SetupPinMux() - Sets the GPxMUX1/2 and GPyMUX1/2 register bits
    // GPIO_SetupPinOptions() - Sets the direction and configuration of the GPIOS
    // These functions are found in the F2837xD_Gpio.c file.
    //
    GPIO_SetupPinMux(43, GPIO_MUX_CPU1, 1);
    GPIO_SetupPinOptions(43, GPIO_INPUT, GPIO_PUSHPULL);
    GPIO_SetupPinMux(42, GPIO_MUX_CPU1, 1);
    GPIO_SetupPinOptions(42, GPIO_OUTPUT, GPIO_ASYNC);
    
    //
    // Step 3. Clear all __interrupts and initialize PIE vector table:
    // Disable CPU __interrupts
    //
    DINT;
    
    //
    // Initialize PIE control registers to their default state.
    // The default state is all PIE __interrupts disabled and flags
    // are cleared.
    // This function is found in the F2837xD_PieCtrl.c file.
    //
    InitPieCtrl();
    
    //
    // Disable CPU __interrupts and clear all CPU __interrupt flags:
    //
    IER = 0x0000;
    IFR = 0x0000;
    
    //
    // Initialize the PIE vector table with pointers to the shell Interrupt
    // Service Routines (ISR).
    // This will populate the entire table, even if the __interrupt
    // is not used in this example. This is useful for debug purposes.
    // The shell ISR routines are found in F2837xD_DefaultIsr.c.
    // This function is found in F2837xD_PieVect.c.
    //
    InitPieVectTable();
    
    //
    // Step 4. User specific code:
    //
    LoopCount = 0;
    
    scia_fifo_init(); // Initialize the SCI FIFO
    scia_echoback_init(); // Initialize SCI for echoback
    
    msg = "\r\n\n\nHello World!\0";
    scia_msg(msg);
    
    msg = "\r\nYou will enter a character, and the DSP will echo it back! \n\0";
    scia_msg(msg);
    
    for(;;)
    {
    msg = "\r\nEnter a character: \0";
    scia_msg(msg);
    
    //
    // Wait for inc character
    //
    while(SciaRegs.SCIFFRX.bit.RXFFST == 0) { } // wait for empty state
    
    //
    // Get character
    //
    ReceivedChar = SciaRegs.SCIRXBUF.all;
    
    //
    // Echo character back
    //
    msg = " You sent: \0";
    scia_msg(msg);
    scia_xmit(ReceivedChar);
    
    LoopCount++;
    }
    }
    
    //
    // scia_echoback_init - Test 1,SCIA DLB, 8-bit word, baud rate 0x000F,
    // default, 1 STOP bit, no parity
    //
    void scia_echoback_init()
    {
    //
    // Note: Clocks were turned on to the SCIA peripheral
    // in the InitSysCtrl() function
    //
    
    SciaRegs.SCICCR.all = 0x0007; // 1 stop bit, No loopback
    // No parity,8 char bits,
    // async mode, idle-line protocol
    SciaRegs.SCICTL1.all = 0x0003; // enable TX, RX, internal SCICLK,
    // Disable RX ERR, SLEEP, TXWAKE
    SciaRegs.SCICTL2.all = 0x0003;
    SciaRegs.SCICTL2.bit.TXINTENA = 1;
    SciaRegs.SCICTL2.bit.RXBKINTENA = 1;
    
    //
    // SCIA at 9600 baud
    // @LSPCLK = 50 MHz (200 MHz SYSCLK) HBAUD = 0x02 and LBAUD = 0x8B.
    // @LSPCLK = 30 MHz (120 MHz SYSCLK) HBAUD = 0x01 and LBAUD = 0x86.
    //
    SciaRegs.SCIHBAUD.all = 0x0002;
    SciaRegs.SCILBAUD.all = 0x008B;


    SciaRegs.SCICTL1.all = 0x0023; // Relinquish SCI from Reset
    }
    
    //
    // scia_xmit - Transmit a character from the SCI
    //
    void scia_xmit(int a)
    {
    while (SciaRegs.SCIFFTX.bit.TXFFST != 0) {}
    SciaRegs.SCITXBUF.all =a;
    }
    
    //
    // scia_msg - Transmit message via SCIA
    //
    void scia_msg(char * msg)
    {
    int i;
    i = 0;
    while(msg[i] != '\0')
    {
    scia_xmit(msg[i]);
    i++;
    }
    }
    
    //
    // scia_fifo_init - Initialize the SCI FIFO
    //
    void scia_fifo_init()
    {
    SciaRegs.SCIFFTX.all = 0xE040;
    SciaRegs.SCIFFRX.all = 0x2044;
    SciaRegs.SCIFFCT.all = 0x0;
    }
    
    //
    // End of file
    //


    I have also added the project file.sci_echoback.zip

  • hi Arindam ,

    I believe your pin muxing configuration for SCI is incorrect . Rest looks fine.

    Modify From : 

    GPIO_SetupPinMux(43, GPIO_MUX_CPU1, 1);
    GPIO_SetupPinOptions(43, GPIO_INPUT, GPIO_PUSHPULL);
    GPIO_SetupPinMux(42, GPIO_MUX_CPU1, 1);
    GPIO_SetupPinOptions(42, GPIO_OUTPUT, GPIO_ASYNC);

    To :

    GPIO_SetupPinMux(43, GPIO_MUX_CPU1, 0xF);
    GPIO_SetupPinOptions(43, GPIO_INPUT, GPIO_PUSHPULL);
    GPIO_SetupPinMux(42, GPIO_MUX_CPU1, 0xF);
    GPIO_SetupPinOptions(42, GPIO_OUTPUT, GPIO_ASYNC);

    Check the TRM table .

    Regards.

  • Dear Meghana,

    Thank you so much for your response. My issue is solved thank you again.

    If possible could you please refer me the document/ reference where I can find this GPIO muxing setting and how to interpret them. I have a technical reference manual which is a little different than this one. I am also having a hard time interpreting the muxing for example why from 0x01 (0b0001) to 0x0F(0b1111).

    Thanks.

  • Hi Arindam , 

    Good to hear that you got it to work. Actually i was referring a previous version of TRM .

    Refer to table 8-7. GPIO Muxed Pins of the TRM found below .

    http://www.ti.com/lit/ug/spruhm8h/spruhm8h.pdf

    The GPIO Index is the value which was are updating from 0x1 to 0xF .

    This inherently takes care of both the GPyGMUXn and the GPyMUXn updates needed for this muxing.

    Details on how to use the API is provided over the API in the respective source files.

    C2000Ware\device_support\f2837xd\common\source

    Regards.

  • Thank you Meghana for your help.