This thread has been locked.

If you have a related question, please click the "Ask a related question" button in the top right corner. The newly created question will be automatically linked to this question.

Locked rotor at full current when running Insta-spin Motion Lab 12b

Other Parts Discussed in Thread: BOOSTXL-DRV8301, TMS320F28069M, MOTORWARE

Hi all,

I've run up against a wall with the dreaded Insta-spin Motion Lab 12b.  After completing the RsRecalc estimation, the motor spins to a nearby position between two poles and locks.  The motor shaft is vibrating slightly, and I can observe this with an oscilloscope on either of the A or B encoder lines.  No matter where I set the value of USER_MOTOR_RES_EST_CURRENT, the locked rotor current is fixed at 2.13A, regardless of the setting for USER_MOTOR_RES_EST_CURRENT in user.h

For background's sake, I've run through the preceeding Instaspin Motion Labs and have the following parameters in the user.h file:

#elif (USER_MOTOR == Yaskawa_USASEM08FJ21_3POLE)
#define USER_MOTOR_TYPE MOTOR_Type_Pm
#define USER_MOTOR_NUM_POLE_PAIRS (3)
#define USER_MOTOR_Rr (NULL)
#define USER_MOTOR_Rs (0.6203403)
#define USER_MOTOR_Ls_d (0.003396241)
#define USER_MOTOR_Ls_q (0.003396241)
#define USER_MOTOR_RATED_FLUX (0.522265)
#define USER_MOTOR_MAGNETIZING_CURRENT (NULL)
#define USER_MOTOR_RES_EST_CURRENT (1.0)
#define USER_MOTOR_IND_EST_CURRENT (-1.0)
#define USER_MOTOR_MAX_CURRENT (5.3)
#define USER_MOTOR_IDENT_FREQUENCY_Hz (20.0)
#define USER_MOTOR_FLUX_EST_FREQ_Hz (80.0)
#define USER_MOTOR_ENCODER_LINES (4096.0)
#define USER_MOTOR_MAX_SPEED_KRPM (3.0)
//as defined using SpinTAC
//#define USER_SYSTEM_INERTIA (0.1129943132)
//#define USER_SYSTEM_FRICTION (0.4687358737)
//as defined with Quadrature encoder in Lab 12a
#define USER_SYSTEM_INERTIA (0.09917843342)
#define USER_SYSTEM_FRICTION (0.3583653569)
#define USER_SYSTEM_BANDWIDTH_SCALE (1.0)

Where I've manually set the USER_SYSTEM_BANDWIDTH rather than using the USER_SYSTEM_BANDWIDTH_SCALE definition (it didn't seem to update anything when changed).

#define USER_SYSTEM_BANDWIDTH      (140.0) 

I'm using the TMS320f28069M Launchpad XL, as well as the BOOSTXL-DRV8301 REV B add-on card.  The Motor is rated for 3000RPM, at 200V, with a maximum continuous current of 5.3A.  I'm limited to a 30Vdc/3A bench supply for this evaluation.  The servo itself is a 3-phase, permanent magnet AC Servo Motor, not a true PMSM.

As well, I've read through this forum and attempted many of the suggested fixes for this issue; including:

Increasing the value of USER_MOTOR_RES_EST_CURRENT up to 3A in 0.5A increments

Varying the USER_SYSTEM_BANDWIDTH value between 20 and 160 by increments of 10

Adjusted the value for gMotorVars.Kp_Idq from 10.61325073 (default) +/- 50% in 10% increments

The incremental encoder is an aftermarket CUI AMT113S-V programmed for 4096 counts per rotation.  Care has been taken to minimize encoder noise (shielded cables, as well as proper system grounding have all helped).  I've verified that both the encoder and the electric angle of the motor are working in concert in Lab 12a, by watching both the st_obj.vel.conv.Pos_erev and st_obj.vel.conv.Pos_mrev, observing 3 pole pairs in Pos_erev and a real-world mechanical rotation equate to 1 in Pos_mrev.  The direction of the manual rotation was counter-clockwise (facing the motor), which is consistent with the rotation of the labs prior to this.  

datasheet for the encoder:  www.cui.com/.../amt11.pdf

In lab 5d, the tuned system was able to rotate the motor at speeds as low as 2 RPM with minimal cogging.

The goal for this project is a speed-controlled servo drive, where the system's higher level instructions are decoded on a separate MCU in order to leverage our company's existing IP.  

Given all of these things, is it common for the motor to vibrate while conducting the electric field to encoder alignment?  This doesn't seem to make sense to me.  Is the disturbance rejection under-damped?  Is the motor over-spec'd for the bench supply?  Could there be an irregularity accross one a single phase's impedance?  

What am I missing?

Jamie Mascola


  • "After completing the RsRecalc estimation, the motor spins to a nearby position between two poles and locks. The motor shaft is vibrating slightly, and I can observe this with an oscilloscope on either of the A or B encoder lines."

    Are you issuing a Speed command? Or is it set to 0 KRPM?

    If set to 0 KRPM it sounds like this is normal operation, probably with too high of a bandwidth setting causing the oscillations. Is there any load on the motor during this testing?

    "In lab 5d, the tuned system was able to rotate the motor at speeds as low as 2 RPM with minimal cogging."
    Unloaded, correct? This is 0.1 Hz, which is really impressive, but we have done the same by using a high voltage motor on a low voltage bus. You are getting enough Bemf generated from you 0.5 V/Hz * 0.1 Hz = 0.05V for FAST to track "good enough". I doubt you are able to produce more than 50% of torque though as there is some error in the estimations at this low of speed. But it's stable!

    "Given all of these things, is it common for the motor to vibrate while conducting the electric field to encoder alignment?"
    You mean during RsRecal? Yes, especially if you are putting in 50%+ rated current, which you are. The purpose of this step is to force the rotor to an electrical 0 angle. You then read your mechanical encoder and can create an offset for encoder mechanical to electrical conversion. But once this state is over and control system is running OnLine you would tune your system for stability and would not expect vibrations.
  • I have tried changing the gMotorVars.SpeedRef_krpm value to different settings between 100 and 300 RPM with no effect.  There is no mechanical load on the motor during these tests.  

    Torque and disturbance rejection are pretty solid during the tests at low speed, but I doubt they're anywhere near the potential for the motor at higher RPM.  

    How does one create an offset for the difference between the mechanical and electrical angles of the motor?  Is this to be defined in the user.h file?  Or is it automated by the lab code?  I didn't see any mention of this step in the lab procedure manual for Instapin Motion and FOC.

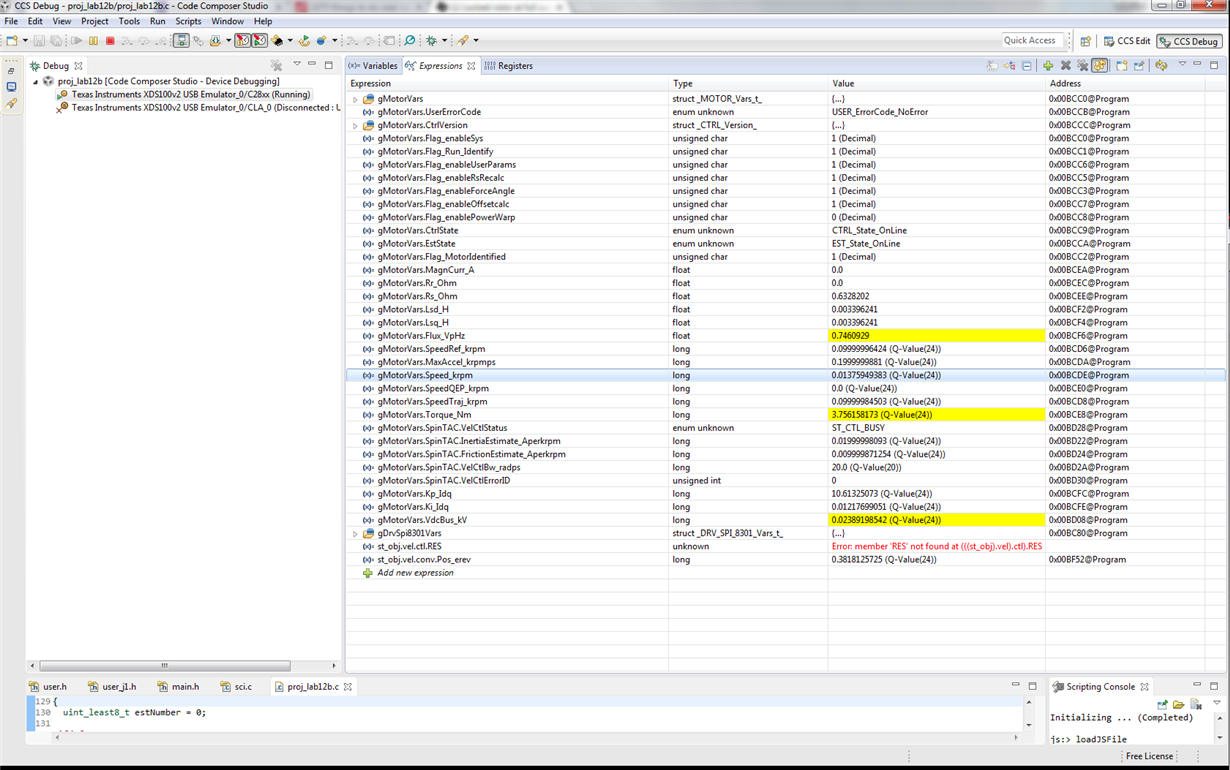
    A screenshot of the watch window is shown below.  Here one can see the state where the process is stuck at.  Measurements at the power supply are 24V and 2.16A.  The Motor is locked in place and oscilating slightly.

    I haven't made any changes to the source code for the lab.

    JM

  • Is there any additional information I can provide (video, source files, etc.) to help diagnose the issue?

    JM
  • have you tried swapping your phase wires? when using a sensored system the order of the phases is important.
  • "How does one create an offset for the difference between the mechanical and electrical angles of the motor? Is this to be defined in the user.h file? Or is it automated by the lab code? I didn't see any mention of this step in the lab procedure manual for Instapin Motion and FOC."

    from instaspin_labs.pdf proj_lab12b:
    This project will setup the calibrated angle of the encoder. This ensures that both the encoder and the
    motor are aligned on a zero degree electrical angle. This step is done when the FAST™ estimator is
    recalibrating the Rs value of the motor.

    from proj_lab12b.c
    // if we are forcing alignment, using the Rs Recalculation, align the eQEP angle with the rotor angle
    if((EST_getState(obj->estHandle) == EST_State_Rs) && (USER_MOTOR_TYPE == MOTOR_Type_Pm))
    {
    ENC_setZeroOffset(encHandle, (uint32_t)(HAL_getQepPosnMaximum(halHandle) - HAL_getQepPosnCounts(halHandle)));
    }
  • I did this earlier, but I'll step through the six combinations now. This was attempted before properly shielding the encoder to get lab 12a to work.

    JM
  • All done.

    Yaskawa labels their phases as U, V, W.  

    I ran through 

    DRV_PHASE(MOTOR_PHASE)

    A(U)   B(V)    C(W)

    A(U)   B(W)   C(V)

    A(V)   B(U)    C(W)

    A(V)   B(W)   C(U)

    A(W)  B(U)   C(V)

    A(W)  B(V)   C(U) 

    No improvement.  The relative angle where the motor would lock changed as the phases were swapped.  As well, the direction of rotation changed for some of the pair swaps.  

    Of note: The electrical angle displayed by the st_obj.vel.conv.Pos_erev never changed from 0.3818125725 despite any of the phases being swapped.  In fact, it never seems to update at all.

  • I've flagged this to Adam @ LineStream. Need his assistance at this point.
  • Thanks for your help Chris,

    I'm both surprised and pleased at how prompt your support has been. If the people that pay you read this post then I'll go on record to say that you did incredibly well.

    JM
  • Jamie,

    Sorry for the delay in my response. Were you able to estimate the inertia in lab 12a? Since you are on the LAUNCHPAD, is the boosterpack connected to J5 and your encoder connected to QEPB? Are you modifying user_j1.h or user_j5.h?
  • Hi Adam,


    I was able to estimate the inertia in lab 12a. The results are shown in my first post within my motor parameters. I’ll paraphrase them below:


    //as defined using SpinTAC in lab 5c
    //#define USER_SYSTEM_INERTIA (0.1129943132)
    //#define USER_SYSTEM_FRICTION (0.4687358737)
    //as defined with Quadrature encoder in lab 12a
    #define USER_SYSTEM_INERTIA (0.09917843342)
    #define USER_SYSTEM_FRICTION (0.3583653569)

    They not exactly the same, but they do sit within a comfortable tolerance margin with respect to those calculated in lab 5c.

    I have the booster pack connected to J1 and QEPA. I’ve verified the quadrature decoder signals by watching the st_obj.vel.conv.Pos_mrev variable while manually turning the motor. Its direction of rotation and counts per revolution are consistent. As well, the general velocity given by gMotorVars.SpeedQEP_krpm seems to be correct (I can’t really tell, as my hands are less sensitive than an encoder).

    Aside from putting my motor parameter definitions in user_j1.h, the only other modification that I’ve made were to the ADC offsets (as derived by lab 3b), as well as the USER_SYSTEM_BANDWIDTH (set for 140.0), since I didn’t see a change when I made changes to the USER_SYSTEM_BANDWIDTH_SCALE  (set for 1.0) value in my motor definitions.  

    I mentioned earlier that the motor is a true AC servo, and not a PMSM. It is intended to run from a 3-phase invertor. Could this cause the vibration that I’m seeing while it attempts to align the electrical and encoder angles?  Could I temporarily increase the PWM frequency to try and coax it into a fixed position?

    JM

  • "I mentioned earlier that the motor is a true AC servo, and not a PMSM. "

    An AC servo is just a synchronous 3 phase motor with rotor feedback integrated. Magnets may be made from Permanent Magnet (PMSM) or may be magnetized iron (typically called a BLDC). All are powered through a 3-ph inverter. This is not your issue.
  • Fair enough. The issue persists where the motor moves to one of three locations (I'm assuming that this is a zero'd electrical state between the stator and armature), and then continues to slowly increase it's current until it reaches a fixed value (2.16A), no matter what I set the value of USER_MOTOR_RES_EST_CURRENT to. The motor shaft is vibrating slightly, and the encoder reflects this vibration. Does the armature need to be absolutely stationary in order to align the encoder with the electrical angle? And how does this happen with an incremental encoder when the armature never passes through the physical location of the z pulse on the encoder?
  • it seems to me the root cause is an incorrect angle being generated from the encoder to the electrical system. I thought this would be an easy fix due to a swapped phase wire...but no.

    I'm hoping Adam has some additional ideas because I do not.
  • I'm baffled too, Chris. I've gone over everything I could find in the forums. I almost guarantee that I'm overlooking something stupid. Any suggestion is welcome. I'm not proud to say "doh!"

    JM
  • Jamie,

    What is really interesting about the issue you are seeing is that lab 12a and lab 12b use the exact same encoder software.  So it is strange that the system works in lab 12a but doesn't in lab 12b.

    Jamie Mascola said:
    Does the armature need to be absolutely stationary in order to align the encoder with the electrical angle?

    Ideally, if the rotor is still moving the software won't get a good fix on where the zero degree electrical angle is.  So during the Rs Recalibration phase at startup, the motor should rotate to a fixed position and hold there for a second or so.

    Jamie Mascola said:
    And how does this happen with an incremental encoder when the armature never passes through the physical location of the z pulse on the encoder?

    The labs use a trick in order to quickly align to any encoder.  By forcing the motor into a zero degree electrical angle (during the Rs Recalibration), the current encoder counts can be captured and established as the offset.  The encoder module is setup to rollover when max count is reached instead of on an index or z-pulse.  This ensures that once the encoder is aligned to the zero degree position, until power is removed it will remain aligned.

    When you tried swapping phases, did you restart the lab each time and go back through the rs recalibration?

    In MotorWare 14 we added input qualification, which will filter the encoder input lines.  With your very high number of counts this could be causing an issue.  This is setup in the HAL_setupGpios function in hal.c

      // EQEP1A
      GPIO_setMode(obj->gpioHandle,GPIO_Number_20,GPIO_20_Mode_EQEP1A);
      GPIO_setQualification(obj->gpioHandle,GPIO_Number_20,GPIO_Qual_Sample_3);
    
      // EQEP1B
      GPIO_setMode(obj->gpioHandle,GPIO_Number_21,GPIO_21_Mode_EQEP1B);
      GPIO_setQualification(obj->gpioHandle,GPIO_Number_21,GPIO_Qual_Sample_3);
    
      // GPIO
      GPIO_setMode(obj->gpioHandle,GPIO_Number_22,GPIO_22_Mode_GeneralPurpose);
    
      // EQEP1I
      GPIO_setMode(obj->gpioHandle,GPIO_Number_23,GPIO_23_Mode_EQEP1I);
      GPIO_setQualification(obj->gpioHandle,GPIO_Number_23,GPIO_Qual_Sample_3);

    Another thing to try is to watch the encoder signals when the PWMs are driving.  I've seen cases where everything is fine and perfect when the PWMs are not firing, but as soon as they start switching, the encoder signal is useless.  You should be able to check this in lab 12a by turning gMotorVars.Flag_enableSys and gMotorVars.Flag_Run_Identify to true, then manually rotating the motor to check the mechanical angle feedback.

    When you ran lab 12a did you try running multiple inertia identifications in a row?

    When running lab 12b and the motor moves to one of three locations and stops moving, does this happen immediately, or does the motor spin for a little bit first?  This seems to indicate that maybe the number of encoder counts is not 100% correct.  If it is close enough it will work for a time, but eventually the calibration will drift and the motor will stop working.

  • Hi Adam

    The motor does rotate to a fixed position, but it also holds there indefinitely.  To be on the safe side, I double checked the DC resistance across the pairs of phases, and everything measures out.  I always leave rs_recalibration in, unless directed to do otherwise by the lab manual.  I understand that it helps to account for variation in the stator coil resistance due to temperature variation.

    If the calibration uses the starting point to determine the offset to electric 0, does this mean that the encoder start position is assumed to be the encoder zero position?  Because this is likely not the case.  The encoder was aligned by connecting the U and V phases to DC power and ground, and passing enough current through them to firmly lock the armature in place.  The encoder was then zeroed over USB using CUI’s PC/GUI tool.

    I restarted the lab with a hard stop on the debugger between phase-pair tests.  The rs_recalibration runs by default for Lab 12b.  I let it do just that.

    I am using the x.14 version of Motorware.  I’ll look for a shorter debouncing time constant.  I imagine that it is set by the “GPIO_Qual_Sample_n” parameter.

    I put the encoder to the test in Lab12a and watched the …mrev and …erev symbols in the watch window with the coils energized.  Induced noise on the encoder lines has been addressed by using shielded cabling and grounding the encoder chassis, as well as the motor chassis, to a common ground point with the control circuit.  There is still some slight noise on the encoder lines, it is slightly less than 100mV peak.  I also watched the change in the ..erev to verify that the stator did indeed have 3 pairs of poles, and that the electric angle was in changing in agreement with the mechanical rotation (aside from the 3 0 to 1 transitions for the electric angle, which is to be expected).  It confirmed what the current-limited energized U(Vdc) -> V(GND) phase test showed.  There are 3 pole pairs in the armature.

    There was often variation when running lab 12a repeatedly.  Some results were orders of magnitude off from the results used in my parameter definitions.  Others were more orthodox.

    When running lab 12b, the motor does not appear to move to any other location but to the location that it locks at.  Which is between any two of the points that I marked off when locking the stator with a low-current (40 mA) DC supply, running the U-phase to Vdc, and the V-phase to ground, and manually rotating the motor to count the pole pairs.

    JM

  • Jamie,

    Jamie Mascola said:
    If the calibration uses the starting point to determine the offset to electric 0, does this mean that the encoder start position is assumed to be the encoder zero position?  Because this is likely not the case.  The encoder was aligned by connecting the U and V phases to DC power and ground, and passing enough current through them to firmly lock the armature in place.  The encoder was then zeroed over USB using CUI’s PC/GUI tool.

    Can you describe how, from the microcontroller's perspective, your encoder is different than a traditional quadrature encoder?  The software makes no assumptions about the encoder until it is recalibrating the resistance.  When it is recalibrating the resistance, the microcontroller assumes that the motor is physically aligned to an electrical angle of zero.  At this point, the current reading of the encoder is stored as the offset.  The QEP hardware is setup to reset its counter once the maximum count has been reached, this way there is no reliance on the encoder index mark and the only dependency in the system is that the maximum count from the encoder is correct.  

    You can think of it as two layers, the QEP hardware layer will count until it has seen one complete rotation (via the maximum count mechanism, and the ENC software layer uses an offset to translate that QEP hardware count into a properly aligned electrical angle.

    When lab 12a produces results that vary by that much, it leads me to believe that there is an issue in either the software or hardware setup of the encoder.  Since it partially works, I think your encoder configuration is close, but is not 100% correct.  Beyond the encoder, is it possible that the pole pairs is incorrect?  This will have a major impact on sensored control and will only impact sensorless control in that the speed will be incorrect.

  • Hi Adam,

    Aside from a relatively high position count, there' not mcuh different about the encoders that we're using than a standard optical encoder.  They use a capacitive scheme, of which I'm not entirely familiar with.  I added another round of noise reduction and shielded the motor wires, which were giving off a fair bit of EMI in 90kHz periodic pulses.  This brought the noise level down even further on the encoder, and by having changed the value for the encoder sampling freuency

    eg

    // EQEP1A
    GPIO_setMode(obj->gpioHandle,GPIO_Number_20,GPIO_20_Mode_EQEP1A);
    GPIO_setQualification(obj->gpioHandle,GPIO_Number_20,GPIO_Qual_Sync/*GPIO_Qual_Sample_3*/);

    I can now run lab 12a and get consistent results.  I've logged the test results for friction and inertia from 10 consecutive tests.  Half were conducted consecutively without resetting the debugger.  The other half were recorded after resting the debugger between iterations.

    gMotorVars.SpinTAC.InertiaEstimate_Aperkrpm               gMotorVars.SpinTAC.FrictionEstimate_Aperkrpm
    0.1013868451                                                                          0.5529382825
    0.09907770157                                                                        0.5976477861
    0.09727728367                                                                       0.5458298922
    0.09592324495                                                                       0.5917863846
    0.0971660614                                                                         0.5784171224
    0.09847939014                                                                       0.5155105591
    0.09884005785                                                                       0.5743053555
    0.09735453129                                                                       0.5475302935
    0.09912538528                                                                       0.5469039083
    0.09912538528                                                                       0.5666786432

    The issues with lab 12b have not changed.  It runs through the RS recal, and then moves counter-clockwise to a fixed location and locks.

    Aside from the current limited, dc coupled 2-phase test for the number of pole pairs that I performed earlier, is there another method to determine the number of pole pairs?

    JM

  • Jamie,

    I'm glad you were able to get more consistent results in lab 12a.  

    What speed are you trying to achieve in lab 12b?

    Also what is the maximum speed you were able to achieve in any of the sensorless labs?

    Jamie Mascola said:
    Aside from the current limited, dc coupled 2-phase test for the number of pole pairs that I performed earlier, is there another method to determine the number of pole pairs?

    The other way I've used to detect the number of poles is to spin at a fixed speed in a sensorless lab, then use a tachometer to check the actual speed of the motor.  If there is any misalignment (aside from a small offset) it will indicate that the number of poles is incorrect.  If the true speed is greater than the setting it means the motor has less poles and if the true speed is smaller, than the motor has more poles.

  • Hi Adam,

    I was aiming for a speed of 300 RPM in lab 12b.  This is the maximum speed for our application.  Typically, we'll be working at speeds below 100 RPM.  I created a tachometer using a third party dev board, and it agrees with the reference speeds set in the watch window in lab 5e.  I've used the same board to determine the encoder counts per revolution and confirm that we're seeing 4096 counts per z-pulse.  This was something that I whipped together to help debug and eliminate the previous encoder noise issues.

    I tested this with speeds ranging between 5 RPM and 446 RPM.  This is the top speed we can achieve for this motor, as it is rated for 3000 RPM continuous (4k max), when fed with a 200V input voltage.  I'm testing at 24 volts, which is the maximum rated voltage for this dev kit, and closer to our target application supply voltage.

    The margin of error that I'm seeing from the RPM counter is +/- 1 RPM from the user-definable gMotorVars.SpeedRef_krpm value.  There's some fluctuation at lower speeds, but we're within the heart of the range of values displayed by gMotorVars.Speed_krpm as well.  I think that both tests agree that we have a 3 pole pair motor.

    Any other ideas?

    Jamie

  • Good News!

    It was something stupid! The build setting in CCS was set as a RAM build rather than flash. After switching to a flash build, everything works swimmingly well. I've got the servo spinning down to 1 RPM. I'll need to overhaul my tachometer, as it can no longer track the motor accurately at such a low speed!

    If it's not too much to ask, please include this point in the next rev of the lab manual - that the default program needs to be built as a flash build rather than a RAM build. I haven't used the GUI tool since day one, and thinking that I might give it a shot, I quickly realized that it required a flash-build hex file to run.

    This clears the rut and gets me back to working on my application development. Thank you both, Adam and Chris for you timely and helpful support on the matter.

    Jamie Mascola
  • Jamie,

    I'm glad you were able to get it working.