This thread has been locked.

If you have a related question, please click the "Ask a related question" button in the top right corner. The newly created question will be automatically linked to this question.

ESP8266 interfacing with MSP430G2553 launchpad

Other Parts Discussed in Thread: MSP430G2553, ENERGIA, MSP430F5529

Hello

I am trying to send data to browser using wifi module ESP8266 with MSP430G2553 launchpad.

ESP8266 work on 3.3V and MSP430G2553 also. So here i connected ESP8266 directly to the launchpad.

connections are-

Tx of ESP to Rx of Launchpad

Rx of ESP to Tx of Launchpad

VCC to Vcc

Gnd to Gnd

CH_PD to 3.3V


and i got working code for energia from internet. code is as follows

        #define SSID        "friends"
        #define PASS        "walchand"
        #define DST_IP      "things.ubidots.com"
        #define idvariable  "569fc4ba76254229c49896a6"   // replace with your Ubidots Variable ID
        #define token       "aIdUatYb4QqgntExGmdi6xIllonUaY3AxwJjs5UzCCVib9reI1dI2XFEnfeX"  // replace with your Ubidots token
        int len;
        
        void setup()
        {
          // Open serial communications and wait for port to open:
          char cmd[254];
          Serial.begin(9600);
          Serial.setTimeout(5000);
          //test if the module is ready
          Serial.println("AT+RST");
          delay(1000);
          if (Serial.find("ready"))
          {
            Serial.println("Module is ready");
          }
          else
          {
            Serial.println("Module have no response.");
            while (1);
          }
          delay (1000);
          //connect to the wifi
          boolean connected = false;
          for (int i = 0; i < 5; i++)
          {
            if (connectWiFi())
            {
              connected = true;
              break;
            }
          }
          if (!connected) {
            while (1);
          }
          delay(5000);
          Serial.println("AT+CIPMUX=0");
          }
        
        void loop()
        {
          int value = analogRead(A0);                          //you can change ir to another pin
          int num=0;
          String var = "{\"value\":"+ String(value) + "}";
          num = var.length();
          String cmd = "AT+CIPSTART=\"TCP\",\"";
          cmd += DST_IP;
          cmd += "\",80";
          Serial.println(cmd);
          if (Serial.find("Error")) return;
          
          len=strlen ("POST /api/v1.6/datasources/");
          len=len+strlen (idvariable);
          len=len+strlen ("/values HTTP/1.1\nContent-Type: application/json\nContent-Length: ");
          char numlenght[4]; // this will hold the length of num which is the length of the JSON element
          sprintf(numlenght, "%d", num); // saw this clever code off the net; works yay
          len=len+strlen (numlenght);
          len=len + num; //fixed length of the string that will print as Content-Length: in the POST
          len=len+strlen ("\nX-Auth-Token: ");
          len=len+strlen (token);
          len=len+strlen ("\nHost: things.ubidots.com\n\n");
          len=len+strlen ("\n\n");
          Serial.print("AT+CIPSEND=");
          Serial.println (len); //lenght of the entire data POST for the CIPSEND command of ESP2866
          //Serial.println(cmd.length());
          if (Serial.find(">"))
          {
            //Serial.print(">");
          } else
          {
            Serial.println("AT+CIPCLOSE");
            delay(1000);
            return;
          }
          Serial.print ("POST /api/v1.6/variables/");
          Serial.print (idvariable);
          Serial.print ("/values HTTP/1.1\nContent-Type: application/json\nContent-Length: ");
          Serial.print (num);
          Serial.print ("\nX-Auth-Token: ");
          Serial.print (token);
          Serial.print ("\nHost: things.ubidots.com\n\n");
          Serial.print (var);
          Serial.println ("\n\n");
          delay(9000);
          //Serial.find("+IPD"); clear the input buffer after the web site responds to the POST
          while (Serial.available())
          {
            char c = Serial.read();
          }
          delay(1000);
        }
        boolean connectWiFi()
        {
          Serial.println("AT+CWMODE=1");
          String cmd = "AT+CWJAP=\"";
          cmd += SSID;
          cmd += "\",\"";
          cmd += PASS;
          cmd += "\"";
          Serial.println(cmd);
          delay(2000);
          if (Serial.find("OK"))
          {
          return true;
          } else
          {
           return false;
          }
        }

when i trying to connect to wifi then it is not working properly Only red LED is glowing but not Blue.

output giving..

AT+RST
Module have no response.

So what can be the problem??

Is there issue of power supply?? because esp require more current than msp provide. But on internet anywhere i didn't  about this issue.

I got code from below link

forum.43oh.com/.../5903-esp8266-iot-on-the-cheap

  • Hello,

    I am thinking to send sensor data from MSP430 launchpad to Laptop using ESP8266 Wi-Fi module. Is it possible to send like buletooth module HC05?. There is no COM port assignment for Wi-Fi module after connecting, so how can i receive the data through UART (e.g.i received bluetooth data using putty software )?. Or is there any way to receive the data on laptop(using browser)?

    if anyone using esp8266 with msp430 or arduino then please share it

    Thank you..

  • Moving it to the MSP Forum
  • Hello Umesh,

    I personally do not have any experience with the ESP8266 device so it is hard to tell exactly where communication is failing. The datasheet specifies that it operates on a 3.3 V supply and requires < 215 mA current maximum which is well within the limits of the MSP430-EXPG2 USB connection. Please make sure that the ESP8266 TX is connected to P1.1, RX to P1.2, and that the device's VDD and CHIP_EN pins are powered by the supply properly. Have you tried to get into contact with the author of the code example that you sourced from? EmbedXcode or this hackster blog might also be worth looking into:

    http://embedxcode.weebly.com/
    www.hackster.io/.../20-wifi-connected-hardware-solution-with-esp8266-fb5995

    Regards,
    Ryan
  • Insufficient power could be issue indeed because EXPG2 have tiny, 250mA max LDO and just 1uF storage capacitor on it's supply rail.
  • Good point Ilmars! I had not realized that such a small LDO was used. Umesh could try using a separate external power supply instead of the eZ-430 supply to test this theory. If confirmed either the LDO would need to be replaced or a better-suited LaunchPad (F5529, FR5969, etc.) be used instead.

    Regards,
    Ryan
  • I ran into "does not work" problems while evaluating ESP8266 with ARM board having LDO. Solution is to disconnect LDO from target uC and power both boards from >= 0.5A switching regulator or just lab supply. If you are in unconditional love with LDO then you can try adding 100..220uF input cap and around 47uF output, thou read LDO datasheet, stability chapter.
  • I would connect the ESP to a set of two AA batteries, or another separate power source. When taking power from USB i never had success with the ESP.

  • Hello Steffen,
    Whether we have to add some libraries of ESP8266 to the energia or not?
    if yes then which are those?
    When i using above code then it compiles and loaded finely but not giving response. It prints AT+RST on serial monitor.
  • Hello everybody,
    I have solved the power supply problem for ESP8266. I have given 3.3V 500mA power externally to esp8266. But now i facing the problem to communicate msp430g2553 with esp8266. I made the connections as follows:

    Tx of ESP to Rx of Launchpad

    Rx of ESP to Tx of Launchpad

    VCC to Vcc

    Gnd to Gnd

    CH_PD to 3.3V

    GPIO0 to 3.3 V

    and i uploaded blank sketch i.e. Bare minimum from example, but i didn't get any response for AT commands. What should i make changes in order to get proper response.
    When i reset the esp then garbage value is shown on serial monitor. I have checked by changing all possible baud rates as well as swap TX and RX pins.

    Thanks and regards
  • Hello Umesh,

    Do you have a logic analyzer available to help debug this matter? It would be interesting to know if the ESP8266 is really outputting logical information or junk. Then we could decide whether the issue involves the ESP8266 or MSP430G2553. Also, how are you separating the ESP8266 UART from the backchannel UART used to communicate with your host PC (since only USCI_A0 supports UART communication on the MSP430G2553)? The original code comments out some Serial.println commands that you do not. Are you reading in an analog input at A0 as indicated by your code? Keep in mind that I know nothing about ESP8266 operation.

    Regards,
    Ryan
  • hello Ryan
    I don't have logic analyzer. MSP430G2553 is having only 1 hardware UART so i am using that to communicate with ESP and software UART for debugging. (Is the pin numbers 5,6 are software UART in MSP430G2553? I am using same). And another thing is that when i connect TX to TX and RX to RX then continuous "yyyyyyyyyyyyy...." printing for any baudrate when i upload blank sketch.


    Thanks
  • Umesh,

    The MSP-EXP430G2's backchannel UART is typically used for debugging and utilizes USCIA0 on pins 1.1 and 1.2. If you are using both a hardware and software implementation of UART then this is not clearly expressed by the code you've provided.

    Regards,
    Ryan
  • Hello Ryan,

    Your correct that code was different for software UART. But for blank sketch it should respond for AT commands. unfortunately it is not responding.

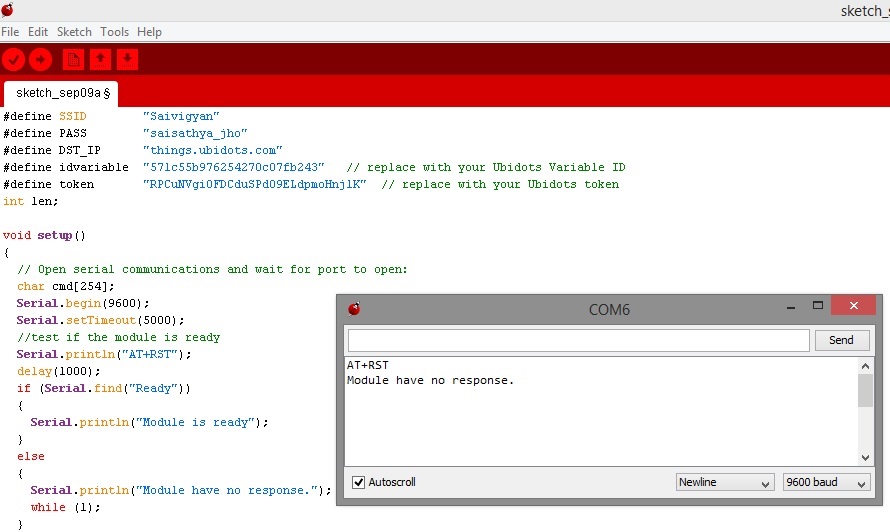
  • May be you could've got it working by now. My answer may help someone who trying this

    ESP8266 AT+RST response is 

    [System Ready, Vendor:www.ai-thinker.com]

    And in this code  Serial.find is looking for "ready" instead of "Ready"

    Serial.println("AT+RST");
      delay(1000);
      if (Serial.find("ready"))
      {
        //dbgSerial.println("Module is ready");
      }

    if you change that you will get it working ..

    Ive attached same code with that modification

    #define SSID        "Saivigyan"
    #define PASS        "saisathya_jho"
    #define DST_IP      "things.ubidots.com"
    #define idvariable  "571c55b976254270c07fb243"   // replace with your Ubidots Variable ID
    #define token       "RPCuNVgi0FDCduSPd09ELdpmoHnjlK"  // replace with your Ubidots token
    int len;
    
    void setup()
    {
      // Open serial communications and wait for port to open:
      char cmd[254];
      Serial.begin(9600);
      Serial.setTimeout(5000);
      //test if the module is ready
      Serial.println("AT+RST");
      delay(1000);
      if (Serial.find("Ready"))
      {
        //dbgSerial.println("Module is ready");
      }
      else
      {
        //dbgSerial.println("Module have no response.");
        while (1);
      }
      delay (1000);
      //connect to the wifi
      boolean connected = false;
      for (int i = 0; i < 5; i++)
      {
        if (connectWiFi())
        {
          connected = true;
          break;
        }
      }
      if (!connected) {
        while (1);
      }
      delay(5000);
      Serial.println("AT+CIPMUX=0");
      }
    
    void loop()
    {
      int value = analogRead(A0);                          //you can change ir to another pin
      int num=0;
      String var = "{\"value\":"+ String(value) + "}";
      num = var.length();
      String cmd = "AT+CIPSTART=\"TCP\",\"";
      cmd += DST_IP;
      cmd += "\",80";
      Serial.println(cmd);
      if (Serial.find("Error")) return;
      
      len=strlen ("POST /api/v1.6/datasources/");
      len=len+strlen (idvariable);
      len=len+strlen ("/values HTTP/1.1\nContent-Type: application/json\nContent-Length: ");
      char numlenght[4]; // this will hold the length of num which is the length of the JSON element
      sprintf(numlenght, "%d", num); // saw this clever code off the net; works yay
      len=len+strlen (numlenght);
      len=len + num; //fixed length of the string that will print as Content-Length: in the POST
      len=len+strlen ("\nX-Auth-Token: ");
      len=len+strlen (token);
      len=len+strlen ("\nHost: things.ubidots.com\n\n");
      len=len+strlen ("\n\n");
      Serial.print("AT+CIPSEND=");
      Serial.println (len); //lenght of the entire data POST for the CIPSEND command of ESP2866
      //Serial.println(cmd.length());
      if (Serial.find(">"))
      {
        //Serial.print(">");
      } else
      {
        Serial.println("AT+CIPCLOSE");
        delay(1000);
        return;
      }
      Serial.print ("POST /api/v1.6/variables/");
      Serial.print (idvariable);
      Serial.print ("/values HTTP/1.1\nContent-Type: application/json\nContent-Length: ");
      Serial.print (num);
      Serial.print ("\nX-Auth-Token: ");
      Serial.print (token);
      Serial.print ("\nHost: things.ubidots.com\n\n");
      Serial.print (var);
      Serial.println ("\n\n");
      delay(9000);
      //Serial.find("+IPD"); clear the input buffer after the web site responds to the POST
      while (Serial.available())
      {
        char c = Serial.read();
      }
      delay(1000);
    }
    boolean connectWiFi()
    {
      Serial.println("AT+CWMODE=1");
      String cmd = "AT+CWJAP=\"";
      cmd += SSID;
      cmd += "\",\"";
      cmd += PASS;
      cmd += "\"";
      Serial.println(cmd);
      delay(2000);
      if (Serial.find("OK"))
      {
      return true;
      } else
      {
       return false;
      }
    } 


  • Hello!

    I am working on the almost same project except I am using MSP430F5529 launch board. I used energia 18 and I can imported library and board manager from third party. But the CCS 6.1.3 does not support energia 18 sketch, I switched back to energia 17 that was supported by CCS V6. My question is how did you make your program work without extra head files?

    And there are two pins for RX and two pins for TX, It does not matter which pin I used to connect with ESP8266 module, right?

    Thanks.
  • Hi Ruben,

    I have bought an ESP8266 module last week,first;trying to work with Arduino,but i have failed.After that i researched ESP8266 with G2553 project,encountered your code.But it is not working my circuit.

    Pinout :

    ESP8266:     g2553:

    Vcc                Vcc

    Gnd              Gnd

    CH_PD        Vcc

    GPIO_0       Vcc

    Rx                P1.2

    Tx                P1.1

    LDO and external capacity are not exist my circuit.But when i embed your code in g2553,serial communication  is provided.But i give this output :

    I did not changed Ubidots parameters because i think problem was caused module.I did not update module and it may be changed settings trying arduino code first.

    Can you help me about this situations please ? Thanks for supports.


  • Hi! we have used ESP12e with Arduino Nano and we are able send data to PC or Android phone usind UDP or TCP Protocol. We have made our own custom board to provide 3.3v to ESP chip and also using SoftwareSerial to communicate with Arduino nano. Now I want develop same thing with MSP432 using Energia IDE. So, can we use SoftwareSerial with MSP432? Is there any library available for SoftwareSerial ? I am newbei with MSP432.

**Attention** This is a public forum