This thread has been locked.

If you have a related question, please click the "Ask a related question" button in the top right corner. The newly created question will be automatically linked to this question.

BQ27220: BQ27220 setup

Part Number: BQ27220
Other Parts Discussed in Thread: BQSTUDIO, AM3352

Dear Sir/Madam,

y customer want to use the default parameters setting in BQ27220 but only want to change the FCC from 3000mAH to 13200mAH.

After few rounds of configuration and calibration steps using BQstudio below, he managed to get the BQstudio => Registers page for FCC changed correctly from 3000mAH to 13200 mAH.
1. RESET=> UNSEAL => UNSEAL_FULL_ACCESS => ENTER_CFG_UPDATE
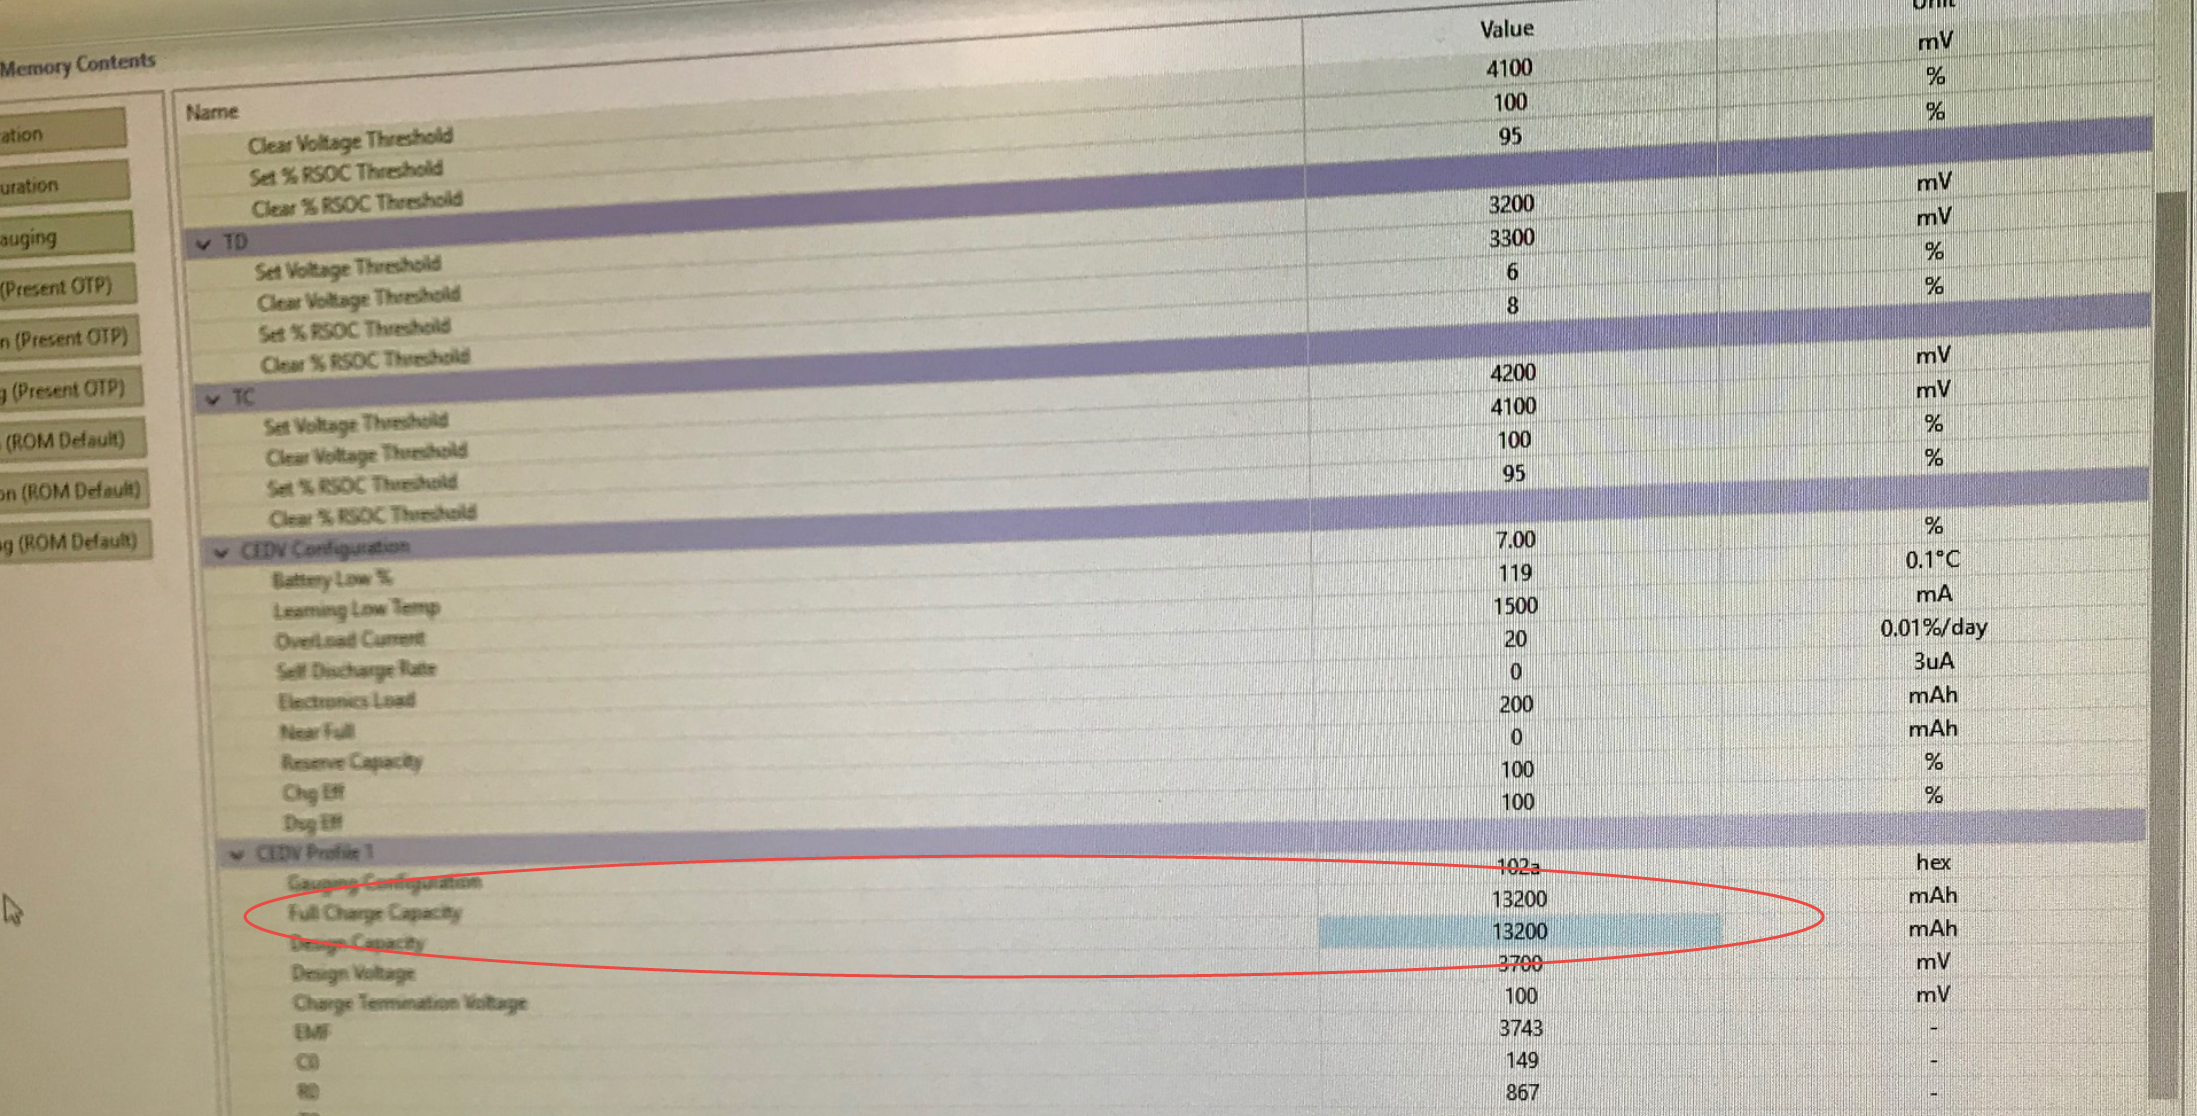
2. Change data memory => Gas Gauging => CEDV Profile 1
 2.1) change Full Charge Capacity value from 3000 to 13200
 2.2) change Design Capacity value from 3000 to 13200


3. Click Write_All option
4. Start calibration process:
 4.1) Calibrate CC Offset and Board Offset
 4.2) Calibrate Voltage
 4.3) Calibrate Current. (can see neg value),
 All Calibrate Gas Gauge is TICKED after calibration
 4.4) EXIT_CFG_UPDATE
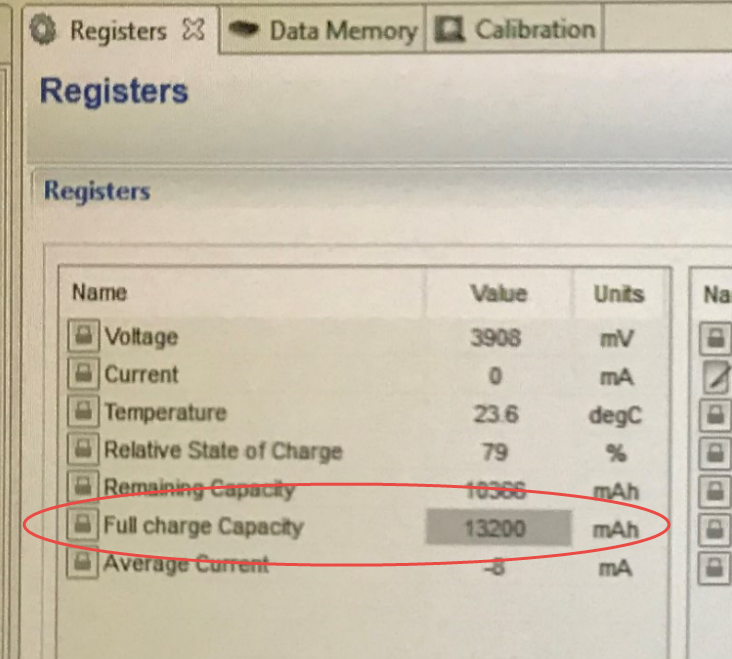
5. Go the Registers page, a continuous Refresh show the Full Charge Capacity (FCC) value has changed from the default 3000mAH to 13200mAH.

Questions

1: Please let me know if my steps above is correct or missing any steps.
2. Can I check if I can skip the calibration steps (all in step 4 above)? We have tried to skipped it, but the result is the FCC value in step 5 is not updated after that. Why is that so? If calibration accuracy is assume correct, why we cannot skip the calibration?

Questions:

1: Please let me know if my steps above is correct or missing any steps.
2. Can I check if I can skip the calibration steps (all in step 4 above)? We have tried to skipped it, but the result is the FCC value in step 5 is not updated after that. Why is that so? If calibration accuracy is assume correct, why we cannot skip the calibration?
 
3. My customer do not want to write to OTP after they generate the golden file but they want to be able to write this golden file to BQ27220 data flash at boot up of AM3352. Do you have any example source code to configure the BQ27220 via I2C at startup from the AM3352 Sitara processor?

Best Regards,

kpk

  • hi KPk,
    1. You need to enter and after the process exit cfg update mode for the values you wrote to stay
    2.if the gauge voltage current and temperature and offset measurements are ok by you, then you do not need to calibrate. Make sure to exit cfg update mode
    3. There is no sample code for that specific processor however, see app note bleow.

    www.ti.com/.../slua801.pdf
    Hope that helps point you in the right direction


    thanks
    Onyx
  • hi Onyx,

    Thx, got the Gauge to work without calibration steps with the following steps:

    1. Unseal

    2. UnSeal Full Access

    3. Enter CFG Update

    4. Change the Design Capacity & FCC  -> Write ALL

    5. Exit CFG Update REINIT (NOTE : Yesterday we were doing “Exit CFG Update”. This will not update the registers, strange!)

    6. Both Design Capacity & FCC are updated correctly.

    Question: Can you help me to check if I translate all this step into the below correctly?

    Step 1. Unseal


    wr 0x00 0x14


    wr 0x01 0x04


    wr 0x00 0x72


    wr 0x01 0x36

    Step 2. Unseal Full Access


    wr 0x00 0xff


    wr 0x01 0xff


    wr 0x00 0xff


    wr 0x01 0xff

    Step 3: ENTER_CFG_UPDATE


    wr 0x00 0x90 0x00


    rd 0x3b Operationstatus();

    Step 4: Change Design Capacity (DC)


    DC= 0x929F

    wr 0x3E 0x9F


    wr 0x3F 0x92


    rd 0x60 Old_Chksum


    rd 0x61 Data_len


    rd 0x40 Old_DC_MSB


    rd 0x41 Old_DC_LSB


    wr 0x40 0x33


    wr 0x41 0x90


    temp = mod(255 – Old_Chksum – OLD_DC_MSB – OLD_DC_LSB, 256);

    New_Chksum = 255 – mod(temp + 0x33 + 0x90, 256);


    wr 0x60 New_Chksum


    wr 0x61 Data_len

    Step 5: Change FCC


    FCC= 0x929D

    wr 0x3E 0x9D


    wr 0x3F 0x92


    rd 0x60 Old_Chksum


    rd 0x61 Data_len


    rd 0x40 Old_FCC_MSB


    rd 0x41 Old_FCC_LSB


    wr 0x40 0x33


    wr 0x41 0x90


    temp = mod(255 – Old_Chksum – OLD_FCC_MSB – OLD_FCC_LSB, 256);

    New_Chksum = 255 – mod(temp + 0x33 + 0x90, 256);


    wr 0x60 New_Chksum


    wr 0x61 Data_len

    Step5: EXIT_CFG_UPDATE_REINIT


    wr 0x91 0x00


    rd 0x3b OperationStatus();

    Step6: SEAL


    wr 0x00 0x30 0x00


    Q2: Is there a shortcut where I can change Design Capacity and FCC in one shot before I update the checksum?  

    Hope to hear from you soon.


    Best regards, kpk


  • Hi KPK,
    Have you looked at our app note below:
    www.ti.com/.../slua801

    your steps in one looks correct and for Q2,you can do block writes to update the data in that register all at once.

    thanks
    Onyx