

Looking for a creative project to reinforce wireless connectivity and the Internet of Things to your students? Here’s one for you – teach your students how to spin a servo from the cloud using the SimpleLink MSP432™ LaunchPad development kit. While this applies to all levels, it is best suited for seniors who may be looking to add wireless control to their senior design projects. Unlike many other cloud services with extensive set-up, Blynk has minimal set-up and operates on a mobile device – a common object for nearly all students.
Hardware Components
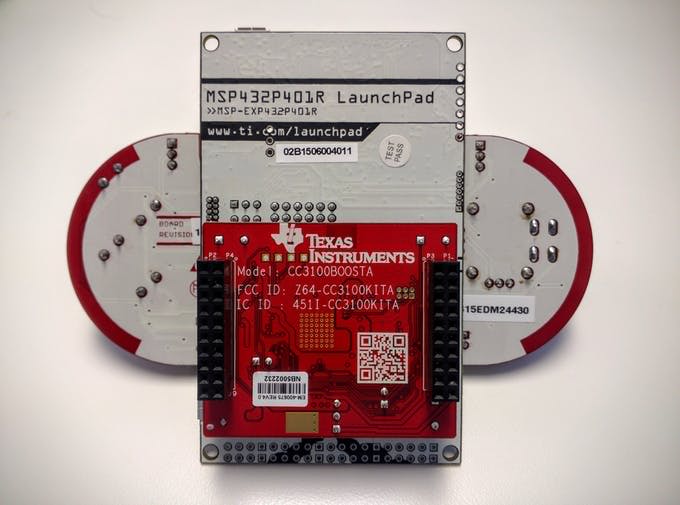
- SimpleLink™ MSP432P401R microcontroller (MCU) LaunchPad™ development kit
- SimpleLink™ Wi-Fi® CC3100 wireless network processor BoosterPack™ plug-in module
- TI BOOSTXL-EDUMKII Educational BoosterPack MK II
Software Apps & Online Services
Before you get started
This tutorial will walk you through all the labs and should point you to all the resources you need to get started with TI hardware and the Internet of Things (IoT). Before you start, download Energia from www.energia.nu/download. For windows, unzip the folder to C:/ti/energia. Be sure to follow the rest of the instructions for your OS in the installation guide (linked below.)
Note: Some of the images in this tutorial show the old version of the SimpleLink MSP432™ LaunchPad development kit which is black. The new red MSP432 LaunchPad kit will function the same.
Useful links:
- Energia installation guide
- Energia API reference guide
- MSP432 Pinmap
- CC3100 Pinmap
- Educational BoosterPack MKII Pinmap

Lab 0: Blink an LED

The goal of this lab is to verify the hardware and software is setup correctly and to give the student a first taste of rapid prototyping in Energia.
1. Plug in your TI LaunchPad kit with the supplied USB cable.
2. Open Energia. Navigate to Tools > Boards > Board Manager. Install the Energia MSP432 MCU boards files.
3. From the Tools menu at the top of the window, select Boards > LaunchPad kit w/ MSP432 EMT (48MHz).
4. From the Tools menu at the top of the window, select Serial Port, and then pick the serial port associated with your MSP432 MCU LaunchPad kit.
5. From the File menu at the top of the window, select Examples > 01. Basics > Blink. This will open the blink example program.
6. Examine the code to see the basic structure of the program.
a. All Energia programs have two required functions: setup() and loop().
i. Setup() is run once at startup
ii. Loop() runs continuously after that
b. pinMode is used to set the direction of a GPIO.
c. digitalWrite is used to set the state of a GPIO.
d. delay pauses execution for a given number of milliseconds.
7. Click the red arrow pointing to the right at the top left of the Energia window. This will compile and upload your program to the board.
8. After programming completes verify that the red LED is blinking on your LaunchPad.
9. To take this a step further try:
a. Fading the LEDs by changing the calls from digitalWrite to analogWrite.
b. Try using the other colored LEDs on the board
i. RED_LED
ii. GREEN_LED
iii. BLUE_LED
Lab 1: Spin a Servo
In this lab, we will use the Educational BoosterPack MKII (Edu BP MKII) to spin the servo motor. The goal of this lab is to familiarize the student with the concept of a BoosterPack plug-in module and how software libraries can speed development of advanced applications. You can find the example code inside of Energia and on www.energia.nu/edumkii.
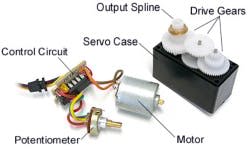
Diagram of a Servo. In our use case, the Joystick is the potentiometer.
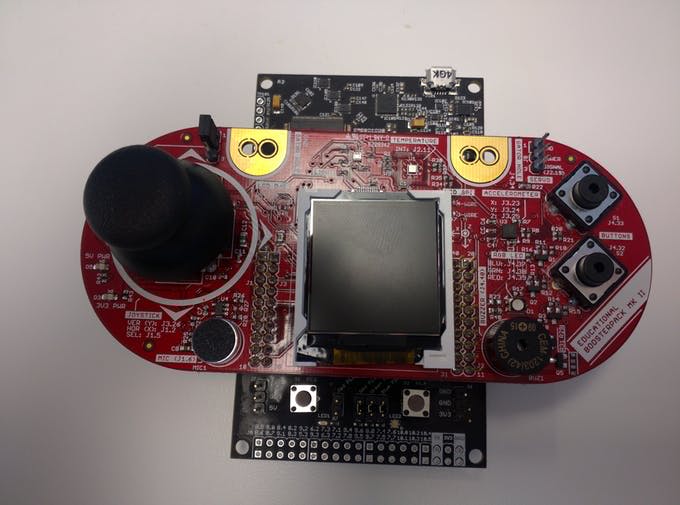
1. Plug the Educational BoosterPack MKII into the MSP432 MCU LaunchPad kit's BoosterPack headers.
2. Plug the Servo connector into the servo header on the EDU BP. Make sure the white wire is connected to SIGNAL, the red wire is connected to POWER, and the black wire is connected to GROUND.

3. Connect your MSP432 MCU LaunchPad kit to your computer. Navigate to File > Examples > EducationBP_MKII > ServofromJoystick.
4. In the setup() function, add the following line:
|
This tells the LaunchPad kit what resolution to use when reading analog values. Your setup function should now look like this:
void
|
5. Click the red upload arrow. After compiling and download, your code will start running! Use the joystick to move the servo left and right. Verify your servo is moving properly.
Lab 2: Controlling the Servo from the Cloud
In this lab, we are going to use an app called Blynk to spin a servo from a smartphone. The goal of this project is to get an MSP432 MCU + CC3100 wireless network processor connected to a Blynk app on either your Android or iOS device. Blynk is an IoT platform that lets you create a custom mobile app to communicate with an internet connected microcontroller.
1. First, let's create the mobile application. To start, create a Blynk account by installing the Blynk app on your Android or iOS device. You'll need to create a new account. Once you create your account, you should see this screen. Click the + button to create a new project.

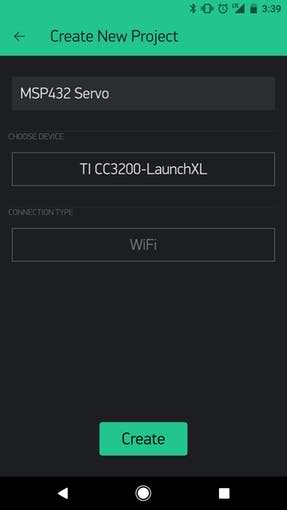
2. In the app, click the + button to create a new project. Name your project, and select TI-CC3200-LaunchXL for your hardware. The connection type will be WiFi.
3. Next, add the necessary widgets to your app with the + button. For this lab, we will just need a Joystick.


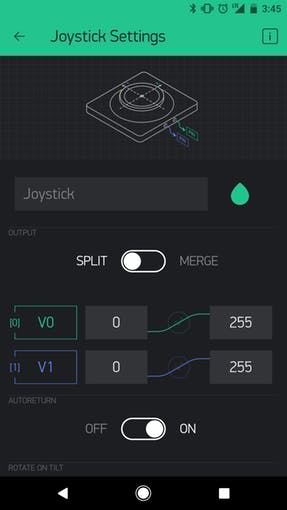
4. After you add the joystick, tap it to configure it. Configure the joystick as shown below. Each of the widgets is assigned a virtual pin. We will use these virtual pins in the embedded code to communicate with the app. For this lab, we will connect the X-axis of the joystick to pin V0 and the Y-axis to pin V1. You will see in the code below where we will read the value of V0 and write it to the servo motor, just like in Lab 1.
5. Now, download the Blynk libraries here. Extract the .zip file and copy the folders inside the Libraries folder to \Documents\Energia\libraries (this may vary depending on where your sketchbook is. To check, go to File > preferences.)
6. Plug in the Wi-Fi CC3100 BoosterPack plug-in module to the bottom of your LaunchPad. Make sure the text on the BoosterPack and the LaunchPad kit are both oriented in the same direction.
7. Launch Energia and create a new project. Copy the code found in the download below, add in your authorization token (emailed to you from Blynk) and your Wi-Fi credentials. Make sure you have MSP432 MCU LaunchPad kit selected in Tools > Board and the correct port selected in Tools > Serial Port.
8. Press the "play" button in the Blynk app to deploy your app.
9. Click the red upload arrow in Energia and open the serial terminal with the magnifying glass in the upper right corner of the window. In the serial terminal, you should see the LaunchPad kit connect to your Wi-Fi network and display the value of the joystick that is being written to the servo.
10. Move the joystick in the Blynk app left and right to see your servo spin left and right.
CODE
#define BLYNK_PRINT Serial    // Comment this out to disable prints and save space
#include <SPI.h>
#include <WiFi.h>
#include <WiFiClient.h>
#include <BlynkSimpleEnergiaWiFi.h>
#include <SimpleTimer.h>
#include <Servo.h>
Servo myservo;
int potpin = 2;  // analog pin used to connect the potentiometer
int val;    // variable to read the value from the analog pin
// You should get Auth Token in the Blynk App.
// Go to the Project Settings (nut icon).
char auth[] = "XXXXXXXXXXXXXXXXXXXX"; //Use your auth token from the app
SimpleTimer timer;
// Your WiFi credentials
char ssid[] = "WiFi SSID HERE";
char pass[] = "WiFi PASSWORD HERE";        // Set to "" for open networks

void setup()
{
  //Open a serial terminal with the PC
  Serial.begin(9600);
  Serial.println("Begining...");
  //Set up a blynk connection with your WiFi credentials
  Blynk.begin(auth, ssid, pass);
  Serial.println("Connected to Blynk...");
  while (Blynk.connect() == false) {
    // Wait until connected
  }
  myservo.attach(19);
}

// Virtual Pin 1 - Toggles the LED high or low depending on the mobile app input
BLYNK_WRITE(V0)
{
  int i = param.asInt();         //Read the X-Axis value and save it to the variable i
  BLYNK_LOG("Got a value: %s!", param.asStr());
  val = map(i, 0, 255, 0, 180);  // scale it to use it with the servo (value between 0 and 180)
  myservo.write(val);            // sets the servo position according to the scaled value
}

// The main loop listens for commands from the mobile app
void loop()
{
  Blynk.run();
  timer.run();
}
Download code above.
Conclusion
And that’s it! You did it! If you have any questions or had any complications while walking through this tutorial, be sure to leave a comment in the below and we’ll try to answer any questions you may have.
Check out our other tutorial content:
