

This project will walk through how easy it is to interface the Texas Instruments LaunchPad™ development kit with Temboo's online service to quickly prototype an Internet of things (IoT) device. The beauty of the Temboo service is its ability to make interacting with APIs simple. Here we will use the Twilio API to create and send an SMS triggered by a change in the Educational BoosterPack™ MKII's accelerometer readings. As the user we simply have to set up an account with both Temboo and Twilio, fill in some settings and slightly modify some Temboo-generated code.
Account Set Up
Setting up a Temboo account is the first step required in creating this fall detector. Fortunately, Temboo makes it very easy to get up and running.
1. Getting set up in Temboo
Create a Temboo account and navigate to the Twilio library section which can be found here.
2. Getting set up in Twilio
Follow the instructions to get a Twilio account in order to enable Temboo-triggered voice calls or SMS messages. The sign up link for Twilio can be found on the Temboo library page as well as here.
After getting Twilio set up, follow the steps provided to register the phone number you want alerted when your device falls.
Gather your Twilio API key from the user dashboard page. This can be found here.
3. Bring them both together
Once Twilio is set up, it is time to sit back and let Temboo do the work for us. Navigate to the SendSMS Choreo, also found here.
Building the Project
1. Connecting your LaunchPad to the network
First, make sure that the "IoT Mode" toggle switch found in the top right of the page is set to “on”. This will unlock some new settings at the top of the page. Make sure to select "Texas Instruments LaunchPad" for hardware. For the connection, if this is your first time using Temboo, you will have to set up the Internet connection. We will be using the SimpleLink™ Wi-Fi® CC3100 BoosterPack plug-in module to connect to the network, so select that from the drop down. Fill in your network settings and give it a convenient name so you can save the settings and do not have to set up the connection every time. Go ahead and ignore the "Want to stream sensor data?" drop down for this project, as it will not be used.
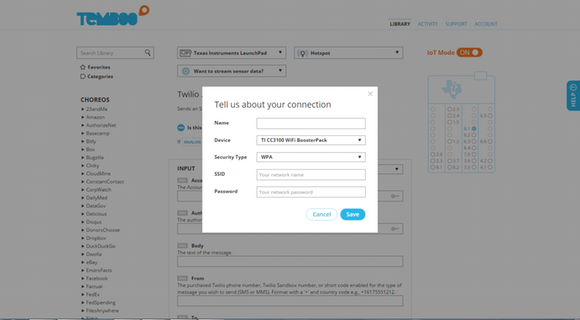
Setting up the connection through Temboo
2. Adapting the code to be triggered by an event
Hit the plus sign next to "Is this Choreo triggered by a sensor event?”. By default this Choreo will trigger when pin 6.1's analog value drops down to zero. Leave this as a default. We will edit it in the code later, but it is important to have the conditional added.
3. Connecting to the Twilio API
In the input section, fill in the AccountSID and AuthToken from the user Twilio dashboard. This should have been found in Step 2 of the account set up. The Body is simply the text that you would like to be sent to your phone to indicate when the device has been knocked over. The "From" number is also from your Twilio profile. The "To" number is the number that you would like to send the SMS to. It is important to make sure that you have registered this number with Twilio or else the Choreo will fail.
4. Saving the Twilio profile in Temboo
Once everything is filled in, press the "save" button next to the "Select Profile" drop down. Give your Twilio profile a name, and make sure to remember it for later.

Finalized settings on Temboo to communicate with the Twilio service
5. Test the Choreo
That's all it takes from the Temboo side! We are almost completely done. Go ahead and hit the "Run" button on the Temboo page. This should return with a success and trigger a text message. This means that everything is set up and we are ready to copy our code into Energia, where we need to make a couple of changes.
6. Set up the accelerometer event
Download AccelTxt.ino and open it in Energia. This code was created using the Temboo code as a foundation and manipulated to use the accelerometer from the Educational BoosterPack to trigger the SMS instead of the default analog pin 6.1. Make sure to change line 110, SendSMS.setProfile("Twilionum"), and rename the profile to the same name you gave in step four of building the project. Take some time to compare the differences between the code on Temboo's site and AccelTxt.ino and realize how similar they are!
7. Edit the Temboo Account Library
The final step is to set up TembooAccount.h, which is a library that the code uses to verify your Temboo account and successfully call Choreos. An example of the library can be found below. All you have to do is change the 'X's' to the values found on your Temboo page. Make sure to add this as a header file to wherever your Energia libraries are stored.
8. Run it!
That’s it! Flash your LaunchPad and open a serial monitor connection. You should see the LaunchPad connect to Wi-Fi using the SimpleLink Wi-Fi CC3100 BoosterPack and then it will start reading out accelerometer values. Once any of the values differ from the initialized values more than the maxChange variable (set by default to 100 in the code below), the sendSMS Choreo will trigger, causing a text to be sent to the recipient specified through Temboo.

Success!
Happy Coding! Have you developed a LaunchPad project using Temboo? Let us know in the comments!
