This thread has been locked.

If you have a related question, please click the "Ask a related question" button in the top right corner. The newly created question will be automatically linked to this question.

TLV320AIC3204EVM-K: AIC3204 CS Programming Loopback with Adaptive Filtering

Part Number: TLV320AIC3204EVM-K
Other Parts Discussed in Thread: TLV320AIC3204

Hey all,

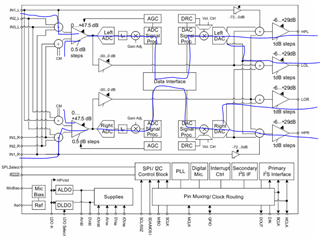
I'm attempting to program a TLV320AIC3204EVM-K board and I'm trying to get the adaptive filtering working with audio loopback. Basically I have routing coming into IN_1L on the board (audio running out of a headphone jack of another device) and have headphones plugged into the headphone output.

I first used the High Performance Stereo Playback setup under Typical Configurations -> Playback - this sets up USB Audio output from my computer and is outputting audio fine from the computer over USB output, but I need the audio to be routed from IN_1L on the board, so I then open Audio Outputs under Analog Settings and enable IN_1L and IN_1R by clicking the checkboxes and now I have audio playing back through headphones.

I then wanted to EQ the audio coming in through IN_1L so I clicked on Adaptive Filtering under Features and it asks if I want to program the device with "Program this device for this feature?" and I clicked "OK". Then audio goes away.

If I adjust the EQ settings for Adaptive Filtering it seems to only affect the USB Audio and it changes routing.

I was trying to put together a script that took the capture values from programming the Adaptive Filtering section and add it to a script that sets up the correct routing.

What do I need to program to keep routing from IN_1L going through the Adaptive Filtering section and out to headphones?

  • Hi,

    You will need to set the path like the following, I have attached here the script to enable loopback from ADC to DAC taken from the typical configuration script from the GUI which enable both the HP and LINE output.

    ###############################################
    # High Performance Stereo Recording
    # ---------------------------------------------
    # PowerTune mode PTM_R4 is used for high
    # performance 16-bit audio. 
    #
    # For normal USB Audio, no hardware change
    # is required.
    #
    # If using an external interface, SW2.4 and
    # SW2.5 of the USB-ModEVM must be set to
    # HI and clocks can be connected to J14 of
    # the USB-ModEVM.
    #
    # IN1L/R is routed to the LADC/RADC in a
    # single-ended manner.
    ###############################################


    ###############################################
    # Software Reset
    ###############################################
    #
    # Select Page 0
    w 30 00 00
    #
    # Initialize the device through software reset
    w 30 01 01
    #
    ###############################################


    ###############################################
    # Clock Settings
    # ---------------------------------------------
    # The codec receives: MCLK = 11.2896 MHz,
    # BLCK = 2.8224 MHz, WCLK = 44.1 kHz
    ###############################################
    #
    # Select Page 0
    w 30 00 00
    #
    # NADC = 1, MADC = 2
    w 30 12 81 82
    #
    ###############################################


    ###############################################
    # Enable Loopback Page 0 register 29
    ###############################################
    #
    # Loopback enable for stereo audio data
    w 30 1D 30
    #
    ###############################################


    ###############################################
    # Signal Processing Settings
    ###############################################
    #
    # Select Page 0
    w 30 00 00
    #
    # Set the ADC Mode to PRB_P1
    w 30 3d 01
    #
    ###############################################


    ###############################################
    # Initialize Codec
    ###############################################
    #
    # Select Page 1
    w 30 00 01
    #
    # Disable weak AVDD in presence of external
    # AVDD supply
    w 30 01 08
    #
    # Enable Master Analog Power Control
    w 30 02 00
    #
    # Select ADC PTM_R4
    w 30 3d 00
    #
    # Set the input powerup time to 3.1ms (for ADC)
    w 30 47 32
    #
    # Set the REF charging time to 40ms
    w 30 7b 01
    #
    ###############################################


    ###############################################
    # Recording Setup
    ###############################################
    #
    # Select Page 1
    w 30 00 01
    #
    # Route IN1L to LEFT_P with 20K input impedance
    w 30 34 80
    #
    # Route Common Mode to LEFT_M with impedance of 20K
    w 30 36 80
    #
    # Route IN1R to RIGHT_P with input impedance of 20K
    w 30 37 80
    #
    # Route Common Mode to RIGHT_M with impedance of 20K
    w 30 39 80
    #
    # Unmute Left MICPGA, Gain selection of 6dB to make channel gain 0dB
    # Register of 6dB with input impedance of 20K => Channel Gain of 0dB
    w 30 3b 0c
    #
    # Unmute Right MICPGA, Gain selection of 6dB to make channel gain 0dB
    # Register of 6dB with input impedance of 20K => Channel Gain of 0dB
    w 30 3c 0c
    #
    # Select Page 0
    w 30 00 00
    #
    # Power up LADC/RADC
    w 30 51 c0
    #
    # Unmute LADC/RADC
    w 30 52 00
    #
    ###############################################
    
    
    ###############################################
    # High Performance Stereo Playback
    # ---------------------------------------------
    # PowerTune mode PTM_P3 is used for high
    # performance 16-bit audio. For PTM_P4,
    # an external audio interface that provides
    # 20-bit audio is required.
    #
    # For normal USB Audio, no hardware change
    # is required.
    #
    # If using an external interface, SW2.4 and
    # SW2.5 of the USB-ModEVM must be set to
    # HI and clocks can be connected to J14 of
    # the USB-ModEVM.
    #
    # Audio is routed to both headphone and
    # line outputs.
    ###############################################


    ###############################################
    # Clock Settings
    # ---------------------------------------------
    # The codec receives: MCLK = 11.2896 MHz,
    # BLCK = 2.8224 MHz, WCLK = 44.1 kHz
    ###############################################
    #
    # Select Page 0
    w 30 00 00
    #
    # NDAC = 1, MDAC = 2
    w 30 0b 81 82
    #
    ###############################################


    ###############################################
    # Signal Processing Settings
    ###############################################
    #
    # Select Page 0
    # w 30 00 00
    #
    # Set the DAC Mode to PRB_P8
    w 30 3c 08
    #
    ###############################################


    ###############################################
    # Playback Setup
    ###############################################
    #
    # Select Page 1
    w 30 00 01
    #
    # De-pop
    w 30 14 25
    #
    # Route LDAC/RDAC to HPL/HPR
    w 30 0c 08 08
    #
    # Route LDAC/RDAC to LOL/LOR
    w 30 0e 08 08
    #
    # Power up HPL/HPR and LOL/LOR drivers
    w 30 09 3C
    #
    # Unmute HPL/HPR driver, 0dB Gain
    w 30 10 00 00
    #
    # Unmute LOL/LOR driver, 0dB Gain
    w 30 12 00 00
    #
    # Select Page 0
    w 30 00 00
    #
    # DAC => 0dB
    w 30 41 00 00
    #
    # Power up LDAC/RDAC
    w 30 3f d6
    #
    # Unmute LDAC/RDAC
    w 30 40 00
    #
    ###############################################

    You can open the Command-Line Interface window, paste the script and hit the execute Command Buffer to run it. 

    Please check and make sure you can send input and receive the output correctly before moving on to the adaptive filtering.

    After that try with the Adaptive filtering windows.

    Refer to this guide for more information.

    https://www.ti.com/lit/ml/slaa557/slaa557.pdf?ts=1660571790086&ref_url=https%253A%252F%252Fwww.ti.com%252Fproduct%252FTLV320AIC3204%253FkeyMatch%253DTLV320AIC3204%2526tisearch%253Dsearch-everything%2526usecase%253DGPN

    Regards.

  • Hey ,

    Thanks for the help on this. This did resolve my issue, and I have loopback working correctly now, however, I do have some bugs and just wanted to ask if things are working correctly.

    After programming the EVM from the Command Line Interface with the code you provided, I went to click on Adaptive Filtering and if I click on "OK" when asked "Program this device for this feature?" audio stops passing through to the headphones. While that panel is still up, if I open the Command Line Interface window and press Execute Command Buffer again to program it with the loopback code you attached, then audio passes through and if I start to adjust things on the Adaptive Filtering, it seems to work, but seems to not react all the time. Sometimes changing the values for some of the biquads seem like nothing is changing. This is more of a report that it seems buggy and I'm not sure if me programming it while the Adaptive Filtering window is up causes any of these issues. Any thoughts?

    It also seems almost impossible to completely roll off high end treble with a shelf. Is the solution here to stack the biquads at the same frequency to increase the slope for the roll off?

  • The script provided has the loopback enabled, but does not enable the adaptive filtering as I don't know which path are you testing ADC/DAC.

    Please refer to the reference guide provided above for more information on adaptive filtering section 2.3.3.2.7 for ADC and 2.4.5.3 for DAC.

    In order to change the filter while ADC/DAC is running you need to enable adaptive filtering; see respective section above.

    You can check the coefficients on the Register Tables starting on Page 8 or the in the command line interface.

  • Understood. That makes sense.

    I was going to program the EQ/Adaptive Filtering in the ADC path and then enable Dynamic Range Compression on the DAC. I'll look more into the coefficients and register tables.

    So is my understanding correct that you can program the ADC or DAC biquads only before power up unless Adaptive Filtering mode is enabled? In that case, the processing blocks can be changed in real time? I want to make sure I'm approaching this correctly for my application.

    I will be powering up the TLV320AIC3204 with a "preset" EQ setting, but I will be allowing them to change EQ settings in real time, so I assume I will just want Adaptive Filtering mode enabled on the ADC and proceed with that as the configuration. Otherwise, the ADC would need to be powered down, updated and then powered back on, correct?

    Another question - is there any reason for enabling Adaptive Filtering in the ADC versus the DAC? Or is this just more of a design choice when it comes to my signal path requirements?

  • Yes if it's user programmable filters you need to recycle the power or enable the adaptive filtering mode to change while it's running.

    ADC/DAC filtering is design choice.

  • Got it. When Adaptive Filtering mode is enabled, with the GUI, which processing blocks does that program? The ADC or the DAC blocks?

  • With EVM connected, press the "Record" button in Command Line Interface and hit "OK" when opening the Adaptive Filtering to program the device.

    Look for Page 0 Register 60 (DAC PRB) or Page 0 Register 61 (ADC PRB) in the recorded script, it will tell you what's set.