This thread has been locked.

If you have a related question, please click the "Ask a related question" button in the top right corner. The newly created question will be automatically linked to this question.

LMC555: Hi Kato or anyone who can help . Question is related to the CMOS LMC 556 1.5 V supply - From Andrew , North Wales - UK

Part Number: LMC555
Other Parts Discussed in Thread: LM555, , TLC556, TLC552, TLC555, TINA-TI

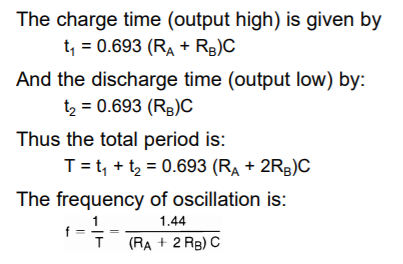
From reading the data sheet I believe I can run a CMOS LMC 556 off a supply voltage of 1.5 V (  One single battery ....... Is it possible to run from a 1.5 v to 3.5 Lithium battery ..watch battery ???? )

The scenario is the user will press Button 1 ( Push to make )  and a miniature LED 1 will be latched ON for 30 seconds ....after the 30 seconds is up , the LED 1 will turn OFF for 30 seconds . LED 1 will continue to go ON for 30 seconds , and you have guessed it..... after 30  seconds .LED 1 will turn OFF ..and so on . This will continue till the USER presses the Push to make  Button  1 for the operation to STOP . It would be good if there was a RESET button 1   .   

Now the same scenario happens with the dual part of the CMOS  LMC 556  . 

Remember this time LED 1 will be OFF  ( no operation unless the user presses Button 1 )...okay !! so

Again the user will now press Button 2 ( Push to make ) and a second miniature LED 2 will now be ON for 25 minutes or 30 minutes .....after the 25 minutes to 30 minutes is up , the LED 2 will turn OFF for either 25 minutes or 30 minutes ..preferably 30 minutes if possible . LED 2 will continue to to go ON for either 25 minutes or preferably 30 minutes , and you have guessed it .....after 25 minutes or preferably 30 minutes  LED 2 will turn OFF   ...and so on . This will continue till the USER presses the Push to make Button 2 for the operation to STOP  . It would be good if there was a RESET button 2 .

Would I need a CMOS LM556 or could I use a standard LMC 556 for this application . I'm trying make the circuit as small as possibly ..not surface mount though ..something I can put on breadboard or veraboard till I can design a pcb .  If anyone can help me with this circuit or has made one then I would be most grateful for your help . 

  • Hi Andrew, 

    The LMC555 is the CMOS version and the LM555 is the bipolar version. They both come in PDIP packages, which are spaced for a breadboard, as well as surface mount if you choose to switch when you finalize your PCB. As far as the dual package, there is no CMOS version of the LM556 (I do not see an LMC556 as you mentioned). The LM556 has a supply voltage range of 4.5V-16V. There is a dual package TLC556 (CMOS) that has a supply voltage of 2V-15V. So it looks like your options are to use a single TLC556 (2V-15V supply), or two LMC555s (1.5V-15V). 

    For your design, these timers are level sensitive, not edge triggered. Your buttons may need to be switches in order to hold the voltage level. Another option is to attach the output of your button to the clock of a D Flip-Flop so that when your button is pressed, the output of the D-FF will be held at high or low voltage. What is the difference of your RESET button 1/2 from the STOP (second push of Button 1/2)? I believe you can configure the timers in astable mode with a 50% duty cycle, and use the timer reset pin as your start and stop. When the reset pin is held low the output will be low, when reset is held high the timer operates as designed. In the dual packages, each timer has its own reset pin. 

    Best,

    Katlynne Jones

  • Hi Andrew,

    TI also offers the TLC552, a dual timer in the TLC555/556 family. It is rated for a minimum supply of 1V and uses the same pinout as the TLC556.

    https://www.ti.com/lit/ds/symlink/tlc552.pdf

    Regards, Thomas

    Precision Amplifiers Applications Engineering

  • Hi Kathryn, 

    First of all thank you so much for replying . I see that you have a Welsh last name . The TLC556 might be an option ,using on/off switches and a reset button would be possible with level sensitive switching rather than edge triggered . I'm trying to keep the cost down , thus eliminating the D Type flip flops. But more important I'm trying to make the P.C.B as small ( Not surface mount components ) as possible . If you have any application circuits incorporating the components to complete my project I would be most grateful as I'm a novice, but I can solder well .

    Kindest Regards 

    Andrew 

  • Dear Thomas 

    First of all thank you for replying , much appreciated .

    The TLC556 was suggested but the TLC552 .

    Does the TLC552 incoprate D type flip flops for Edge triggering or would be better if I just used ON / OFF switchers and a RESET button ?

    I'm trying to keep the cost down , thus eliminating the D Type flip flops. But more important I'm trying to make the P.C.B as small ( Not surface mount components ) as possible . If you have any application circuits incorporating the components to complete my project I would be most grateful as I'm a novice, but I can solder well .

    Kindest Regards 

    Andrew 

  • Hi Katelynne ,

    I do apologize as my last message stated Kathryn . I'm not wearing my reading glasses this evening ...ooops !!

  • Hello Andrew,

    I'll be honest, I am not on top of the different types of flip-flops as I am the precision analog amplifier products that I cover. The TLC556 and TLC552 datasheets show an RS flip-flop, and a RESET pin. I don't think that is exactly the same function as a D flip-flop. You may have a better idea of their equivalency than I do! But do know that the TLC556 and TLC552 do use the same type of flip-flop circuit.

    Regards, Thomas

    Precision Amplifiers Applications Engineering

  • Hi Andrew,

    The TLC552 is still going to be level sensitive like the TLC556. The difference is going to be the lower supply voltage. So either way you're going to need to use on/off switches. I'm attaching a Tina-TI simulation for you. The part number is TLC555 but the operation is going to be the same. You can play around with different combinations of the RA, RB, and C values based on the parts you have available to you. The equations necessary to do so are in the data sheet as well as this FAQ on astable 555 timers. In the simulation I have the timer set up in an astable configuration with a period of 60 seconds, 50% duty cycle (so 30 seconds on/30 seconds off). You can attach any LED you have at the output pin of the timer. Just make sure to limit the current with a resistor. 

    As you can see in the screenshot of the simulation, when the switch is open (connected to VDD) the timer is tuned on. The timer turns off when you close the switch (connected to ground). The switch can be configured in the opposite way if you would like. One thing to note is that the first high pulse is going to be greater than 30s. This is because the capacitor is charging up from zero as can be seen in the simulation. The FAQ that I linked also provides a solution for this if that is important to you. To get the 30 minute circuit, you would duplicate the 30 second circuit but with different values for RA, RB and C.

    I am still wondering what your reset button is doing. How does it different from the on/off functionality of buttons 1 & 2? 

    Best,

    Katlynne Jones

    e2e_Andrew.TSC

  • Hi Katlynne ,

    Thank you once again . Thinking about it I would not need a reset a button as you suggested . AN on/off button for the 30 seconds timer and an on/off button for the 30 minute timer .  I'm hoping an ordinary 1.5 volt battery could power the circuit . I would use miniature L.E.D' s . As you know I'm trying to make the circuit as small as possible with discrete components that I can can put onto veraboard and then hopefully make a little printed circuit board . You mentioned about making the circuit using a computer program called spice . I don't have this program . If you have this software is it possible to make the circuit with software with a glimpse of the inputs and outputs working ? or screen shots .It's a simulation packet if I'm correct .

    I'm so grateful for help you have certainly inspired me . This may sound like a silly question if button 1 ( 30s timer ) and button 2 ( 30 minutes) will one Timer work independently from the other or can you get both to work at the same time or either or . The user decides .

    Thank you once again .

    Kindest Regards

    Andrew 

  • Hi Katlynne ,

    Thank you once again . Thinking about it I would not need a reset a button as you suggested . AN on/off button for the 30 seconds timer and an on/off button for the 30 minute timer .  I'm hoping an ordinary 1.5 volt battery could power the circuit . I would use miniature L.E.D' s . As you know I'm trying to make the circuit as small as possible with discrete components that I can can put onto veraboard and then hopefully make a little printed circuit board . You mentioned about making the circuit using a computer program called spice . I don't have this program . If you have this software is it possible to make the circuit with software with a glimpse of the inputs and outputs working ? or screen shots .It's a simulation packet if I'm correct .

    I'm so grateful for help you have certainly inspired me . This may sound like a silly question if button 1 ( 30s timer ) and button 2 ( 30 minutes) will one Timer work independently from the other or can you get both to work at the same time or either or . The user decides .

    Hi Katlynne  ...... I have downloaded the Tina Simulation Software , never used this before so I'm looking forward to practicing . So the TLC556  atable operation is what I'm going to choose from the library . I guess I select 555 timer from the menu and then enter TLC556 and work around that with VDD which will have a supply of 1.5 volts in my case an then add the ground rail and insert the resistors and capacitors and switches . I'll use a 1 Kohm resisitor to limit the current to the L.E.D'S . 

    Thank you once again .

    Kindest Regards

    Andrew 

  • Hi Andrew,

    I have linked my Tina- TI simulation. You can download it and use the one I have made for you.

    3326.e2e_Andrew.TSC

    I changed the schematic slightly from the one I posted before. This one has the switch in a different place. The 2 switches will work separately button1 will control the 30 second timer and button2 will control the 30 minute timer. You can choose to use one switch to operate both if you want, but you cant change that after you make your pcb. I don't think the Tina-TI TLC556 model shows the dual timers, so you would just have to use two (the real parts has them both in one chip). Also remember that the TLC556 minimum supply is 2V. So if you do want to supply with 1.5V then you would need to choose the TLC552 like Tom suggested. They all work the same for the most part and for your purposes I don't think the difference matters besides the supply voltages.

    Tina-TI is great for simulating circuits before making them on a breadboard. There are a lot of tutorials on TI.com and YouTube if you need help. In your case you will want to run transient simulations to see how the timer is working over time. 

    Best,

    Katlynne Jones

  • Hi Katelynne ,

    Thank you once again . You mentioned that when Button 1 is open the 30 second pulse would run longer than 30 seconds because of the capacitor charging , do you know much more time ? also thinking about the on / off buttons configured in the opposite way maybe better, as the use presses the button down the LED would light up ..a little more than 30 seconds as you stated before the pulses stabilized at roughly 30 seconds switching on and off .

    Once you have constructed the circuit using the Tina Simulation program what do you press in order see the LED go on and off  and the wave forms etc ??

    The simulation output .

    Thank you once again 

    Kindest Regards

    Andrew 

  • Hi Andrew,

    I'm attaching a screenshot of the last schematic I made for you. It fixes the longer first pulse problem. When the switch is closed the timer is turned off. At 200s on my simulation you can see that the timer is quickly turned off and then back on (switch closes then opens). 

    On/off is relative to the button you're using. You can buy buttons that are push to break rather than push to make. But remember, for this to work without adding D Flip Flops, the button needs to be held in the on position or off position while you want the timer to be operating or not operating. Have you already purchased a button? I would recommend using a slide switch instead. This configuration is a clever way to fix the longer first pulse problem without adding a lot of extra parts. If you do want the switch to work the other way and you want to solve the longer first pulse problem, you would need to use something like Figure 16 in the astable FAQ (which adds an extra transistor and diodes) where reset would be the switch you are controlling. This FAQ explains how much longer the first pulse will be (59% longer) and gives suggestions on how to fix it.

    To get the simulation to run you select Analysis and preform a transient simulation. You will not see the LED light up, but in the simulation you can view the voltage at the LED by adding a voltage meter which will let you know if it's on or off. This Tina-TI training series can help you if you need more help with simulations. Make sure to use a Time-Controlled Switch to act as your on/off button. You can double click on the switch and select when you want the switch to be opened or closed. When you run the transient simulation, the switch will be open/closed at the times you selected. 

    Best,

    Katlynne Jones

  • Hi Andrew,

    I'm attaching a screenshot of the last schematic I made for you. It fixes the longer first pulse problem. When the switch is closed the timer is turned off. At 200s on my simulation you can see that the timer is quickly turned off and then back on (switch closes then opens). 

    e2e_Andrew_v1.TSC

    On/off is relative to the button you're using. You can buy buttons that are push to break rather than push to make. But remember, for this to work without adding D Flip Flops, the button needs to be held in the on position or off position while you want the timer to be operating or not operating. Have you already purchased a button? I would recommend using a slide switch instead. This configuration is a clever way to fix the longer first pulse problem without adding a lot of extra parts. If you do want the switch to work the other way and you want to solve the longer first pulse problem, you would need to use something like Figure 16 in the astable FAQ (which adds an extra transistor and diodes) where reset would be the switch you are controlling. This FAQ explains how much longer the first pulse will be (59% longer) and gives suggestions on how to fix it.

    To get the simulation to run you select Analysis and preform a transient simulation. You will not see the LED light up, but in the simulation you can view the voltage at the LED by adding a voltage meter which will let you know if it's on or off. This Tina-TI training series can help you if you need more help with simulations. Make sure to use a Time-Controlled Switch to act as your on/off button. You can double click on the switch and select when you want the switch to be opened or closed. When you run the transient simulation, the switch will be open/closed at the times you selected. 

    Best,

    Katlynne Jones

  • Hi Katlynne ,

    Thank you so much . I can't wait to purchase the components and make the circuit . I wonder if Texas Instruments have a branch I can purchase the TLC552  in the UK .  Thank you once again . You have made one Welshman very happy and I hope to send you a picture of the circuit when it is completed .

    Kindest Regards

    Andrew 

  • Hi Andrew,

    You are very welcome. Please let me know if you have any more questions as you continue your design. You can order your parts and have them shipped to the UK from TI.com or find an authorized distributor. I'm going to mark this thread as closed for now but you can still respond to this post or create another post if you run into any other issues.

    Good luck!

    Katlynne Jones