This thread has been locked.

If you have a related question, please click the "Ask a related question" button in the top right corner. The newly created question will be automatically linked to this question.

DLP3010EVM-LC: Problem with image projection after boot initialization

Part Number: DLP3010EVM-LC
Other Parts Discussed in Thread: DLP3010LC

Tool/software:

Hello, engineer.
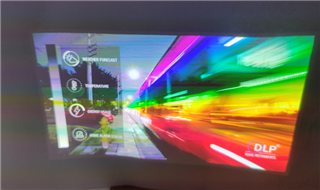
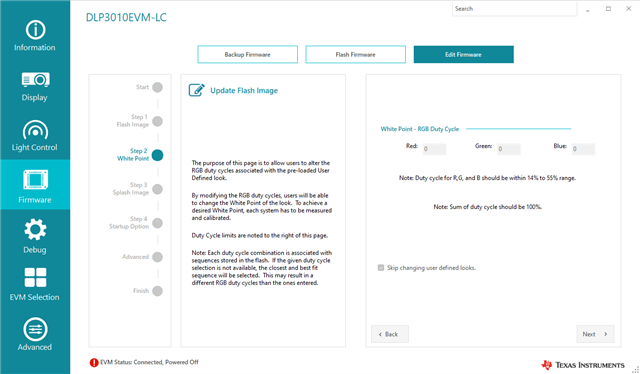
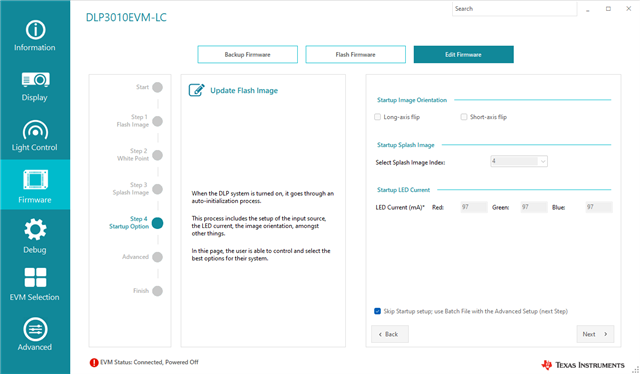
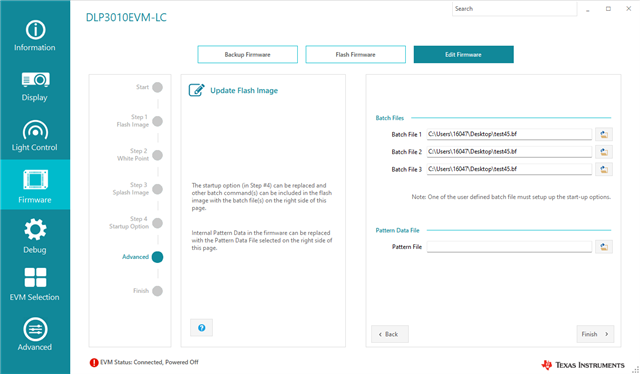
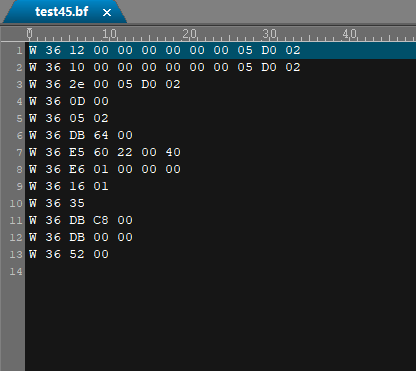
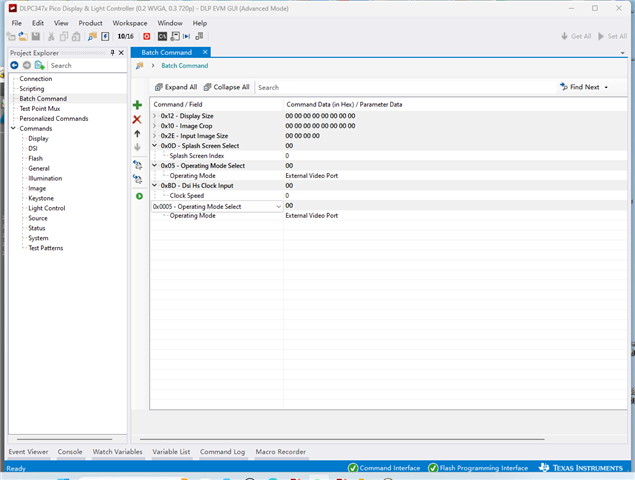
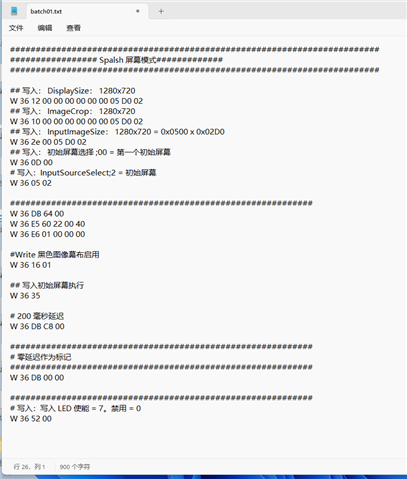
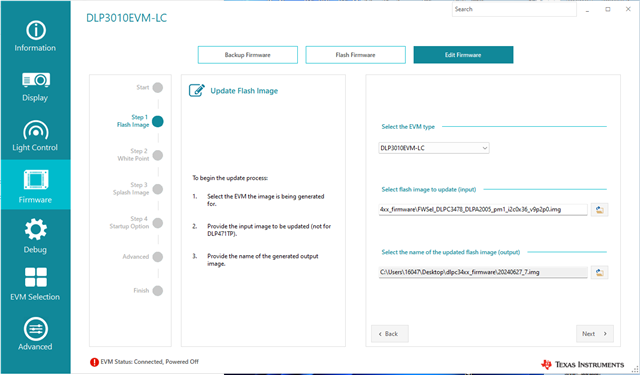
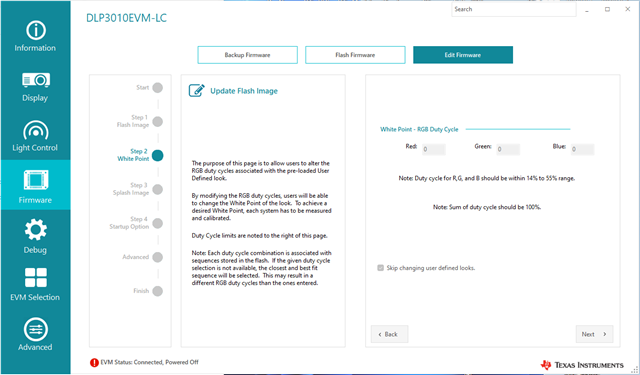
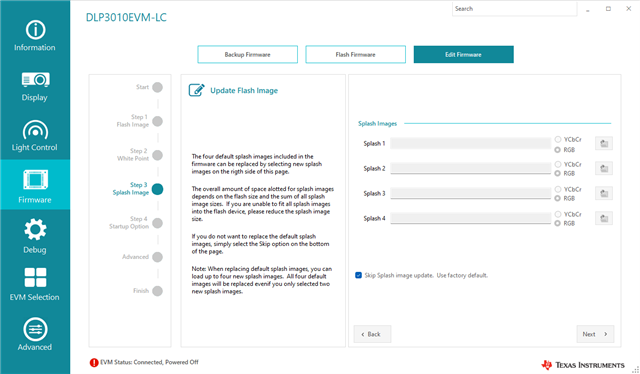
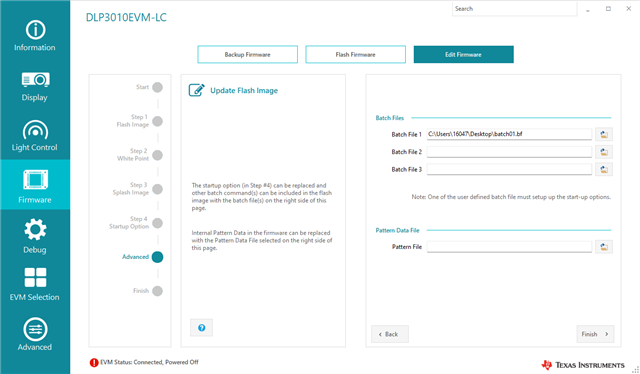
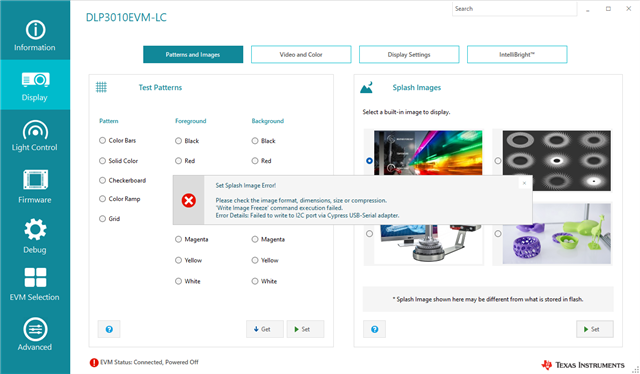
I would like to ask you a question, that is, DLP3010EVM-LC will project a picture by default after power-on initialization, before using IIC for any command control. I want to know how to make FLASH firmware, can make DLP3010EVM-LC after powering up, after initialization without projecting pictures? The following image is the projection image after the DLP is powered on and initialized.Ask the engineer how to solve this problem

  • Hello,

    You may use the DLP EVM GUI to edit the firmware and replace the splash screens. In the GUI go to Firmware -> edit firmware, and then follow the steps.

    Best,

    Maximus

  • Hello,

    I know how to replace splash screens. I don't mean to replace splash screens. What I mean is that when I power up the EMV board and initialize it, it will project the image itself before I use the IIC to control it. I want it to power up and not project pictures after the initialization is complete, but wait until I use the IIC control to project pictures.

  • Hello,

    Thanks for clarifying this, in order to change the startup option you should edit the Auto-Init batch file. Once you have edited the batch file and are editing firmware via the GUI please place this batch file as batch file #1. In your application, you would most likely want to enable a black image curtain before the write splash execute.

    Best,

    Maximus

    Below is an example DLP3010LC system auto-init bactch file:

    ########################################################################
    ################# Spalsh Screen Mode #############
    ########################################################################

    ## Write: DisplaySize: 1280x720
    W 36 12 00 00 00 00 00 05 D0 02
    ## Write: ImageCrop: 1280x720
    W 36 10 00 00 00 00 00 05 D0 02
    ## Write: InputImageSize: 1280x720 = 0x0500 x 0x02D0
    W 36 2e 00 05 D0 02
    ## Write: Splash screen select ; 00 = First Splash screen
    W 36 0D 00
    # Write: InputSourceSelect; 2 = Splash screen
    W 36 05 02

    ###########################################################
    W 36 DB 64 00
    W 36 E5 60 22 00 40
    W 36 E6 01 00 00 00

    ## Write Splash screen execute
    W 36 35

    # 200 ms delay
    W 36 DB C8 00

    ###########################################################
    # Zero delay as a marker
    ###########################################################
    W 36 DB 00 00

    ###########################################################
    # Write: WRITE LED ENABLE = 7. DISABLE = 0
    W 36 52 07

  • Hello,
    I have tested the batch file you said, but it still can not solve my problem, you look at the batch file I wrote below, I only wrote "W 36 52 00", in theory, I should turn off the RGB three lights when I power on, but the power initialization will still light up, and then turn off the RGB three lights. Why is that? I feel that after the power-on initialization, I will first project a picture before executing the batch file I wrote.


    The phenomenon is as follows:

    As you can see from the video above, after the initialization is successful, an image will be projected and then closed, which is the black and white square image on the right. So my guess is that before executing the batch file, the DLP optical machine will first project a picture of a black and white square.

    Let me describe again the functionality I want. Because I now make DLP projection boards by myself, I need to make a product, but the power supply capacity of my circuit board is relatively weak, so a bright picture after the power-on initialization requires relatively large current. However, the power supply capacity of my circuit board is relatively weak, resulting in unsuccessful initialization and inability to project at the back. Only when I unplug the wire connected to the RGB three-color light, then power on the initialization, and then connect the RGB three-color light wire to the circuit board, this time can be normal projection. So I wanted to do the power-on initialization without letting the DLP project anything, so that the DLP board I made myself could be successfully initialized.

  • Hello, 

    Can you send the batch file which you have written? I do not believe it attached to your previous comment. I can look over it and see how to best solve your issue. Though I believe using the command Write Display Image Curtain (16h) to write a black image curtain will be best in your case, you would have to do this before Write Execute Display

    If you simply want a lower brightness image on startup, you may also lower the LED currents in the batch file. 

    Best,

    Maximus

  • hello,

    Here is my code using the batch file

    ########################################################################
    ################# Spalsh Screen Mode #############
    ########################################################################
    
    ###########################################################
    # Write: WRITE LED ENABLE = 7. DISABLE = 0
    W 36 52 00

    How to Write the command Write Display Image Curtain (16h)? Can you write a batch file that you think can solve my problem to me?

  • Hello,

    Please see below, I have verified this works. Your front end will have to disable the image curtain whenever it is ready to project by writing

    W 36 16 00

    Best,
    Maximus

    ########################################################################
    ################# Spalsh Screen Mode #############
    ########################################################################

    ## Write: DisplaySize: 1280x720
    W 36 12 00 00 00 00 00 05 D0 02
    ## Write: ImageCrop: 1280x720
    W 36 10 00 00 00 00 00 05 D0 02
    ## Write: InputImageSize: 1280x720 = 0x0500 x 0x02D0
    W 36 2e 00 05 D0 02
    ## Write: Splash screen select ; 00 = First Splash screen
    W 36 0D 00
    # Write: InputSourceSelect; 2 = Splash screen
    W 36 05 02

    ###########################################################
    W 36 DB 64 00
    W 36 E5 60 22 00 40
    W 36 E6 01 00 00 00

    #Write black image curtain enable
    W 36 16 01

    ## Write Splash screen execute
    W 36 35

    # 200 ms delay
    W 36 DB C8 00

    ###########################################################
    # Zero delay as a marker
    ###########################################################
    W 36 DB 00 00

    ###########################################################
    # Write: WRITE LED ENABLE = 7. DISABLE = 0
    W 36 52 07

  • hello,

    Can you see if the batch file is written like this:

    It will still project a very bright grid image with black edge at startup before projecting a darker image. I don't want him projecting that bright picture.

  • hello,

    I'll describe here why I want the DLP component not to project a very bright picture when powering on initialization. Now I am making a product that uses DLP components, and I make a circuit board by myself to drive DLP. The power input interface of my circuit board is tyoe-c, and type-c needs to be connected to a computer for power supply, but the power supply capability of the computer is limited. During the initialization of my circuit board, the DLP projected a bright picture, which required a relatively high current. If the type-c interface could not provide enough current, the initialization could not be successful, so I could not control the DLP through the IIC. So I want to power on again and not project a bright picture during the initialization, or not project a picture at all. So I can power on and initialize the DLP, and I can control the projection through the IIC

  • Hi, 

    What firmware version are you using with this? Please try with latest firmware found at TI DLP Pico Firmware Selector Tool (link). Also in your case you would likely want to lower your LED currents as well.

    Best,

    Maximus

  • hello,

    The firmware version I am using is 8.0.0. The latest firmware version I tested was 9.2.2, but the same question also appeared, and a very bright picture appeared. You can record a video of yourself testing the DLP, and I'll see if you get a very bright picture when you power on the initialization. By the way, send me the firmware that you use without problems.

    Yes, if the power-on initialization is a relatively dark picture can also be, so that the current of the LED will be relatively small.

  • Hello,

    I cannot record a video, though I assure you I am not seeing an image projected before going dark though each LED is still enabled. I have tested the below batch file and have zero illumination on startup, can you test this with firmware v9.2.0?

    ########################################################################
    ################# Spalsh Screen Mode #############
    ########################################################################

    ## Write: DisplaySize: 1280x720
    W 36 12 00 00 00 00 00 05 D0 02
    ## Write: ImageCrop: 1280x720
    W 36 10 00 00 00 00 00 05 D0 02
    ## Write: InputImageSize: 1280x720 = 0x0500 x 0x02D0
    W 36 2e 00 05 D0 02
    ## Write: Splash screen select ; 00 = First Splash screen
    W 36 0D 00
    # Write: InputSourceSelect; 2 = Splash screen
    W 36 05 02

    ###########################################################
    W 36 DB 64 00
    W 36 E5 60 22 00 40
    W 36 E6 01 00 00 00

    #Write black image curtain enable
    W 36 16 01

    ## Write Splash screen execute
    W 36 35

    # 200 ms delay
    W 36 DB C8 00

    ###########################################################
    # Zero delay as a marker
    ###########################################################
    W 36 DB 00 00

    ###########################################################
    # Write: WRITE LED ENABLE = 7. DISABLE = 0
    W 36 52 00

  • hello,

    I wrote the batch file according to the way you gave, and then the GUI could not control the DLP component, prompting an error as shown below.


    The GUI version I use is 3.2.0.6:

    My GUI operation process is as follows:

    The contents of the batch file are as follows:

    I did not use the Advanced Mode of the GUI when creating the batch file because I did not find registers 0XE5 and 0XE6 in the Advanced Mode batch Command. Therefore, I directly write the batch file in UltraEdit software. I wonder if this will have any impact. Could you please send the original batch file to me?

  • Hi Renzhen,

    Can you create a regular text file and copy and past the text I previously provided directly. Then simply rename the file as batch01.bf and only upload it as the first batchfile, leaving the others empty. Please let me know how this works.

    Best,

    Maximus

  • hello,

    I do as you said, as shown below:

    I did it your way and still got the following error warning.

    Could you please send me your batch01.bf file and firmware?

  • Hi Renzhen,

    Do you have the proj_on switch toggled during this? The text below the EVM page says "powered off" which seems to indicate the EVM has proj_on switch has not been flipped.

    I will share the batchfile i made shortly.

    Best,

    Maximus

  • Hello Renzhen,

    I have sent you a friend request via E2E to take this thread offline. Please respond and I will send a private message to continue the topic.

    Best,

    Maximus

  • hello,

    I have toggle the proj_on switch, but it doesn't solve my problem.

    I am glad to receive your batch file soon.

  • hello,

    I have accepted your friend request.

  • Thanks, I will follow up with you over private messages.

    Best,

    Maximus