This thread has been locked.

If you have a related question, please click the "Ask a related question" button in the top right corner. The newly created question will be automatically linked to this question.

DLP4500: Issue with displaying video via HDMI port.

Part Number: DLP4500
Other Parts Discussed in Thread: DLPC350

We are trying to get a video stream of Raspberry PI 4 desktop to DLP's micromirror via hdmi.

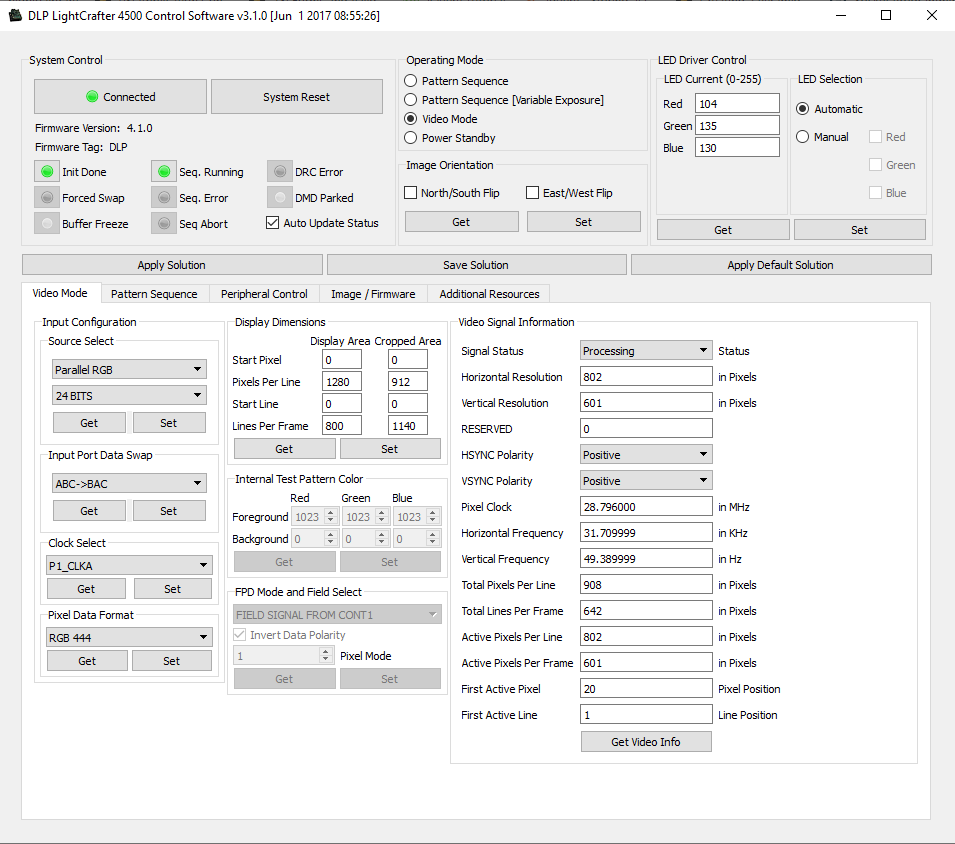
Somehow, GUI shows that everything is OK and there's no problem with video signal capturing, but there's still an issue of no video/picture displaying on the DLP's mirror.

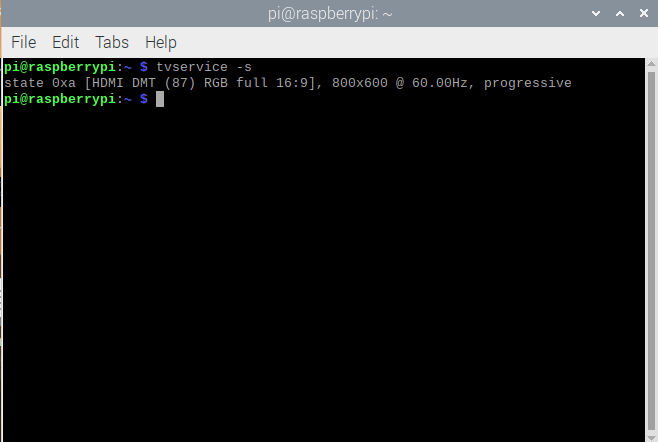
Also, horizontal resolution and vertical resolution are detected with a slight addition in pixels, GUI shows that resolution is 802x601, but HDMI model is configured to be 800x600 60fps mode
broadcast, and there is no trouble with displaying Raspberry's desktop, when it's connected to other devices. We also tried different kinds of DLP's supported resolution, but the trouble is constant.

I attach screenshots to be more clear with my problem. We are new to this and it's a struggle for us to solve this kind of trouble.

Any help will be highly appreciated, thank you!

  • Hello Alexander,

    Welcome to DLP forum and thank you for your interest in DLP technology. We will review it and get back to you.

    regards,

    Vivek

  • Thank you! I will be waiting for your answer.

    Alexander

  • Hi Alexander, 

    Can you please confirm that the raspberry pi output includes blanking intervals more than specified on the DLPC350 Datasheet  section 6.11 Video Timing Input Blanking Specification?

    Also, could you please try connecting the LCR4500 EVM to another source (such as HDMI out from laptop/ PC) and see if you can get image on the wall?

    Thanks & Regards,

    Hirak.

  • Hello Hirak,

    Yes, I was configuring custom hdmi model on rasperry referring to DLPC350 Datasheet section 6.11. I think that i can attach model parameters with desription.

    hdmi_timings=800 1 20 20 68 600 1 4 20 388 0 0 0 60 0 28800000 3, where

    1 <h_active_pixels> = 800 (width)
    2 <h_sync_polarity> = 1
    3 <h_front_porch> = 20
    4 <h_sync_pulse> = 20
    5 <h_back_porch> = 68 
    6 <v_active_lines> = 600
    7 <v_sync_polarity> = 1
    8 <v_front_porch> = 4
    9 <v_sync_pulse> = 20 
    10 <v_back_porch> = 388 
    11 <v_sync_offset_a> = leave at zero
    12 <v_sync_offset_b> = leave at zero
    13 <pixel_rep> = leave at zero
    14 <frame_rate> = 60
    15 <interlaced> = leave at zero
    16 <pixel_freq> = 28800000  (width*height*framerate)
    17 <aspect_ratio> = 3 (16:9)

    Actually, we have a custom electronic board and I assume we may have some problems with EDID EEPROM, because it's empty, and we may need a EEPROM firmware file for DLP, because it's hard to configure.

    Thank you,

    Alexander.

  • Alexander,

    Thanks for sharing your Raspberry Pi configuration. Do you have the full config.txt file? 

  • Hello Philippe,

    For sure, i can share my Raspberry config file in attachments.

    rasp_config.txt
    # For more options and information see
    # http://rpf.io/configtxt
    # Some settings may impact device functionality. See link above for details
    
    # uncomment if you get no picture on HDMI for a default "safe" mode
    #hdmi_safe=1
    
    # uncomment this if your display has a black border of unused pixels visible
    # and your display can output without overscan
    #disable_overscan=1
    
    # uncomment the following to adjust overscan. Use positive numbers if console
    # goes off screen, and negative if there is too much border
    #overscan_left=16
    #overscan_right=16
    #overscan_top=16
    #overscan_bottom=16
    
    # uncomment to force a console size. By default it will be display's size minus
    # overscan.
    #framebuffer_width=1280
    #framebuffer_height=720
    
    # uncomment if hdmi display is not detected and composite is being output
    hdmi_force_hotplug=1
    
    # uncomment to force a specific HDMI mode (this will force VGA)
    hdmi_group=2
    hdmi_mode=87
    hdmi_timings=800 1 20 20 68 600 1 4 20 388 0 0 0 60 0 28800000 3
    
    # uncomment to force a HDMI mode rather than DVI. This can make audio work in
    # DMT (computer monitor) modes
    hdmi_drive=2
    
    # uncomment to increase signal to HDMI, if you have interference, blanking, or
    # no display
    #config_hdmi_boost=4
    
    # uncomment for composite PAL
    #sdtv_mode=2
    
    #uncomment to overclock the arm. 700 MHz is the default.
    #arm_freq=800
    
    # Uncomment some or all of these to enable the optional hardware interfaces
    #dtparam=i2c_arm=on
    #dtparam=i2c2_iknowwhatimdoing
    #dtparam=i2s=on
    #dtparam=spi=on
    
    # Uncomment this to enable infrared communication.
    #dtoverlay=gpio-ir,gpio_pin=17
    #dtoverlay=gpio-ir-tx,gpio_pin=18
    
    # Additional overlays and parameters are documented /boot/overlays/README
    
    # Enable audio (loads snd_bcm2835)
    dtparam=audio=on
    
    [pi4]
    # Enable DRM VC4 V3D driver on top of the dispmanx display stack
    dtoverlay=vc4-fkms-v3d
    max_framebuffers=2
    
    [all]
    #dtoverlay=vc4-fkms-v3d
    start_x=0
    

  • To add, I got this config tested by Raspberry Pi support engineer, he answered that it works correctly (but he got it tested on the HDMI capture card).

    Regards,

    Alexander

  • Hi Alexander, 

    Can you please try with another source such as your laptop/PC? That will confirm once & for all if there is something wrong with your EVM. Also, did you modify the TI FW Image (adding custom Images, I2C Settings, Config INI etc)  in any way before flashing it on to the device?

  • Hi Hirak,

    Yes, I've already tried to connect DLP to another source - and the streaming was successful. Also, I did try to add custom images but nothing was displayed

    Regards,

    Alexander

  • Hi Alexander,

    could you kindly note the blanking information while connected to the device with successful streaming and apply them to your RPi module to see if that works?

    Also, while modifying official FW kindly note the following:

    DLPC350 FW v4.0 and below should be modified ONLY by LCR4500 GUI v3.1.0  and

    DLPC350 FW v4.1 should be modified ONLY by LCR4500 GUI v4.0.0

    mixing incompatible GUI and FW may generate corrupted FW.

  • Hi Hirak,

    Thank you for your answer and providing information about types of GUI, it really helped. I've installed correct version for FW v.4.1., but still there's no stream on DLP and resolution's still to be inaccurate.

    Blanking information from the device with successful streaming is attached, still no result from applying same params to RPi module.

    Regards, 

    Alexander

  • Alexander,

    I noticed that your Raspberry Pi config.txt uses the old timings (28 MHz), and that the above timing does not work. What happens when you use the above timing configuration on the Raspberry Pi:?

  • Philippe,

    Thank you very much for your help, I've managed to resolve my issue with changing config input interfaces.

    Regards,

    Alexander

  • I will add a short guide of how I managed to resolve the issue.

    First of all, I made a custom EDID model that is able to support 912x1140 because of an empty EEPROM on our electronic board. Then, enabled i2c (overall in raspi-config) and edited config.txt in /boot to get control over HDMI's i2c bus with following line "dtparam=i2c2_iknowwhatimdoing".

    After all these steps, I was able to detect the second bus and 0x50 with an empty EEPROM, so, I made a script using Python to write EDID model in EEPROM.

    Also, I commented out all the lines in config.txt that are connected with forced HDMI output on RPi. hdmi_group=2, hdmi_mode=87, hdmi_cvt=912 1140 50 is all you need + I switched to newer GUI as Hiraak was advicing.

    I should mention that I've switched to RPi3 for that.

    Best of luck,

    Alexander