This thread has been locked.

If you have a related question, please click the "Ask a related question" button in the top right corner. The newly created question will be automatically linked to this question.

BP-DAC61402EVM: MSP-EXP432E401Y setup

Part Number: MSP-EXP432E401Y
Other Parts Discussed in Thread: DAC61402, DAC81404, DAC81404EVM

Hi,

I got the MSP-EXP432E401Y to use with BP-DAC61402EVM and, I tried to use https://dev.ti.com/uniflash but it doesn't work, I tried also to download it from the GUI composer Galley but it also doesn't work.

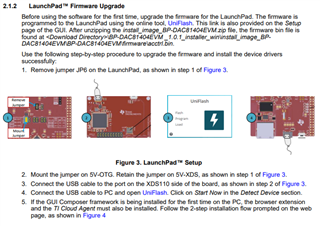
1) is it a must to do a firmware upgrade? it's not very clear which jumper I need to remove. The figure is different as MSP-EXP432E401Y (2.2.1 BP-DAC81404EVM USER Guide)

1)Do you have any software to use this device, link to download? I want to use it to change the output voltage from BP-DAC61402EVM by the computer 

2) There are 2 USB ports, is one of them for power supply and the other for communication? when I connect the MSP-EXP432E401Y to the computer the device manager recognizes it as XDS110 (02.03.00.09) Embed with CMISIS-DAP and the driver not installed. where I can download the drivers that I need?

Regards,

Avi

  • Hello Avi,

    I'm not sure about the setup for this EVM exactly, so I have forwarded this post to the team that owns that EVM. 

    The USB port on the MSP-EXP432E401Y board is the one you would utilize for programming the MSP432E4 device (it will come up as XDS110).

  • Hi Avi,

    Please use this link for the DAC81404EVM GUI. I do not see a DAC61402 GUI published in GUI Composer. The DAC81404 has the same registers, but the two output channels for the DAC61402 are labeled as DACB and DACC in the DAC81404EVM GUI. https://dev.ti.com/gallery/view/1958706/BP-DAC81404EVM/ver/1.0.0/ 

    For the firmware upgrade steps, the USB should be plugged into the XDS110 port as Jace mentioned. When using the GUI after the firmware has been updated, the USB should be plugged into the port labeled U7 closest to the ethernet port as shown in the figure. The jumpers shown in the figure determine which USB port supplies the 5V supply to the Launchpad. The figure shows to close the jumpers to the 5V OTG and 5V XDS so that the launchpad will be supplied with 5V when either USB is plugged in. Only one will be plugged in at a time though. The figure is accurate when I compare it to the MSP-EXP432E401Y. Remove JP6 and apply it to the the middle section of JP1. 

    Please try the firmware upgrade again with the USB plugged into the XDS110 port and the correct jumper configuration. You should not need to install any additional drivers. Let me know if you still have trouble and we can go from there. 

    Best,

    Katlynne Jones