This thread has been locked.

If you have a related question, please click the "Ask a related question" button in the top right corner. The newly created question will be automatically linked to this question.

CCS/EK-TM4C123GXL: Using I2C PCF8574AP inputs, not interrupting

Part Number: EK-TM4C123GXL

Tool/software: Code Composer Studio

Hi all,

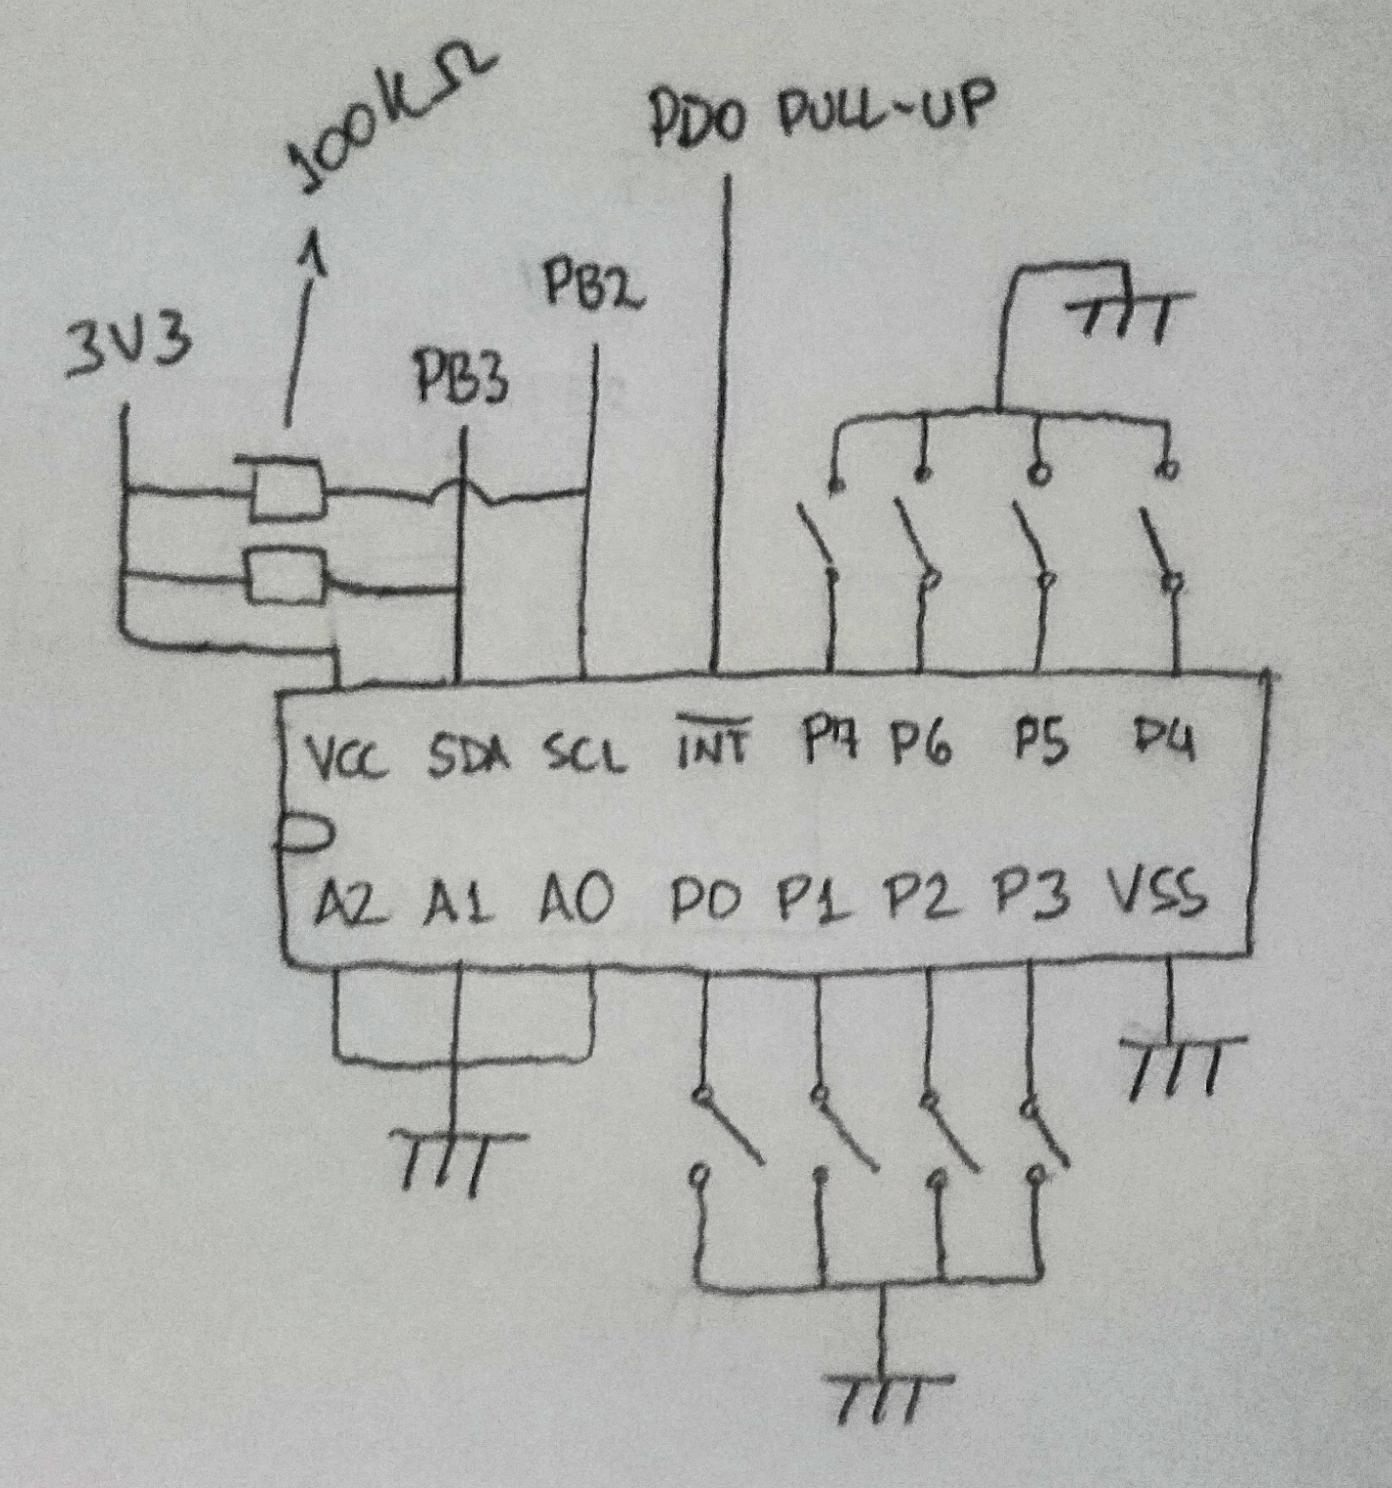
I successfully wrote to a 7-Segment display using only 2 wires thanks to I2C. I'm starting to like this protocol. So I decided to use as an input expander, but now I'm facing some problems.

I'm trying to use the PCF8574AP inputs, if I'm not mistaken, when I pull the pins to GND, it should generate an interrupt. Well, it generates indeed, but in the INT port of the chip, not on the Tiva, and the MCU does not get any data from the IC. I tried both Master and Slave modes.

#include <stdbool.h>
#include <stdint.h>
#include "inc/hw_i2c.h"
#include "inc/hw_ints.h"
#include "inc/hw_memmap.h"
#include "inc/hw_types.h"
#include "driverlib/gpio.h"
#include "driverlib/i2c.h"
#include "driverlib/interrupt.h"
#include "driverlib/pin_map.h"
#include "driverlib/sysctl.h"
#include "driverlib/uart.h"
#include "uartstdio.h"

#define SLAVE_ADDRESS           0x38

//*****************************************************************************
//
// Global variable to hold the I2C data that has been received.
//
//*****************************************************************************
static uint32_t g_ui32DataRx;

//*****************************************************************************
//
// This function sets up UART0 to be used for a console to display information
// as the example is running.
//
//*****************************************************************************
void
InitConsole(void)
{
    //
    // Enable GPIO port A which is used for UART0 pins.
    // TODO: change this to whichever GPIO port you are using.
    //
    SysCtlPeripheralEnable(SYSCTL_PERIPH_GPIOA);

    //
    // Configure the pin muxing for UART0 functions on port A0 and A1.
    // This step is not necessary if your part does not support pin muxing.
    // TODO: change this to select the port/pin you are using.
    //
    GPIOPinConfigure(GPIO_PA0_U0RX);
    GPIOPinConfigure(GPIO_PA1_U0TX);

    //
    // Enable UART0 so that we can configure the clock.
    //
    SysCtlPeripheralEnable(SYSCTL_PERIPH_UART0);

    //
    // Use the internal 16MHz oscillator as the UART clock source.
    //
    UARTClockSourceSet(UART0_BASE, UART_CLOCK_PIOSC);

    //
    // Select the alternate (UART) function for these pins.
    // TODO: change this to select the port/pin you are using.
    //
    GPIOPinTypeUART(GPIO_PORTA_BASE, GPIO_PIN_0 | GPIO_PIN_1);

    //
    // Initialize the UART for console I/O.
    //
    UARTStdioConfig(0, 115200, 16000000);
}

//*****************************************************************************
//
// The interrupt handler for the for I2C0 data slave interrupt.
//
//*****************************************************************************
void
I2C0MasterIntHandler(void)
{
    //
    // Clear the I2C0 interrupt flag.
    //
    I2CMasterIntClear(I2C0_BASE);

    //
    // Read the data from the slave.
    //
    g_ui32DataRx = I2CMasterDataGet(I2C0_BASE);

    //
    // Display that interrupt was received.
    //
    UARTprintf("\n  Master Interrupt Received!\n");

    //
    // Display the data that the slave has received.
    //
    UARTprintf("  Received: '%s'\n\n", g_ui32DataRx);
}

int main(void)
{
    //init clock and periph
    SysCtlClockSet(SYSCTL_SYSDIV_1 | SYSCTL_USE_OSC | SYSCTL_OSC_MAIN | SYSCTL_XTAL_16MHZ);

    SysCtlPeripheralEnable(SYSCTL_PERIPH_I2C0);
    SysCtlPeripheralEnable(SYSCTL_PERIPH_GPIOB);

    GPIOPinConfigure(GPIO_PB2_I2C0SCL);
    GPIOPinConfigure(GPIO_PB3_I2C0SDA);

    GPIOPinTypeI2CSCL(GPIO_PORTB_BASE, GPIO_PIN_2);
    GPIOPinTypeI2C(GPIO_PORTB_BASE, GPIO_PIN_3);

    //
    // Enable the I2C0 interrupt on the processor (NVIC).
    //
    IntEnable(INT_I2C0);

    //
    // Configure and turn on the I2C0 slave interrupt.  The I2CSlaveIntEnableEx()
    // gives you the ability to only enable specific interrupts.  For this case
    // we are only interrupting when the slave device receives data.
    //
    I2CMasterIntEnableEx(I2C0_BASE, I2C_MASTER_INT_DATA);

    //
    // Enable and initialize the I2C0 master module.  Use the system clock for
    // the I2C0 module.  The last parameter sets the I2C data transfer rate.
    // If false the data rate is set to 100kbps and if true the data rate will
    // be set to 400kbps.  For this example we will use a data rate of 100kbps.
    //
    I2CMasterInitExpClk(I2C0_BASE, SysCtlClockGet(), false);


    //
    // Tell the master module what address it will place on the bus when
    // communicating with the slave.  Set the address to SLAVE_ADDRESS
    // (as set in the slave module).  The receive parameter is set to false
    // which indicates the I2C Master is initiating a writes to the slave.  If
    // true, that would indicate that the I2C Master is initiating reads from
    // the slave.
    //
    I2CMasterSlaveAddrSet(I2C0_BASE, SLAVE_ADDRESS, true);

    //
    // Set up the serial console to use for displaying messages.  This is just
    // for this example program and is not needed for proper I2C operation.
    //
    InitConsole();

    //
    // Enable interrupts to the processor.
    //
    IntMasterEnable();

    //
    // Display the example setup on the console.
    //
    UARTprintf("I2C Master Interrupt Example ->");
    UARTprintf("\n   Module = I2C0");
    UARTprintf("\n   Mode = Receive interrupt on the Master module");
    UARTprintf("\n   Rate = 100kbps\n\n");

    //
    //tried to read without interrupt
    //

    SysCtlDelay(SysCtlClockGet()/3);

    //
    // Read the data from the master.
    //
    g_ui32DataRx = I2CMasterDataGet(I2C0_BASE);

    //
    // Display that data was received.
    //
    UARTprintf("\n  Master Data Received!\n");

    //
    // Display the data that the master has received.
    //
    UARTprintf("  Received: '%s'\n\n", g_ui32DataRx);

    while(1);
}

As a Slave interrupt:

#include <stdbool.h>
#include <stdint.h>
#include "inc/hw_i2c.h"
#include "inc/hw_ints.h"
#include "inc/hw_memmap.h"
#include "inc/hw_types.h"
#include "driverlib/gpio.h"
#include "driverlib/i2c.h"
#include "driverlib/interrupt.h"
#include "driverlib/pin_map.h"
#include "driverlib/sysctl.h"
#include "driverlib/uart.h"
#include "uartstdio.h"

#define SLAVE_ADDRESS           0x38

//*****************************************************************************
//
// Global variable to hold the I2C data that has been received.
//
//*****************************************************************************
static uint32_t g_ui32DataRx;

//*****************************************************************************
//
// This function sets up UART0 to be used for a console to display information
// as the example is running.
//
//*****************************************************************************
void
InitConsole(void)
{
    //
    // Enable GPIO port A which is used for UART0 pins.
    // TODO: change this to whichever GPIO port you are using.
    //
    SysCtlPeripheralEnable(SYSCTL_PERIPH_GPIOA);

    //
    // Configure the pin muxing for UART0 functions on port A0 and A1.
    // This step is not necessary if your part does not support pin muxing.
    // TODO: change this to select the port/pin you are using.
    //
    GPIOPinConfigure(GPIO_PA0_U0RX);
    GPIOPinConfigure(GPIO_PA1_U0TX);

    //
    // Enable UART0 so that we can configure the clock.
    //
    SysCtlPeripheralEnable(SYSCTL_PERIPH_UART0);

    //
    // Use the internal 16MHz oscillator as the UART clock source.
    //
    UARTClockSourceSet(UART0_BASE, UART_CLOCK_PIOSC);

    //
    // Select the alternate (UART) function for these pins.
    // TODO: change this to select the port/pin you are using.
    //
    GPIOPinTypeUART(GPIO_PORTA_BASE, GPIO_PIN_0 | GPIO_PIN_1);

    //
    // Initialize the UART for console I/O.
    //
    UARTStdioConfig(0, 115200, 16000000);
}

//*****************************************************************************
//
// The interrupt handler for the for I2C0 data slave interrupt.
//
//*****************************************************************************
void
I2C0SlaveIntHandler(void)
{
    //
    // Clear the I2C0 interrupt flag.
    //
    I2CSlaveIntClear(I2C0_BASE);

    //
    // Read the data from the slave.
    //
    g_ui32DataRx = I2CSlaveDataGet(I2C0_BASE);

    //
    // Display that interrupt was received.
    //
    UARTprintf("\n  Slave Interrupt Received!\n");

    //
    // Display the data that the slave has received.
    //
    UARTprintf("  Received: '%s'\n\n", g_ui32DataRx);
}

int main(void)
{
    //init clock and periph
    SysCtlClockSet(SYSCTL_SYSDIV_1 | SYSCTL_USE_OSC | SYSCTL_OSC_MAIN | SYSCTL_XTAL_16MHZ);

    SysCtlPeripheralEnable(SYSCTL_PERIPH_I2C0);
    SysCtlPeripheralEnable(SYSCTL_PERIPH_GPIOB);

    GPIOPinConfigure(GPIO_PB2_I2C0SCL);
    GPIOPinConfigure(GPIO_PB3_I2C0SDA);

    GPIOPinTypeI2CSCL(GPIO_PORTB_BASE, GPIO_PIN_2);
    GPIOPinTypeI2C(GPIO_PORTB_BASE, GPIO_PIN_3);

    //
    // Enable the I2C0 interrupt on the processor (NVIC).
    //
    IntEnable(INT_I2C0);

    //
    // Configure and turn on the I2C0 slave interrupt.  The I2CSlaveIntEnableEx()
    // gives you the ability to only enable specific interrupts.  For this case
    // we are only interrupting when the slave device receives data.
    //
    I2CSlaveIntEnableEx(I2C0_BASE, I2C_SLAVE_INT_DATA);

    //
    // Enable and initialize the I2C0 master module.  Use the system clock for
    // the I2C0 module.  The last parameter sets the I2C data transfer rate.
    // If false the data rate is set to 100kbps and if true the data rate will
    // be set to 400kbps.  For this example we will use a data rate of 100kbps.
    //
    I2CMasterInitExpClk(I2C0_BASE, SysCtlClockGet(), false);

    //
    // Enable the I2C0 slave module.
    //
    I2CSlaveEnable(I2C0_BASE);

    //
    // Set the slave address to SLAVE_ADDRESS.  In loopback mode, it's an
    // arbitrary 7-bit number (set in a macro above) that is sent to the
    // I2CMasterSlaveAddrSet function.
    //
    I2CSlaveInit(I2C0_BASE, SLAVE_ADDRESS);

    //
    // Tell the master module what address it will place on the bus when
    // communicating with the slave.  Set the address to SLAVE_ADDRESS
    // (as set in the slave module).  The receive parameter is set to false
    // which indicates the I2C Master is initiating a writes to the slave.  If
    // true, that would indicate that the I2C Master is initiating reads from
    // the slave.
    //
    I2CMasterSlaveAddrSet(I2C0_BASE, SLAVE_ADDRESS, true);

    //
    // Set up the serial console to use for displaying messages.  This is just
    // for this example program and is not needed for proper I2C operation.
    //
    InitConsole();

    //
    // Enable interrupts to the processor.
    //
    IntMasterEnable();

    //
    // Display the example setup on the console.
    //
    UARTprintf("I2C Slave Interrupt Example ->");
    UARTprintf("\n   Module = I2C0");
    UARTprintf("\n   Mode = Receive interrupt on the Slave module");
    UARTprintf("\n   Rate = 100kbps\n\n");

    //
    //tried to read without interrupt
    //

    SysCtlDelay(SysCtlClockGet()/3);
    //
    // Read the data from the slave.
    //
    g_ui32DataRx = I2CSlaveDataGet(I2C0_BASE);

    //
    // Display that data was received.
    //
    UARTprintf("\n  Slave Data Received!\n");

    //
    // Display the data that the slave has received.
    //
    UARTprintf("  Received: '%s'\n\n", g_ui32DataRx);

    while(1);
}

I'm configuring the device incorrectly?

Thanks

  • What pin did you attach the PCF8574AP's INT pin to? That pin should attach to a GPIO and then you need to configure the GPIO to provide an interrupt.
  • But what about the I2C0 interrupt? That shouldn't depend on the INT pin.

    I gave it a try configuring the GPIO pin to generate a interrupt, but I still get no data from the PCF. I2C0 interrupt was never triggered also.

    What I know is that PCF have weak pull up resistors that is giving me a HIGH level on the inputs, and I'm trying to pull the pins to GND to read something. If I have P0, P1, P2, P3 as LOW, HIGH, HIGH, HIGH, I should have 0001 (or 1000, one of those) as the output data, right?

  • To be fair, I must point out that your questions are really about understanding the NXP PCF8574AP. My competitor, NXP, is the proper authority on that part. From what I read of their datasheet, the device is only an I2C slave. As such it cannot initiate an I2C transfer directly. They have added an open-drain pin that can be used as a GPIO interrupt request to a processor. The following is from the NXP datasheet:

    The scenario is that the PCF8574AP pulls the INT pin low. This is connected to a TM4C123 GPIO pin which is configured to generate an interrupt on a falling edge. In the interrupt routine, the TM4C should issue an I2C operation to read the PCF8574AP. If you have further questions about the operation of the PCF8574AP, please contact NXP.

  • Helder Sales said:
    Well, it generates indeed, but in the INT port of the chip, not on the Tiva, and the MCU does not get any data from the IC. I tried both Master and Slave modes.

    As Bob has already mentioned, the PCF8574AP is an I2C slave.

    Therefore, for the Tiva to read any data from the PCF8574AP the Tiva must initiate a I2C master transfer. The posted master code shows I2CMasterDataGet() being called, but there are no functions called to actually initiate a I2C trasfer.

  • This directed to the O.P.

    While you report success w/other I2C projects - the (non-vendor) device you've (now) selected - will prove greatly challenging.     Thus - it (likely) proves NOT the best choice.     You (likely) "chose via feature set" - but w/out great (i.e. much) "attention to the device's operating detail."    This device is HIGHLY Demanding!

    The data vendor Bob (so kindly) provided reveals a powerful "gotcha" - you must (first) configure that device's inputs - and only after having done so (successfully) - will that device (potentially - under strict conditions) output the alerting signal!    And - that output (interrupt generating signal @ TM4C) will only occur, "if the device's inputs have undergone change!"   (from their, "input port Register state" - good luck w/setting that!) 

    So - you've plenty of work to do - even before the first (successful) alerting of TM4C - may occur.    

    As an alternative - you may (endlessly) attempt to read this device - which saves you the necessity to master the complex interrupt scheme - but proves extremely wasteful.

    KISS dictates a simpler device - ideally one provided by this vendor.    (or at least you should "start" here.)

  • Sad is, almost anything new I try to do is challenging, but I think that persistence is what matters. I always try to employ KISS, but not in all cases I have the luxury to rely on that.

    Gladly, Bob just spoke what I needed to hear, somehow I've been able to get the device to work properly.

    I'll share my code to anyone that is interested on making the PCF8574AP as input expander.

    #include <stdbool.h>
    #include <stdint.h>
    #include "inc/hw_i2c.h"
    #include "inc/hw_ints.h"
    #include "inc/hw_memmap.h"
    #include "inc/hw_types.h"
    #include "driverlib/gpio.h"
    #include "driverlib/i2c.h"
    #include "driverlib/interrupt.h"
    #include "driverlib/pin_map.h"
    #include "driverlib/sysctl.h"
    #include "driverlib/uart.h"
    #include "uartstdio.h"
    #include "driverlib/rom.h"
    #include "driverlib/rom_map.h"
    
    //if A2 A1 A0 is pulled to GND (starts with 0x38 on PCF8574AP, 0x20 on PCF8574, see datasheet)
    #define SLAVE_ADDRESS           0x38
    
    //8 bit data to receive from PCF8574AP
    volatile static uint8_t g_ui8DataRx;
    
    //init the UART console
    inline void InitConsole(void)
    {
        //
        // Enable GPIO port A which is used for UART0 pins.
        // TODO: change this to whichever GPIO port you are using.
        //
        MAP_SysCtlPeripheralDisable(SYSCTL_PERIPH_GPIOA);
        MAP_SysCtlPeripheralReset(SYSCTL_PERIPH_GPIOA);
        MAP_SysCtlPeripheralEnable(SYSCTL_PERIPH_GPIOA);
        while(!MAP_SysCtlPeripheralReady(SYSCTL_PERIPH_GPIOA));
    
        //
        // Configure the pin muxing for UART0 functions on port A0 and A1.
        // This step is not necessary if your part does not support pin muxing.
        // TODO: change this to select the port/pin you are using.
        //
        MAP_GPIOPinConfigure(GPIO_PA0_U0RX);
        MAP_GPIOPinConfigure(GPIO_PA1_U0TX);
    
        //
        // Enable UART0 so that we can configure the clock.
        //
        MAP_SysCtlPeripheralEnable(SYSCTL_PERIPH_UART0);
    
        //
        // Use the internal 16MHz oscillator as the UART clock source.
        //
        MAP_UARTClockSourceSet(UART0_BASE, UART_CLOCK_PIOSC);
    
        //
        // Select the alternate (UART) function for these pins.
        // TODO: change this to select the port/pin you are using.
        //
        MAP_GPIOPinTypeUART(GPIO_PORTA_BASE, GPIO_PIN_0 | GPIO_PIN_1);
    
        //
        // Initialize the UART for console I/O.
        //
        UARTStdioConfig(0, 115200, 16000000);
    }
    
    //interrupt generated by a falling edge on pin PD0
    void I2CInterruptPin(void)
    {
        //saves the interrupt status (to see what pin triggered the interrupt)
        uint32_t status = MAP_GPIOIntStatus(GPIO_PORTD_BASE, true);
    
        //clear interrupt state
        MAP_GPIOIntClear(GPIO_PORTD_BASE, status);
    
        //PD0 was interrupt cause
        if(status & GPIO_PIN_0)
        {
            //request read from slave
            MAP_I2CMasterControl(I2C0_BASE, I2C_MASTER_CMD_SINGLE_RECEIVE);
            while(MAP_I2CMasterBusy(I2C0_BASE));
    
            //get the data from Master
            g_ui8DataRx = MAP_I2CMasterDataGet(I2C0_BASE);
    
            //prints the data received
            UARTprintf("Interrupt Received, Slave Reading (Decimal): %03u\n", g_ui8DataRx);
        }
    }
    
    //init the input pin on Tiva
    inline void InitPin(void)
    {
        //enable port D
        MAP_SysCtlPeripheralDisable(SYSCTL_PERIPH_GPIOD);
        MAP_SysCtlPeripheralReset(SYSCTL_PERIPH_GPIOD);
        MAP_SysCtlPeripheralEnable(SYSCTL_PERIPH_GPIOD);
        while(!MAP_SysCtlPeripheralReady(SYSCTL_PERIPH_GPIOD));
    
        //PD0 as input
        MAP_GPIOPinTypeGPIOInput(GPIO_PORTD_BASE, GPIO_PIN_0);
    
        //enable pull-up
        MAP_GPIOPadConfigSet(GPIO_PORTD_BASE, GPIO_PIN_0, GPIO_STRENGTH_2MA, GPIO_PIN_TYPE_STD_WPU);
    
        //clears pending interrupts
        MAP_IntDisable(INT_GPIOD);
        MAP_GPIOIntDisable(GPIO_PORTD_BASE, GPIO_PIN_0);
        MAP_IntPendClear(INT_GPIOD);
        MAP_GPIOIntClear(GPIO_PORTD_BASE, GPIO_PIN_0);
    
        //configure the interrupt to activate on a falling edge
        MAP_GPIOIntTypeSet(GPIO_PORTD_BASE, GPIO_PIN_0, GPIO_FALLING_EDGE);
        //define the interrupt priority (0x00 being the highest and 0xE0 the lowest)
        MAP_IntPrioritySet(INT_GPIOD, 0x00);
        //enables interrupt
        MAP_GPIOIntEnable(GPIO_PORTD_BASE, GPIO_PIN_0);
        MAP_IntEnable(INT_GPIOD);
    }
    
    //main program
    int main(void)
    {
        //set system clock to 80 MHz
        MAP_SysCtlClockSet(SYSCTL_SYSDIV_2_5|SYSCTL_USE_PLL|SYSCTL_XTAL_16MHZ|SYSCTL_OSC_MAIN);
    
        //init the UART
        InitConsole();
    
        //clears screen
        UARTprintf("\033[2J");
        //move cursor to position 0,0
        UARTprintf("\033[0;0H");
    
        //init pin PD0 as input
        InitPin();
    
        //init the I2C0 and GPIOB
        MAP_SysCtlPeripheralDisable(SYSCTL_PERIPH_I2C0);
        MAP_SysCtlPeripheralDisable(SYSCTL_PERIPH_GPIOB);
        MAP_SysCtlPeripheralReset(SYSCTL_PERIPH_I2C0);
        MAP_SysCtlPeripheralReset(SYSCTL_PERIPH_GPIOB);
        MAP_SysCtlPeripheralEnable(SYSCTL_PERIPH_I2C0);
        MAP_SysCtlPeripheralEnable(SYSCTL_PERIPH_GPIOB);
        while(!MAP_SysCtlPeripheralReady(SYSCTL_PERIPH_I2C0) || !MAP_SysCtlPeripheralReady(SYSCTL_PERIPH_GPIOB));
    
        //configure PB2 to SCL and PB3 SDA
        MAP_GPIOPinConfigure(GPIO_PB2_I2C0SCL);
        MAP_GPIOPinConfigure(GPIO_PB3_I2C0SDA);
        MAP_GPIOPinTypeI2CSCL(GPIO_PORTB_BASE, GPIO_PIN_2);
        MAP_GPIOPinTypeI2C(GPIO_PORTB_BASE, GPIO_PIN_3);
    
        //init I2C Master with 100kbps (if true would be 400kbps)
        MAP_I2CMasterInitExpClk(I2C0_BASE, MAP_SysCtlClockGet(), false);
    
        //sets slave adress, and master is reading from slave (writing if false)
        MAP_I2CMasterSlaveAddrSet(I2C0_BASE, SLAVE_ADDRESS, true);
    
        //sends a read request (need to do that before the first interrupt,
        //otherwise it'll not interrupt when MCU is reset, or never interrupt at all)
        MAP_I2CMasterControl(I2C0_BASE, I2C_MASTER_CMD_SINGLE_RECEIVE);
        while(MAP_I2CMasterBusy(I2C0_BASE));
    
        //do nothing (waits for a interrupt)
        while(1);
    }
    

  • Persistence may not prove as useful as:

    • searching out a variety of devices meeting initial objectives
    • reasonably comparing/contrasting operating demands

    and only then selecting the device.

    Much depends upon the time/effort you wish to expend - and device's performance, size & cost.

    The "necessity" to set - & then "track" - the state of those 8 input registers (so that a change may be detected - and generate the interrupt) seems a burden.    Especially in a real-world usage - where signals are likely to vary far faster - & at higher frequency - than your "limited, hand testing" (now) allows & reveals.

    You may also wish to consider how your device handles, "very rapid changes" especially those which occur several times - (before) you can respond to the interrupt AND the I2C's (relaxed/slowed) serial response?   Had your "working" code anticipated that condition?    Which input signal(s) then - are you willing to "miss?"

    Surely you purchased that I2C device from a "disty" - I would wager a (tall) stack of Vegas chips that its complexity vastly reduces its Sales appeal.   (you may compare/contrast inventory stocking levels/movement - to gauge most any device's "popularity & usage level."   (this clearly can be "skewed" by large firm's buying patterns - but in general - proves an effective "sales indicator.")    As "sales" is included in your forum ID - such may deserve your attention...

  • Actually I borrowed this IC , this device is not so cheap and easy to find here (the only part that bothers me is having to find a store that sells it). I have no need to use it for now, I'm just learning how to use it before I actually need it.

    In fact, the most "complex" think I ever did with MCUs was program a dishwasher (electronic panel was dead) with Arduino some time ago. Now I'm using Tiva to adquire data from a mini-baja prototype, like fuel level, RPM, velocity, send commands from the steering wheel (like setting up a chronometer), etc.

    But I'm hoping that someday all the efforts I did until now would be paid off, if not at least I'll have the knowledge.

    cb1_mobile said:
    You may also wish to consider how your device handles, "very rapid changes" especially those which occur several times - (before) you can respond to the interrupt AND the I2C's (relaxed/slowed) serial response?

    I'm aware of this unfortunate drawback. Maybe a solution is to use SPI (if I ever need it)?

    cb1_mobile said:
    As "sales" is included in your forum ID - such may deserve your attention...

    Well, that's my last name, I'm just a simple electrical engineering student hahaha

  • Never would I have expected "sales" as your last name! May I suggest that you "copy/forward" my "device selection criteria" to he/she who, "chose that device?"

    Your idea of SPI - due to its "100x" speedup (100KHz vs 10MHz) does vastly improve.  

    Has not a valuable lesson - which both you & others have learned - the goal of,  "I/O Expansion" - via most any means - is achieved but at (some, performance degrading) cost!     And that cost - along w/"ease of use" must receive fair consideration...