This thread has been locked.

If you have a related question, please click the "Ask a related question" button in the top right corner. The newly created question will be automatically linked to this question.

TPS62843: how to succeed on soldering this tiny DSBGA part in the lab?

Part Number: TPS62843

Dear all,
I am struggling to successfully solder this incredible tiny part on my prototype with my scarce lab possibilities.

Well, soldering is rather overrated, then the biggest problem is how to place the ic on the pcb.

Please do not start laughing... I think, you know the procedure:

You have this nice strip with the bright silver chips inside, you open the strip carefully and you take one ic out of it. Better said, the chip springs out  and if you are lucky, you can find it on you very clean table.
Then you take your twizzers, the finest ones, and grab the ic. No doubt, the thing lays with the bumps upside. So, you want to turn it. This is the moment, where the ic starts jumping around, like a flea...

Suppose, the thing landet on another clean spot of your table, and this time with the bumps downside, now you have to find the mark for bump 1... this nice dark point... but the surface is silver, and is reflective, so if your microscope has lights, you only see black. A light source from the side must be, oh, yes! And there is the point (at least, I think so) But the chip must be turned 90 degrees, in order to be placed correctly. Yes, you guess perfectly good: there is it again, the flea-jump. 

By the time you have it again and found the point, (either on the first chip you grabbed out of the strip, or on the third, because the flea flew away of your table), you grab it with the twizzer and transport it to the right place, the solder paste is dry and the chip wont stick to it anymore. If it doesn't stick, the reflow-oven will blow it out of the position (I had this experience too).
This, if you have such a steady hand, that you succeed on placing the flea on the right spot. The chance, that you don't is inmensely bigger, And, off course, you take with you (or the ic does) some of the paste with and you need to start everything again.

Vacuum, that's it, yes, I need vacuum!
But... the tips are all too big.
So, I made a tiny tip and succeeded to grab the chip out of the strip (avoiding flea-jumping, laying on the table looking to the ceiling, etc etc.)
And there is it, the right spot, Now stop the vacuum, let the chip go down, give a nice tick to fix it, Yeah!... yes?... hmmm... no, the chip is not there, but still on the vacuum-tip... Or is down, but on the side...

Aaaaaaahhhhhhh!!!!!!!!!!

Now, if you do not know this, is because you have the correct tools and technic to do it.

Please, please, tell me how you do it !!!

With my best regards,
and also greetings from all the fleas on the ground of my lab...

Gustavo

  • Hi Gustavo,

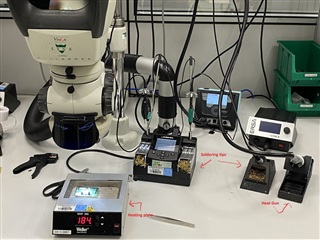
    Please see our soldering setup below:

    To solder tiny IC pacakges, we place the EVM on a hot plate and we hold the IC through a tweezer in the desired position on the PCB and with the help of heat gun, we solder the IC. Just a small tip, do not use extra solder on the PCB pads, just use the heat gun to melt the solder balls below the IC and place it on the PCB.

    Thank you!

    Best regards

    Sneha 

  • Hi Gustavo,

    There is one article which you can refer to for soldering tips:

    https://e2e.ti.com/blogs_/b/powerhouse/posts/qfn-soldering-tips-and-tricks

    I hope this would help.

    Thanks!

    Best regards

    Sneha

  • Hi Sneha, thanks for your kind replys!
    I am now traveling and will not be able to follow your suggestions until the end of April, but I would like to ask another question:

    At what temperature do the bumps of the IC melt?

    If I first solder the DSBGA like you suggest, Would I then be able to solder on the reflow oven al the rest of the components?
    Since the pcb is very thin, I am using a solder paste with low melt temperature (No-Clean Sn42/Bi57.6/Ag0.4 T4 - 138°C Melt. 165°C Hold)
    Or is it better to do it all on the plate? I am affraid, it will take a too long time and I could dammage the ICs with the heat.

    Or the alternative could be, first to place all the parts with the oven and then the DSBGA using the plate?

    Here is the section where the DSBGA is placed:

    Thanks a lot for the help!

    I wish you a nice day.

    Gustavo

  • Hi Gustavo,

    You should set the temperature of the heat plate to less than 200degrees and of the heat gun to around 200-250degrees and I guess this should help with the melting of the IC bump.

    I would suggest to first solder the rest of the components in the oven and then you can solder the IC in the heat plate.

    Thank you!

    Best regards

    Sneha

  • Thank you Sneha!
    By the first week of May I will do this and then rapport to you my success!

    With best regards.

    Gustavo

  • Hi Gustavo,

    Okay. Thanks for letting me know. 

    Good luck!

    Best regards

    Sneha 

  • Hi Gustavo,

    I will close this thread for now. If you have any further questions/comments, please feel free to comment below.

    Thanks!

    Best regards

    Sneha