This thread has been locked.

If you have a related question, please click the "Ask a related question" button in the top right corner. The newly created question will be automatically linked to this question.

TMDSEVM6657: Using the EEPROM and FLASH writing utilities

Part Number: TMDSEVM6657

I have been working with the TMDSEVM6657LS and attempting to use the I2C EEPROM and the SPI FLASH writing utilities. I found them in the "C:\ti\pdk_c665x_2_0_16\packages\ti\boot\writer" directory but have been unable to find any detailed documentation on how to use them. Would you be able to point me towards where they would exist either in the installed PDK or on this or another website?

Thanks,

Brad

  • Hi Brad,

    Flashing and booting steps provided in the following SDK developer guide URL, 

    https://software-dl.ti.com/processor-sdk-rtos/esd/docs/06_03_00_106/rtos/index_how_to_guides.html#flashing-and-boot

    Thanks,

    Rajarajan U 

  • Rajarajan,

    Thankyou for pointing to these instructions.  I followed the link and followed the instructions but my results are different from that shown on the web page.  What I did..

    1) Opened a command prompt session.

    2) Changed to the SDK RTOS directory "cd \ti\processor_sdk_rtos_c665x_6_03_00_106\bin"

    3) Set the DSS_SCRIPT_DIR "set DSS_SCRIPT_DIR=C:\ti\ccs930\ccs\ccs_base\scripting\bin"

    4) Sent the bat file "%DSS_SCRIPT_DIR%\dss.bat program_evm.js evm6657ls -le"

    It looks like the Gel file executed but the images did not load (when comparing my outputs to that of the web page).  Any suggestions?

    Load Script Results.txt
    Microsoft Windows [Version 10.0.19042.1348]
    (c) Microsoft Corporation. All rights reserved.
    
    C:\WINDOWS\system32>cd \ti\processor_sdk_rtos_c665x_6_03_00_106\bin
    
    C:\ti\processor_sdk_rtos_c665x_6_03_00_106\bin>set DSS_SCRIPT_DIR=C:\ti\ccs930\ccs\ccs_base\scripting\bin
    
    C:\ti\processor_sdk_rtos_c665x_6_03_00_106\bin>%DSS_SCRIPT_DIR%\dss.bat program_evm.js evm6657ls -le
    Picked up JAVA_TOOL_OPTIONS: -Djava.vendor='Sun Microsystems Inc.'
    board: evm6657l
    endian: Little
    emulation: XDS200 emulator
    binaries: ../prebuilt-images/
    ccxml: C:\ti\processor_sdk_rtos_c665x_6_03_00_106\bin/configs/evm6657l/evm6657ls.ccxml
    C66xx_0: GEL Output:
    Connecting Target...
    
    C66xx_0: GEL Output: DSP core #0
    
    C66xx_0: GEL Output: C6657L GEL file Ver is 1.00800002
    
    C66xx_0: GEL Output: Global Default Setup...
    
    C66xx_0: GEL Output: Setup Cache...
    
    C66xx_0: GEL Output: L1P = 32K
    
    C66xx_0: GEL Output: L1D = 32K
    
    C66xx_0: GEL Output: L2 = ALL SRAM
    
    C66xx_0: GEL Output: Setup Cache... Done.
    
    C66xx_0: GEL Output: Main PLL (PLL1) Setup ...
    
    C66xx_0: GEL Output: PLL not in Bypass, Enable BYPASS in the PLL Controller...
    
    C66xx_0: GEL Output: PLL1 Setup for DSP @ 1000.0 MHz.
    
    C66xx_0: GEL Output:            SYSCLK2 = 333.333344 MHz, SYSCLK5 = 200.0 MHz.
    
    C66xx_0: GEL Output:            SYSCLK8 = 15.625 MHz.
    
    C66xx_0: GEL Output: PLL1 Setup... Done.
    
    C66xx_0: GEL Output: Power on all PSC modules and DSP domains...
    
    C66xx_0: GEL Output: Power on all PSC modules and DSP domains... Done.
    
    C66xx_0: GEL Output: DDR3 PLL (PLL2) Setup ...
    
    C66xx_0: GEL Output: DDR3 PLL Setup... Done.
    
    C66xx_0: GEL Output: DDR3 Init begin (1333 auto)
    
    C66xx_0: GEL Output: XMC Setup ... Done
    
    C66xx_0: GEL Output: IFRDY bit is SET: DDR3 Interface Ready
    
    C66xx_0: GEL Output:
    DDR3 initialization is complete.
    
    C66xx_0: GEL Output: DDR3 Init done
    
    C66xx_0: GEL Output: DDR3 memory test... Started
    
    C66xx_0: GEL Output: DDR3 memory test... Passed
    
    C66xx_0: GEL Output: PLL and DDR3 Initialization completed(0) ...
    
    C66xx_0: GEL Output: configSGMIISerdes Setup... Begin
    
    C66xx_0: GEL Output: SGMII SERDES has been configured.
    
    C66xx_0: GEL Output: Enabling EDC ...
    
    C66xx_0: GEL Output: L1P error detection logic is enabled.
    
    C66xx_0: GEL Output: L2 error detection/correction logic is enabled.
    
    C66xx_0: GEL Output: MSMC error detection/correction logic is enabled.
    
    C66xx_0: GEL Output: Enabling EDC ...Done
    
    C66xx_0: GEL Output: Global Default Setup... Done.
    
    
    C:\ti\processor_sdk_rtos_c665x_6_03_00_106\bin>

  • Hi Brad,

    We can also use CCS to flash the binary in EEPROM. This method will be easier. Will post a video of flashing ASAP.

    Thanks,

    Rajarajan

  • Brad,

    I personally tested yesterday and it worked. I am able to flash the IBL into NOR and boot it successfully.

    The following is the procedure to flash the IBL into the EEPROM memory of C6657 EVM.

    Steps:

    1. Copy the IBL built into the path, "C:\ti\pdk_c665x_2_0_16\packages\ti\boot\writer\eeprom\evmc6657l\bin" and rename it into i2crom.bin.

    2. Open CCS, launch the target configuration, do connect and load the gel file and run.

    3. Load the EEPROM writer into the first core of C6657. ( Do not run the program...Let it get halted and ready in the main())

    4. Open-->view-->Memory window--> click-Load memory-->select the path, " C:\ti\pdk_c665x_2_0_16\packages\ti\boot\writer\eeprom\evmc6657l\bin\i2crom.bin.

    5. Select the next option as "Binary"--> click next--> set the loading address as "0x0C000000" -->Finish

    6. Run

    7. The output messages are  given below.

     FlashingAndBootingNOR.rtf

    8. Power off. Change the DIP switch settings: SW3: off,off,on, off,on,on,on,on ; SW5: on,on,off,on,on,on,on

    ---

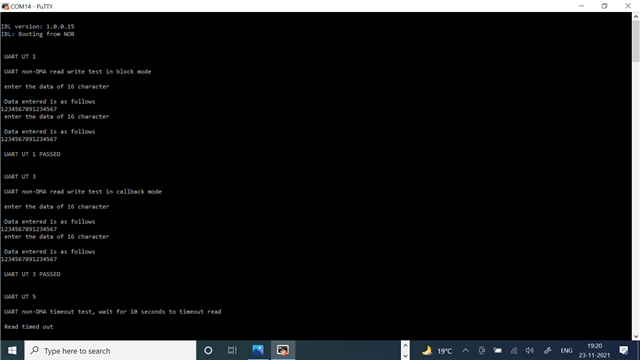
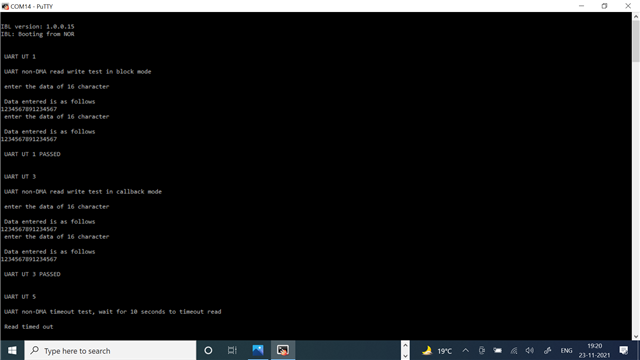
    9. Power on the EVM, Connect the uart cable to PC, 

    Observe the output as 


    Regards

    Shankari G

  • Brad,

    Attaching you the video file, on "How to flash the IBL into NOR of C6657"

    Set the DIP switch into "NO-BOOT" mode.

    Modify the eepromwriter_input.txt located at "C:\ti\pdk_c665x_2_0_16\packages\ti\boot\writer\eeprom\evmc6657l\bin"

    file_name = i2crom.bin
    bus_addr = 0x51
    start_addr = 0
    swap_data = 0

     Booting IBL:

    1. Change the DIP switch settings into

    1. Open hyper terminal or putty and Connect the UART
    2. Observe the IBL booting with version, 1.0.0.15 or 1.0.017

    Regards

    Shankari G