This thread has been locked.

If you have a related question, please click the "Ask a related question" button in the top right corner. The newly created question will be automatically linked to this question.

SK-AM62: SK-AM62 Evaluation Board unable to connect to Code Composer Studio V12 - GEL Expression:OnTargetConnect()

Part Number: SK-AM62
Other Parts Discussed in Thread: SYSCONFIG

Hi Team, 

Good day. I am posting this inquiry on behalf of the customer.

"We are currently using SK-AM62 for evaluation purposes. 

We are using Code Composer Studio as a built environment to load programs into the board. However, we are facing an issue we hope to get your advice on. 


JTAG Debugger: BlackHawk XDS200 USB Debug

Board: SK-AM62

Software: Code Composer Studio v12

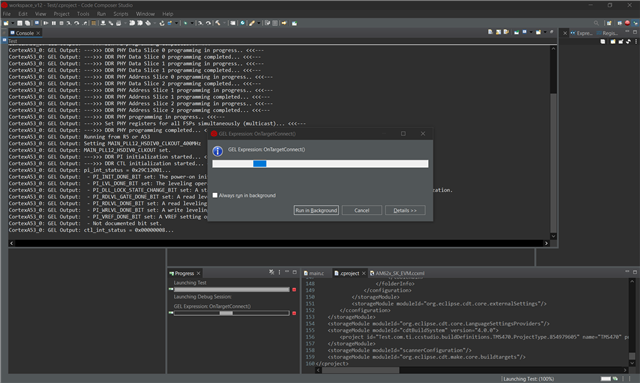
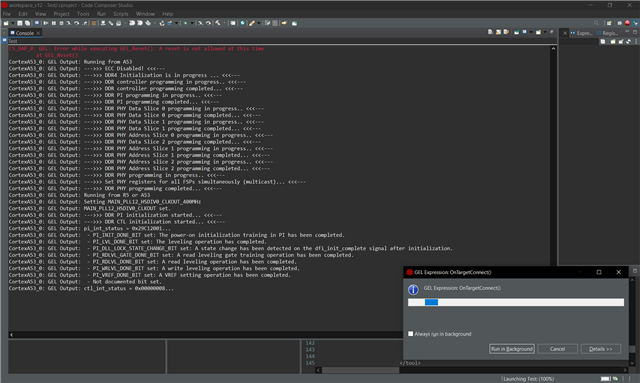
Description: When debugging and loading the program into the board, the process will be stuck at GEL Expression:OnTargetConnect().

Remarks:

1. We have verified the integrity of the JTAG debugger and the board is working
2. We have looked through resource explorer documentation and tried many solutions on the web to no avail.

Attached below are the relevant files for your ease of reference."

Please help to advise. Thank you for extending your help.

Kind regards, 

Marvin 

  • Hello Marvin,

    To confirm, the customer is walking through our "getting started" steps in the MCU+ SDK and they are still unable to connect to CCS?
    https://software-dl.ti.com/mcu-plus-sdk/esd/AM62X/08_04_00_16/exports/docs/api_guide_am62x/GETTING_STARTED.html

    specifically,
    https://software-dl.ti.com/mcu-plus-sdk/esd/AM62X/08_04_00_16/exports/docs/api_guide_am62x/CCS_LAUNCH_PAGE.html 

    Regards,

    Nick

  • Hi Nick, 

    Thank you for the prompt response. Please see the feedback from our customer.

    "Thanks for sending the documentation over! I have forwarded them to our team, and we have progressed on the setup phase by following the steps listed within.

    However, we encountered a potential problem with the documentation. Namely step 3, "EVM Setup".
    Here's the corresponding link for your ease of reference:
    software-dl.ti.com/.../EVM_SETUP_PAGE.html

    In the section "Flash SOC Initialization Binary", the documentation states to build the device manager app image. The directory is {SDK_INSTALL_PATH}/tools/boot/deviceManagerAppimageGen. However, our team could not find this specific directory in our SDK install path despite following the previous steps successfully.

    Remarks: We have thoroughly checked the files in the C:/ti, and confirmed there is no deviceManagerAppImageGen folder."

    Please help to advise. Thank you for extending your help.

    Kind regards, 

    Marvin 

  • Please see additional feedback from the customer.

    We managed to find out the root of the aforementioned problem, turns out it is from a misinterpretation of the documentation in which we downloaded a different SDK.

    1. We followed the guide and successfully flashed the hello world project to our board. The boot mode that we actually want to use is eMMC. However, when we tried to do the same thing in the guide, we saw an error while trying to connect to BLAZAR_Cortex_M4F_1.
    Here's the error message:
    Error connecting to the target:
    (Error -1274 @ 0x0)
    Error encountered during connect sequence. The specific reason is unknown but may be the result of trying to access a Core or logic that is inaccessible due to a lack of Power, Clocks, or Authentication (i.e. Security is preventing).
    If blocked by security, and if supported, access may be allowed after following the Authentication process.
    (Emulation package 9.9.0.00040)


    The main difference is:
    a. Instead of SD boot mode we want to use eMMC boot mode.
    b. Instead of using the default image provided in the SDK folder, we're using the base image provided in the same folder, this is because the default image is too large to flash into eMMC.

    2. We followed the guide and successfully printed out the "Hello world" in the console and the terminal port 4 in CCS. However, this will only work once, if we want to print another "Hello World" we will need to reload the program. Is this normal?
    We're expecting to see the "Hello World" to appear automatically at the 4th USB serial console as soon as the device is boot into Arago Project after a power cycle, is this possible? If it is possible, is there anything that we missed out?

    Thanks in advance! These are 2 problems our team is currently facing.

    Please help to advise. Thank you for extending your help.

    Kind regards, 

    Marvin 

  • Hi Nick, 

    Please see the additional input from the customer.

    "We have successfully booted to Linux, except this time we are using eMMC instead of the SD card method mentioned in the guide (We can see the "Arago project" screen in serial). We also used "base-image" instead of the "default-image" mentioned in the guide because "default-image" is too large to be loaded into eMMC.


    Another thing that we have also tried is we switched back to SD card, only to change the "default-image" into "base-image", and it is still not working. We have tried with other images in the SDK installation folder too but none of them is working. By this, we believe we can conclude that only "default-image" is usable. I wonder what's the difference of this "default-image" with the others that it is usable while the others are not?

    In that case, I would also like to ask if you may provide the following supports:
    1. An image that will not have the above error and can successfully output "Hello World" AND small enough to load into eMMC (<2GB).
    2. A tutorial on how to prepare these images so that we can make ours.

    Thanks in advance!"

    Please help to advise. Thank you for extending your help.

    Kind regards, 

    Marvin 

  • Hello Marvin,

    The "default-image" includes all the extra goodies in the filesystem (e.g., examples that customers can run out-of-the-box). The "base-image" has removed all the unnecessary stuff so that customers can add only what they want. For more information, please reference https://software-dl.ti.com/processor-sdk-linux/esd/AM62X/08_04_01_03/exports/docs/linux/Foundational_Components_Filesystem.html

    In this case, the "default-image" includes firmware binaries that can be loaded into the remote cores, while those firmware binaries are removed in the "base-image". That is probably causing issues.

    On the EVM (or within the computer where you have extracted the filesystem images), try doing

    # cd /lib/firmware/
    # ls -al

    Here's my example using default-image:

    root@am62xx-evm:~# cd /lib/firmware/
    root@am62xx-evm:/lib/firmware# ls -al
    total 46724
    drwxr-xr-x  7 root root    4096 Jun 17  2022 .
    drwxr-xr-x 10 root root    4096 May 17 13:31 ..
    -rw-r--r--  1 root root    2040 May 17 11:52 LICENCE.ibt_firmware
    -rw-r--r--  1 root root    2046 May 17 11:52 LICENCE.iwlwifi_firmware
    lrwxrwxrwx  1 root root      63 May 17 13:32 am62-main-r5f0_0-fw -> /lib/firmware/pdk-ipc/ipc_echo_testb_mcu1_0_release_strip.xer5f
    lrwxrwxrwx  1 root root      72 Jun 17  2022 am62-mcu-m4f0_0-fw -> /lib/firmware/pdk-ipc/ipc_echo_baremetal_test_mcu2_0_release_strip.xer5f
    lrwxrwxrwx  1 root root      47 May 17 13:32 am62x-pru0-fw -> /lib/firmware/pru/PRU_RPMsg_Echo_Interrupt0.out
    lrwxrwxrwx  1 root root      47 May 17 13:32 am62x-pru1-fw -> /lib/firmware/pru/PRU_RPMsg_Echo_Interrupt1.out
    

    Notice how there is a link for all the remote cores that Linux is aware of, and that the link is pointing to the firmware binaries?

    If you try the same thing with "base-image", you will see that the link am62-mcu-m4f0_0-fw is not populated, and there is no firmware binary /lib/firmware/pdk-ipc/ipc_echo_baremetal_test_mcu2_0_release_strip.xer5f for the Linux RemoteProc driver to load.

    Regards,

    Nick

  • So why would this cause issues?

    I assume the customer is trying to connect CCS to the remote cores after Linux has booted and initialized the remote cores.

    If we are using the "default-image", the Linux RemoteProc driver will see the links, and load the firmware and initialize the remote cores as expected. Then CCS will be able to attach to the remote cores.

    However, if we are using "base-image", the Linux RemoteProc driver will look for the links, but it will not be able to find any firmware to load into the remote cores. Thus, it will not initialize the remote cores. If CCS tries to connect to the remote cores, I would expect that the remote core will not even have clock signals getting sent to it, so CCS will be unable to attach to the remote cores.

    I would first try copying the entirety of the /lib/firmware folder from "default-image" into "base-image" to see if you are now able to connect to the remote cores. Note that there may be other changes required.

    Regards,

    Nick

  • Hi Nick, 

    Thank you for the response. Please see the feedback from our customer.

    "Thanks for the solution above! We would like to ask for some advice on some encountered problems.

    1.
    Issue: We managed to merge the lib/firmware/ file from the "default" image into the "base" image. However, we found out that even if we managed to compress the files into the same tar.xz format and load into eMMC, the AM62 board does not recognize the image.

    Question: How does your team prepare the tar.xz and wic.xz file images for the AM62 board? is there a specific software we need to use? We have found that the wic.xz conversion is not widely available, and the Linux compression into tar.xz is not recognized by the board (cannot boot in).

    2.
    Issue:
    In the example tutorial using the "default" image, we were able to run the "Hello World" on BLAZAR_Cortex_M4F_1. However, when we tried the same process on other cores such as Cortex_A53_0 to Cortex_A53_3, and BLAZAR_Cortex_M4F_0, we were unable to connect to those cores successfully.

    Question:
    How do we connect to these different cores with the "Hello World" program? Are there any special configurations that need to be done in CCS or sysconfig to successfully load these cores? Or is the target core connection configured in the "Hello World" main.cpp itself?

    Much advice would be appreciated, thanks!"

    Hope there are solutions for these 2 problems we are currently facing right now, thanks!

    Please help to advise. Thank you for extending your help.

    Kind regards, 

    Marvin 

  • Hello Marvin,

    For question 1 

    I am reassigning your thread to another team member to discuss formatting of filesystems to write to EMMC.

    For question 2 

    Keep in mind that the cores A53_0 to A53_3 are the cores that are running Linux. So you will not be able to both run Linux on the A53 cores, AND run RTOS/NORTOS projects on the A53 cores.

    Please also keep in mind that we do not provide any MCU+ SDK support for RTOS/NORTOS on AM62x A53 cores. For AM64x RTOS/NORTOS on A53 is currently an experimental, nonsupported feature as per the AM64x docs: https://software-dl.ti.com/mcu-plus-sdk/esd/AM64X/08_04_00_17/exports/docs/api_guide_am64x/RELEASE_NOTES_08_01_00_PAGE.html#EXPERIMENTAL_FEATURES 

    Similarly, BLAZAR_Cortex_M4F_0 is not exposed for development.  BLAZAR_Cortex_M4F_1 is the only remote core where we support MCU+ development as of the AM62x MCU+ SDK 8.4.

    Regards,

    Nick

  • Hi Marvin,

    Issue: We managed to merge the lib/firmware/ file from the "default" image into the "base" image. However, we found out that even if we managed to compress the files into the same tar.xz format and load into eMMC, the AM62 board does not recognize the image.

    I guess you if you use the unmodified "base" image on eMMC, it can be recognized, correct?

    Please provide the detailed steps/logs showing how you created the merged "base" image, loaded it to eMMC, and the Linux boot failure.

  • Hi Bin, 

    Thank you for the response. Please see the feedback from our customer.

    "There are updates regarding our aforementioned inquiries. I have segregated each update into its own respective message for ease of reference.

    Question 2: A53 cores and M4F cores
    Since A53 cores are running Linux, are M4F cores running RTOS/NORTOS only when connected to our CCS?

    Also,
    We intend to load programs into A53 cores through CCS to run and debug.
    Is there any tutorial or documentation that will guide us in loading programs and debugging the A53 cores which are running Linux through CCS?

    Question 1: Merging lib/firmware/ file from the "default" image into the "base" image.
    "I guess if you use the unmodified "base" image on eMMC, it can be recognized, correct?" - Yes, that is correct, the original base image is usable. However, after extracting and recompressing the file into the same format (tar.xz), after loading into eMMC it will be unusable.

    Below are the steps detailing how we created the modified base image.
    Step 1: Extract "base image" tar.xz and "default image tar.xz into a folder. Copy the lib/firmware/ file from default into base folder and recompress.

    Step 2: After that, we will flash in eMMC using the steps in this link:
    https://e2e.ti.com/support/processors-group/processors/f/processors-forum/1127618/faq-sk-am62-how-to-flash-emmc-using-usb-dfu-on-am62x-sk-e2

    Step 3: The Linux Boot failure message is as follows:

    Here are the 2 updates of our aforementioned inquiries, we heavily appreciate your cooperation and patience in assisting us. Do let us know if we left out anything."

    Please help to advise. Thank you for extending your help.

    Kind regards, 

    Marvin 

  • Hi Marvin,

    I will let our IPC expert to comment on other questions, but regarding question #1,

    Step 3: The Linux Boot failure message is as follows:

    The log shows uboot is unable to find kernel image and dtb from the root filesystem. It is likely the updated rootfs wasn't compressed/flashed correctly.

    Step 1: Extract "base image" tar.xz and "default image tar.xz into a folder. Copy the lib/firmware/ file from default into base folder and recompress.

    Please list the exact commands used to do these steps, and the console log as well.

  • Hi Bin, Nick, 

    Thank you for the response. Please see the feedback from our customer.

    We have read and tried the forum in the link you sent earlier regarding the A53 debugging cores. However, the forum was inconclusive and did not articulate the exact way to connect to the A53 cores to load the "Hello World" project.

    As such, we have articulated 2 exact questions for your convenience.

    1. Can we have the exact way to build images to be loaded into the AM62-SK board?

    2. Can we have the exact way to connect to A53 cores using CCS, so that we could load the "Hello World" project and run it in the A53 cores?

    Your experience in the matter would be appreciated, thanks in advance.

    Kind regards, 

    Marvin

  • Hello Marvin,

    I have unlocked the thread, thank you for the ping. At this point in time, the link I provided is all the information that I currently have.

    Regards,

    Nick

  • Hi Nick,

    I'm from Keysight which my colleague was the one who contacted Marvin regarding this issue, you can call me Koon Kee.

    So is there a way to connect to A53 cores using CCS through blackhawk? so that we could load and debug the "Hello World" project using blackhawk debugger and run it in the A53 cores? Can you please guide us on what kind of modification we can do on the project file to load the "Hello World" project into A53 cores?

    Thanks,

    Koon Kee

  • Hello Koon Kee,

    I assume you are talking about Linux running on A53 cores. At this point in time, the information I am aware of is listed in my previous post:
    https://e2e.ti.com/support/processors-group/processors/f/processors-forum/1108360/sk-am62-code-composer-studio-failed-to-connect-to-xds-110-probe/4155604#4155604

    Regards,

    Nick