This thread has been locked.

If you have a related question, please click the "Ask a related question" button in the top right corner. The newly created question will be automatically linked to this question.

TMS320C6657: NANDFLASH curing burn program, read back register gets stuck

Part Number: TMS320C6657

Hi team,

1) Using a custom board, NANDFLASH connects directly to C6657 via EMIF, using 1G08 chip, and the boot pin is controlled by FPGA which is always in NAND boot mode. Flash is burned through the official C6657_directROM_Boot_example curing routine.

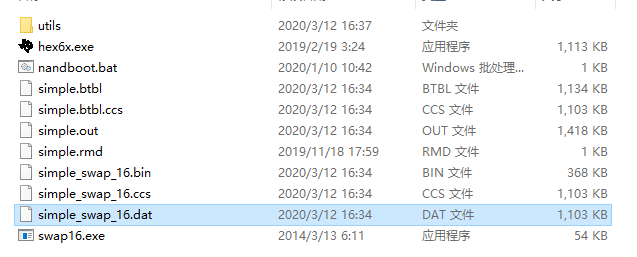
Compile the .dat binary file.

Loading evmc6657l.gel causes the above to occur, so their own .gel script was used later.

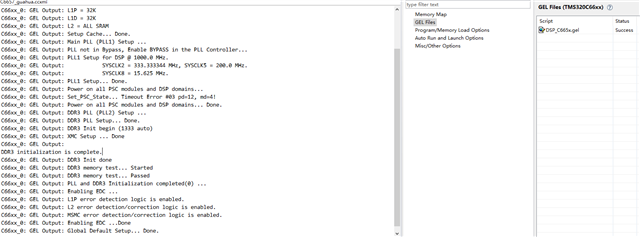
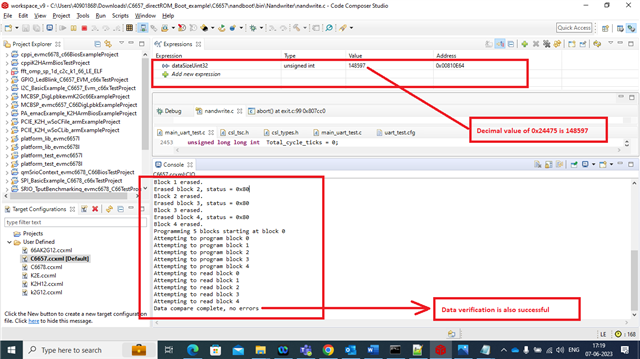
After initialization is complete, load the nandboot.out file, import .dat and modify the number of bytes. After running, it will get stuck.

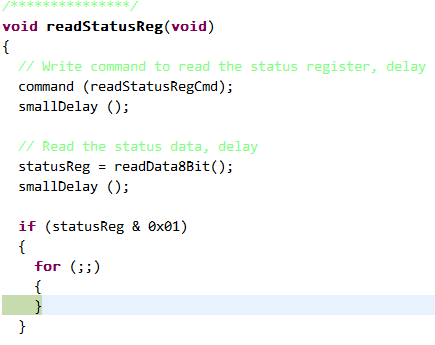
It gets stuck when reading back the status register. 

2) The .dat file that is compiled with a flash-driven project starts on page 0 of block 0 and is written to flash by page, with no error in readback. However, the boot still does not start after power cycle and the bootcompleted bit is 0. 

Could you help check this case? Thanks.

Best Regards,

Cherry

  • Cherry,

    Thanks for the detailed note. Let me check and get back in a day or two.

    Regards

    Shankari G

  • Cherry,

    Could you please give the following details.

    1. Name of the TI software package, used.

    2. Version of the package.

    Regards

    Shankari G 

  • Hi Shankari G,

    Thank you for the support.

    1. Name of the TI software package, used.

    3034.C6657_directROM_Boot_example2678.C6657_directROM_Boot_example.zip

    Also, the status register read back has a value of 0xE1, and according to the manual, this command indicates that execution was not successful. 

    Thanks and regards,

    Cherry

  • Cherry,

    Let me give it a try and get back. ( NAND-Direct boot )

    ---

    Meanwhile, have you tried SPI-NOR - Direct boot example? 

    If you are not very particular about the NAND flash but particular only about the direct boot mthod, the SPI-NOR direct boot will work.

    Please follow the steps given here: 

    (1) [FAQ] TMS320C6657: How to run the direct SPI-BOOT example on TI-C6657-EVM without IBL ? - Processors forum - Processors - TI E2E support forums

    Regards

    Shankari G

  • Hi Shankari G,

    1) The customer’s scheme determines that NAND flash is required and that there is no IBL, connected directly with the EMIF bus. SPI has other uses so cannot be modified at this time. 

    2) The NANDFLASH chip used on the custom board is the MT29F1G08ABBFAH4, and the corresponding spareBytesPerSegment is found in the manual, which is different from the EVM board. It was modified in the nandwrite project. The original spareBytesPerSegment = 16.

    /* These values are setup at run time */
    unsigned int busWidth = 8;
    unsigned int pageSizeBytes = 2048;
    unsigned int pagesPerBlock = 64;
    unsigned int spareBytesPerSegment = 32;
    unsigned int spareBytesPerPage = 0;

    But the issue persists.

    Thanks and regards,

    Cherry

  • Cherry,

    I have tested the same procedure on TI-C6657 EVM and able to succeed the loading of image into NAND flash successfully.

    Even, the data verification step was passed without any errors.


    --

    LET me upload a video file of my procedures. Please compare it with yours.

    Check whether there is any difference. Particularly in updating the size of variable, "dataSizeUint32"   in hex/decimal format.... 

    For example, I update it as "0x00024475" in hex format and it displays as "148597" in decimal format

    --

    And also, I could see, there are " Programming 5 blocks" where as in yours it is " programming 4 blocks" 

     Regards

    Shankari G

  • Hi Shankari G,

    Particularly in updating the size of variable, "dataSizeUint32"   in hex/decimal format.... 

    For example, I update it as "0x00024475" in hex format and it displays as "148597" in decimal format

    DataUINT32 in hex, copied from the imported .dat file to 0x0c000000. The customer has verified that the result is the same when modifying dataUINT32 whether hexadecimal or decimal is used. 

    The customer found that when reading back block 0, it first entered readAndCorrectSegment and then went to readSparebytes. And it got stuck after stepping at scratch[I] = readData8bit();

    That is, the first byte that starts reading back gets stuck, what might be the cause of the read back feature error? Or might it be a hardware issue? 

    Thanks and regards,

    Cherry

  • Cherry,

    No, No. I mean to say, if they use hexadecimal value, append "0xvalue". And if they use decimal value, they could convert the hexadecimal value into decimal 

    and type the value without "0x".

    ---

    Whether they have TI-C6657 EVM board with them ?

    If yes, Please ask them to try it out in that board. So that we can compare and check what goes wrong... 

    ---

    When I build, the size of simple_swap_16.dat is 1 KB. 

    But, in your post, your screenshot says 1103KB... Why?

    ---


    That is, the first byte that starts reading back gets stuck, what might be the cause of the read back feature error? Or might it be a hardware issue? 

    Actually, once the image is written on the NAND flash, for data verification, it reads back , compare and verify.

    This will ensure that the data written on the NAND flash is correct or not.

    Regards

    Shankari G

  • Hi Shankari G,

    Whether they have TI-C6657 EVM board with them ?

    They don't have EVM board.

    When I build, the size of simple_swap_16.dat is 1 KB. 

    But, in your post, your screenshot says 1103KB... Why?

    The .simple_swap_16.dat file is compiled by running .bat here by changing the .out file that needs to be burned to simple.out. This flow is done as described in the docs in the software package: 

    Building the boot image:

    Set C6000 and PDK path in the setup.bat and run setup.bat form windows command line. 

    Change directory to src and build the simple application

    Gmake clean

    Gmake all

    Copy the simple.out to the build folder 

    Set the %IBL_UTIL% path in the nandboot.bat file and run the nandboot.bat file. The simple_swap_16.dat file is used to flash the image to NAND flash.

    Thanks and regards,

    Cherry

  • Cherry,

    My question is.... the same procedure is followed by both, you and me.... How come the size of the binary is different?

    Let me post a video in a while...

    Regards

    Shankari G

  • Cherry,

    Video steps to generate the bootable image, simple_swap_16.dat

    Video steps on flashing the bootable image, simple_swap_16.dat into NAND memory, using NAND writer.

    Regards

    Shankari G