Part Number: IWR6843AOPEVM
Other Parts Discussed in Thread: MMWAVE-SDK, IWR6843AOP, IWR6843,
MMWAVE-SDK 3.2.x startup sequence needs to be updated for IWR6843 ES1.0 and IWR6843AOP ES1.0 devices
NOTE: The following update will be included in future MMWAVE-SDK releases.
Users can follow the instructions provided below to make the necessary code changes in the SDK themselves
OR
use the pre-updated C file (soc.c) and the updated AOP out of box demo binary: xwr64xxAOP_mmw_demo.bin available in the 68xx AoP - mmWave SDK Demo Lab in mmWave Industrial Toolbox 4.0.1. You will still need follow step-2 given below to re-build the soc lib with source code updates.
Devices affected: IWR6843 ES1.0, IWR6843AOP ES1.0
SW Versions affected: MMWAVE-SDK 3.2.0.4, MMWAVE-SDK 3.2.0.6_AOP
Description: The start-up sequence in the affected MMWAVE-SDK and MMWAVE-SDK AOP releases can fail causing the application to terminate during startup.
The ROM bootloader on IWR6843 ES1.0 devices performs APLL calibration during device boot-up and the status of this calibration is checked by MMWAVE-SDK initialization code. The APLL might not fully settle during ROM bootloader execution causing this SDK check to fail. This does not impact application code since APLL calibration is again performed by the BSS firmware during BSS (aka Radar SS) power-up and SDK checks BSS returned APLL calibration status before starting the application tasks.
In summary, the SDK startup code checks the APLL calibration status twice:
- The first check for ROM bootloader based APLL calibration in SOC_init. This check is redundant and needs to be removed.
- Second check for BSS based APLL calibration in MMWave_initMMWaveLink in mmwave_link.c
Solution: As mentioned above, the first check is redundant and needs to be removed. Please follow the steps given below to update the code in MMWAVE-SDK 3.2.0.4 (if using IWR6843 ES1.0) and MMWAVE-SDK 3.2.0.6_AOP (if using IWR6843AOP ES1.0). The following updates will be included in future MMWAVE-SDK releases.
Instructions to update the start-up sequence in MMWAVE-SDK 3.2.x
Step-1. Make the following modifications in file: C:\ti\mmwave_sdk_03_02_00_xx\packages\ti\drivers\soc\src\soc.c
a) In function SOC_init(), delete/disable the section of code highlighted below (you can put this section inside #if 0 and #endif pre-processor directives to disable it):
if (ptrCfg->clockCfg == SOC_SysClock_INIT)
        {
#if 0
            retVal = SOC_checkBLAPLLCalibration();
            if(retVal < 0)
            {
                /* Error: Expect APLL calibration is done by BL without errors */
                *errCode = SOC_EBLERR;

                /* Free memory and return NULL handle */
                MemoryP_ctrlFree(ptrSOCDriverMCB, sizeof(SOC_DriverMCB));
                ptrSOCDriverMCB = (SOC_DriverMCB *)NULL;
                goto exit;
            }
#endif
b) You will also need to disable the :exit label towards the end of this function to avoid an unused label compiler error.
c) Delete/disable both the function declaration and definition for SOC_checkBLAPLLCalibration() in the same file.
d) Add the new function call SOC_waitAPLLCalibration(…) after SOC_unhaltBCC(…) as highlighted below;
            /* YES: Unhalt the BSS: */
            SOC_unhaltBSS((SOC_Handle)ptrSOCDriverMCB, errCode);

            /* Wait until APLL calibration is done by BSS */
            SOC_waitAPLLCalibration(ptrSOCDriverMCB);
e) Add the following new code (function declaration and body for SOC_waitAPLLCalibration) in the same file, as shown below. This code can be added at the top of this file before other function declarations and definitions.
/* Function declaration */
static void SOC_waitAPLLCalibration(SOC_DriverMCB* ptrSOCDriverMCB);

/* Function definition */
/**
 *  @b Description
 *  @n
 *      This function checks APLL status and wait until APLL clock Calibration
 *      is done from BSS.
 *
 *  @param[in] ptrSOCDriverMCB
 *      Pointer to the SOC Driver
 *
 *  \ingroup SOC_DRIVER_INTERNAL_FUNCTION
 *
 *  @retval
 *      Not Applicable
 */
static void SOC_waitAPLLCalibration(SOC_DriverMCB* ptrSOCDriverMCB)
{
    TOPRCMRegs* ptrTopRCMRegs;

    /* Get the TOP RCM registers: */
    ptrTopRCMRegs = ptrSOCDriverMCB->ptrTopRCMRegs;

    /* Wait until APLL clock calibration is done successfully */
    while (CSL_FEXTR(ptrTopRCMRegs->SPARE0, 17U, 16U) != 0x3);
}
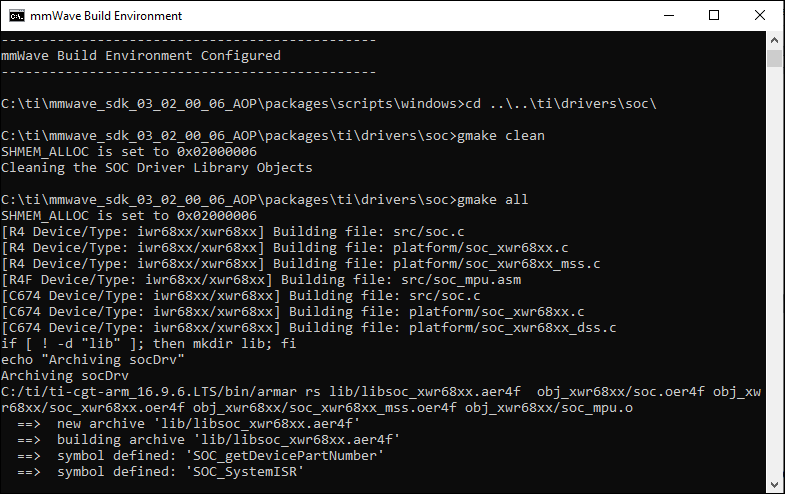
Step-2. Rebuild the soc lib using the steps provided below
a) Open a command window in C:\ti\mmwave_sdk_03_02_00_xx\packages\scripts\windows
b) Execute “setenv.bat”
c) In the same terminal session cd to C:\ti\mmwave_sdk_03_02_00_06_AOP\packages\ti\drivers\soc
d) Execute “gmake clean” followed by “gmake all”.
e) The above steps are also shown in the following snapshots (all from the same command window):
Step-3. Rebuild the mmw demo for the Target device (68xx or 68xx AOP)
a) Either using the build instructions provided in the corresponding SDK user guide, section Building Demo
or
b) Using the mmWave SDK Demo lab for the target device (68xx or 68xx AOP) provided as part of mmWave Industrial Toolbox on TI Resource Explorer
- For IWR6843: Follow the Developer’s Guide instructions in the 68xx – mmWave SDK Demo – DSP Version (or HWA Version)
- For IWR6843AOPEVM: Follow the Developer’s guide instructions in the 68xx AOP – mmWave SDK Demo – HWA Version
Step-4. Flash the updated mmw demo binary on the target EVM.
Flash and execute the new demo binary on the target EVM as described in the mmWave SDK user’s guide or the mmWave SDK Demo Labs mentioned above.


