This thread has been locked.

If you have a related question, please click the "Ask a related question" button in the top right corner. The newly created question will be automatically linked to this question.

LAUNCHXL-CC1310: Need a little help on Sensor Controller code integration

Part Number: LAUNCHXL-CC1310
Other Parts Discussed in Thread: CC1310

Setup:

Win 10 PC, Code Composer Studio Version: 10.1.1.00004, Sensor Controller Studio 2.7.0.155, Node and Concentrator project, using CC1310 as node and CC1352 as concentrator.

Success:

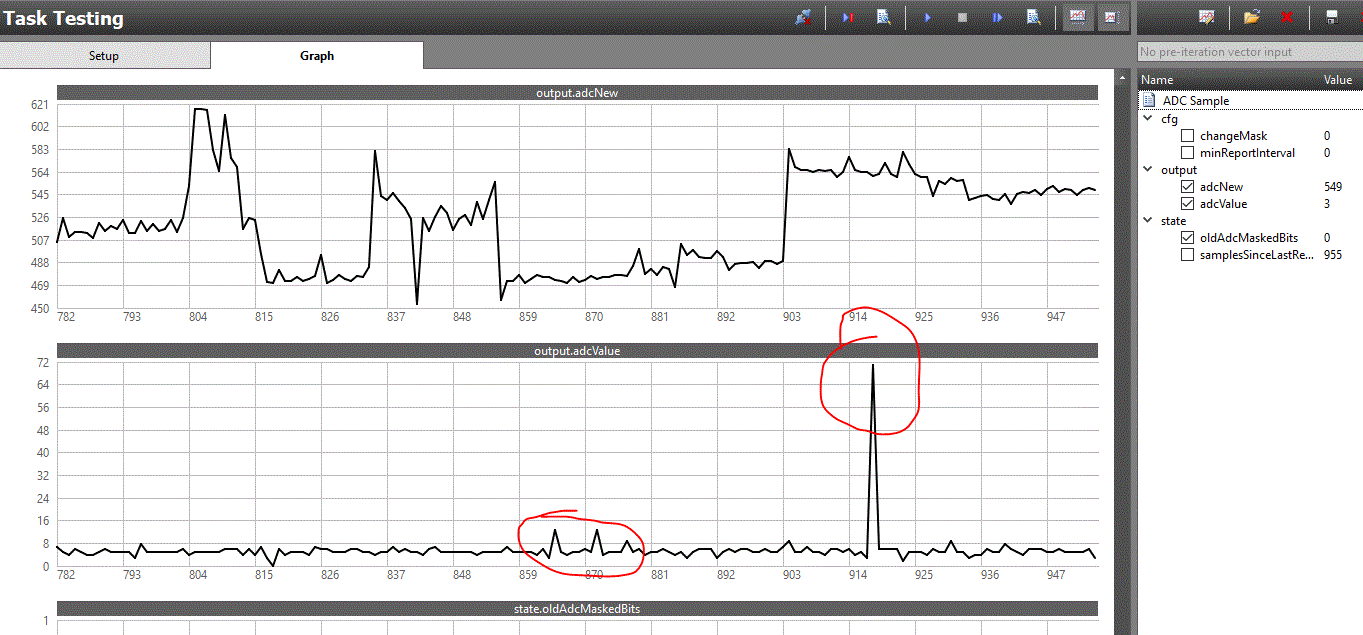
I had good success running TI generated code on 3 CC1310 nodes and 1 concentrator, with one ADC channel being sampled both from CCS, and from SCS. I was even to add 2 more ADC channels and successfully test (Task Test) the added ADC sampling code. 

Failure:

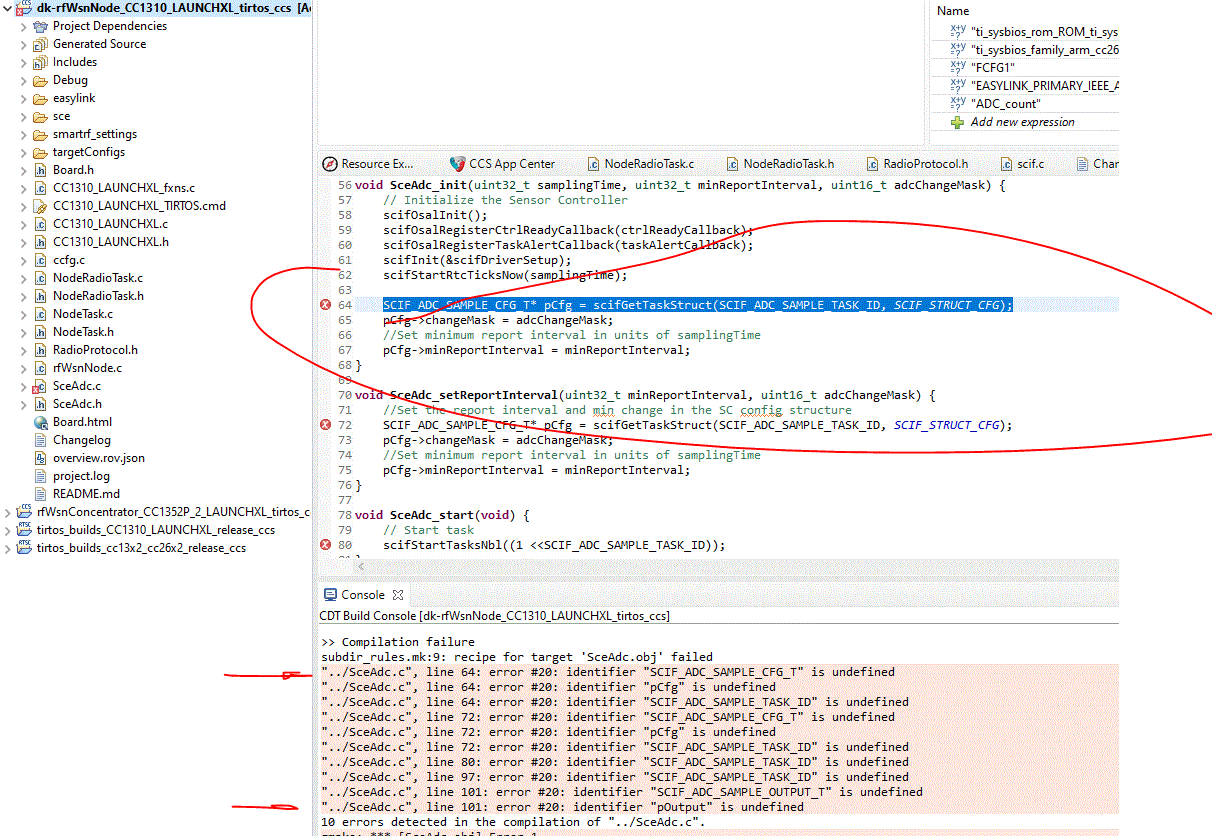
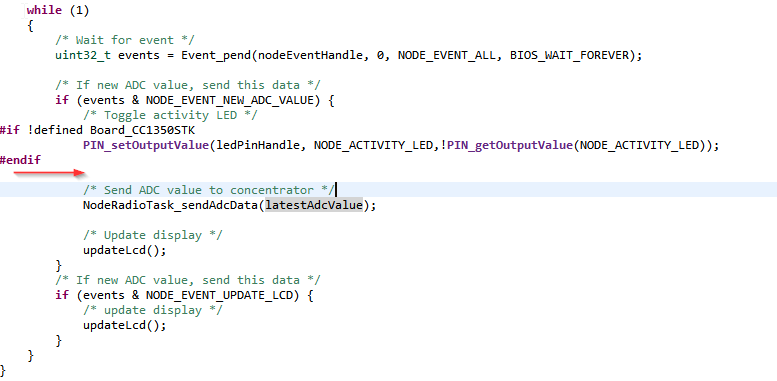
Now I have problems trying to compile the code generated from SCS in CCS once I added 2 more ADC channels. 

I'm just digging into the Sensor Controller Studio for the first time, and I'm stuck and I need some help figuring out why my SCS projects runs fine (I can see ADC values changing correctly) in SCS but when the same code is generated for Code Composer Studio, I get errors in the SceAdc.c file. I don't see anything in the scif_how_to_use.html about the SceAdc.c nor is there anythng in the node readme.md file about the SceAdc file, so I'm not sure where to start.

I'm not a C programmer by trade, but I have done a number of projects involving both hardware and software (a lot of assembly) design, but this is just a little beyond my reach.

Thanks,

Tim

  • Hi Tim,

    First of all, did you take a look at the SimpleLink Academy lab on this topic?


    Then, in general for C code where you get the "undefined" error, please check what file file you have defined these objects in and make sure it's imported where they are used.

  • It is not possible to say why you get problems with CCS when we do not know what changes you have implemented in SCS.

    Siri

  • Thanks for the help Marie. I did go through that example but it has been a while. I'll take another look. And I will take a look at the C files imported, thanks again.

    Tim

  • Hi Marie,

    I  gotta say I've developed a lot of products in my life (with ADC hardware), but I've never had this hard of time with an Analog to Digital converter software. It's funny because, I can get the TI supplied SCS applications working within SCS, but as soon as I import them to the Sensor project, I have all kinds of problems. It seems really hard to read the code, and the comments with code that is generated from the Sensor Controller Studio.

    So my question is, is there a way to modify the TI supplied Sensor code, or just simply add new code for a simple ADC task. The task is comprised:

    1. Init ADC, and ADC input port

    2. Trigger the ADC

    3. Read from the ADC FIFO

    I don't really want to use the SCS code unless that is the only way to get this simple result. If you have example code I can use, that would be terrific.

    Thank you very much,

    Tim

  • And by the way, I did do a couple of the simplelink academy for SCS, the cap switch and a couple of the ADC tasks, all worked great.  But now I'm looking at adcsinglechannel using RTOS and it looks like what I might need. Now to understand how to integrate it with my Sensor/Concentrator project.

    So it looks like I need the ADC to do two things. 

    1. Already it samples a channel, compare output value to bins (is default for 5 bins - 4096/5 or ???) , so I need it to not just sample one channel, I need two. I do have the Sensor controller code working, it's just getting my application Sensor software to read/report the ADC values.

    2. From the application, I'd like to make analog samples of some ADC channels. Right now I'm not getting much success here either.

    Thanks again!

    Tim

  • OK, update.

    I'm getting something close to working for 2 channels in the SCS. This is the ADC  project that comes from TI in the Sensor project.

    Here is the Execution Code, Init and Termination code are unchanged. My problem is that both adcValue and adcNew read the same adcNew value.

    // Enable the ADC
    adcEnableSync(ADC_REF_FIXED, ADC_SAMPLE_TIME_2P7_US, ADC_TRIGGER_MANUAL);
    //adcEnableSync(ADC_REF_FIXED, FW_DELAY_RANGE_20_US, ADC_TRIGGER_MANUAL);
    
    
    // Sample the ADC
    S16 adcValue;
    adcGenManualTrigger();
    adcReadFifo(adcValue);
    output.adcValue = adcValue;
    
    //debug
    S16 adcValue2;
    // Select ADC input -- make new input channel = DIO30
    adcSelectGpioInput(0);
    adcEnableSync(ADC_REF_FIXED, ADC_SAMPLE_TIME_2P7_US, ADC_TRIGGER_MANUAL);
    adcGenManualTrigger();
    adcReadFifo(adcValue2);
    output.adcNew = adcValue2;
    //debug
    
    // Disable the ADC
    adcDisable();
    
    // Alert the driver if outside of change mask
    U16 adcMaskedBits = adcValue & cfg.changeMask;
    if (adcMaskedBits != state.oldAdcMaskedBits) {
        fwGenAlertInterrupt();
        state.samplesSinceLastReport = 0;
    } else {
        state.samplesSinceLastReport = state.samplesSinceLastReport + 1;
    }
    
    //Alert driver if minimum report interval has expired
    if(cfg.minReportInterval != 0) {
        if(state.samplesSinceLastReport >= cfg.minReportInterval) {
            fwGenAlertInterrupt();
            state.samplesSinceLastReport = 0;
        }
    }
    
    // Save old masked ADC value
    state.oldAdcMaskedBits = adcValue & cfg.changeMask;

    And then here is the Task Testing Graph...please note that adcValue input is tied to GND.

    The code works perfectly for one channel when I remove all the code between the "//debug" comments:

    //debug
    S16 adcValue2;
    // Select ADC input -- make new input channel = DIO30
    adcSelectGpioInput(0);
    adcEnableSync(ADC_REF_FIXED, ADC_SAMPLE_TIME_2P7_US, ADC_TRIGGER_MANUAL);
    adcGenManualTrigger();
    adcReadFifo(adcValue2);
    output.adcNew = adcValue2;
    //debug

  • The Test graph did not come through...so here it is

  • OK fixed the SCS output

    // Enable the ADC
    adcEnableSync(ADC_REF_FIXED, ADC_SAMPLE_TIME_2P7_US, ADC_TRIGGER_MANUAL);
    //adcEnableSync(ADC_REF_FIXED, FW_DELAY_RANGE_20_US, ADC_TRIGGER_MANUAL);
    
    // Select ADC input (A3 / DIO26)
    adcSelectGpioInput(AUXIO_A_AD_INPUT);
    
    // Sample the ADC
    S16 adcValue;
    adcGenManualTrigger();
    adcReadFifo(adcValue);
    output.adcValue = adcValue;
    
    Now on to gettting this working in my Sensor application!
    t //debug // Change ADC input -- make new input channel = DIO30 adcSelectGpioInput(0); adcGenManualTrigger(); adcReadFifo(output.adcNew); //debug // Disable the ADC adcDisable(); // Alert the driver if outside of change mask U16 adcMaskedBits = adcValue & cfg.changeMask; if (adcMaskedBits != state.oldAdcMaskedBits) { fwGenAlertInterrupt(); state.samplesSinceLastReport = 0; } else { state.samplesSinceLastReport = state.samplesSinceLastReport + 1; } //Alert driver if minimum report interval has expired if(cfg.minReportInterval != 0) { if(state.samplesSinceLastReport >= cfg.minReportInterval) { fwGenAlertInterrupt(); state.samplesSinceLastReport = 0; } } // Save old masked ADC value state.oldAdcMaskedBits = adcValue & cfg.changeMask; // Schedule the next execution in seconds fwScheduleTask(2);

    . Now I have two channels sampling and here is the code.

  • OK, the problem with the Sensor Controller Studio code was that I needed to change the analog channel being sampled inside the Execution Code, not the Init Code. So that is fixed, and the SCS now has 2 channels sampling. Here's the SCS Execution code, note there really is no need for Init or Term code.

    // Enable the ADC
    adcEnableSync(ADC_REF_FIXED, ADC_SAMPLE_TIME_2P7_US, ADC_TRIGGER_MANUAL);
    
    // Select ADC input (A3 / DIO26)
    adcSelectGpioInput(AUXIO_A_AD_INPUT);
    
    // Sample the ADC
    S16 adcValue;
    adcGenManualTrigger();
    adcReadFifo(adcValue);
    output.adcValue = adcValue;
    
    // Change ADC input -- make new input channel = DIO30
    adcSelectGpioInput(0);
    adcGenManualTrigger();
    adcReadFifo(output.adcNew);
    
    // Disable the ADC
    adcDisable();
    
    // Alert the driver if outside of change mask
    U16 adcMaskedBits = adcValue & cfg.changeMask;
    if (adcMaskedBits != state.oldAdcMaskedBits) {
        fwGenAlertInterrupt();
        state.samplesSinceLastReport = 0;
    } else {
        state.samplesSinceLastReport = state.samplesSinceLastReport + 1;
    }
    
    //Alert driver if minimum report interval has expired
    if(cfg.minReportInterval != 0) {
        if(state.samplesSinceLastReport >= cfg.minReportInterval) {
            fwGenAlertInterrupt();
            state.samplesSinceLastReport = 0;
        }
    }
    
    // Save old masked ADC value
    state.oldAdcMaskedBits = adcValue & cfg.changeMask;

    Now the code running on CCS looks like the TI-supplied Sensor code except this addition for second channel:

    static void adcCallback(uint16_t adcValue, uint16_t adcNew);
    
    static void adcCallback(uint16_t adcValue, uint16_t adcNew)
    {
        /* Save latest value */
        latestAdcValue = adcValue;
        latestAdcValueFromVcellHI = adcNew;
    
        /* Post event */
        Event_post(nodeEventHandle, NODE_EVENT_NEW_ADC_VALUE);
    }
    
    *****AND THEN in reading the SCE output.....
            /* Get the SCE "output" structure */
            SCIF_ADC_SAMPLE_OUTPUT_T* pOutput = scifGetTaskStruct(SCIF_ADC_SAMPLE_TASK_ID, SCIF_STRUCT_OUTPUT);
    
            /* Send new ADC value to application via callback */
            if (adcCallback)
            {
                adcCallback(pOutput->adcValue, pOutput->adcNew);
            }

    I hope this helps someone else, since I spent way too much time trying to figure out what the TI-supplied software was trying to do (I'm not gonna say how much time!).

    Tim

  • Marie, if you are still listening, I really need some help understanding why there is so much noise on the ADC channel values as seen in the Task Testing output. I have one channel jumped to ground and the other channel floating and I expect that big spike is the internal mux switching but will that value be ignored? And then the residual noise level seems very high to me, up to 12-13 counts with the input grounded. Would that value be zero'd if I do the input scaling required for raw ADC inputs? Where do I find that documented if so?

  • Last question first: See https://dev.ti.com/tirex/explore/node?node=ABO7T5VshSOTTVANhMb1NQ__eCfARaV__LATEST

    ADC_convert( ... ); is the same as the Sensor Controller do. You then have to run ADC_convertRawToMicroVolts( ... ); to get the adjusted value. 

    You could also run the example I pointed to and compare the data before and after the gain/ offset adjustment when you have the ADC input grounded. 

  • TER, thank you:

    You said "ADC_convert( ... ); is the same as the Sensor Controller do. You then have to run ADC_convertRawToMicroVolts( ... ); to get the adjusted value. "

    Are you saying that instead of using adcReadFifo() function I need to use ADC_convert(), to be able to do gain and scale calibration? 

    And I'm not clear how converting a 3.0V signal to microvolts, which would be about 3M microvolts, will fit into a 16bit memory for use by the application. Can you refer me to something that helps me understand that function a little better please?

    I will try the code you pointed to  and see if that reduces the noise, but after reading ENOB of about 10bits in my application, and around 60db SNR, that you could help illuminate what actual noise floor with input connected to ground would look like. 

    I gotta say that TI provides a wealth of material, including resources on this forum, but I find myself reading day and night to try and absorb it all. For a little 3 buck chip, this thing sure does lot, and is hugely complicated. I totally see why and am extremely thankful that TI wrote a lot of the RF comms software. That stuff is hard work, and I truly appreciate that a lot has been done to make it easier for we application developers. I'm hoping I can get this "easy analog" stuff done and be on my way!

    T

  • No.

    If you with the same board and the same input you should get equal result if you run ADC_convert() vs reading the output using adcReadFifo() 

    The wo functions use the ADC in the same way, the difference is that the first use it from the CM3, the other one use the ADC from the sensor controller. 

    The result of ADC_convertRawToMicroVolts( ... ) is a 32 bit value, see dev.ti.com/.../_a_d_c_8h.html

  • So you are saying that to use ADC_convertToMicroVolts(), it has to be run in the main application code after ADC_convert(), right?

    Because if I try to run ADC_convertToMicroVolts() from SCS, it gives me a syntax error. And if this is true, then I have to rewrite all of my ADC code, which uses averaging and some math for limit checking, which will not make me happy at all. So please tell me there is an equivalent function to ADC_convertToMicroVolts() that i can run from Sensor Controller Studio code.

  • Slightly poor wording from my side. 

    The Sensor Controller code runs adcReadFifo(). It then has to pass the value over to the CM3 side which runs the ADC_convertMicroVolts() (That is why I linked to the example)

  • TER,

    Thank you for your help. Is there a way to do the calibration inside Sensor Controller Studio?

    t

  • OK, to calibrate the ADC , an ADC_convert() is required to run before the convert to microvolts routine. But the ADC_convert() is not the same as the adcReadFifo(), so for my app I will need to do numerous samples using ADC_convert(). Here's the definition of ADC_convert() according to TI documentation.

    Also, is it possible to provide an example, or documentation that uses the SCS for the ADC sampling and then then CCS code for the callibration? 

  • I'll try to rephrase. 

    If you only have a CCS project (the Sensor Controller not in use): The flow is as shown in https://dev.ti.com/tirex/explore/node?node=AKW5AKwnAYE1tS0FZ14ixw__eCfARaV__LATEST

    To simplify: Do an ADC_convert(), then use ADC_convertRawToMicroVolts() to adjust the gain and offset error.

    If you use the Sensor Controller: 

    adcGenManualTrigger(); to do the ADC conversion then adcReadFifo(); to read out the value. This value is typically passed to a part of memory the CM3 has access to. See the scif_how_to_use.html file generated when you use the Code Generator in SSC. 

    If you look at the ADC Data Logger example and open the main_tirtos.c file: In this example you could have run ADC_convertRawToMicroVolts after this line: uint16_t value = scifTaskData.adcDataLogger.output.pSamples[tail];

  • So I'm pretty stuck here. I feel like I'm being sent to do busy things, instead of solving my problem, which is trying to get calibrated ADC values, while also using the Sensor Controller (SC) for other ADC work. I'll summarize your most recent help as 3 items.

    1. "the Sensor Controller not in use". As we have been discussing above, I am using SC because I need low power ADC samples.

    2. Use adcReadFifo and then scif_how_to_use to complete the calibration. Two problems, first as we discussed above, you said that ADC_convert had to be used first, and so does all the TI documentation I can find. So which is it? And second the scif_how_to_use  mentions neither of adcReadFifo, or how to use ADC_convertRawToMicroVolts or any other calibration method. 

    3. I can find ADC Data Logger example in the SCS, but there is no main_tirtos.c file there. Looking in SimpleLink directory under CC1310 Launchpad, and in the Simplelink Academy, there are no ADC Data Logger examples. Can you be more specific about where to find?

    Maybe you could just have an CC1310 ADC specialist look at my code (almost exactly collector/node code) and describe how and where I can do a calibration on analog pin A7? I have had good luck with this following code, but it only works until the SC starts up:

    #include "dkboards.h"
    #include <sce/scif.h>
    
    // Import ADC Driver definitions
    #include <ti/drivers/ADC.h>
    
    
    /* ADC conversion result variables */
    
    static uint32_t resultUv_HI;      // calibrated analog value from hi side
    static uint32_t resultUv_LO;      // calibrated analog value from lo side
    
    void ADC_calibration(void)
    {
        // Define name for ADC channel index
        #define VCELL7PT4V  7
        #define VCELL3PT7V  5
        static uint16_t adcValue9 = 0;     // analog value read from adc
    //    One-time init of ADC driver
    //    ADC_init();           // done in main before BIOS_start();
    
        // initialize optional ADC parameters
        ADC_Params params;
        ADC_Params_init(&params);
        params.isProtected = true;
        // Open ADC channels for usage
        ADC_Handle adcHandle = ADC_open(VCELL7PT4V, &params);
    
    
        // Sample the 7.4V hi side analog
        ADC_convert(adcHandle, &adcValue9);
        // Convert the sample to microvolts
        resultUv_HI = ADC_convertToMicroVolts(adcHandle, adcValue9);
    
        // Sample the 3.7V lo side analog
        adcHandle = ADC_open(VCELL3PT7V, &params);
        ADC_convert(adcHandle, &adcValue9);
        // Convert the sample to microvolts
        resultUv_LO = ADC_convertToMicroVolts(adcHandle, adcValue9);
    
    //    ADC_close(adcHandle);
    
        if (resultUv_LO == resultUv_HI) adcValue9= 1+1;
    }
    

    Thank you very much,

  • (taking off from above)

    Actually I think I hit on the easiest way to get there. 

    If you can describe how, in the Node project, to calibrate the adcValue sample (NodeTask.c), that would be magnificent. Even better if I can call the calibration to a global function.

    I'm having a similar problem with toggling an output pin. I'm using the following code but it's only running once.

          PIN_Config portTable[] = {
                LO_FAN_CNTRL | PIN_GPIO_OUTPUT_EN | PIN_GPIO_LOW | PIN_PUSHPULL | PIN_DRVSTR_MED,
                HI_FAN_CNTRL | PIN_GPIO_OUTPUT_EN | PIN_GPIO_LOW | PIN_PUSHPULL | PIN_DRVSTR_MED,
                HI_SHUNT_CNTRL | PIN_GPIO_OUTPUT_EN | PIN_GPIO_LOW | PIN_PUSHPULL | PIN_DRVSTR_MED,
                LO_SHUNT_CNTRL | PIN_GPIO_OUTPUT_EN | PIN_GPIO_LOW | PIN_PUSHPULL | PIN_DRVSTR_MED,
              PIN_TERMINATE
          };
          PIN_State PinState;
          PIN_Handle PinHandle = PIN_open(&PinState, portTable);
        PIN_setOutputValue(PinHandle, LO_FAN_CNTRL, OFF);
        PIN_setOutputValue(PinHandle, HI_FAN_CNTRL, OFF);
        PIN_setOutputValue(PinHandle, HI_SHUNT_CNTRL, OFF);
        PIN_setOutputValue(PinHandle, LO_SHUNT_CNTRL, OFF);
    

    So I guess I'm looking for the simplest code that can be run on Sensor Node that will calibrate the ADC and will allow a I/O pin toggle. I'm having the dimmest time getting the simplest code to run outside of the supplied functions.

    Thank you very much

  • Are you here referring to the rfWsnNode example under EasyLink? 

  • Yes...all the messages in this thread are based on Node/Concentrator project in easylink.

  • In SceADC.c:

    You see from the lines below that the ADC value is sent from the Sensor Controller via a callback:

            /* Send new ADC value to application via callback */
            if (adcCallback)
            {
                adcCallback(pOutput->adcValue);
            }

    The ADC value is used in nodeTask.c here:

    static void adcCallback(uint16_t adcValue)
    {
        /* Save latest value */
        latestAdcValue = adcValue;
    
        /* Post event */
        Event_post(nodeEventHandle, NODE_EVENT_NEW_ADC_VALUE);
    }

    This value is sent over the air here:

                /* Send ADC value to concentrator */
                NodeRadioTask_sendAdcData(latestAdcValue);

    Meaning that you can compensate the ADC value by inserting the required code on the line before. 

  • Thanks TER.

    When you say "Meaning that you can compensate the ADC value by inserting the required code on the line before. ",

    Do you mean ...by inserting the required code on the line before the NodeRadioTask, or before one of lines on the callbacks?

    And on the I/O port toggle, I'm doing the port pin change right after the LED pin state change (TI supplied Node code) but I'm still only getting one toggle then no further change, instead of continuous toggles. Can you advise where in the Node code my port output drivers should be?

    //TI supplied
    #if !defined Board_CC1350STK
                /* Toggle activity LED */
                PIN_setOutputValue(ledPinHandle, NODE_ACTIVITY_LED,!PIN_getOutputValue(NODE_ACTIVITY_LED));
    
    //TI supplied
    
    // offgrid code
                /* Enable the I/O ports on DK board */
                  PIN_Config portTable[] = {
                        LO_FAN_CNTRL | PIN_GPIO_OUTPUT_EN | PIN_GPIO_LOW | PIN_PUSHPULL | PIN_DRVSTR_MED,
                        HI_FAN_CNTRL | PIN_GPIO_OUTPUT_EN | PIN_GPIO_LOW | PIN_PUSHPULL | PIN_DRVSTR_MED,
                        HI_SHUNT_CNTRL | PIN_GPIO_OUTPUT_EN | PIN_GPIO_LOW | PIN_PUSHPULL | PIN_DRVSTR_MED,
                        LO_SHUNT_CNTRL | PIN_GPIO_OUTPUT_EN | PIN_GPIO_LOW | PIN_PUSHPULL | PIN_DRVSTR_MED,
                      PIN_TERMINATE
                  };
    
                  PIN_State PinState;
                  PIN_Handle PinHandle = PIN_open(&PinState, portTable);
    
                PIN_setOutputValue(PinHandle, LO_FAN_CNTRL, ON);
                PIN_setOutputValue(PinHandle, HI_FAN_CNTRL, ON);
                PIN_setOutputValue(PinHandle, HI_SHUNT_CNTRL, ON);
                PIN_setOutputValue(PinHandle, LO_SHUNT_CNTRL, ON);
    
                PIN_setOutputValue(PinHandle, LO_FAN_CNTRL, OFF);
                PIN_setOutputValue(PinHandle, HI_FAN_CNTRL, OFF);
                PIN_setOutputValue(PinHandle, HI_SHUNT_CNTRL, OFF);
                PIN_setOutputValue(PinHandle, LO_SHUNT_CNTRL, OFF);
    //offgrid code
    

  • Hopefully this screenshot shows better where you can insert code:

    For the pin toggle: Have you inserted the code you show above the red arrow in the figure above? This is within a while(1) loop which mean that you redefine the pintable and the PinHandle each time you start on the while loop which is not a good way to do it. 

    I came in in this post late. Since the rfWsnNode example uses the sensor controller, way did you change the SCS code? 

  • Thanks TER,

    I now have a working calibration running on SCS samples!! THank you so much. The code I ended up using is following your pointers.

        while (1)
        {
            /* Wait for event */
            uint32_t events = Event_pend(nodeEventHandle, 0, NODE_EVENT_ALL, BIOS_WAIT_FOREVER);
    
    
            /* If new ADC value, send this data */
            if (events & NODE_EVENT_NEW_ADC_VALUE) {
    
    
                /* Toggle activity LED */
                PIN_setOutputValue(ledPinHandle, NODE_ACTIVITY_LED,!PIN_getOutputValue(NODE_ACTIVITY_LED));


                // Do ADC cal right after fresh sample here
                ADC_calibration();  //  get voltage samples and cal for accuracy, save results
                latestAdcValue = resultMv_HI;  // read in calibrated Vcell hi
                latestAdcValueFromVcellLO = resultMv_LO;  // read in calibrated Vcell lo
    
                PIN_setOutputValue(ledPinHandle, RED_LED,!PIN_getOutputValue(RED_LED));
                PIN_setOutputValue(ledPinHandle, GREEN_LED,!PIN_getOutputValue(GREEN_LED));
                PIN_setOutputValue(ledPinHandle, YELLOW_LED,!PIN_getOutputValue(YELLOW_LED));   // No yellow LED here because SCS has control
    
                PIN_setOutputValue(PinHandle, LO_FAN_CNTRL, OFF);
                PIN_setOutputValue(PinHandle, HI_FAN_CNTRL, OFF);
                PIN_setOutputValue(PinHandle, HI_SHUNT_CNTRL, OFF);
                PIN_setOutputValue(PinHandle, LO_SHUNT_CNTRL, OFF);


                NodeRadioTask_sendAdcData(latestAdcValue);
    

    I do wish the scif_how_to_use example file showed exactly how to calibrate the adc, that would be a nice feature to add, and would have saved loads of time.

    So thanks again...but I do not understand your last line...

    "I came in in this post late. Since the rfWsnNode example uses the sensor controller, way did you change the SCS code? "

    That's it for now...