This thread has been locked.

If you have a related question, please click the "Ask a related question" button in the top right corner. The newly created question will be automatically linked to this question.

CC2650 SensorTag Image Download via TI sensorTag iOS APP

Other Parts Discussed in Thread: CC2650

Hi,

Setup:

Using TI sensorTag iOS App 4.4

Using SDK 2.1

IDE IAR

My project is derived from the sensorTag project.

My Goal:

I am trying to check if my project supports OTA download recurringly. Using the TI sensorTag App

My Actions:

I have succesfully created a .bin for OTA download(with the assistance of the community members) and sent it to the TI sensortag App.

I prepare the target sensorTag by downloading the .hex  file of this image via the debugger.

I open the TI sensorTag App, and connect.  Wanting to download the .bin image

I  go to the FW Download Menu (I have OAD Enabled).

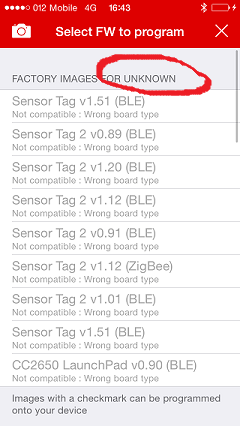
I go to the select FW file menu, and see a lot of disabled files. 

The heading says FACTORY IMAGES FOR UNKNOWN (See image below)

I am expecting FACTORY IMAGES FOR SENSOR TAG 2


Question:

My question is what does the TI SensorTag App look for to identify the sensorTag 2.0?.

Probably I have made some changes that makes my version unrecognizable to the App, thus not allowing me to download

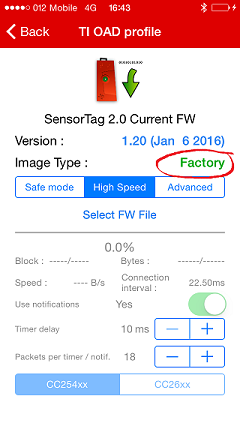
files as I expect. ( Also my image is always recognized as a Factory Image in Image Type: in the TI OAD profile screen (See image below))

Is the App using?:

GAP_ADTYPE_LOCAL_NAME_COMPLETE? in the scanRspData

or

data in GAP_ADTYPE_MANUFACTURER_SPECIFIC?

or

attDeviceName?.

Device information parameters?.

or 

something else

What should I not change or touch in my project?.

Attached screenshots
Thanks

Tamir


  • Hi Tamir,

    I have looped in our STK OAD expert and we will be getting back to you.
  • Thanks, waiting for your valuable input.

    Regards,

    Tamir

  • Tamir,

    The SensorTag phone applications will blindly update the entire app starting at address 0 and are oblivious to image type. Have you merged the bim/app and stack together into one .bin file and tried to use this (merged bin file) to OAD your code?
  • Hi Sean,

    Sorry, but this is not what I am seeing.

    I have successfully created a .bin file(bim +app + stack) and have downloaded it to a clean sensortag, running version 1.2.

    The download was succesfull and I can reconnect using the TI iOS sensortag App.->This means that my .bin file is OK.

    The problem begins when I try to download again. As I said I am trying to check the OAD functionaliy in

    my image. Thus on a target running my image I am trying to download again the .bin file.

    After connecting to the device.

    What I see are the screenshots I have attached.

    1. On the "TI OAD Profile" screen. I would expect to see Image Type: "-" and not Factory.(See attached in thread)

    2. On the screen "Select FW to Program" it  says Factory Images for Unkown(I circled it).I think this is a symptom to the problem.

    2. I would also expect to see in the "Select FW to program"  the sensortag version Sensor Tag 2 v1.20(BLE) enabled for download, but it is grayed. And not 

    Not compatible: wrong board type.

    4. My .bin file can be choosen(note: not seen in the screenshot) When I chose my .bin file to download I recieve the following message:

    "Wrong image type !"

    "Image that was selected was of type: B, which is the same as on the periperhal...."

    I believe the image running (my image) on the target is not recognized as a sensortag board image.

    Causing the TI iOS App to behave differently.

    As I said my project is derived from the sensortag project. I might have changed something in it 

    that causes the sensortag App(now running my image) not to recognize my running image as a valid sensortag board image.

    Question:

    What does the sensortag app look for in order to recognize the image running on the target as a valid sensortag 2.0 board image?

    Are there specific services I have to keep. some kind of identifier?.

    Do I need to keep some identifier in board.c\h,? Maybe some GPIOs are used to identify the board?.(I have disabled a few)

    What are the origins of the messages:

    Factory Images for Unkown instead of

    FACTORY IMAGES FOR SENSOR TAG 2

    &

     Not compatible wrong board type?.

    Will be gratefull if you could assist.

    Thanks in advance

    Tamir

  • Hi,

    Any inputs on this subject.(see post above)?

    Question:

    What does the sensortag app look for in order to recognize the image running on the target as a valid sensortag 2.0 board image?

    Are there specific services I have to keep. some kind of identifier?.

    Do I need to keep some identifier in board.c\h,? Maybe some GPIOs are used to identify the board?.(I have disabled a few)

    What are the origins of the message:

    Factory Images for Unkown instead of

    FACTORY IMAGES FOR SENSOR TAG 2

    Thanks

    Tamir

  • Hi Tamir,

    Do you have FACTORY_IMAGE defined in your firmware image that you are preparing for OAD?

    Second, I believe that the iOS application does use the advertisement data to determine if the device is a sensortag. This should not matter as the OAD process doesn't worry about the device. There are no flags in the board file, etc.
  • Hi,

    I dont have FACTORY_IMAGE in my project. I disabled it.

    I understand that it copies the current image into external flash if one doesnt exist.

    Do I need it?.

    Thanks
  • Hi Tamir,

    I apologize for the long wait, I had to set aside some time to investigate this myself. I have given you misinformation and again for that I apologize.

    If you look at your factory image screenshot at the top, you'll see that the app is highlighting the cc254x. We don't want this. Starting from the beginning here are the steps I took to create an OAD ready image for the STKv1.2 using BLE stackv2.1.0 and the iOS app

    Building the resident factory image:
    1.Build BIM_extFlash w/ FlashOnly_sensorTag configuration
    2.Build SensorTagStack w/ FlashROM configuration
    3.Build SensorTagApp w/ FlashOnlyOAD configuration
    4. Add the above 4 files to SmartRF Flash Programmer 2, and flash to the STK board. If you see an error about overlap, I was able to get the programming to go ahead by just clicking the program button again (I was confident there was no overlap) if you see any issues, please post here.

    5. At this point you have a clean "factory image" on the STK. Now we are ready to build an OTA image
    6. IMPORTANT: Remove your device from the debugger and attach a battery or at least connect/disconnect the device from the debugger.

    Build the OAD image:
    7. Make changes to application image I added a Blinking light to the periodic task function, as a way to tell me that my OAD completed.
    8. Rebuild the application image, undefine FACTORY_IMAGE
    9. Take note of the Flash boundary location (More on the boundary and where to find it in the SDG)
    10. copy the hex output of the application and stack projects into a temporary folder (i.e. C:\YOUR_USR\temp or ~/temp)
    11. *Assuming you've installed the IntelHex module and have C:\python27\scripts in your env vars*: merge the hex files
    hexmerge.py -o STK_superhex.hex -r 0000:1EFFF SensorTagAppFlashOnlyOAD.hex:0000:YOUR_BOUNDARY-1_HERE SensorTagStackFlashROM.hex:YOU_BOUNDARY_HERE:1EFFF --overlap=error

    from above replace YOU_BOUNDARY-1_HERE with the boundary var that you read -1 and YOUR_BOUNDARY_HERE with the value you saw from the output of the boundary tool
    12.*Assuming you've installed the IntelHex module and have C:\python27\scripts in your env vars*: convert the above hex file to bin
    hex2bin.py STK_superhex.hex customImage.bin

    Note that you can name the images whatever you want. At this point customImage.bin contains the image you need to send OTA.

    13. Get the .bin file to your phone. I recommend emailing it to yourself, then click "open in" the TI STK app
    14. Connect to the STK and go the FW Download service. Select highspeed and make sure 26xx is selected. Scroll down, you will see the image you imported at the bottom (customImage.bin)
    15. Start the OAD process, it should go quickly. Wait
    16. The STK should eventually disconnect and reset, and you will see a sucessful OAD message pop up.

    If you're like me and the change that you made to your OTA image was making a light blink during the period task, you will now see the at light blinking once you reconnect to your STK, thus proving that you just accomplished a sucessful OAD.
  • Note that if you application/stack boundary has not changed you can omit the OTA portions for the stack image. i.e. generate app hex file, convert to bin, send to phone and perform OAD.
  • The BIM/last page of internal flash should never be updated.
  • Thanks

    Will check it out & update.

    Tamir
  • Tamir,

    Great, thanks for your patience. Let me know you if you run into any other issues.
  • Hi sean,

    Tried out your proposed solution, created the bin file without the BIM.

    And tried downloading it on a  clean "factory image" on the STK, as you instructed.

    Result: The download proceeded but eventually image doesnt boot. 

    The bin file was created as you suggested without the BIM.

    My ICALL_STACK0_ADDR=0x0000E000

    python "C:\Python27\Scripts\hexmerge.py" -o "%1\DISCOVERY_ST\Exe\OAD_FULL_IMAGE.hex" -r "000:1EFFF" --overlap=error "%1\DISCOVERY_ST\Exe\SensorTagAppFlashOnlyOAD.hex":0000:DFFF "%1\..\..\Stack\CC2650\FlashROM\Exe\SensorTagStackFlashROM.hex":E000:1EFFF && "c:\Python27\Scripts\hex2bin.py" "%1\DISCOVERY_ST\Exe\OAD_FULL_IMAGE.hex" "%1\DISCOVERY_ST\Exe\NewDiscovery.bin"

    On the other hand, when the BIM file was included in the creation of the bin file.(according to previous instructions )

    Result:  The download and boot of the image was succesful.

    But trying to download again fails since the running target image is recognized as a Factory image on a CC254XX within the OAD menu

    According to the screenshots I supplied.

    bin file creation(with BIM):

    python "C:\Python27\Scripts\hexmerge.py" -o "%1\FlashOnlyOAD\Exe\OAD_FULL_IMAGE.hex" -r "000:1FFFF" --overlap=error "%1\FlashOnlyOAD\Exe\SensorTagAppFlashOnlyOAD.hex":0000:1EFFF "%1\..\..\Stack\CC2650\FlashROM\Exe\SensorTagStackFlashROM.hex" "%1\BIM_ext.hex":1F000:1FFFF && "c:\Python27\Scripts\hex2bin.py" "%1\FlashOnlyOAD\Exe\OAD_FULL_IMAGE.hex" "%1\FlashOnlyOAD\Exe\NewDiscovery.bin"

    Why is this so?.

    Can you please advise how to proceed.

    Thx,

    Tamir

  • Tamir,

    I apologize that you are still seeing issues. I have attempted the procedure that I detailed in my last comment multiple times and had success. So there is still a discrepancy somewhere. After successfully downloading an image without BIM to the device, can you attempt to attach the debugger (attach to running target) and see where the execution has failed or maybe step through the BIM code.

    I can at least explain one thing, it seems that the mobile app identifies any image that contains the full flash ranage (page0-31) as a factory image.
  • Thanks
    I will check it out

    Tamir
  • Hi Sean,

    I find a similar problem with Sensor Tag App ver 4.4. I think this problem is a bug on App

    if I change name of device, Image Type on App will be Factory.
    Example:
    I will change "SensorTag 2.0" to "SensorTag 1.0"
    static const uint8_t attDeviceName[GAP_DEVICE_NAME_LEN] = "SensorTag 2.0";
    => static const uint8_t attDeviceName[GAP_DEVICE_NAME_LEN] = "SensorTag 1.0"

    Please check this problem.

    Thanks,
    Vy

  • Hi Vy,

    Thanks for the update. I have checked with our SensorTag experts about the device name.
  • Hi,

    Can you please specify what you mean by an application that contains the full flash range as you wrote:

    "I can at least explain one thing, it seems that the mobile app identifies any image that contains the full flash ranage (page0-31) as a factory image."


    Do you mean an application that overwrites the BIM?.  

    If yes, where should I look at to see this?.

    Thx

    Tamir


  • Hi all,

    I think the error is caused by the conditions on iOS app to detect the cc254x and cc26xx. Because I only change Device Name. 

    I find some topic which there are same problem. So I am waiting for an update from TI

    Thank you

    Vy