This thread has been locked.

If you have a related question, please click the "Ask a related question" button in the top right corner. The newly created question will be automatically linked to this question.

TrxEB: Changing EB ID

Other Parts Discussed in Thread: CC1120

Hi all,

I want to configure two TrxEB-Boards (Rev. 1.7) in combination with two CC1120 Skyworks EM using Smart RF Studio 7 (1.14.2). My problem is that both TrxEBs have the same USB device ID (5167) so SmartRF lists only one connected board if I connect both of them. If I connect only one of them everything works perfectly. In the SmartRF Flash Programmer (1.12.7) I can see both boards and they also have the same EB ID (5167). There is a possibility to change the ID for SmartRF05EB and SmartRF04EB using Flash Programmer but I don't see this option for the TrxEB.

My question is: How can I change this ID so that SmartRF Studio lists the two connected boards at the same time?

The EB Firmware ist 0520 and EB Firmware Revision is 0042 for both boards.

Thanks a lot.

  • Hi

    Do you have a CC Debugger? You will need that in order to change the device id on the trxEB

  • Hi Martin,

    thanks for your reply. No unfortunately I do not have a CC Debugger. But I have already bypassed the problem by exchanging one of the boards with a collegue, who has another development kit. Now everything works perfectly.

    Thank you anyway!


    Best regards

    Juri

  • Hi Juri,

    Just for the information: It is possible to change the Device Id if you have two TrxEB boards. By connecting the two boards in a special way and programming the bootloader with the SmartRF Flash Programmer this is possible.

    One TrxEB board should act as the programmer in the same way as the CC Debugger. The following connections should be made:

        Programmer        Target
        P7.4 (GPIO2)       P200.3
        P7.8(GPIO0)        P200.4
        P7.10(RST)          P200.9
        P7.20(GND)         P7.20

    Since the P200 header is position under the LCD display there is also an alternativ on the back side of the TrxEB board. There the debug interface of the USB MCU is available as three pads. In that case it looks like this:

        Programmer        Target
        P7.4 (GPIO2)       DC
        P7.8(GPIO0)        DD
        P7.10(RST)          Reset

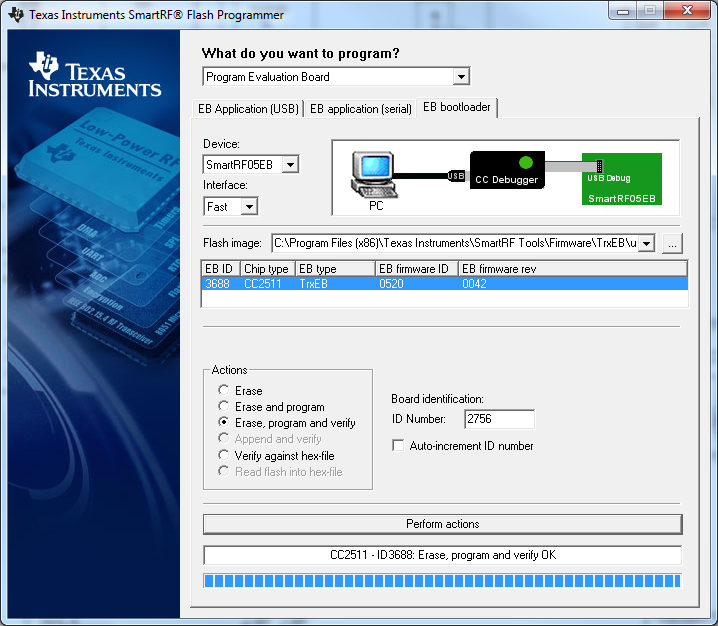
    Below is a screenshot from the SmartRF Flash Programmer:

    Select the bootloader image and specify the new Board identification. In the example above it is "2756". 
    The bootloader image can be found together with the installation of the SmartRF Flash Programmer. Typically this would be: C:\Program Files (x86)\Texas Instruments\SmartRF Tools\Firmware\TrxEB
    The bootloader image is called usb_bootloader_trxeb_combo.hex.

    Regards,
    Øyvind


  • Hi Øyvind,

    thanks for your reply. Your solution could be a great help for me and others in the future.


    Regards,

    Juri