


All,
We would like to present a brief tutorial on how to get your DLP® LightCrafter™ Display 2000 EVM up and running on a BeagleBone Black. This tutorial will assume limited Linux/Debian experience. For more general information on using this EVM, please consult the DLPDLCR2000EVM User's Guide, which can be located here: http://www.ti.com/lit/pdf/dlpu049
In order to set up the system you will need the following:
- 1x DLPDLCR2000EVM
- 1x EVM Power Supply – 5V, 3A Rated (We recommend PW172KB0503F01 ITE Switch Mode Power Supply or equivalent)
- 1x BeagleBone Black USB Cable (miniUSB type B)
- 1x Laptop/Computer
- >=4GB MicroSD Card (If updating/installing Debian onto BeagleBone)
Step 1: Download and Install PuTTy on your machine. You can download the latest version of PuTTY at: https://www.chiark.greenend.org.uk/~sgtatham/putty/latest.html
Step 2: Download the latest version of Debian with driver support for the EVM. You can download this here:
https://debian.beagleboard.org/images/rcn-ee.net/rootfs/bb.org/testing/2017-08-01/lxqt-4gb/
(NOTE: If your BeagleBone is already up-to-date, skip steps 2-6)
Step 3: Download SDFormatter & Win32DiskImager. These programs will be used to load Debian to the microSD card. You can download them from:
https://www.sdcard.org/downloads/formatter_4/
and
https://sourceforge.net/projects/win32diskimager/
Step 4: Use SDFormatter to format the microSD card, as seen below:

Step 5: Use Win32DiskImager to write the Debian distro onto the BeagleBone Black, as seen below:

Step 6: Use the microSD card to install Debian to the BeagleBone Black. To do so, follow the instructions located at http://exploringbeaglebone.com/chapter2/#Writing_a_New_Image_to_the_BBB
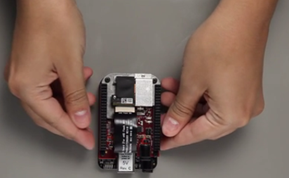
Step 7: Plug the EVM into the BeagleBone Black The Ethernet port on the BeagleBone Black should align with the indentation cut out of the EVM. Refer to the video located at http://www.ti.com/tool/dlpdlcr2000evm for a demonstration of how to plug in the system with 5V power.
Step 8: After booting both the EVM and the BeagleBone Black, the EVM splash screen should show up.

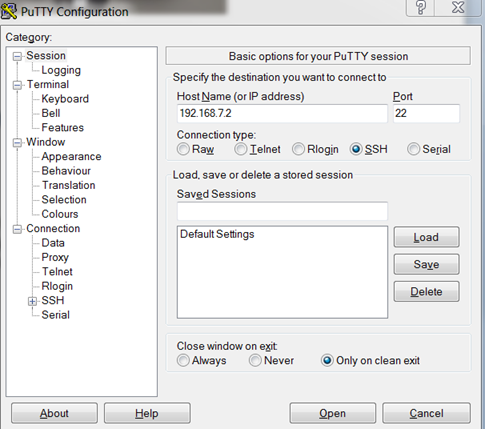
Log into the BeagleBone Black by launching PuTTY on the computer (while connected via USB to the BeagleBone Black). When prompted for host information, use 192.168.7.2 via port 22 as shown below.
Step 9: You will be given a login prompt. Use the following credentials:
Username: debian
Password: temppwd
Use the password “temppwd” whenever the system asks for a password for administrator purposes. At this point we will be ready to set up the software side of the BeagleBone Black.
Note: Information from Step 10 onwards is also referenced in the EVM user’s guide, which can be located here: http://www.ti.com/lit/ug/dlpu049/dlpu049.pdf
Step 10: As a test, you can bring up the BeagleBone Desktop on the projector with the following commands:

If you have a mouse connected to the BeagleBone Black via usb, you can use the BeagleBone as you would a regular PC.
Step 11: To run the video, you need to update the BeagleBone Black with software to install mplayer (python is also needed, but should be installed by default). Run the following commands:
> sudo apt-get update
> sudo apt-get upgrade
> sudo apt-get install mplayer2
Step 12: Using the cd command, navigate to the following directory:
> cd /opt/scripts/device/bone/capes/DLPDLCR2000/
Step 13: To install the test scripts, follow the instructions below:
Use of the provided Python scripts requires the accompanying library:
dlp_lightcrafter-1.0.19.tar
To install on BeagleBone Black, do:
> tar -xvf dlp_lightcrafter-1.0.19.tar.gz
> cd dlp_lightcrafter-1.0.19
> sudo python setup.py install
Step 14: Finally, we can play the fishbowl video by navigating back to the /opt/scripts/device/bone/capes/DLPDLCR2000/ directory:
> export DISPLAY=:0
> cd /opt/scripts/device/bone/capes/DLPDLCR2000/
> python MplayerTest.py

