This thread has been locked.

If you have a related question, please click the "Ask a related question" button in the top right corner. The newly created question will be automatically linked to this question.

ADS54J60: Stuck bits in received data

Part Number: ADS54J60
Other Parts Discussed in Thread: , STRIKE, ADS54J20


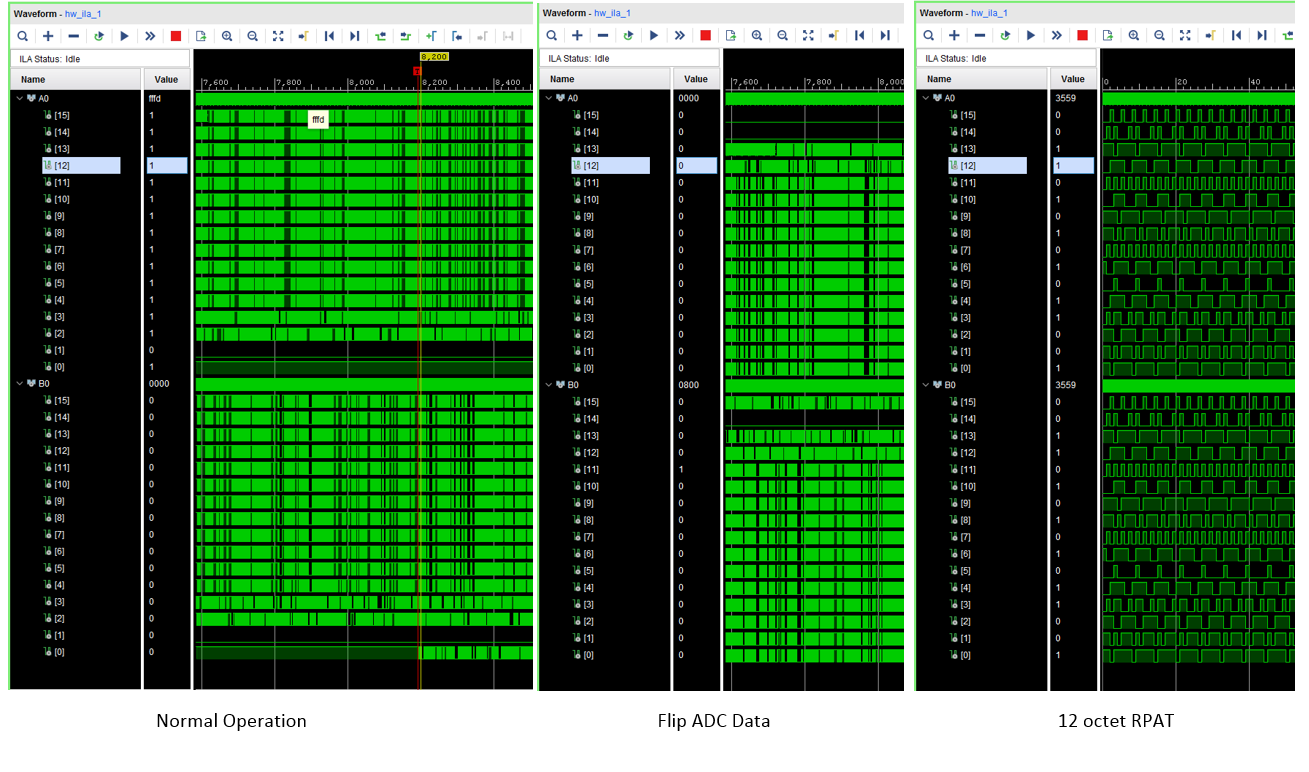
In the following setup we are seeing some stuck bits in position A0(1:0) and B0(1:0) in the received ADC data on the FPGA.
Sometimes bit 0 toggles in the data, sometimes it is stuck. But bit 1 is always stuck.

IF we "Flip ADC Data" then the position of the stuck bit changes to A0(14:15) and B0(14:15)

If we us the 12 octet RPAT JESD Test pattern there are no stuck bits.

(diagram below shows captures from 3 scenarios)


We observe the same in our custom board based on the below setup.

Setup:

ADS54J60EVM connected to Xilnx KCU105
External 1GHz clock used

FPGA clock = 250MHz
K = 16
SYSREF Divider set to 256
SYSREF in continuous mode

The steps we follow are:

Program the FPGA
Load a modified version of LMK_Config_External_Clock to generate the requried clock & sysref frequencies
Press the ADCReset button
Load ADS54J60_LMF_8224.cfg
I have alo tried a modified version of this file to remove the LMK writes to assert and deassert the sysref (as we want it in continuous) however this makes no difference.


Can you suggest any problems in our setup which would cause this problem?

Kind regards

  • Thanks Jim,

    I'll have a look into that - although I am still seeing some stuck bits using your chipscope project, therefore I don't thin it is a problem unique to our setup any more. Were your team able to replicate the stuck bits at all over multiple FPGA downloads/power cycles?

    I have also gone back to try and get the HSDC software working. I run into the same issue as Richard has - getting the "Read DDR to file TIMED_OUT_ERROR Time Out error" message when I try to do a capture. I have tried using the onboard clock (following steps in section 7.4 of the KCU105 HSDC Pro User's Guide (but for the J60 rather than J20) but I still get the same error message.

    (Note : after I run the "LMK_983p04_8224_VC707.cfg" script, the LED indicating PLL2 has locked does not always light. I sometimes have to run the script muliple times, or power cycle the board and write the script again to make it come on. I make sure I have got in a state where it does light before continuing to try the HSDC demo. Its not really consistent i'm afraid so haven't got a repeatable process to make it work/not work yet.

    Do you know what the cause of the LED not lighting?
    Do you have any suggestions as to why the error message may be occurring in our setup? We are using a 5v 3A supply to drive the board only - I noted that was an issue for some others in the forum.

    Kind regards,

    Isabel
  • 4353.LMF_8224_Fs_983p04M.pptxIsabel,

    I have seen issues if I do not press the hard reset on the ADC EVM after power up. There also may be an issue with this config file. Please try using the example attached which uses the default LMK config file and make sure the LMK clock outputs are set per slide 4. This is required to get both the core clock and ref clock sent to the FPGA. By default, the config file only enables one of these clocks. We have not tried multiple captures with our setup. How often did you see the bit stuck mode?

    Regards,

    Jim

  • I always press the hard reset after programming the LMK as per instructions. So I expect the LED to light before pressing it.

    The instructions you provided - was that intended for use with the HSDC bitstream, or your chipscope project? I have tried both but it neither fixes the "Read DDR to file" problem with the HSDC nor the stuck bits problem with the chipscope project.

    Regarding the chipscope project:

    The stuck bits seem to occur every time now - If i do subsequent captures then sometimes they appear stuck then sometimes they toggle.

    I have tried all the combinations of config files you have suggested but none seem to fix the problem.

    To be sure that i'm not doing something fundamentally wrong I have attached a powerpoint indicating the steps I go through which results in stuck bits. I have also uploaded a zip file with all the config files I have used (including the ones I refer to in the powerpoint).

    Note: I am using the following versions of the tools in case that could be a concern:

    Vivado 2018.1ADS54Jxxx GUI v1.8

    Regarding the HSDC build.

    I have tried all combinations with HSDC (following steps 6, then 7.4 in the  HSDC Pro With Xilinx® KCU105 user guide) but always get the "Read DDR to file" problem.

    The only bit that differs is that because I am connecting directly from my PC to the KCU105 using a dedicated network card, the DHCP times out and the board IP defaults to 192.168.1.10.

    Could this cause any problems - I can still connect to the board so assume that is fine?

    I am using v4.90 of the HSDC Pro.

    Kind regards,

    Isabel

    Steps to recreate stuck bits.pptxStuckBits_ConfigFilesUsed.zip

  • 6813.KCU105 HSDC Pro User's Guide.pdfIsabel,

    Can you try a test using your settings and follow the Vivado loading instructions in the attached users guide to verify your setup is working properly using our HSDC Pro GUI. This comes up just fine with my setup. Not sure if you have tried this or not. I plan on looking into the chipscope project but have been to busy with many other tasks right now. You should never see the PLL2 lock LED turn off when using the on-board clock of the ADC EVM. The ADC EVM should draw about 1.2 Amps from the 5V supply. 

    Regards,

    Jim


  • Hi Jim, 

    Yes, These were the instructions I was referring to in my previous post. I followed sections 6, followed by 7.4.

    Isabel

  • Isabel,

    When you get the "Read DDR to file error", what is the status of the PLL lock2 LED on the ADC board? In your previous post you were talking about the chipscope project. I want to make sure you were getting the DDR error with the default firmware that comes with HSDC Pro GUI. If this is the case, there may be an issue with the KCU105 board if you are seeing this across several ADC EVM's. We have 3 KCU105 boards here and 2 are failing on us randomly, even when using other EVM's, not just the ADC54J60.

    Regards,

    Jim

  • Hi Jim,

    I appreciate you persevering with helping us out .
    Yes, the LED was lit.

    To be absolutely clear the step by step process I went through is below.
    We only have the 1 EVM to try - however I now also have access to a VC707 so I believe I can try this?


    1. Connect up boards as per 6.1 in instruction manual
    2. Power KCU105
    3. Initialise serial port connections
    4. Program device with KCU105_TI_DHCP.bit (we were using vivado 2018.1, but I have also downloaded 2016.3 labtools and tried that incase for some reason that made a difference)
    LEDs on the KCU105 are in the following state at this point.
    LEDS (7 on, 4 - flashing, 3 - flashing slower, others off)
    5. Check DDR calibration has passed and no errors displayed
    6. Adjust the FMC ADJ voltage as per 6.3
    7. Open High Speed Data Converter Pro v4.90 as administrator
    8. Connect to board (our address is 192.168.0.200:80)

    Following Process 7.4 in manual

    9. Power up the ADS54J60 (board draws 0.66amp from 5v supply)
    10. Open ADS54Jxx GUI v1.8
    11. Click reset in LMK04828-PLL1 Configuration tab
    12. Download "LMK_983p04_8224_VC707.cfg"
    13. Check PLL2 light on EVM
    (board draws 0.8amp from 5v supply)
    LEDS (as before with 6 and 5 now flashing)
    14. Press ADC reset button on EVM
    15. Download "ADS54J60_LMF_8224New.cfg"
    (board draws 1.12amp from 5v supply)
    16.IN HSDC Pro, select ADS54J60_LMF_8224 from drop down box
    17.In Data Capture Options menu-> Capture Option and set # samples per channel to 32768
    18.Set Analysis window to 32768
    19.Set ADC Output Data rate to 983.04M
    20.Click capture
    LEDS (as before with 2 high now also)
    21. Get TIMED_OUT_ERROR
  • Jim,

    To rule out the KC105 I have rebuilt our design for the VC707 ... and still experience the same issue with the sticking bits.
    As with the KCU105, on successive captures they are either stuck high, stuck low or toggling normally.
    Regards,

    Isabel
  • Dear Mr. Isabel.

    This phenomenon looks the same as what I encountered.
    Please see this discussion.
    e2e.ti.com/.../598565

    I recognized that since the ADS54J60 runs with interleaving four sub 250MHz ADCs and the lower 2 bits are used to adjust the DC offset,
    they do not output the right ADC result.
    No matter how hard I try, it came out with accuracy of 14 bits only.

    However, since there may be a way to put out with 16 bit precision, I'll support you!!
  • Jim,

    I have some progress - By using external DC correction as detailed in document you attached previously in the chain I can reliably make the bits stick/toggle.

    For ADC A0 - it appears to be dependent on the state of the 2 LSBs of the offset load register. ADC0_CORR_INT_EST[1:0] when EXT CORR EN is enabled.

    If they are

    00 - ADC A0[1:0] toggle as expected.
    01 - ADC A0[1:0] both stuck high

    10 - ADC A0[1] stuck high, ADC A0[0] stuck low.

    11 - ADC A0[1] stuck low, ADC A0[0] stuck high.

    The same behaviour applies for ADC B0[1:0] depending on the state of bits 1:0 in its offset load register.

    Note: ADC A1, A2, A3, B1, B2 and B3 always toggle regardless of their offset setting.


    I guess this explains why we when we were not using external dc correction we were seeing different behaviour on subsequent captures - it would change when new internal dc values changed.

    Is this behaviour expected? Could you explain why it is as it is?
  • Isabel,

    I have passed these new findings to the deign team.

    Regards,

    Jim

  • Hi Jim,

    Any word from the design team?

    Kind regards,

    Isabel
  • Richard and Isabel,

    If you are still looking for a solution to this issue, can you try writing a "1" to bit 1 of page 0x6A00 address 0x12? By default OVR of one of the four interleaving cores is placed at bit[1] of the 16 bit output data instead of ADC’s data. This is a bug.

    This ‘Always write 1’ bit corrects the bug by removing the OVR and placing ADC’s data on bit[1].

    Regards,

    Jim


  • Hi Jim,

    Yes we are still looking for a solution.

    The 'always write 1' change you suggested a while back and we have already made it - we added the following line to the ADC script:

    0x6A0012 0x02 // always write 1 to bit 1

    Before adding this line bit [1] was previously stuck to 0 (which ties up with it being the OVR bit).

    After making the change bits [1] and bit [0] behaves as detailed in my previous post (dated October 16th). When using external DC correction, their behaviour seems to depend on the the state of the 2 LSBs of the offset load register - (either toggling or sticking high or low - see previous post for details). This, I figured, explained why when using internal DC correction they were sometimes toggling and sometimes sticking - it depended on the current value of the DC offset, which continuously changes.

    I was waiting a response from your design team. Do they also see the same behaviour if using external DC correction?

    Kind regards,
    Isabel