This thread has been locked.

If you have a related question, please click the "Ask a related question" button in the top right corner. The newly created question will be automatically linked to this question.

Unable to change IP address for LightCrafter

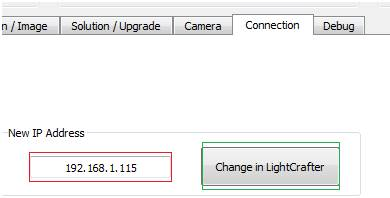
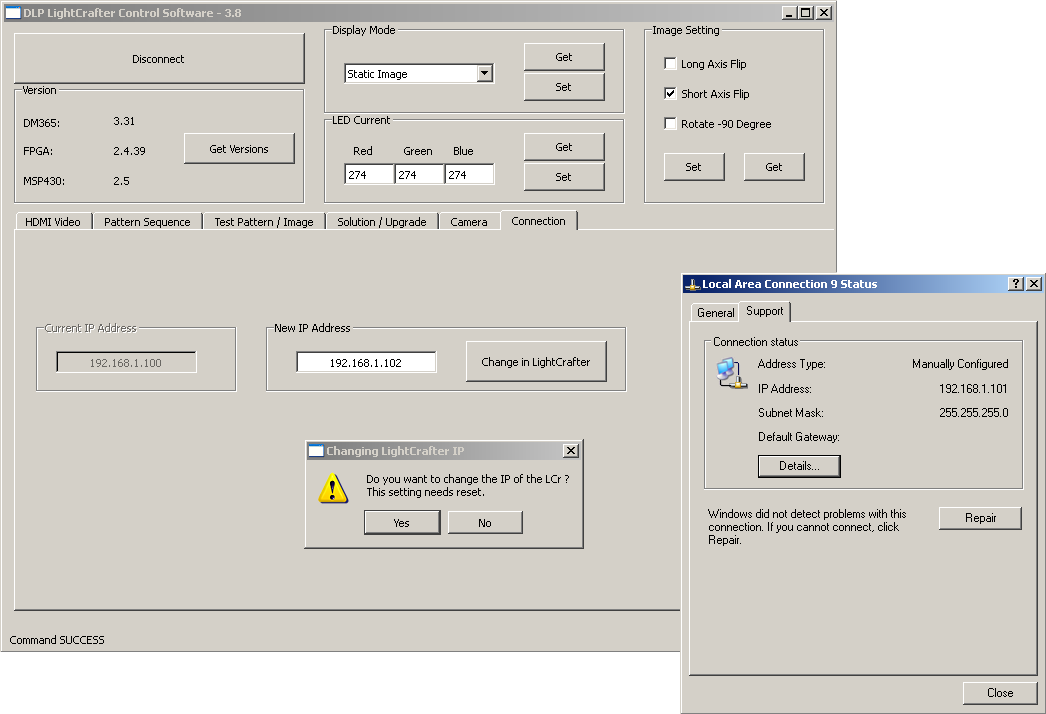
Yesterday we have received two new LightCrafter DLPs for the project. But we found that ONE of them was not able to change IP address.

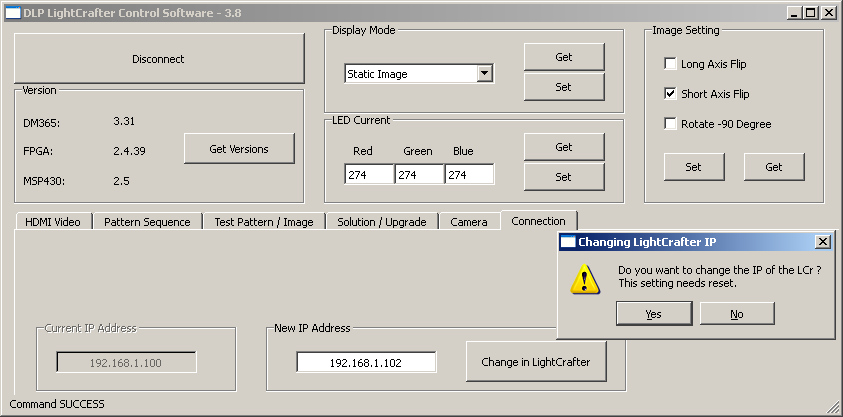
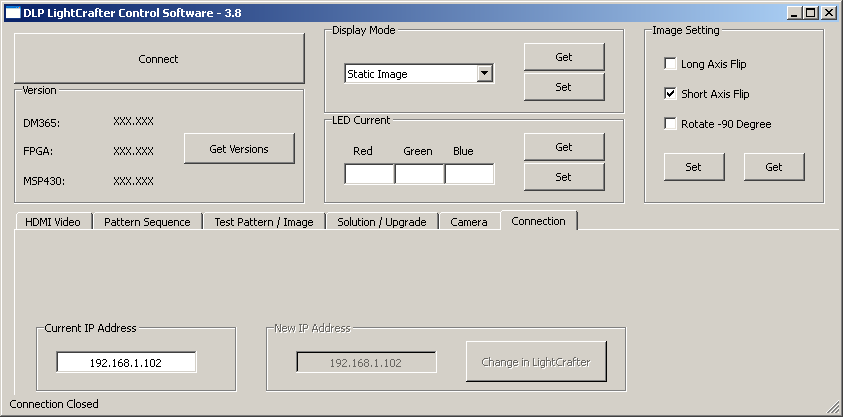
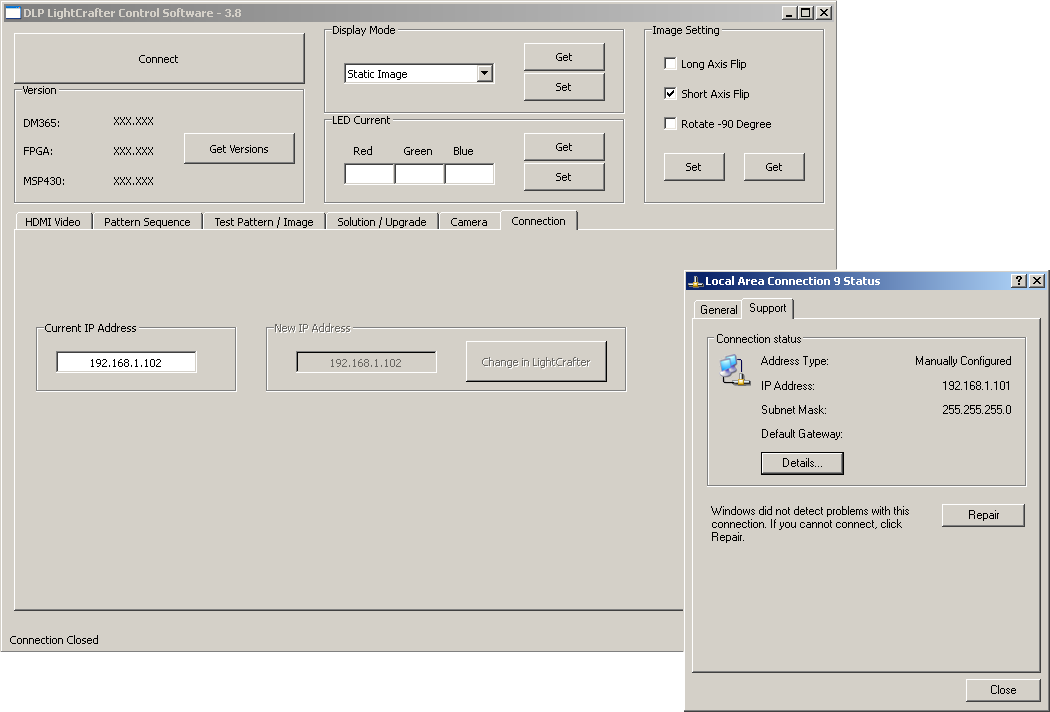
We receive "Command SUCCESS" message on GUI after we set the new IP but the IP is still the old one after we reset the device.

Both device are with same firmware version, and we have re-update the malfunctioning device but it didn't work.

We have even grabbed the TCP/IP packets and found that both send & receive packet data are correct.

Now we are completely confused. PLEASE HELP!!!

  • Hi Cheung Ka Yan,

    Below is the procedure for connecting more than one LightCrafter to a PC,

    1. Connect ‘first’ device to your PC using GUI. Change the IP address in the “Connection” tab, click on ‘Change in LightCrafter’ button and wait until the command is successful.

    2. Power cycle the LightCrafter. Before clicking on ‘Connect’, change the Current IP address to reflect the new value.

    To connect to the GUI, manually change the “Current IP Address” value to 192.168.1.115.

    3. Now, click on ‘Connect’ and you should be able to establish a connection with the device.

    4. For the second device, repeat steps 1, 2 and 3 but make sure the IP address last subnet is 2 numbers higher or lower than the previous one.

    In the above case, since 192.168.1.115 has been assigned to the LightCrafter, the virtual IP on the PC would be 192.168.1.114.

    You can check the IP configuration by typing ipconfig in cmd terminal.

    Regards,

    Divya

  • Hi Divya:

    Thanks for your reply!

    But I am afraid the problem is not solved.

    Note that we have 2 identical devices. When we configure them on IP address individually (configuring one device without the other one being connected), using same procedure, we found that one of them can always be configured, the other one fail(Unable to connect using the configured address, but using the original one).

    But we receive "COMMAND Success" feedback in both case from GUI 3.8.

    And it is strange that the sent and received packets' data shows the configuration command is success.

    Thus we suspect there is a defect in the failed device.

    Any more suggestion for our case? Thank you!

  • Hi Cheung Ka Yan,

    Can you please post your ipconfig log and GUI settings. This will help in debugging the issue.

    Thanks,

    Divya

  • Hi Divya, Sorry for the inconvenience!

     Origin state

     Change IP

    REBOOT the device

     Cannot connect using the configured address...

    ...but the original one.

     The DHCP service address from device remains the same.

     Grabbed packets during configuring.

     COMMAND packet

     COMMAND REPLY packet

     All ip config

    Please help to judge. Thank you!

  • Can anyone comment on this? We have even try to re-update the firmware but it doesn't work.

    Thank you very much

  • Hi Cheung Ka Yan,

    Sorry for the delay. Are you able to change the Display Modes and project patterns with the default IP address on this LightCrafter?

    One workaround is to change the IPaddress in the LAN properties manually as mentioned by Stuti in this E2E post. I will look into this and let you know of my findings.

    Thanks,

    Divya

  • Hi Divya,

    The Change Display Mode and Project Patterns work fine. So far we have only discovered problem in changing IP address.

    And we have read the workaround. Seems it talks about how to apply a static IP address to PC so that no time consumed on acquiring IP address from the DHCP server in LightCrafter. While our problem is unable to change the IP address of LightCrafter.

    Thanks for your work. We are looking forward a solution coming out soon! :)

  • Hi Cheung,

    Can you please try one more thing,

    Before assigning 'New IP Address' in the GUI, change the IP address in the Network connections as follows,

    • Go to Network Connections. Right click on the new LAN connection, and choose "Properties"
    • In the box "This connection uses the following items" under the Networking tab, look for “Internet Protocol Version 4”. Highlight by clicking on it, and then click “Properties” underneath the box.
    •  Choose "Use the following IP address" and enter the address and subnet mask you would like to assign (192.168.1.101). Power-cycle the LightCrafter.

    Now, change the IP address (192.168.1.102) in GUI and see if you are able to connect. Please let me know of your findings.

    Regards,

    Divya

  • Hi Divya:

    Happy Lunar New Year! Thanks for the reply!

    We've tried the method and it doesn't work.

    Here are the screen captures:

  • Hi Cheung Ka Yan,

    Thank you and I wish you a very Happy Lunar New Year :)

    I wonder why the DHCP server address is not changing for this LightCrafter. The DM365 command sets this value and I request you to reload the DM365 build booting from NAND and try connecting.

    Regards,

    Divya

  • Dear Divya:

    By following the following instruction file and using the corresponding micro-SD card image, we have upgrade the DM365 build by booting from NAND:

    -----------------------------------------------------------------------------------------------------------------------------------------------
    ----------------------------------------------------------------------------------------------------------------------------------------------- 
    Copyright � 2012 Texas Instruments Incorporated - http://www.ti.com/        
    -----------------------------------------------------------------------------------------------------------------------------------------------
    -----------------------------------------------------------------------------------------------------------------------------------------------
    Product name and version number: DLP LightCrafter Software and Firmware Package v1.1
    Company name: Texas Instruments
    
    -----------------------------------------------------------------------------------------------------------------------------------------------
    IMPORATANT NOTES:
    -----------------------------------------------------------------------------------------------------------------------------------------------
    � Following software and Firmware have been changed from the previous versions:
      GUI, DM365, FPGA and MSP430
    
    � Please upgrade the firmware in the listed order. The GUI v3.8 is compatible with DM365 v3.31 and later.
    
    -----------------------------------------------------------------------------------------------------------------------------------------------
    GUI Version 3.8:
    -----------------------------------------------------------------------------------------------------------------------------------------------
    �For Windows XP and 7 - Use DLPLightCrafterGUI for Windows-v3.8 version
    �For Linux OS - Use DLPLightCrafterGUI for Linux (32-bit version)-v3.8 version
     Note: If running under 64-bit Ubuntu, download libQTgui4:i386 (32-bit QtLibrary)
    �For Mac OS- Use DLPLightCrafterGUI for Mac-v3.8 version
    
    New Feature:
    
    * Option to select Internally generated patterns in Pattern Sequence mode.
     
    -----------------------------------------------------------------------------------------------------------------------------------------------
    DM365 Software version 3.31
    -----------------------------------------------------------------------------------------------------------------------------------------------
    
    The DM365 build contains two images:
    1) dm3xx_nandv3.31.dat: Boots the device from NAND flash
    2) dm3xx_sdv3.31.dat:Boots from SD card
    
    To upgrade DM365 software:
    
    a) Booting from NAND:
    
    �Uncompress DLP3000-C300REFDM365-v3.31
    �Pen a MSDOS command shell with "run as administrator" and change to the directory just uncompressed.
    �Format a micro SD card. Need about 80MB free.
    �Execute the command:
     - For a SD card that is mapped to E: drive, execute the following command to create an SD card that flashes NAND,
       lcr_boot_sd.exe dm3xx_nandv3_31.dat E:
    �Insert the micro-SD card with this image on LightCrafter
    �Set the DIP switch on System board to the side closest to the micro-SD card connector
    �Power up the LightCrafter, LED next to DM365 will light up red
    �While flashing NAND,
     - Wait until the LED next to DM365 lights up green. This should be a few seconds after the fourth splash screen
     - Power off the LightCrafter (short press of button on driver board)
     - Remove the micro-SD card and set the DIP switch to the side closes to DM365
     - Power up the LightCrafter using short press of button on driver board)
     - The LED next to the DM365 will start flashing red and green
     - A test screen with three colored bars will appear. 
    �Uncompress LightCrafterGUI-v3.8 (Based on the operating system being selected)
    �Connect USB cord and run GUI v3.8
    
    New Features:
    
    * Source selection
        - Short press on push button (system board) changes the source
          between DM365/Test Pattern/HDMI Video
    
    * Self-Test
        - Long press on push button will start the HW self test
          which tests the following functionalities and reports the
          error on the screen
            . DM365 Interface
            . HDMI Interface
            . Camera Interface & Camera Trigger
            . Trigger in/ Trigger out
            . UART1 Interface (MSP430)
            . SPI Flash interface (DLPC300 & FPGA)
    
    * Camera Capture
        - Capture one frame from the MT9v113 camera
    
    * Additional Pattern support
        - 24 bit RGB BMP Support for Pattern sequence 
        - 1, 4, 8 bit BMP Support for Static image & Slide show
    
    * Pattern Sequence Mode
        - Play once mode added (not applicable for AUTO trigger)
        - Preview any given pattern for arbitrary amount of time in "Load Pattern Image" section og the GUI
        - Trigger output support for pattern preview mode
        - Extended Patterns Sequence
            . More than 96 patterns can be uploaded by editing the "Pattern Count"
            . Exposure time of up to 5 seconds
            . Limitations :
              * supported only on upgraded Hardware
                Requires a zero ohm R205 installed and R202 removed in System Board. R205 is next to DM365 on top board. Resistor R205 is between 
                DM365 and flashing LED.
                Requires FPGA Firmware version 2.4.39  
              * Minimum trigger period of 18ms and exposure of 5ms
              * Play Once mode not supported
              * 330us of dark time added for Every 20ms
    
    *Solutions
        - With more than one stored solution, a press on the system board button loads a solution. Each subsequent press, loads the next solution
    
    b) Booting from SD:
    
    �Uncompress DLP3000-C300REFDM365-v3.31
    �Pen a MSDOS command shell with "run as administrator" and change to the directory just uncompressed.
    �Format a micro SD card. Need about 80MB free.
    �Execute the command:
     - For a SD card that is mapped to E: drive, execute the following command to create an SD card that flashes NAND,
       lcr_boot_sd.exe dm3xx_sdv3_31.dat E:
    �Insert the micro-SD card with this image on LightCrafter
    �Set the DIP switch on System board to the side closest to the micro-SD card connector
    �Power up the LightCrafter and wait for the test screen with colored bars to appear.
    �Connect USB cord and run GUI v3.8
    
    Features:
    
    * Supports all the above mentioned features for booting from NAND along with allowing projection of patterns from SD card.
    
    Instructions to load more patterns through SD card:
    
    �Format a new SD card with FAT partition and save the required BMP files.
     
       -Create a file config.txt with list of image file names, order delay.
        You can specify the delay between images once or multiple times in the text file.
     
       -Long press on the push button will switch to the slide show mode.
        Press again to go back to normal mode. (Go back to normal mode before turning off the power)
     
        Example : config.txt
                
                5
                Image1.bmp
                Image2.bmp
                Image3.bmp
                10
                Image4.bmp
                Image5.bmp
     
          Image 1,2 and 3 will have 5 second delay image 4 and 5 will have 10 second delay in this example.
    
    ------------------------------------------------------------------------------------------------------------------------------------------------
    MSP430 Firmware version 2.5
    ------------------------------------------------------------------------------------------------------------------------------------------------
    To upgrade MSP430 Firmware:
    
    �Uncompress DLP3000-C300REFMSP-v2.5 file
    �Connect the LightCrafter to the PC via USB cable
    �Run the GUI, and connect to the board and in the "Solution/Upgrade" tab select MSP430 Software
    �Browse for the file and click install. Wait for the command to complete reboot the board. 
    
    ------------------------------------------------------------------------------------------------------------------------------------------------
    FPGA Firmware version 2.4.39
    ------------------------------------------------------------------------------------------------------------------------------------------------
    To upgrade FPGA Firmware:
    
    �Uncompress DLPR300-FPGA-v2.4.39 file
    �Connect the LightCrafter to the PC via USB cable
    �Run the GUI, and connect to the board and in the "Solution/Upgrade" tab select FPGA Firmware
    �Browse for the ipico20120208_b39_ce6i7.rbf file and click install. Wait for the command to complete reboot the board. 
    
    ------------------------------------------------------------------------------------------------------------------------------------------------
    EDID PROM version 1.0
    ------------------------------------------------------------------------------------------------------------------------------------------------
    To change the EDID PROM resolution (HDMI):
    
    Step1:
    
    �Uncompress DLP3000-C300REFEDID-v1.0
    �Connect the LightCrafter to the PC via USB cable
    �Run the GUI, and connect to the board and in the "Solution/Upgrade" tab
    �In �Solution/Upgrade� tab, select EDID.
    �Browse for the EDID_LightCrafter_608x684.bin or EDID_LightCrafter_864x480.bin file based on the requirements
    �Click on �Install� button
    �Wait for the command to complete reboot the board.
     
    Step2:  Create a HDMI Video solution and assign it as default solution (Below procedure is for 864x480 resolution)
    
    �In the GUI �Select Display Mode� as �HDMI Video�
    �Goto �HDMI Video� section in the GUI; set �Video Settings� as
    Resolution = 864 x 480
    Active Pix = Start = 0, Width 864
    Active Line = Start = 0, Height = 480
    �Goto �Solution/upgrade� section and under �solutions� option type any name For example � �HDMIVideoDefault�.
    �Click on �Save� button and wait for it to be saved, the name appear in below text area.
    �Select the name, Click on �Default�, see the that the name becomes �blue� in color.
    
    ------------------------------------------------------------------------------------------------------------------------------------------------
    Known Issues
    ------------------------------------------------------------------------------------------------------------------------------------------------
    "Command Failed" error in Pattern Sequence mode when loading less patterns than what was loaded the entire time LightCrafter is "ON" irrelevant 
    of the pattern bit-depth.
    
    Please reset the LightCrafter and GUI to successfully upload patterns after this instance. 
    
    ------------------------------------------------------------------------------------------------------------------------------------------------
    Contact us
    ------------------------------------------------------------------------------------------------------------------------------------------------
    At http://e2e.ti.com/
    Post your questions in DLP & MEMS Section of TI E2E Forum.

    But the operation of modifying IP address is still not working. The phenomenon is identical with the one before.

    And actually we have tried to re-upgrade all firmwares before but it doesn't work.

    Does this possibly show the existence of a hardware defect?