This thread has been locked.

If you have a related question, please click the "Ask a related question" button in the top right corner. The newly created question will be automatically linked to this question.

Issues with the LCr and HDMI input

Hello E2E Community,

I have an LCr 2.0 and I am trying to get it to work with HDMI input. Whenever I connect an active HDMI source, whatever image is on the LCr disappears and a high-pitched whine comes from the LCr. The splash screen will flash every 10 seconds or so. I've tried using my Macbook's DVI out, my Raspberry Pi, and my Apple TV (these are the only HDMI devices I have). If I reset the LCr with an HDMI source plugged in, as soon as the boot finishes, the same thing happens with the blank screen and whine. 

Any and all help is appreciated, thanks.

-Nikita

  • Nikita,

    It sounds like the LightCrafter is expecting a different video resolution that you are sending it. Have you installed the 864x480 EDID? The "stock" EDID ONLY accepts 608x684 resolution, which many devices may not be able to do without configuration. The 864x480 EDID accepts a number of different resolutions as input, which it then scales to the 608x684 physical array.

    Also, from the LightCrafter GUI, you must set up the expected resolution in the HDMI configuration tab. Try these suggestions, and let me know if you make any progress.

  • Pascal,

    Thanks for your reply. I installed the 864x480 EDID, set the LCr's resolution and my computer's resolution to 864x480, but to no avail. As soon as a plug in the cable, the screen goes blank and I hear that whine.

    EDIT: I think I've found the root of the problem: My computer sends a 32-bit DVI signal, which I convert to HDMI. The LightCrafter GUI doesn't allow me to change the color mode higher than 8 bits.

    Thanks,

    -Nikita

  • Nikita,

    That doesn't sound right. Have you tried any other HDMI sources? A DVD will work fine. Usually, you have to set the LCr resolution to 720x480. You should be able to watch a movie. If that doesn't work, we will look further.

  • Pascal,

    I have been able to try: my desktop's DVI output, which I have set to various resolutions, my Macbook's DVI output, but it doesn't list any resolutions, only having an option for the native one, my AppleTV, which I think is 1920x1080, and my RaspberryPi, which only has one output, but i think it defaults to the native resolution given by the EDID.

    Thanks,

    -Nikita

  • Nikita,

    With the 864x480 EDID installed, the LightCrafter can support quite a few resolutions - but many of them are not common. The highest resolution it supports is 864x480. In definitely will not like 1920x1080 !

    With the RaspberryPi, it may be possible to configure it for 640x480, or 800x480. That would be a good place to start. As I mentioned, a standard DVD player usually outputs at 720x480, and that will work. Remember that you should configure the LightCrafter for the resolution which you expect to see.

  • Pascal,

    I connected it to my BluRay player, set the players resolution to 480p and the Lightcrafter's resolution to 720x480. This time, instead of the high pitched whine and no video, I get a dim, white screen, but it doesn't display the player's splash screen. I haven't gotten this effect with any other device, though.

    Also, I made a serial cable to connect to a terminal, and it is working, so let me know if there is any kind of debugging that can be done from that console.

    Thanks,

    Nikita 

  • Pascal,

    An update on my progress:

    I am able to configure the Raspberry Pi to 608x684. When I plug in the Lightcrafter, I get the RPi boot screen, but vertically compressed and below it the Lightcrafter boot progress bar quickly flickering. After about a minute or so, the lightcrafter looses signal and I get my original symptoms again. If i try any other resolution, I get a distorted image, with the first 4th or so of the image repeating across the entire screen.

    Thanks,

    Nikita

  • Nikita,

    Sorry about the rough going there.

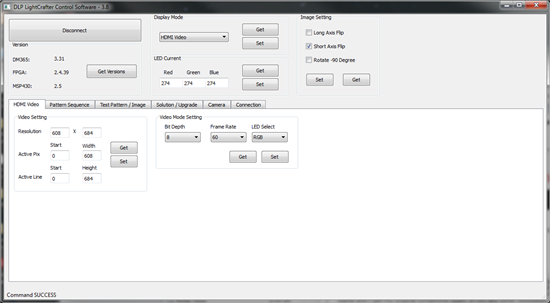
    Please make sure that the LightCrafter settings look like this:

    Notice that the "Active Pix" and "Active Line" must be set to 608 and 684, as well as set in the "Resolution" box.

    Remember that the "Set" button has to be pressed after each change.

  • Pascal,

    Thanks for your reply. Those are the settings I have been using, but not much success. Now that I have been playing with it today, could you please list out the steps necessary to get the HDMI working as if the LCr was just opened? I can configure my RPi to display any resolution, including 608x684 and 864x480

    EDIT: There seems to be an issue with the EDID. When I'm on the stock one, I can connect to the RPi with the resolution at 608x684. If I install the new EDID, I can't display anything at any resolution.

    Thanks,

    Nikita

  • Nikita,

    Well - first connect power and USB to the LightCrafter, allow it to boot up to the static pattern - usually the vertical colored bars.

    After a 90 second or so delay, connect to it using the GUI. Make sure that the "Version" info loads.

    Under "Display Mode" click on the button and select "HDMI video" and then click set. The bottom panel shifts to the HDMI video tab.

    Verify, or enter the "Resolution" 608x684 and click set. Then click "Get". If the "Active Pix" and "Active Line" boxes do not show 0, 606 and 0, 684 respectively, then enter those values in the appropriate boxes and click "Set". Then click "Get" again to make sure that they are set.

    Set "Video Mode Setting" check the settings ("Get"), or enter the following: "Bit Depth" 8, "Frame Rate" 60, and "LED Select" to RGB. Again, hit "Set" then "Get" to verify.

    Now, connect your HDMI video input - which should be set also to 608x684 60 Hz.

    You should see the video displayed by the projector. Depending on what your source image is, it will probably be stretched or compressed by the 608x684 diamond array geometry. But it should be clear and steady, and you shouldn't see other static or shimmering artifacts. The input image should fill the whole array.

    I hope that helps.

  • Pascal,

    Thanks for your reply. I follow those steps, but unfortunately I don't get the same end result. Here's what I have gotten to work:

    With the RPi set at 608x684, I can display my screen using the updated EDID, but I get the flickering boot bar. 

    But other that that, I've had no success.

    Thanks,

    Nikita

  • Nikita,

    One more question. Have you tried more than one HDMI cable? Does it act the same with both cables?

    I don't know what else you could be doing incorrectly. If the resolutions are set correctly - on both ends - it should work.

  • Pascal,

    I only have one HDMI-A to HDMI-C cable. But I did just have another thought: On the box that the cable came in, it said "HDMI with Ethernet". Is it possible that the wiring is different for "with Ethernet" and that is whats causing my problems? I'll look into it more tonight and see if any local computer stores have a non-Ethernet cables/adapters.

    Thanks,

    Nikita

  • Nikita,

    Hmmm. I'm not familiar with the "HDMI with Ethernet" cable. I'm not sure if that could be the source of the problem. Worth trying, though.

  • Pascal,

    Although the cable construction is slightly different (HDMI 1.4 cables are built for the higher HDMI 1.4 bandwidth required for the protocol), I have no luck with a different cable. I'll keep digging, please let me know if you think of anything or need any other info from me.

    Also, HDMI 1.4 (HDMI with Ethernet) is a newer HDMI protocol that has a higher bandwith requirement and supports Internet protocols between HDMI devices. The Wikipedia article on HDMI has a more detailed explanation. In theory, a cable certified for HDMI 1.4 should be perfectly ok for something using HDMI 1.0-1.3.

    Thanks,

    Nikita

  • Good news! I got it working! Turns out, my 3A bench-top power supply couldn't handle some fast changes in current. The way I got it to work with this power supply, is I changed the default solution to have an LED current setting of 50 in HDMI mode. I let it boot and once it's waiting for an HDMI signal, I could plug in the cable no problem. My take on this is that when the LCr changes to HDMI mode, there is a spike in current that the power supply is built to protect against, so the LCr crashes. 

    I just got it working with the LEDs at full current by taking an old laptop charger (rated for 2.4A) and I got a 5v switching regulator, hooked everything up and it boots, no problem and even displays from my computer. I guess this is a good example of "Keep it Simple, Stupid".

    Thanks for all your help,

    Nikita

  • Nikita,

    That is great! I'm so glad that you discovered the problem. We use 2.5A wall-wart switching power supplies, and never have a problem.

    Now - good DLP exploring.