This thread has been locked.

If you have a related question, please click the "Ask a related question" button in the top right corner. The newly created question will be automatically linked to this question.

A look inside the iView Engine in LightCrafter4500

Other Parts Discussed in Thread: DLP4500, DLPLCR4500EVM

LightCrafter4500-aficionados,

iView Limited has developed a compact light engine for LightCrafter4500 0.45" DMD. To explain the light engine, I have disassembled one of our early units by removing the bottom thermal plate, heat sinks, and driver board. Note that any disassembly of the light engine voids the warranty on the LightCrafter4500 system. Note that opening the light engine allows dust and smudges to collect on the optics. Also, the opening of the light engine might move the optics out of alignment. Both conditions will distort the output image. 

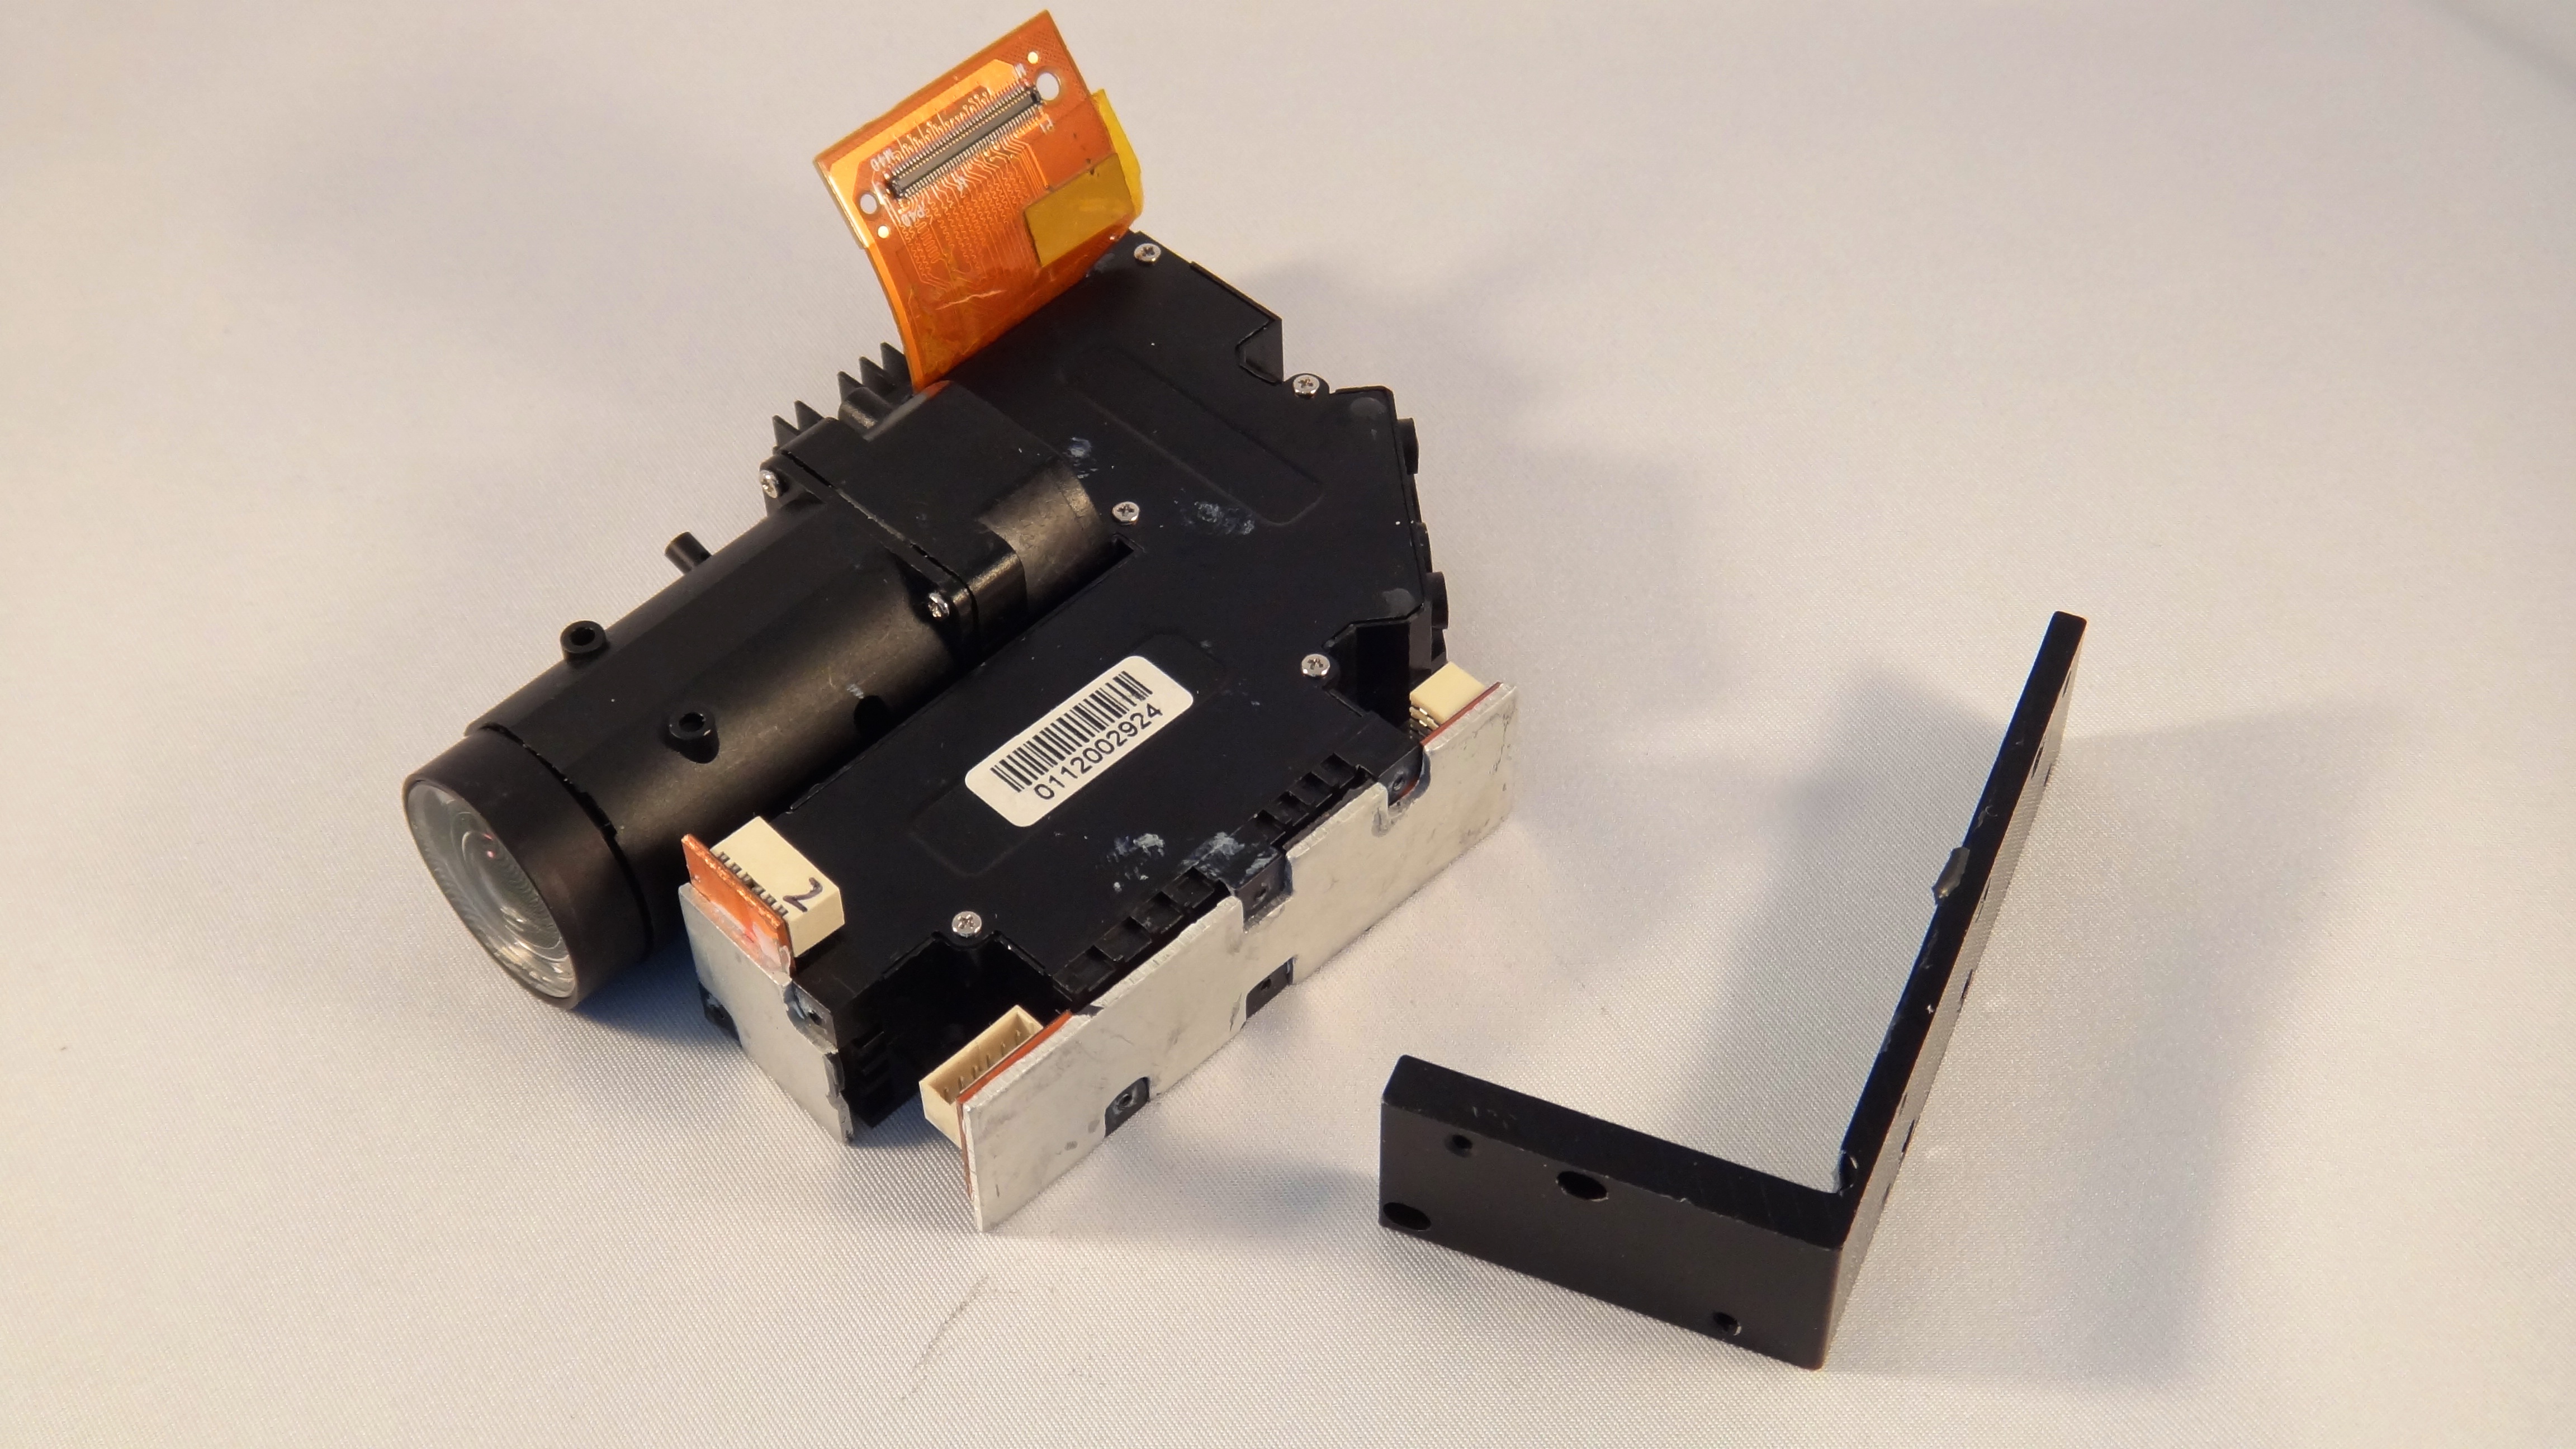
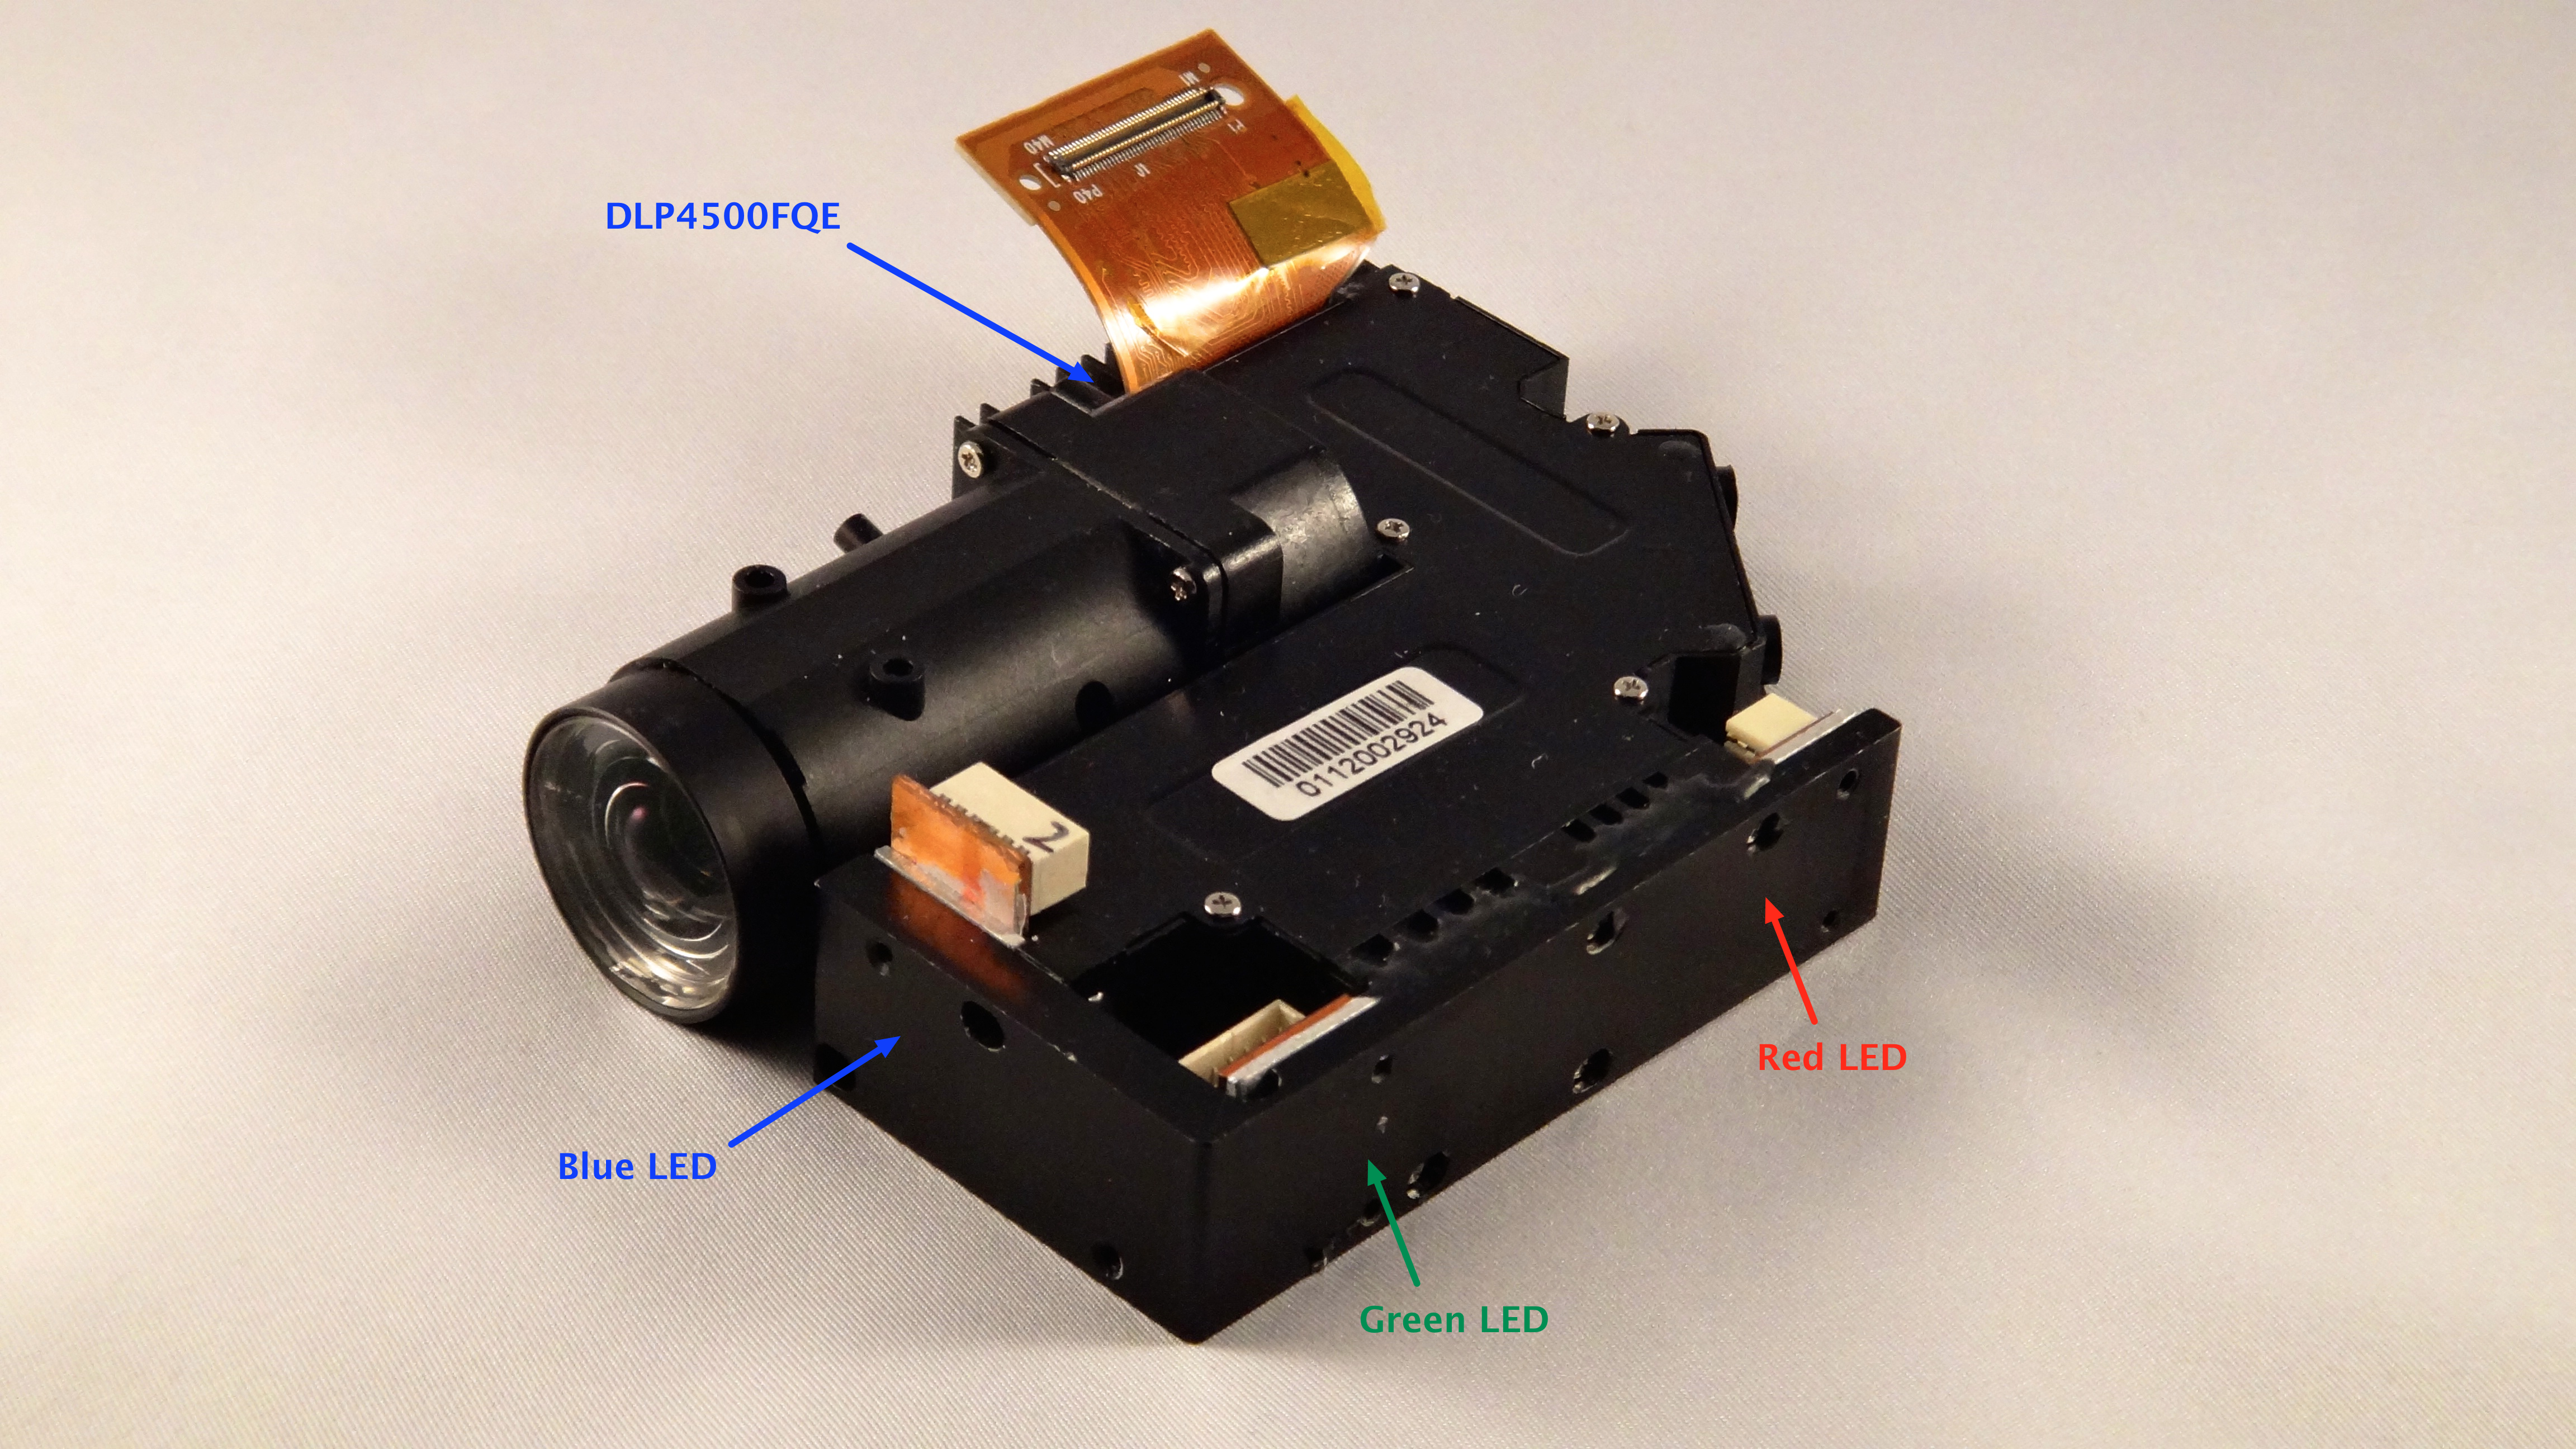
The following photo shows the top side of the light engine. The flex cable connects the 0.45" DLP4500 DMD to the driver board. The DLP4500 is on the top at the end of the flex cable and behind the heat sink. The DLP4500, DMD heat sink, and flex cable are glued to the light engine. The connectors on the bottom are for the Red, Green, and Blue LEDs. 

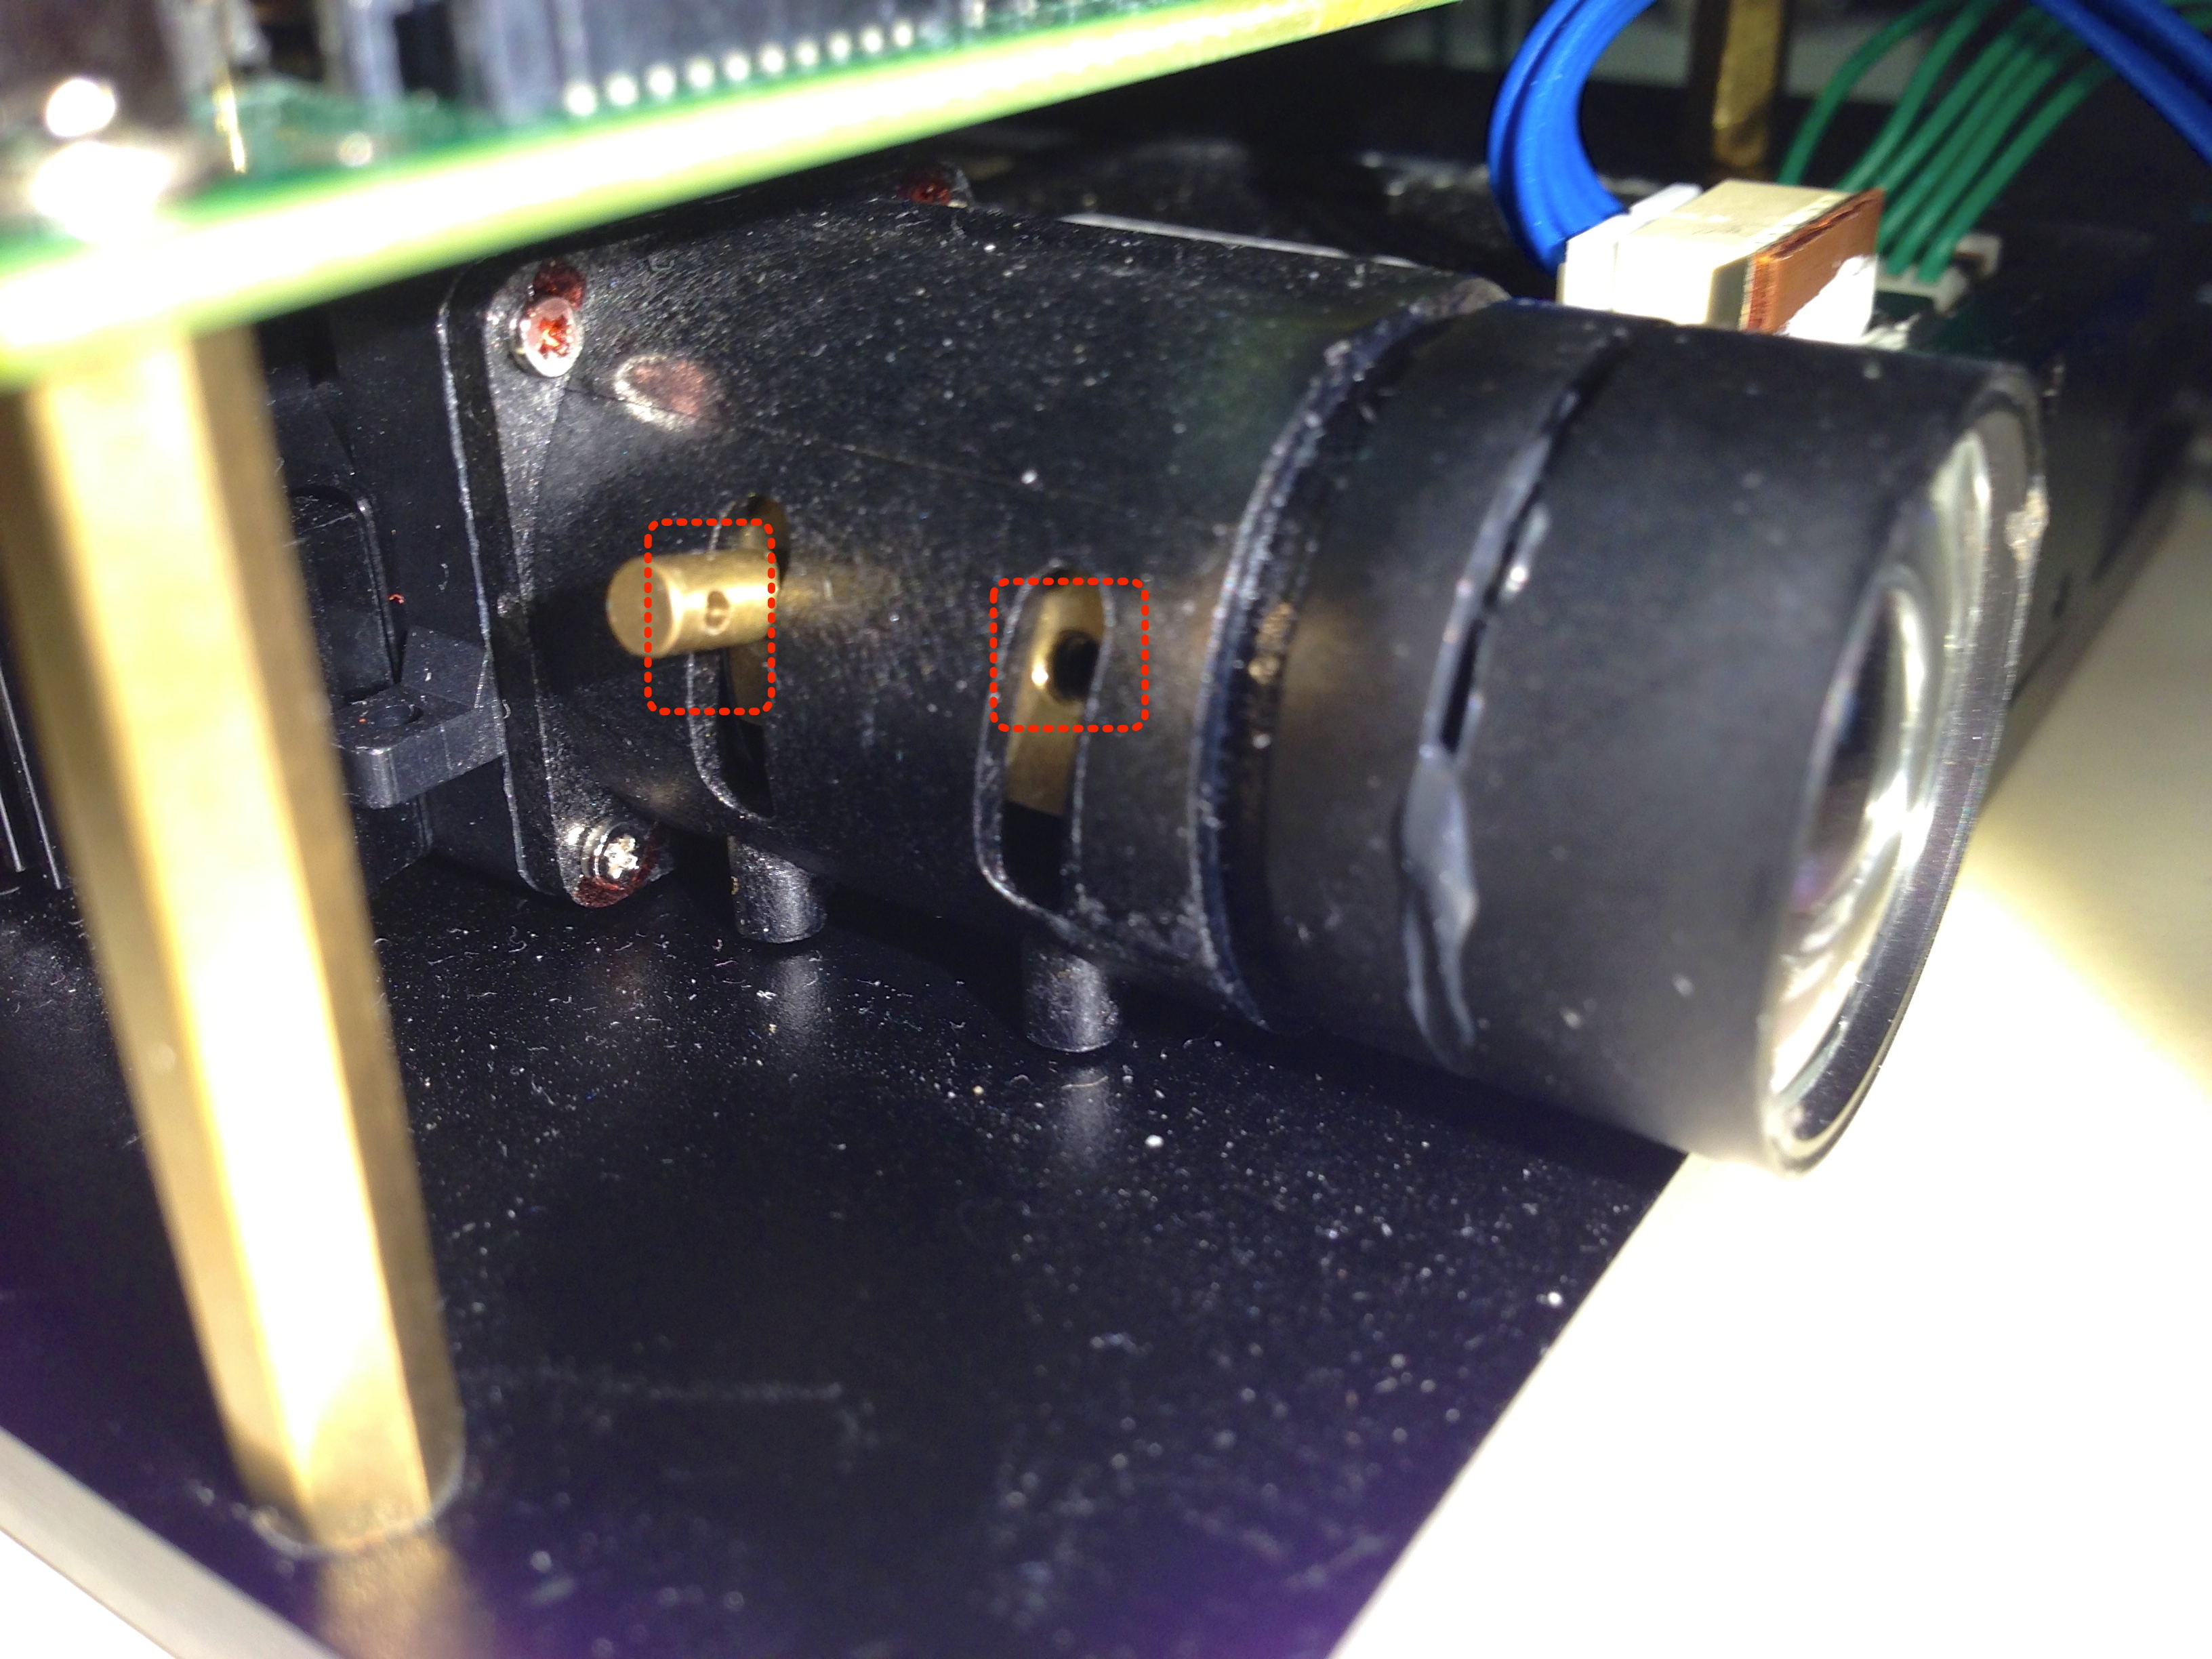
Disassembling the light engine is fairly straightforward with the focus portion screwed on the light engine. The focus optics are held to the light engine with the four screws around it. The rest of the internals of the light engine can be seen by removing the top plate. 


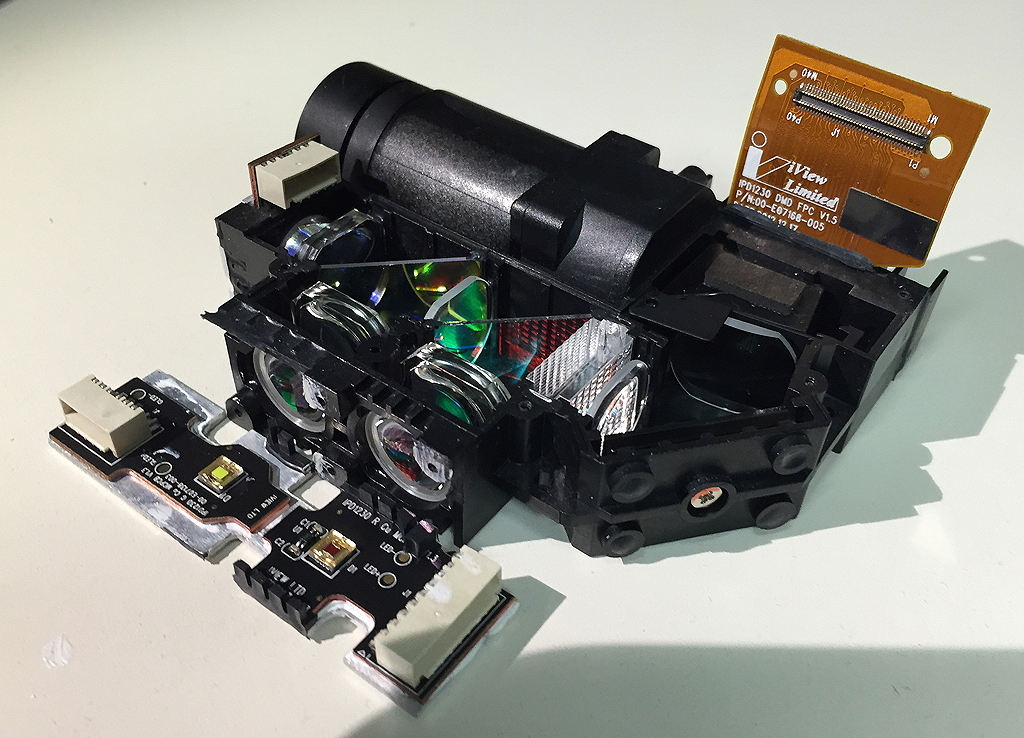
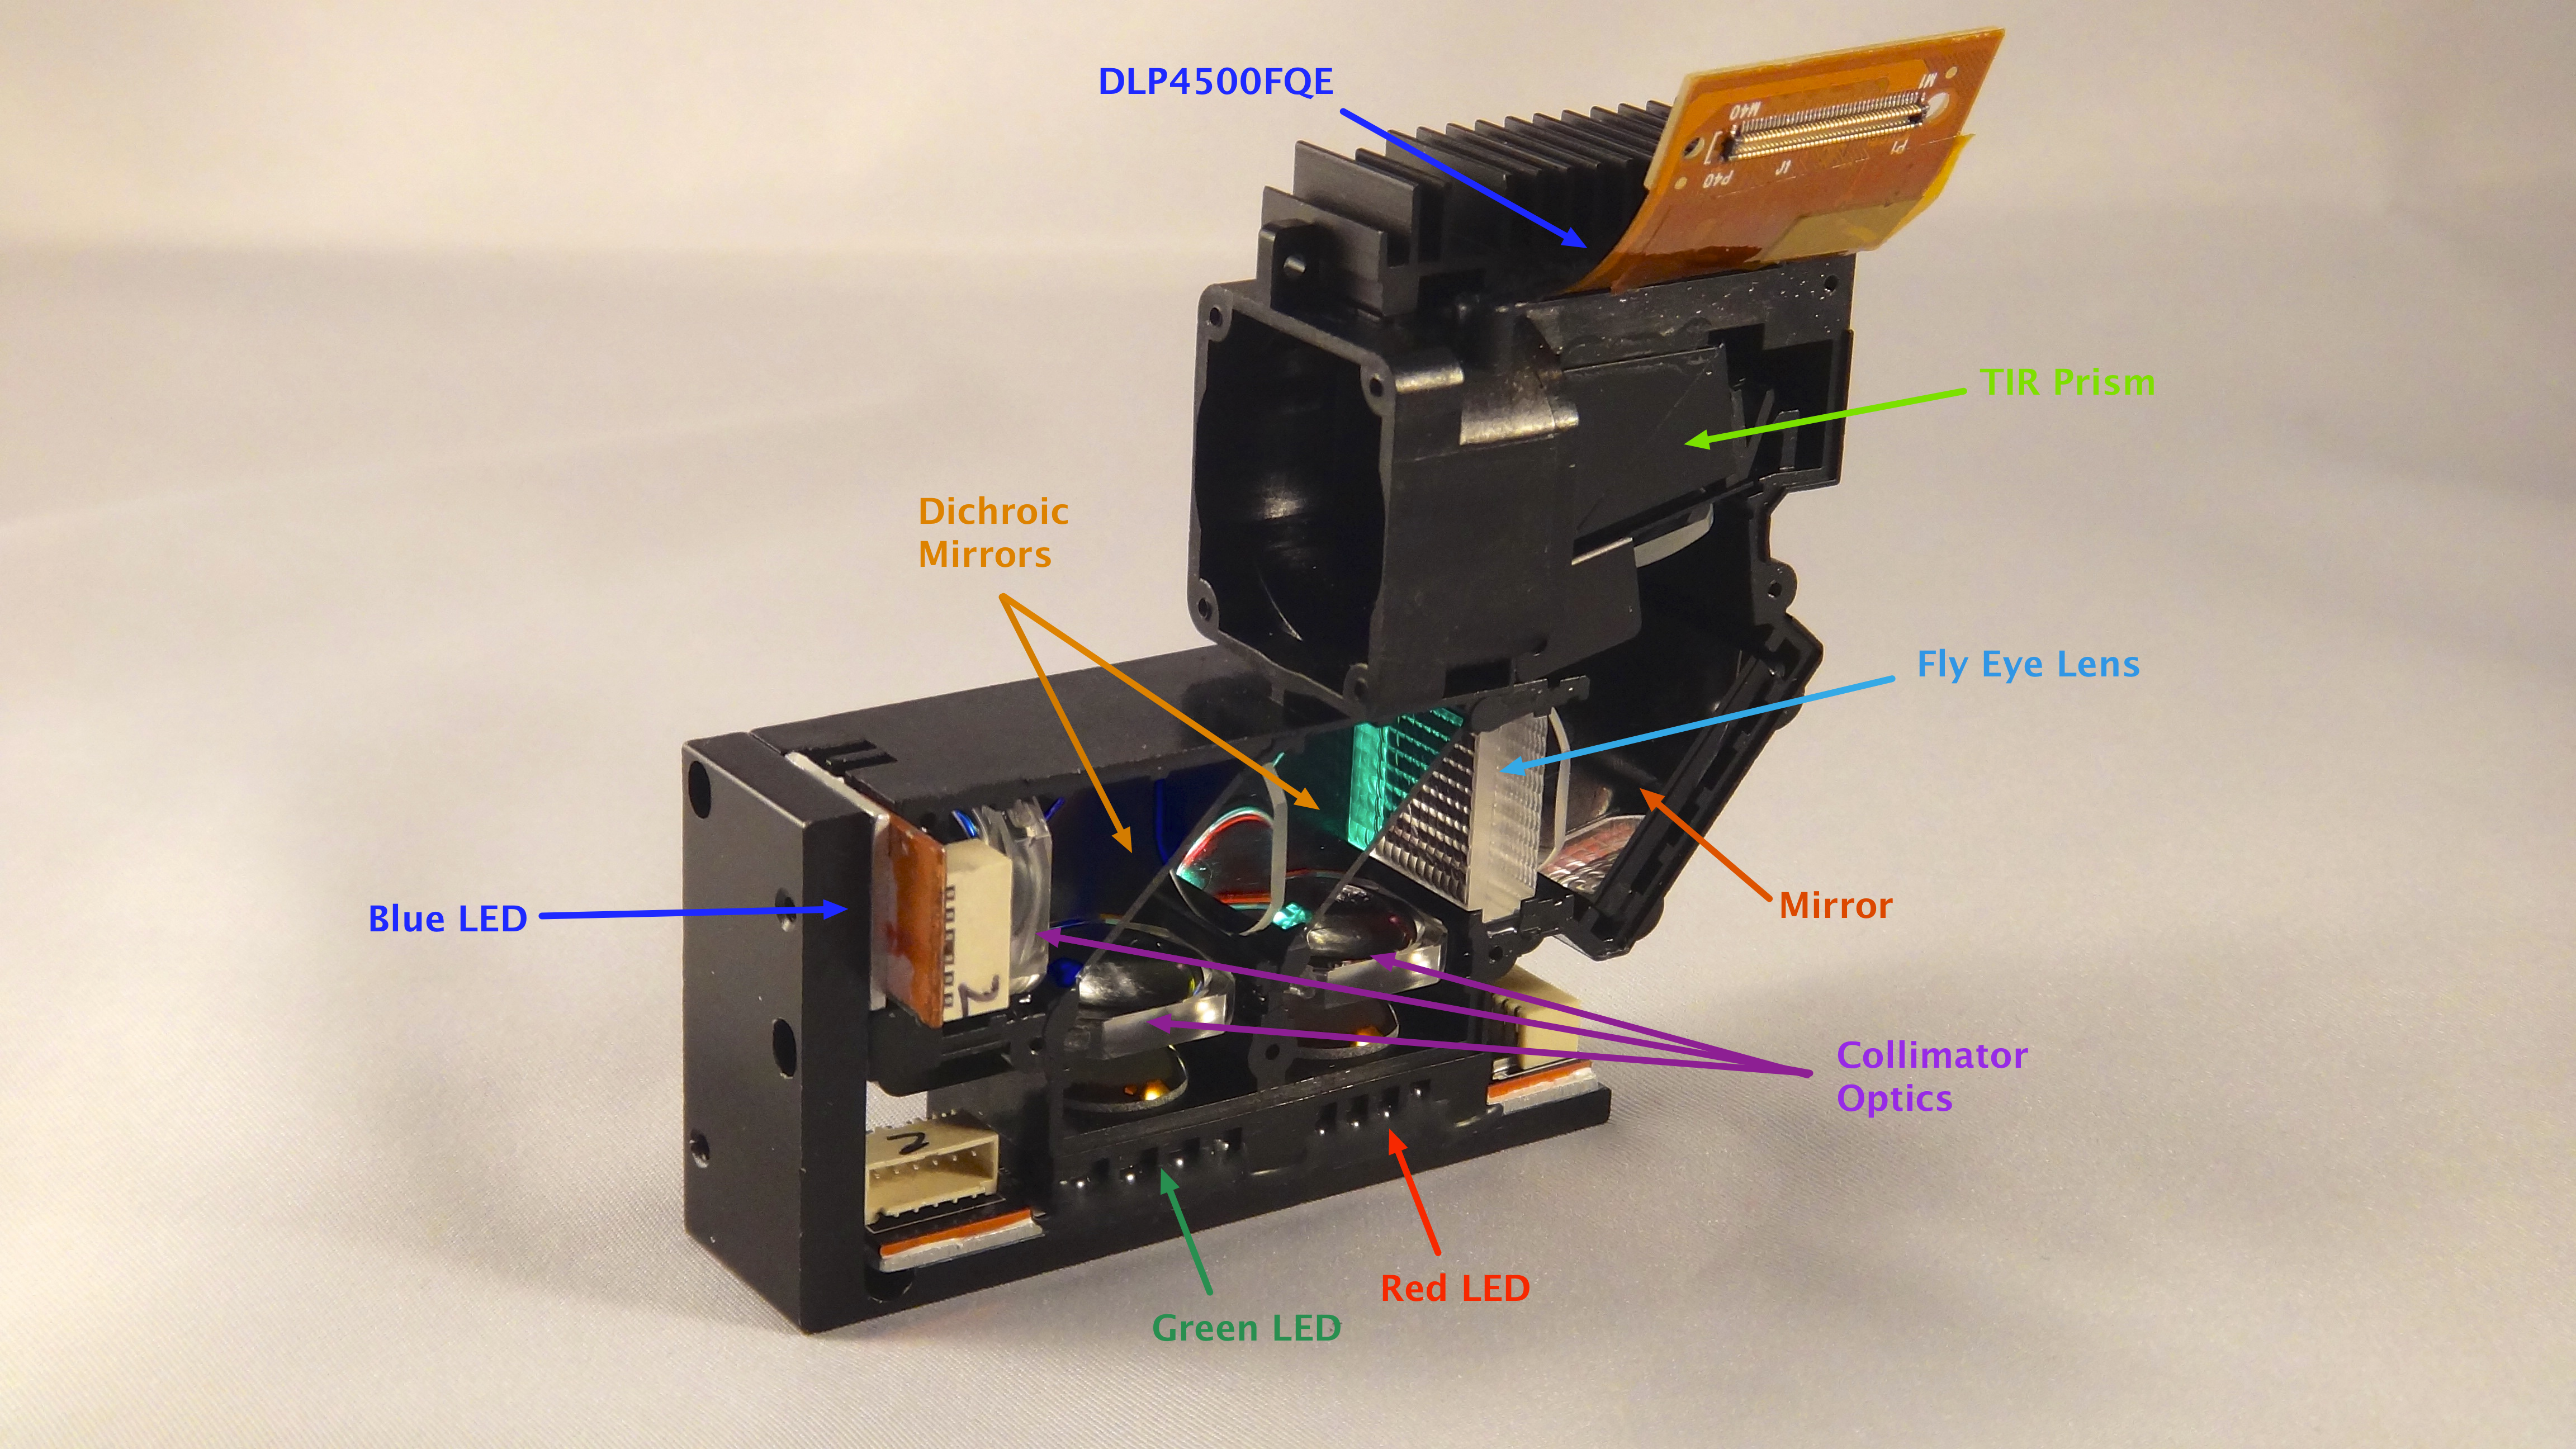
Each LED has an optical collimator to collect the wide beam of light from the LED and produce a narrower beam. This narrow beam of light passes through a set of dichroic mirrors that reflect a specific color of light while letting other colors of light pass through it. The dichroic mirrors recombine the different colors of light  into one co-linear beam. The recombined light passes through a fly-eye and condenser lens that provides uniform light intensity. The light bounces of a mirror and passes through a total internal reflection (TIR) prism. The light is directed towards the DLP4500 DMD and goes through the focus optics.

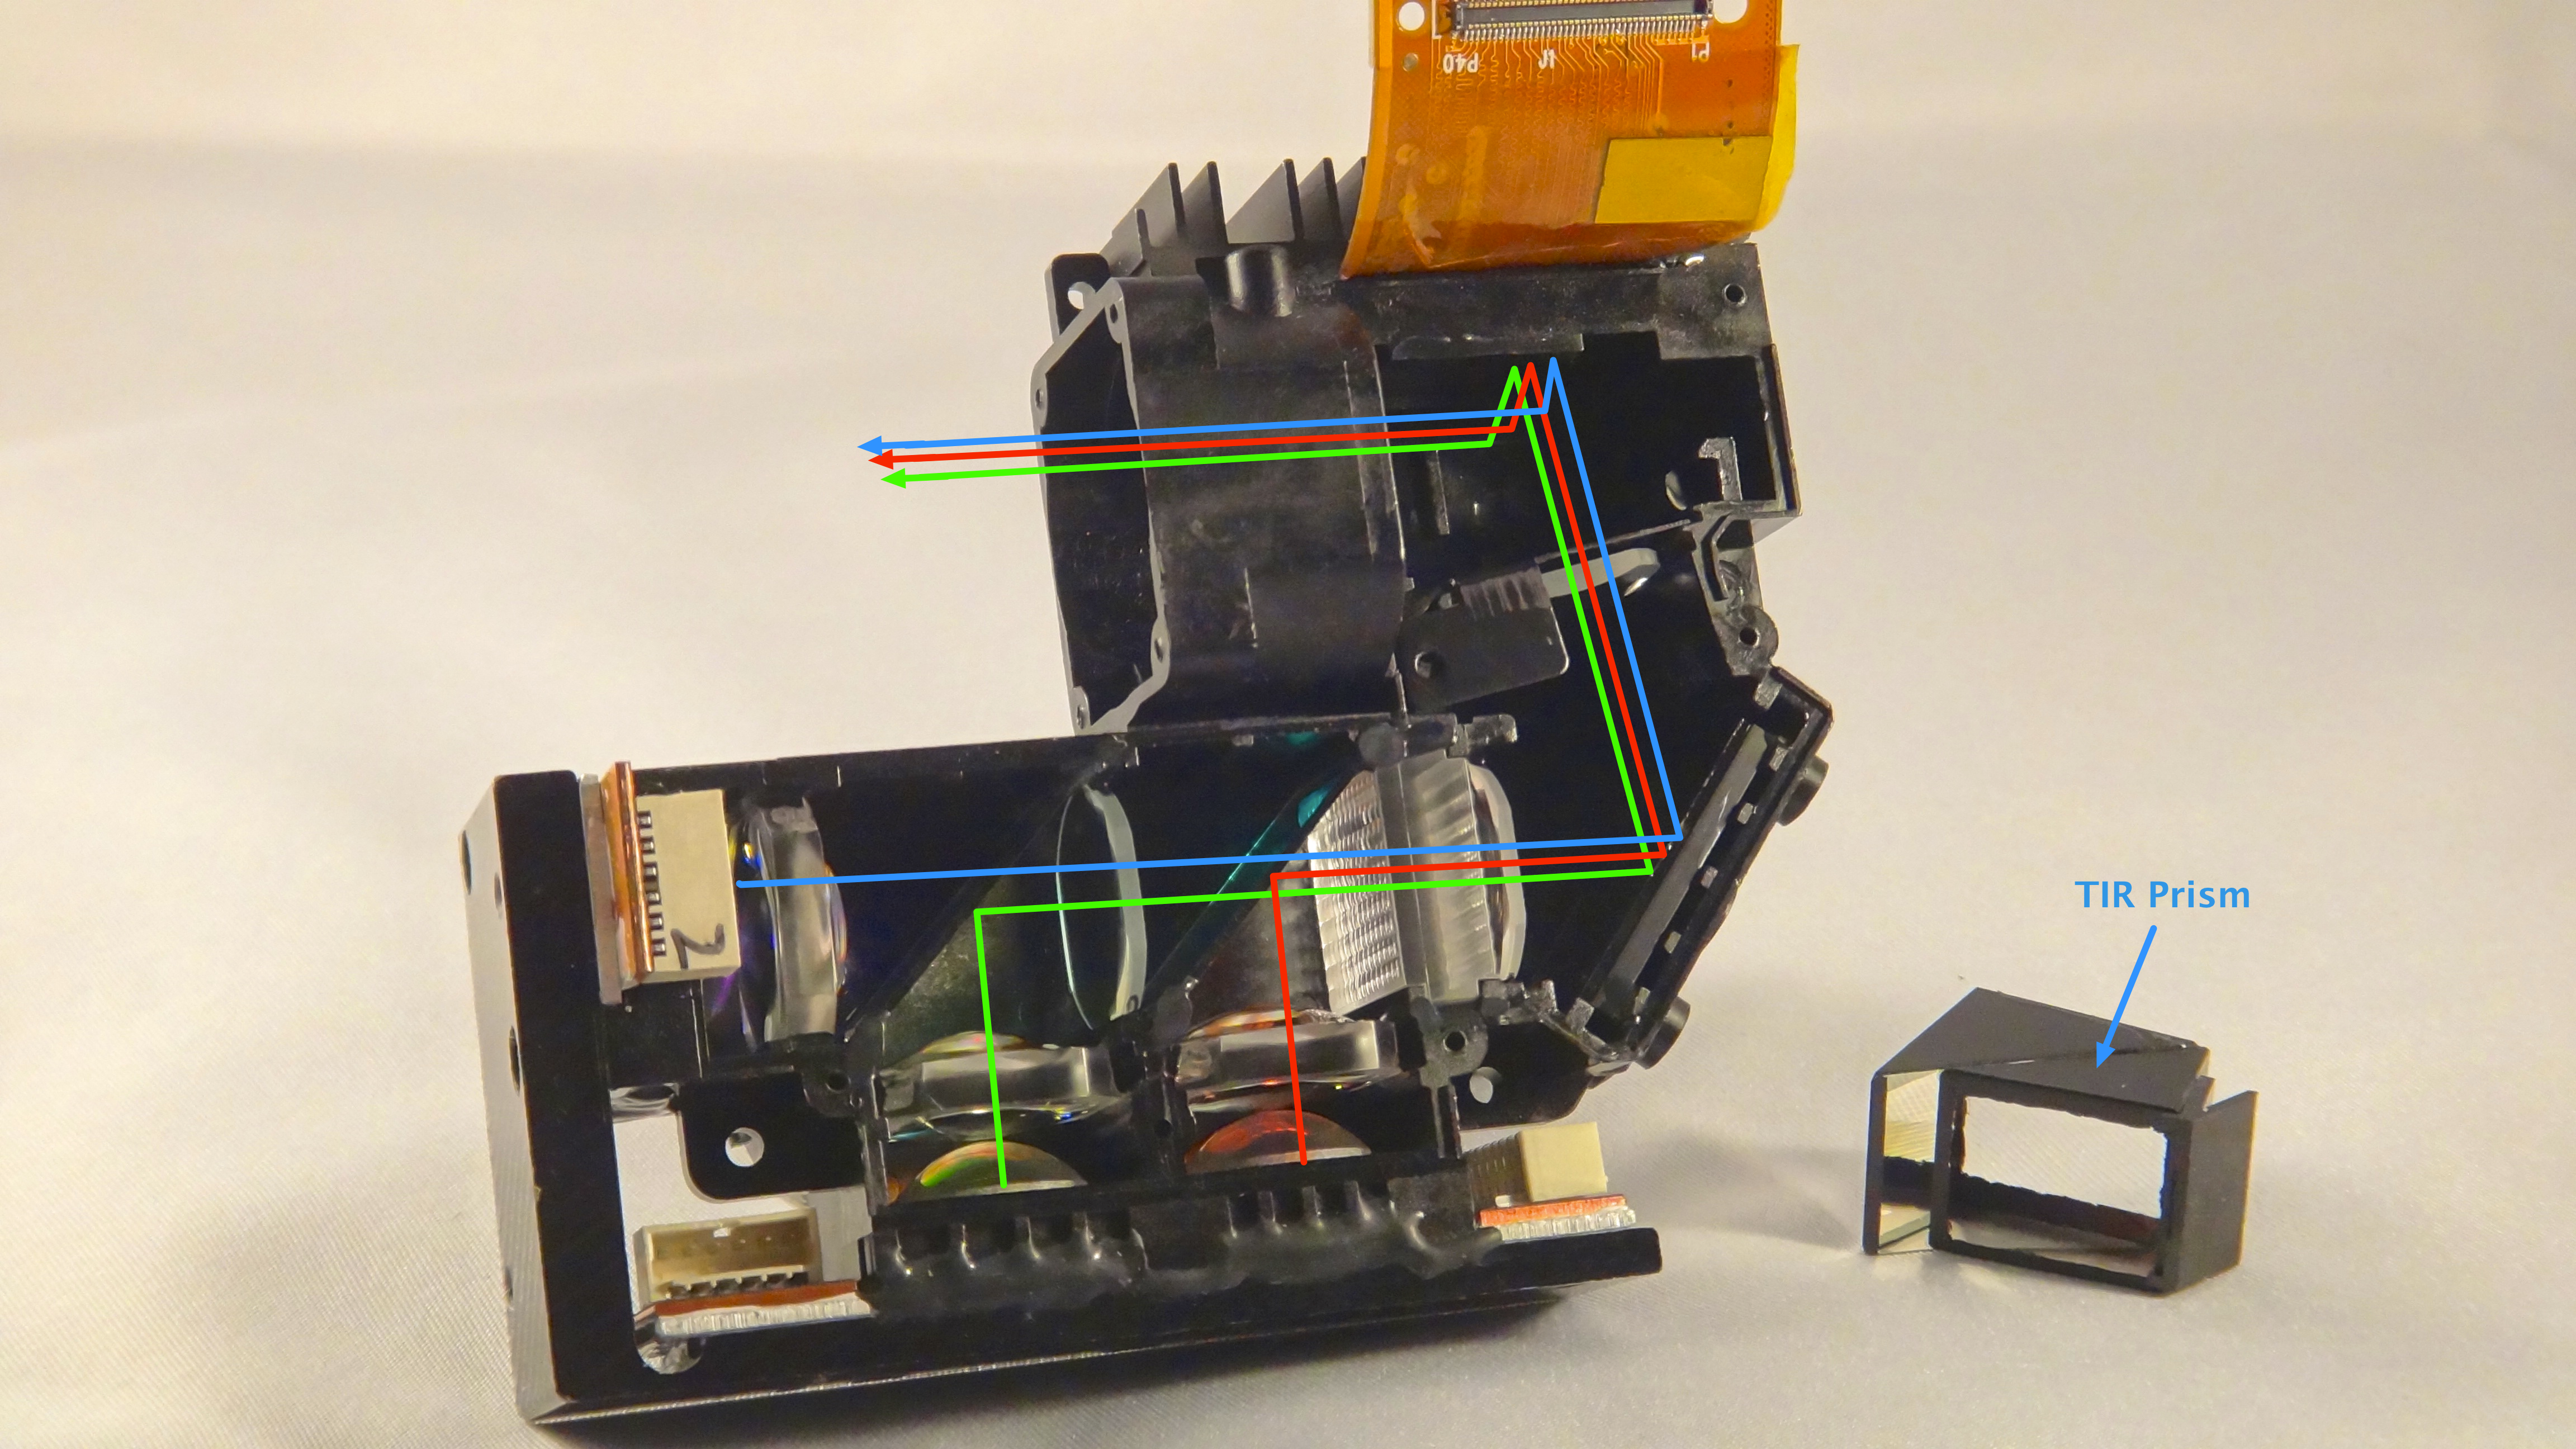
The next image shows the paths of the red, green, and blue light. Note that the TIR prism has been removed.

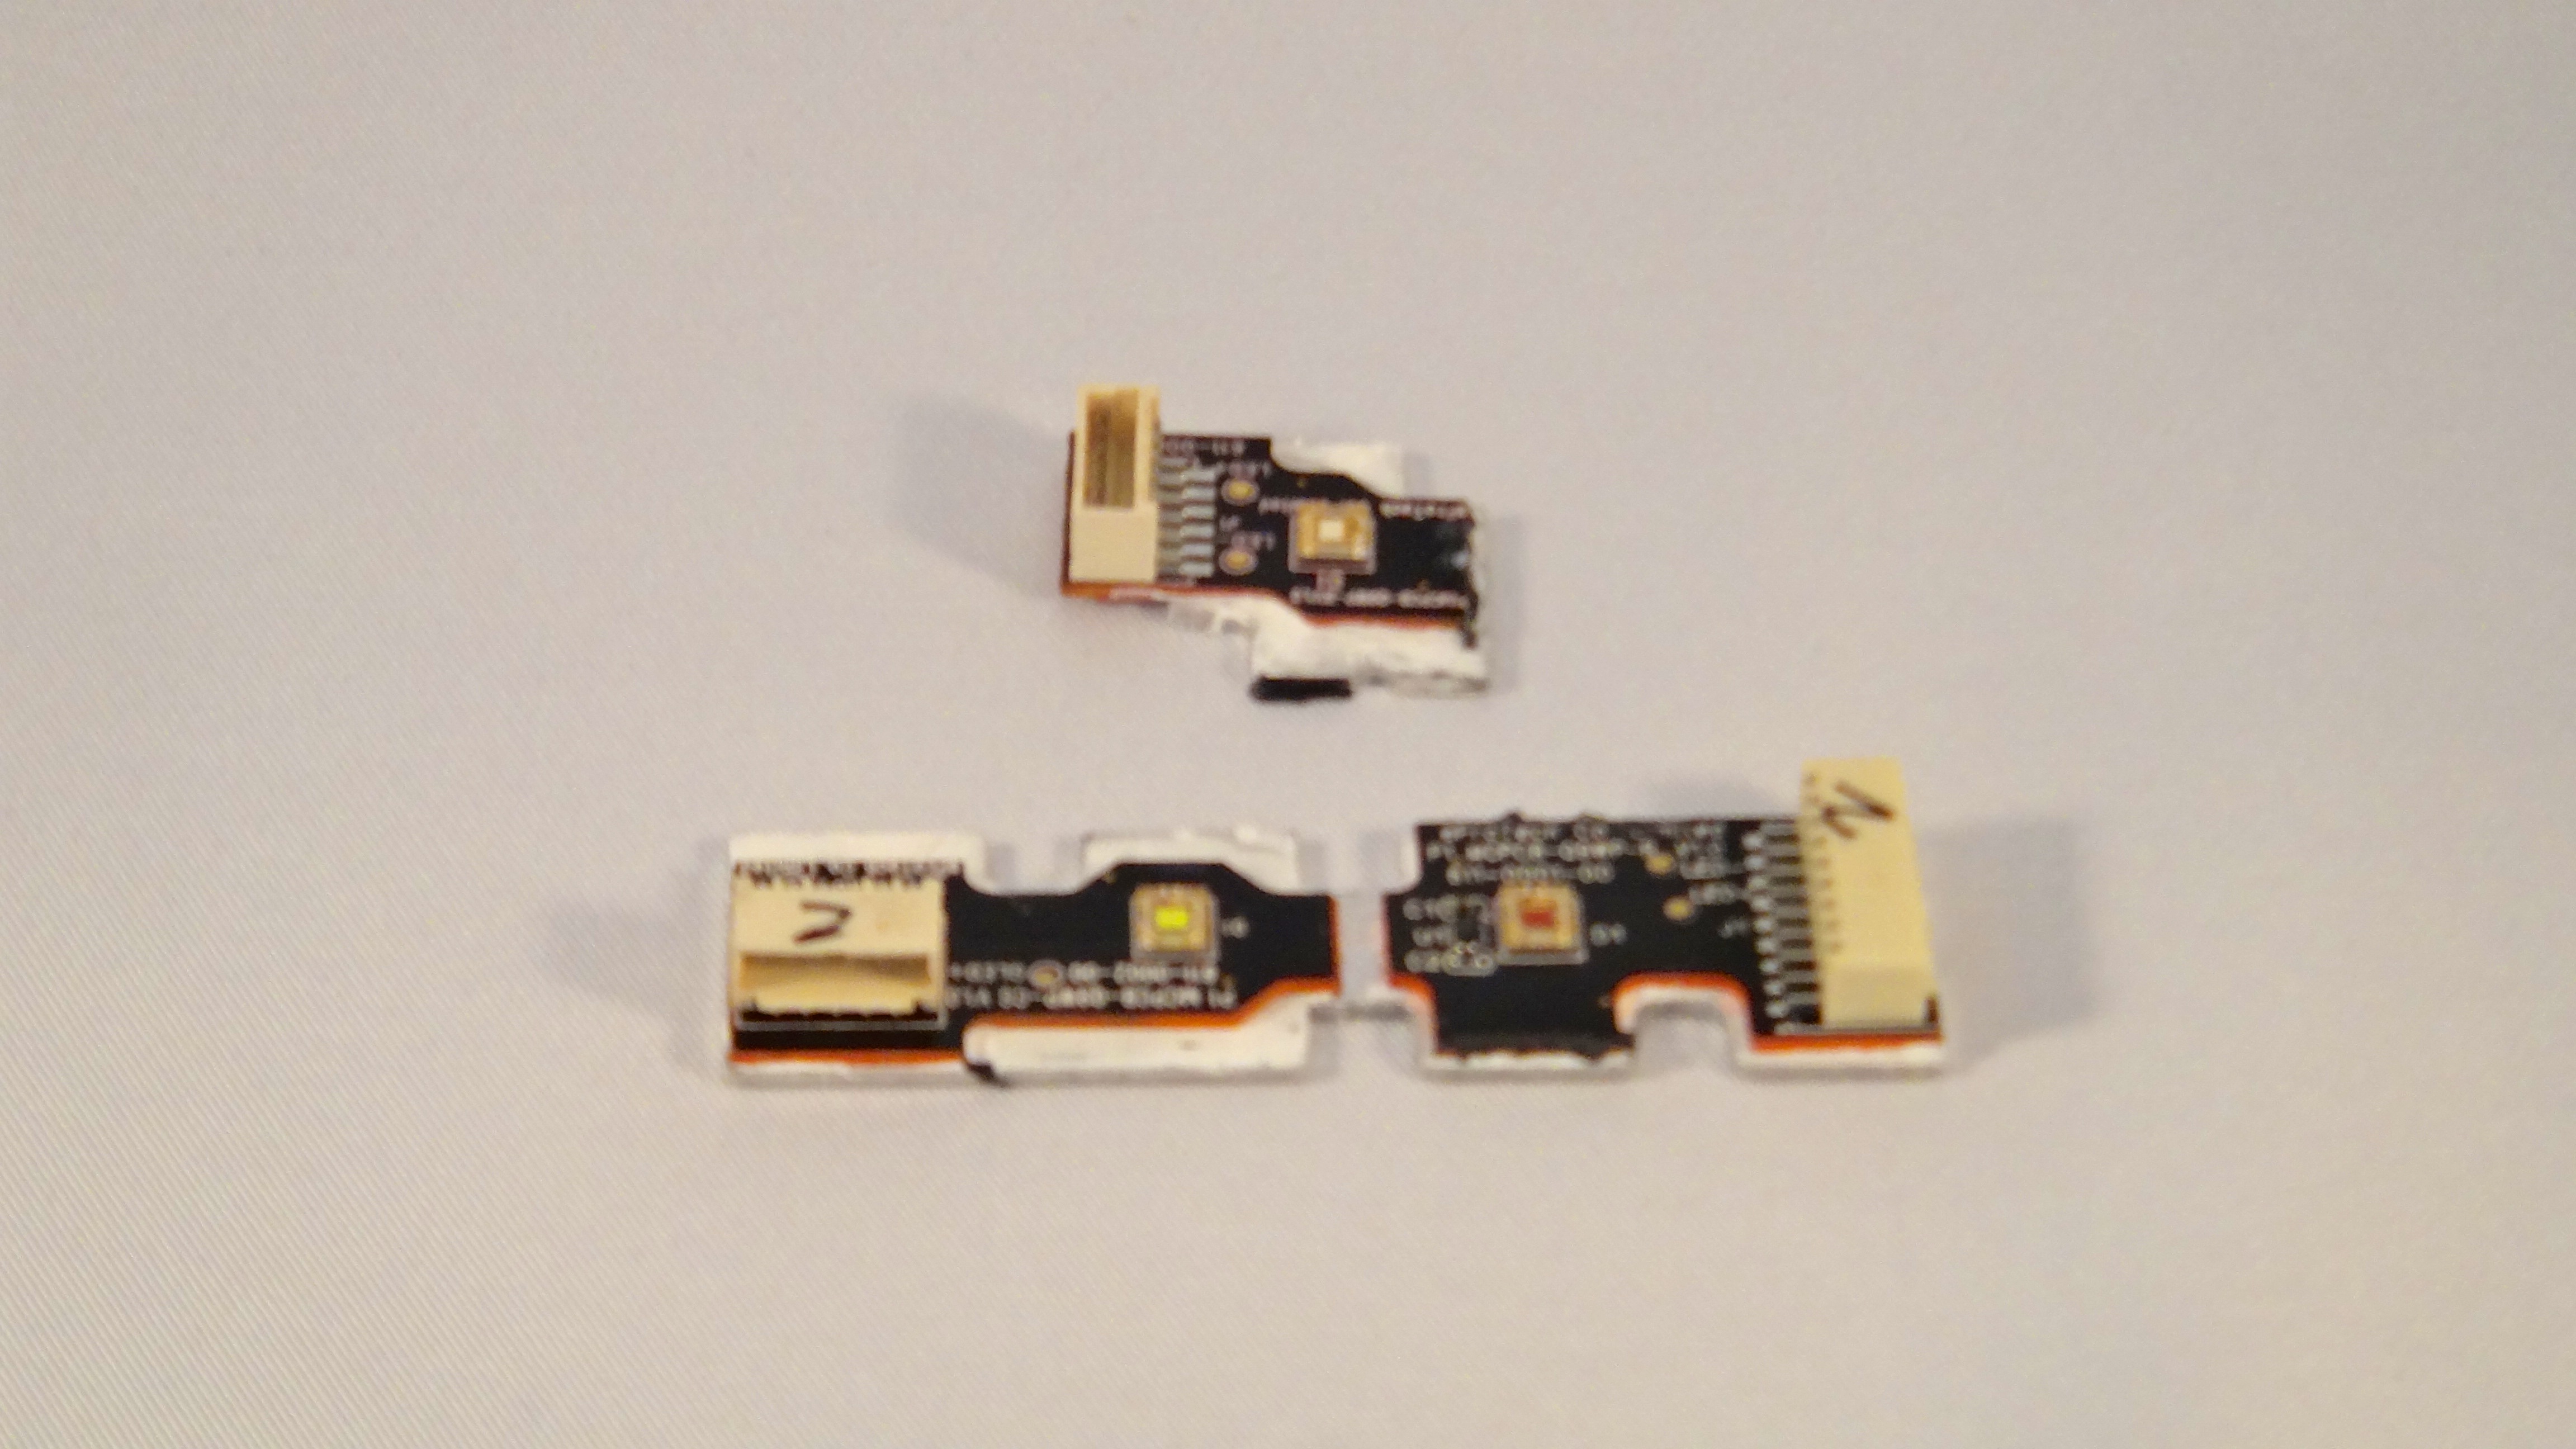
The LED used in this engine are:

  • Red LED: OSRAM LE A Q9WP
  • Green LED: OSRAM LE CG Q9WP
  • Blue LED: OSRAM  LE B Q9WP
  • A few more pictures.

    Removing the heat sink behind the LEDs:

    Removing the LED boards:

    Removing the DMD heat sink. You can now see the DMD placement on the light engine:

    And finally, light engine without DMD, LEDs, and TIR prism:

  • PedroGelabert ,

    I have some  questions,

    1. What's the  reflectivity of the dichroic mirror in front of the red LED?

    2. The dominant wavelength of the red LED is 617nm, right? is there higher wavelength red LED?

    thanks,

    He

  • He,

    The transmission of the red dichroic mirror is roughly above 95% from 420nm to 550nm. It has close to 99% reflectance between 600 and 650nm. These values might change or shift due to variations in coating during production.

    The transmission of the blue dichroic mirror is roughly above 95% from 510nm to 600nm. It has close to 99% reflectance between 400nm to 480nm. These values might change or shift due to variations in coating during production.

    The light engine has as Red LED the OSTAR LE A A Q9WP from OSRAM with a dominant wavelength of 617nm. In why Q9WP package, i am only aware that OSRAM only produces amber light. You can find more information of these LEDs in this link.

    Best regards,

      Pedro

  • This is very interesting insight in the LC 4500 optics.

    One important question for me is whether there is a way to lock the focus setting reliably once it is focussed to the correct distance.

    Regards

    Erik

  • The focusing mechanism is a pin that rotates in helix fashion around the focus optics. As you can see in the attached image, the pin has a hole that could be used to hold/tie it in place. There is also another screw hole in the focus barrel that can be used to hold the focus mechanism in place. 

  • Hi Pedro,

    I have a question concerning the light engine and the illuminance of the 3 LEDs. Could you specify how were the values provided on pages 23-24 of the User manual determined? I'm referring to the graphs of LED illuminance. Is this illuminance at the output of the light engine, or the illuminance of the LEDs without any optics? If the latter, is there any data available on the effective illuminance (or better yet, on the irradiance) at the output of the system for each color?

    Thanks,

    Zuzanna

  • Yes, the illuminance is at the output of the Light Engine. For illuminance at the output of each LED, refer to OSRAM data sheets. The LEDs are at the end of this thread.

  • Thanks a lot Pedro for this info and also your reply concerning the noise. I think the link you posted refers to the LEDs in the first LigthCrafter though, right? There are other LED part numbers listed above in your original post concerning the light engine, are these the ones for the 4500 model?

    best

    Zuzanna

  • Also, just to make sure I understand correctly: the irradiance values are in lux, ie in lumens/sq meter, so were they measured for an image at 1m, ie of 33.3'' diagonal size (I'm going by the iView specs here)? I'm trying to recover information about the total light flux in fact, is that the way to go? I get an image area of 0.324 sq meters at 1m, so that gives me for ex. 110*0.324=35 lumens max for the blue LED. Could you confirm or else specify for what total image size the values were taken?

    Thanks a lot!

    Zuzanna

  • Zuzanna,

    Sorry about that. You are correct that link was the 0.3" LightCrafter LEDs. The LightCrafter 4500 OSRAM LEDs are:

    • CG Q9WP - Green
    • LE A Q9WP - Red
    • LE B Q9WP - Blue

    You can find the data sheets here.

  • Hi Pedro,

    I have another question concerning the light engine of the LightCrafter 4500 (we should be receiving the one we ordered soon and are planning how to integrate it in our microscopy system) - is the illumination of the chip telecentric?

    best

    Zuzanna

  • Dear Pedro,

    How easily can you replace the LEDs in the light engine with different ones? I understand that the filters need to be changed if this is done but I'm more interested in the practical aspect of changing the LEDs.  And what about the casing of the light engine, is it made out of aluminium or is it plastic?

    I sent you a friend request  and I was hoping if you could give some advice in our imaging project.

    Best,

    Kari

  • Hi Pedro,

    Could you possibly provide data for optical elements (e.g. focal length of each lens)? Recently we have purchased a DLPLCR4500EVM., but for our research application we need to replace current optical elements (from LED to DMD) with UV compatible ones.


    Thanks,

    Hamid

  • Hi Pedro,

    Can I have optical element data inside DLP LightCraft 4500 EM?

    Best,

    James

  • James,

    The light engine in LightCrafter 4500 was designed by the DLP Design House iView Limited. You would need to contact them for entail information on their light engine. Contact information is on the link. 

  • Hi, 

    How to align the three beams?

    The final beam after DMD without projection lens is tilted upward some degree. How to make it correct, i.e no tilt ?

    I think that there is tip-tilt mirror before DMD (after lenslet array), so can I use this mirror?

    Many thanks in advance,

    James

  • James,

    This upward tilt is by design.  This projector engine is designed with "100%" offset.  This means that the bottom (of the projected image) is along the axis of the projection lens.  There is no adjustement designed into this engine to make the center of the image align with the optical axis of the lens.

    This allows the projection engine to lay flat on a table and project onto a wall without being clipped by the table.

    Typicaly the three beams are aligned well enough to illuminate the DMD and do not contemplate alignment for use without the final imaging (projection lens).

    Fizix

  • Dear Pedro,


    thank you so much for your excellent analysis.

    I have a small question about the DLP4500: is it possible to operate the device after removing the objective (as in second photo)

    I would need to keep the illumination path and the TIR prism, but I would then design custom optics for the projection path. Is it possible in this case to use the electronic boards to control the system?

  • Dear Michele,

    You can remove the projection optics easily since it is only attached to the light engine with 4 screws. We've done this already in our lab and we've also modified the baseplate in order to have the DMD in the optical axis.

    The Lightcrafter will work 100% normally with or without the projection optics.

    Best,

    Kari

  • Dear Kari,

    thanks a lot for the quick answer!


    Best,

    michele

  • Michele,

    Yes, the electronics only drive the LEDs and the DMD. All the optics can be removed and the electronics will drive the DMD. You can place a jumper on J30 to turn off the LED driver if you are not using it. If you intend to change the projection optic, but keep the illumination portion that also will be fine. Note that there is a 100% offset in the projection, so you will need to account for that in your optics.

    Best regards,

      Pedro

  • I am trying to follow these instructions to remove the default LEDs and replace them with different ones. I am finding a lot of resistance and glue with every single part that your pictures show you dismantling easily; is there a safe and efficient way to take apart the light engine in the presence of all of the glue?

  • Hi,

    I would like to have the control board laying further from the light engine. Is it possible to extend the flex cable somehow ? It looks pretty particular, do you have a reference of a cable that could work as an extensions for it ?

    Thanks

    Artemis
  • Artemis,

    Our Design Houses are working on increasing the length with different cable approaches. I have requested them to comment on the same.
    Regards,
    Sanjeev
  • Dear Artimus,

    We demonstrated our new LC4500 control board at Photonics West last week. Among other features, it supports a cable length up to about 250 mm (we've not tested longer than that yet). Please go to our contact page at KeynotePhotonics.com and we can send you some information... we've not had time to put it on our web-site yet. 

  • Hi Pedro,

    I am willing to use a LightCrafter4500 module for a lab experiment. According to your post, it should be feasible to unmount the DMD from the Light engine itself, if I am to use the DMD only without LEDs, focusing optics, and filters/mirrors.

    Am I right ? Do you think unplugging the DMD from the Light engine can be done without damage ?
    Is it possible to temporarily disconnect the flexible cable between the electronic board of the Light crafter 4500 and the DMD ?

    Thanks a lot !

    Julien
  • Hi Pedro,

    I know that I am a bit late to this thread, but I'm hoping that you can help me out. For my current experiment, I need to modify a DLP with UV light. From your post, I see that it is possible to remove the LED components, but is it possible to change out the current RGB LEDs with UV LEDs? Are the current RGB LEDs integrated into the board or can they be interchanged?

    Additionally, for my experiment, I will need to use UV light in the lower spectrum (around 365 nm) and as a result, can you also tell me if the current optics will pass this wavelength?

    Thank you very much!
  • Nevin,

    The LED are mounted on the Light Engine with small custom boards. When you swap LEDs, you need to consider how they are driven:

    • same operating voltages and currents from the LED driver
    • size of the LED and how it is coupled to the system (etandue)
    • dichroic mirrors and how they pass or cut the wavelengths of lights produced by the LEDs
    • wavelengths of light supported by the DMD. Note that the DLP4500 data sheet has a 420nm low end limit and power level restrictions

  • Interesting and useful link. I am in the process of adding some optics after the projection lens of the LigtCrafter 4500 for a project I'm working on and I would find extremely useful a Zemax ray tracing file of the light engine or only of the projection lens. Is there any ray tracing data available?

    Radu
  • All LEDs are obsolete, If you know vendors who sells, let me know.

    James
  • Hi, this is extremely helpful, thank you! I was wondering how you safely removed the adhesive from the DMD enclosure - is it easy to remove? Does it require any tools, or does the adhesive break easily?

  • Hi PedroGalbert!

    May I use your pictures for my senior thesis if I provide a link to this page and mention the author of this article and the company (you and TI)?

    Greetings,
    Leon