This thread has been locked.

If you have a related question, please click the "Ask a related question" button in the top right corner. The newly created question will be automatically linked to this question.

'Light engine' stopped working

Other Parts Discussed in Thread: DLPC300, DLPR300

Hi

I just got my DLP Lightcrafter (0.3 WVGA) and hooked it up to my computer using the 'User's Guide'. 

This morning my LCr worked just fine. I was able generate a static image and some internal test pattern. But after turning the LCr off and then on again something strange happened: The boot screen turned red and a few moments later the device stopped producing light.

When I try to connect to the LCr from the GUI I get the message 'Command fail' but after I click 'ok' the bottom left corner of the GUI says 'Command SUCCES' and it appears that the connection is established even though the LCr is still not producing light.

What had happened and how can i fix it?

Regards

Nicolai

  • Hello Nicolai,

    Welcome to TI E2E Community!

    I would be happy to help you with the LightCrafter Booting issue. Before I dive into this issue deeper, could you give me the following details about the LightCrafter operation:

    • Are you booting the Lightcrafter from SD card or NAND? If you are booting through NAND, is the switch S2 in the correct position (away from SD card)?
    • After the Lightcrafter is booted, do you see LED (D1) on the top board blinking Red and Green?
    • When the Lightcrafter is booting up, do you see any splash images or for that matter any light output?
    • Do you see Red and Green LEDs ON when you look at the Light Engine through the brown ribbon?

    To ensure that the connection between the top board and the bottom board and between the bottom board and the light engine is intact, follow the steps below to disassemble and reassemble the system:

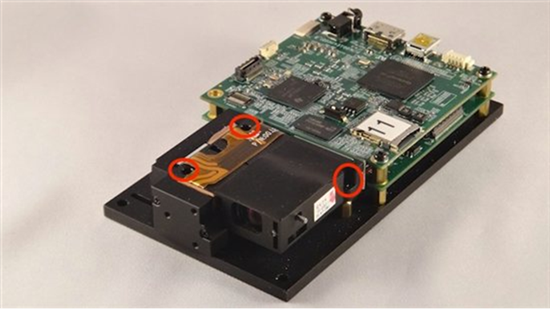
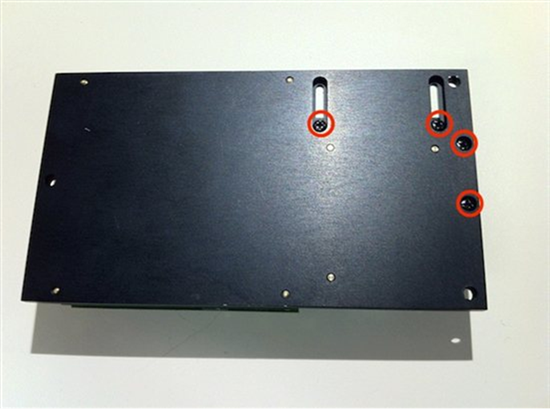
    • Remove the top board (systems board) and double check that the ribbon connected from the connector on the driver board to the light engine is intact. Following screenshots would give you step by step instructions of disassembling the Lightcrafter and reassembling it.
    • remove the system board (top board) by removing the four screws in the corner posts.


    • remove the three screws from the top of the light engine, you will need a Phillips P00 screwdriver
    • remove the four screws on the bottom thermal plate holding the LED heat sinks
       
    • Make sure that this ribbon is intact (not broken), remove the ribbon cables from the driver board (bottom board). Just pull-up the plastic tab and pull-up the ribbon cable. Be careful, these ribbons are fragile and easy to break while pulling. Then just make sure you push the ribbon all the way in the connector snap it back on and put the system board back on top.

    Try booting it up and let me know if this fixes the issue.

    Also, if booting through the NAND does not still work,  build the SD card with DM365 SD Card Build , flip the switch towards the SD Card and try booting from SD Card.

    Regards,

    Manasi


  • Hi, I am having a similar problem. The LightCrafter is not projecting any light.

    I am booting it up through the SD boot and I have the Dip switch in the right spot and all of the firmware versions are up to date.

    When the Lightcrafter is booted, the LED (D1) on the top board is blinking Red and Green.

    I do not see any light output at all.

    Can you please help me with this problem?

    Thank you.

  • Hello Heather,

    Did you ever see a light output after you bought the LightCrafter? Also do you see red and green LEDs on top of the Light engine through the ribbons?

    I would also recommend trying the steps that I had mentioned in this E2E post to disassemble and assemble the systems and driver boards:

    http://e2e.ti.com/support/dlp__mems_micro-electro-mechanical_systems/f/850/p/322842/1215323.aspx#1215323

    Also are you able to connect and talk to LightCrafter using the GUI? Try sending LED current set command and do a get to see if it has set the value correctly. If this works then it tells that the I2C command interface is working.

    Let me know how this troubleshooting goes else I can further give you list of pins you can probe on the board to see the status of RGB enable signals.

    Regards

    Manasi

  • Hi Heather

    I solved my problem by updating some 'firmware' that wasn't included in the software bundle. I don't have access to my project right now so i can't give you a more detailed description of how i fixed it at the moment.


  • Hi Manasi,

    Yes, when I first started using the LightCrafter I was able to project images, color, and the test patterns out of it. After updating the firmware, I no longer saw any light out of the LightCrafter. I do not see LEDs on top of the light engine through the ribbon, but I am not sure I am looking in the right place.

    I'm not sure how to go about checking if the LED current set/get command is working. When I type in different values for the current, the mA number on the right changes and when I hit set or get, there is a Command SUCCESS message in the bottom left corner.

    Is that right?

    Heather

  • Hi Nicolai,

    I updated my firmware, but that is when the problem started. The LightCrafter was projecting light before, I just couldn't do the stored pattern sequence. After I updated my firmware (DM365: 5.0     FPGA: 2.6.43     MSP430: 3.0), no light is projected out of the LightCrafter at all.

    Thanks for your suggestion, though! I really appreciate the quick response. If you have any other thoughts, please let me know.

    Heather

  • Hello Heather,

    Yes the fact that you can change the LED current value to something, Set it and retrieve the changed value when you do a Get tells me that  the I2C interface between DM365 to FPGA to DLPC300 is correct and working.

    There is one piece of firmware which is not included in the bundle and it is the actual controller DLPC300 firmware. For some reason if that has got corrupted then the LightCrafter will fail to function properly.

    Can you try reverting this back to the original firmware obtained at:

    http://www.ti.com/tool/dlpr300

    Install that and then from GUI go to Firmware Upgrade tab, pick DLPC300 and select the .bin file from the installed directory.

    Give this a shot and let me know what you see. 

    Also it would be very helpful if you can connect a UART cable and send me the debug log that way I can exactly figure out which piece of firmware is causing an issue.

    Regards

    Manasi

  • Which firmware download is it? There is DLPR300PROM and DLPR300SPLASH.

  • It's the DLPR300PROM.

    Manasi

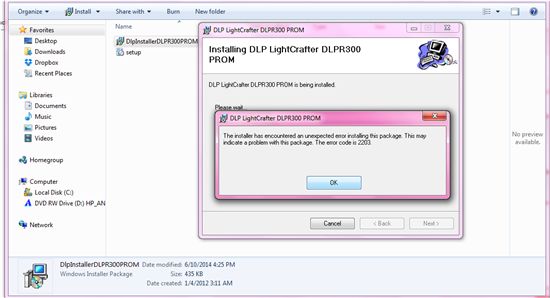
  • I recieved this error message

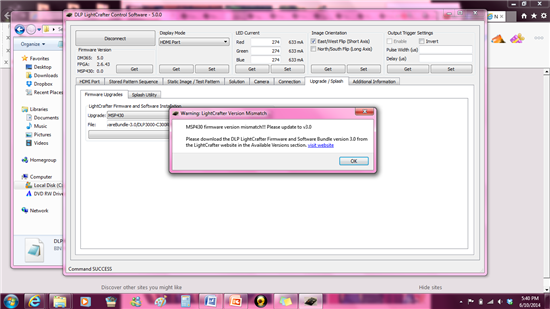
  • Okay, figured it out, I now have light display, however, it got rid of the MSP430 firmware (saying 0.0 in the firmware version).

    I tried re-updating the firmware through the Upgrade/Splash tab, and it said "Command SUCCESS" in the bottom left corner but the firmware did not update when the get firmware button was hit.  

    Any ideas?

    Thank you,

    Heather

  • Hello Heather,

    That's a great news that you got DLPC300 upgraded and finally have the light output!

    Regarding upgrading the MSP430 firmware, it should be a very straight forward process.

    You should be able to choose MSP430 from the Upgrade drop down menu and then browse to the C:\Texas Instruments-DLP\DLPLCRSoftwareBundle-3.0\MSP430 v3.0 - FW directory to pick lcr_msp430_v3.txt file and hit Install.

    Remember that after you finish upgrading through GUI, you would have to hard reboot the system (unplug the power cord an plug it back in).

    Hope this helps. Let me know how it goes.

    Regards

    Manasi