This thread has been locked.

If you have a related question, please click the "Ask a related question" button in the top right corner. The newly created question will be automatically linked to this question.

NA

Other Parts Discussed in Thread: DLPDLCR2000EVM

Hi Philippe,

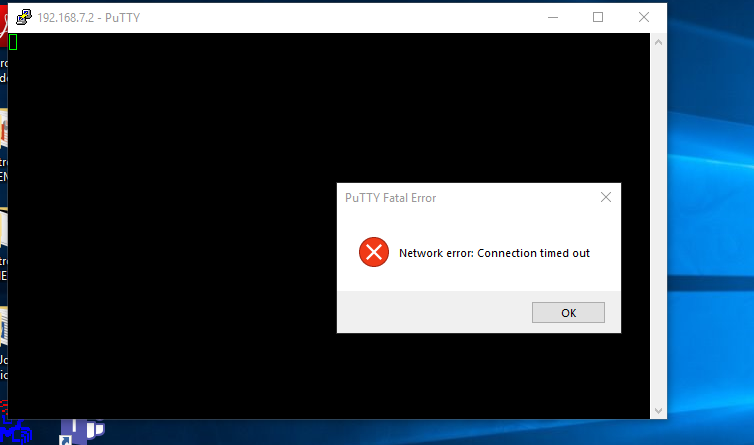
I have started Putty and have followed steps 1-8. After I enter the credentials that you have given, I get a blank window which later gives me an error message Network Error: Connection Timed out. I have inserted the screenshot. My Internet connection is OK. Can you please tell me why this occurs and help me through it as soon as possible?

Thanks

Adnan Ahsan Shibib

  • Adnan,

    Welcome to the E2E forums, and thank you for your interest in our DLP technology.

    It is possible that you are encountering an issue that is preventing the BeagleBone Black's USB driver from loading. Here are some suggestions for you:

    > Perform your initial connection without the DLPDLCR2000EVM connected, to ensure that the BeagleBone is working on its own before trying to install the EVM.
    > When connecting the BeagleBone via USB, the device should appear as a drive on your "My Computer" page before you attempt to access it over SSH. If it is not something is wrong.
    > If possible, try reproducing the issue on a separate computer to eliminate sources of error.

    I recommend you review the guide located here to get your BeagleBone connection working. Operation of the PuTTY terminal connection is independent of the DLPDLCR2000EVM so you should debug this issue first before you proceed:

    http://beagleboard.org/getting-started


    Let me know if you have further questions.

    Best Regards,
    Philippe Dollo

  • Hi Philippe,

    Thank you for your prompt reply. Firstly, I have tested the device on three computers till now and they all have given me the same exact issue. Secondly, the Beaglebone seems to boot up normally, as all the LEDs light up in a pattern when connected to the PC via USB. Thirdly, the EVM produces the splash screen when plugged in to the power supply. Fourthly, I do see the Beaglebone appear as a drive in my My Computer. From these, I assume that the Beaglebone is working fine. However, if there is some other test to see if the Beaglebone is working or not, please tell me.

    Regards
    Adnan Ahsan Shibib
  • Adnan,

    What is the LED pattern you are observing? If the lights are flashing in a sequence, the system is not actually booting. Rather, this means that the operating system is installing. Are you using the system with an SD card?

    Regards,
    Philippe Dollo
  • Hi Philip,

    After this email I will upload a short video of the LED pattern that I see when the Beaglebone boots up. Secondly, there is no micro SD card inside the Beaglebone. My friend had used it before, so I assumed that the Debian image is still loaded into the Beaglebone. Can the problem be related to an absence of the Debian image? Do I need to have the micro SD card inside the Beaglebone at all times?

    Thanks
    Adnan
  • Here is the video of the Beaglebone bootup

    Thanks

    Adnan

  • Adnan,

    This is normal behavior for the BeagleBone. As such, disregard my original inquiry about the OS installation.

    What version of Debian are you using with the system?
  • Hi Philippe,

    I don't know which version of Debian is installed, since it was my friend who installed it. Since you suspect something wrong with the Debian image, what I was gonna do is buy a micro SD card tonight and install the latest version of Debian, the one labelled "BBB-blank-debian-8.9-lxqt-4gb-armhf-2017-08-01-..> 01-Aug-2017 22:26 4394" from the link you have provided. Then, I am gonna try and see if it works. How about that? If you have any more suggestions, let me know.

    Thanks
    Adnan
  • Hi Philippe,

    I was following a tutorial on Youtube for the Beaglebone alone and after some time, I was able to login using the username debian. So, now I no longer have problems logging in. Now, I am trying to follow Step 10 and execute the two lines of command. This is where I face several problems. I cannot write the second line without the first line being executed. I tried to copy and paste  the lines

    i2cset -y 2 0x1b 0x0b 0x00 0x00 0x00 0x00 i

    i2cset -y 2 0x1b 0x0c 0x00 0x00 0x00 0x1b i

    into the space, but it gives me an error message, instead of the projector turning on. The message is this:

    If I try to type and execute each line separately, I get this error message:


    So now my problem is pasting multiple lines of code for the same command. I also get errors for Step 11 because of this. Can you help me?

    Thanks
    Adnan 

  • Adnan,

    You cannot execute both lines of code at the same time. You should execute them one at a time.

    You should start by using the "i2cdetect" command to determine whether your BBB can actually see the EVM as a usable i2c device. If you do not see a device at address 0x1B (the address of the EVM) you will be unable to write to it. If that is the case, you should verify that the DLPDLCR2000EVM cape overlay driver is properly installed by checking your cape overlay manager.

    Ensure you have a version of Debian with the compatible drivers installed:
    e2e.ti.com/.../615806

    Best Regards,
    Philippe Dollo