This thread has been locked.

If you have a related question, please click the "Ask a related question" button in the top right corner. The newly created question will be automatically linked to this question.

aspect ratio

Other Parts Discussed in Thread: DLPC300

If I load a 648x608 image using the pattern sequence mode, the image that I see (using a particular distance to the screen) is 22.1mm x 12.5mm. This is an apect ratio of 1.8, but the source image is 648/608=1.06. Images of circles look like ovals. Is there an image size that I should use to get square pixels?

  • Hi Marc,

    For an accurate display of patterns, the recommended image resolution is 608*684 (which is the native resolution of DLP3000).

    The DLPC300 also supports Input Resolutions of 854x480 (WVGA), 640x480 (VGA), 320x240 (QVGA). For the distance and image size (22.1mm x 12.5mm) mentioned above, you can choose a wider aspect ratio of 16:9 (854*480).

    Thanks & Regards,

    Divya

  • Hi Divya,

        What I mean is that when I use the pattern generator feature on the Lightcrafter system, and I load 608x684 images, the image that is displayed looks stretched out.

    Regards,
    Marc

  • Marc,

    DMD devices have two types of pixel topographies in the micromirror arrays:

    • Orthogonal pixel array configuration
    • Diamond pixel array configuration

    The Orthogonal pixel array utilizes an orthogonal grid where each squared pixel is arranged in a set of vertical columns and horizontal rows. The hinge axis is positioned diagonally relative to the micromirror array. The tilt direction makes a 45 degree angle with the micromirror array. Therefore, the incident illumination to the micromirror array is directed from the top right hand corner of the array.

    The Diamond pixel array utilizes an orthogonal grid, with a pixel configuration that is rotated 45 degrees. The hinge axis is positioned vertically relative to the micromirror array. The tilt direction makes a 0 degree angle with the micromirror array. Therefore, the incident illumination to the micromirror array is directed from the left hand side of the array. This produces a much more compact light engine.

    LightCrafter uses a DMD with diamond pixel array configuration. On the default 608x684 resolution, LightCrafter offers a one-to-one pixel to mirror mapping that bypasses any video procession. This video processing is handled by the DLPC300 and supports:

    • Front-end processing
    • Video graphics processing
    • Frame memory controller
    • DMD Formatting
    • Configuration control
    • Display control

    The front-end processing performs digital video format and color space conversions between different protocols, such as, 24-bit RGB, 24-bit YUV, BT.656, etc. The video graphics processing includes several image-enhancement functions, like degamma, automatic gain control, de-interlacing, image scaling, noise reduction, etc. It also performs artifact migration functions through spatial-temporal multiplexing (dithering). The frame memory controller manages on-chip or off-chip frame storage of the image sent to the DMD. The DMD formatting takes frame data, formats, and loads it into the DMD.  A host processor uses the configuration and display control to manage how data is presented and arranged for the DLP chipset.

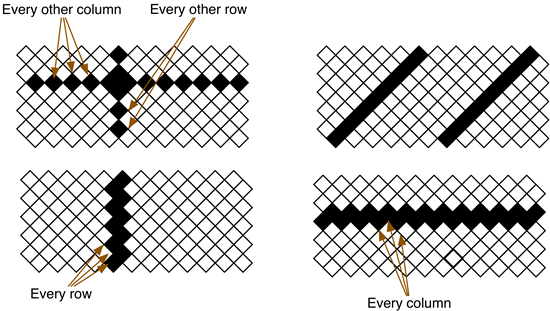
    Thus, when creating patterns in the 608x684 mode, this diamond pixel configuration must be understood to preserve the aspect ratio. For example, the Diamond pixel array configuration produces smooth diagonal lines, with jagged vertical and horizontal lines. Two options exist to produce the vertical and horizontal lines: use very row or column, or skip every other row or column. When every row or column is used, a thicker line is projected. When every other row or column is used, a fainter line is projected.

    When greyscale patterns are use, the “jagged” edges can produce the appearance of an intermediary pixel or “sub-pixel” when viewed or captured through a camera that has greater resolution than the projected pattern. The appearance of these sub-pixels can provide additional resolution in some applications. This is an advantage on structure light application using shifted intensity sine waves grey scale patterns.

    Thus, if you take an image designed for orthogonal array configuration, it will look stretched on a diamond pixel array configuration.

  • Hello Pedro,

        That explains it. The mirror center-to-center distance in the horizontal direction is twice the distance in the vertical direction. I just need to modify my source image so it accounts for the actual position of each mirror.

    Thanks,
    Marc

  • Hello Pedro,

    As i see, since the "608x684 native resolution" is valid for diamond pixel array arrangement, the patterns we are loading should be 854x480 images. Did i get it right?

    Thanks,

    Emrah

  • Hi Emrah,

    The DLP3000 DMD micromirrors are arranged in Diamond pixel array configuration. And the native resolution is 608x684, but it also supports WVGA (854X480), VGA (640X480) and QVGA (320x240). You can upload images with any of the above resolutions.

    Regards,

    Divya

  • Emrah,

    The DLP3000 DMD has a native resolution of 608x684, but the DLPC300 controller offers several interpolating and image processing features that support resolutions that include:

    • 320 x 240
    • 640 x 480
    • 608 x 684
    • 800 x 480
    • 854 x 480

    To upload an image in any of these resolutions, you must first set the appropriate resolution in the GUI or sending through I2C the Input Resolution Command described in the DLPC300 SW Programmer's Guide (DLPU0004). to do this in the GUI:

    • Set Display Mode to Static Image and click set
    • In Video settings, set the appropriate resolution and active pixels. For example, to set the resolution to 854 x 480, enter 854 x 480 with Active Pix Width of 854 and Active Line Height of 480. Then click set.

  • Hi Emrah,

    One thing to remember is that the settings mentioned by Pedro and Divya works only on video inputs through mini HDMI port.

    The pattern display mode and static image mode of LightCrafter always works on native resolution.

    You will have to generate the image assuming the diamond nature of the pixels.

    One crude way to generate the correct aspect ration image (convert form square pixel to diamond) is

    Create the image of size 854x480 and then stretch the image to 608x684 using and image editor and then upload it through the GUI.

    But this method is not recommended as the pixel arrangement will not be accurate due to scaling.

  • Hello,

    Thank you all for the information.

  • Pedro,

    Thanks for the detailed instructions.  I'm trying to use a 640x480 bitmap.  I've loaded it in via the GUI under Display Mode / Static Image.  I'm trying to edit the video settings under the HDMI Video tab / Video Settings to:

    resolution: 640 x 480

    Active Pix: 0 to 640

    Active Lin: 0 to 480

    When I click 'set' nothing happens.  I'm wondering if I'm in the wrong section or why the resolution isn't adjusting from this?  I'm also using the Lightcrafter and am on MacOSX.

    Thanks - Robbie

  • Robbie,

    The HDMI video tab is for streaming video only. With your settings, you should be able to connect the HDMI video output of a computer and see an image of 640 x 480.

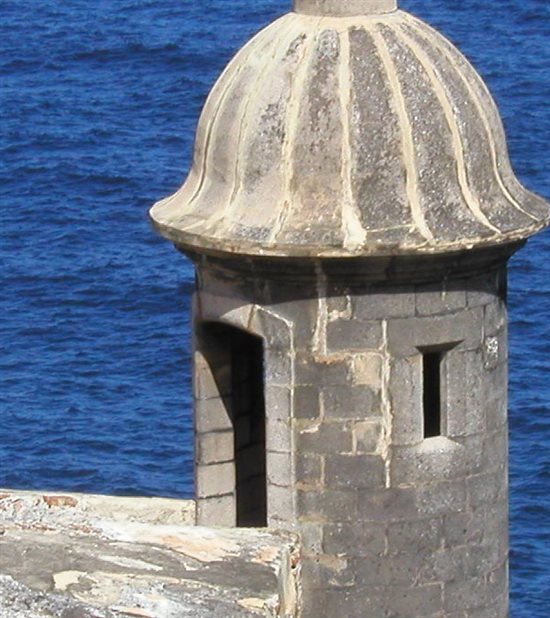
    The Display Mode / Static image is set for 608 x 684 only. You can take a 640 x 480 bitmapp and extend it to 608 x 684 using a tool like GraphicConverter, then download it to the LightCrafter. I am attaching an image that you can use to try. The image is a Spanish Sentry box from the fort El Morro in Puerto Rico. Due to the Diamond pixel arrangement, the image will look "squished" compared to your computer screen.

    By the way, I see that the Mac version of the GUI was embedded in the windows installer. If you download and install (on Windows) the DLP LightCrafter Firmware and Software Package v1.1 (see http://ti.com/memshttp://www.ti.com/tool/dlplightcrafter) the GUI programs for Windows, Linux, and OSX will be copied into the directory c:\Program Files(x86)\Texas Instruments-DLP. Extract the Mac compress GUI. 

    However, I forgot to embed the QT libraries in the Mac version.  Go to http://qt-project.org/downloads. Download and install Qt libraries 4.8.4 for Mac (185 MB) http://releases.qt-project.org/qt4/source/qt-mac-opensource-4.8.4.dmg. We are fixing this for the next release, so that each platform will have its own native installer and the QT libraries are embedded in the executable.

  • according to Sureshkumar Manimuthu, Static Image mode is always in native mode, so there will be no interpolation and image processing to convert anything into 604x684. If you want to use 640x480 input resolution, you have to use HDMI input to stream video into the eval board, and run in "Display Mode/HDMI Port".
  • I'm having the same problems with projecting custom images. For example, when I create a 608x684 image with Matlab to upload to the lightcrafter, the picture is stretched out and the height of the FOV is shorter than with the test pictures. Many comments here talk about creating images with a diamond pixel orientation, but I don't understand how you do that. How can I create custom images that display correctly?

  • i did it before by just resize the original image to the proper aspect ratio, it will look normal on the projector. you don't need to worry too much about re-arranging your pixel data into diamond pattern unless you need sub-pixel precision on your projected image. Dont forget that the projector lens is a optical low pass filter, so it "smudge" the boundary between pixels and you won't really see the mirror pattern.

  • None of the above solution solve our problem, that's related to astronomical instrumentation. We need to configure the dmd array to pixel accurate position. Is there a way to simply change the native resolution while not in video mode?
    Regards