This thread has been locked.

If you have a related question, please click the "Ask a related question" button in the top right corner. The newly created question will be automatically linked to this question.

TMS320F280025C: moduleOverCurrent = 1 & flagEnableRunAndIdentify =0

Part Number: TMS320F280025C
Other Parts Discussed in Thread: LAUNCHXL-F280025C, BOOSTXL-DRV8323RS

Hi Yanming:

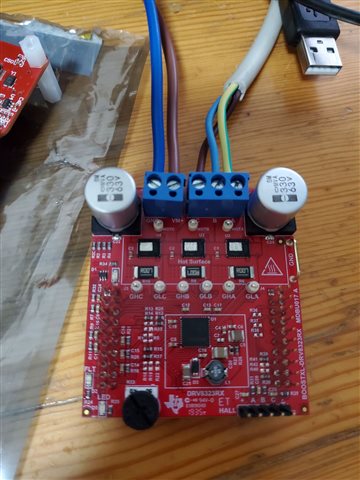
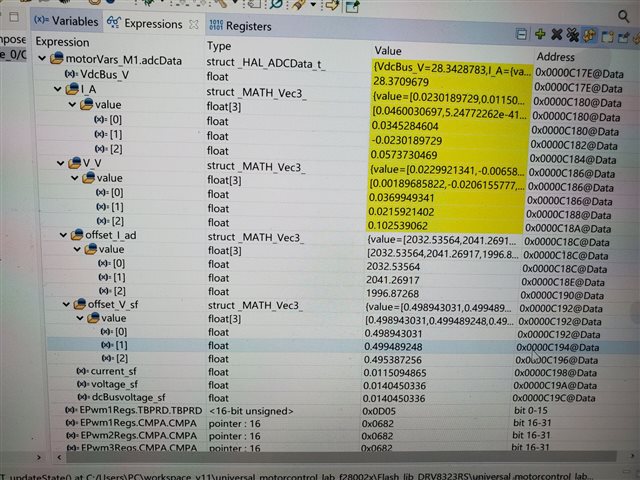
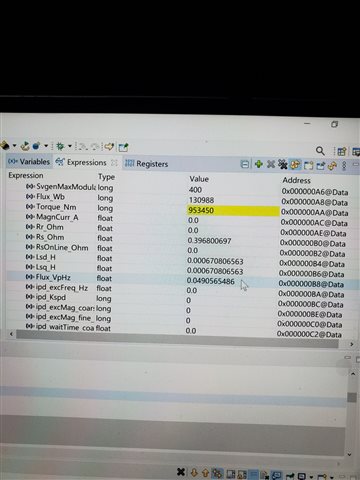
HW: F280025C +8323RS, The motor is in no-load state, and C9 C10 C11 is 47nF.

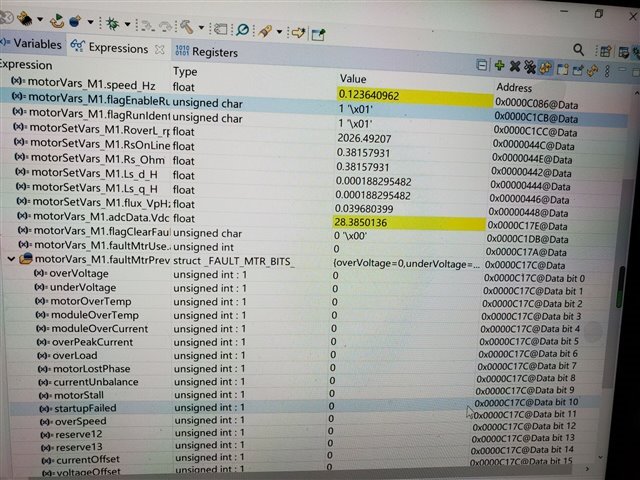
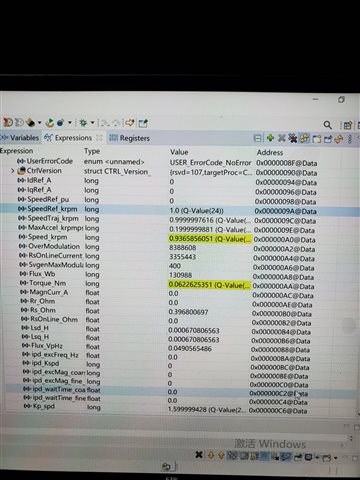
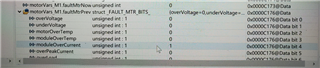
When customers test DMC_LEVEL_4 based on the above hardware, there will be moduleOverCurrent = 1 and flagEnableRunAndIdentify = 0, and moduleOverCurrent = 1 will not appear until the motor is removed. And it can be run with F28027f+8353RS before.

Best regards,

Green

  • Please take a look at the lab guide and follow it to connect the kits and run the lab from build level 1. Make sure that the related switches are set correctly on LAUNCHXL-F280025C, and the connection is as below shown in the lab guide. Universal Project and Lab User’s Guide: https://www.ti.com/lit/spruj26


    • For more details about the BOOSTXL-DRV8323RS, see the User's Guide for the EVM.

    • Make sure that the following items are completed as described below, and then connect the BOOSTXLDRV8323RS

    to J1/J3 and J4/J2 of the LAUNCHXL-F280025C as shown in Figure 2-7.

    – Populate C9, C10, and C11 with a 47nF capacitor.

    – Bend J3-29 and J3-30 of the LAUNCHXL-F280025C90 degrees so that they are not connected to the

    BOOSTXL-DRV8323RS as shown in Figure 2-5.


    Please make sure that the switches are set correctly as shown in lab guide as below also, especially the S2.

    • Install jumpers on JP1, JP2, JP3 and J101 for the power supply and debug JTAG. And jumpers on JP8 for the power supply of DAC128S board if used.
    • For S2, position the SEL1 (LEFT) switch UP (1) to route GPIO28 and GPIO29 to the BoosterPack connector, and position the SEL2 (RIGHT) switch UP (1) to rout GPIO16 and GPIO17 to the virtual COM port of the XDS110 debugger.
    • For S3, position the SEL1(LEFT) switch DOWN to pull GPIO24 low to logic 0, and position the SEL2(RIGHT) switch UP to pull GPIO32 high to logic 1 to put the F280025C into wait boot mode for reducing the risk of connectivity issues or a previous loaded code execution.
    • For S4, set S4 to DOWN (on), GPIO32 and GPIO33 are routed to the CAN transceiver to J14 CAN interface if the pre-define symbols "CMD_CAN_EN" is set in project properties.
    • For S5, position the SEL1(LEFT) switch DOWN to route GPIO44/37/43 to eQEP1 for the encoder interface on J12, and position the SEL2 (RIGHT) switch DOWN to route GPIO14/25/26 to eQEP2 for the Hall sensor interface on J13.
  • Hi Yanming:

    The customer is connected according to the requirements of the document. moduleOverCurrent = 1 appears after the motor is connected.

    #elif (USER_MOTOR1 == Teknic_M2310PLN04K)
    #define USER_MOTOR1_TYPE MOTOR_TYPE_PM
    #define USER_MOTOR1_NUM_POLE_PAIRS (4) //极对数
    #define USER_MOTOR1_Rr_Ohm (NULL)
    #define USER_MOTOR1_Rs_Ohm (0.38157931f) //阻值
    #define USER_MOTOR1_Ls_d_H (0.000188295482f)
    #define USER_MOTOR1_Ls_q_H (0.000188295482f)
    #define USER_MOTOR1_RATED_FLUX_VpHz (0.0396642499f) //额定磁通VpHz
    #define USER_MOTOR1_MAGNETIZING_CURRENT_A (NULL)
    #define USER_MOTOR1_RES_EST_CURRENT_A (1.5f) //电机额定电流的10-30%
    #define USER_MOTOR1_IND_EST_CURRENT_A (-1.5f) //电机额定电流的10-30%,足以支持旋转
    #define USER_MOTOR1_MAX_CURRENT_A (2.5f) //最大电流 A 电机额定电流的50-150%
    #define USER_MOTOR1_FLUX_EXC_FREQ_Hz (40.0f) //电机额定频率为10~30%
    #define USER_MOTOR1_NUM_ENC_SLOTS (1000)
    #define USER_MOTOR1_INERTIA_Kgm2 (7.06154e-06)
    
    #define USER_MOTOR1_FREQ_NEARZEROLIMIT_Hz (5.0f) //频率接近零极限 Hz
    
    #define USER_MOTOR1_RATED_VOLTAGE_V (48.0f) //额定电压
    #define USER_MOTOR1_RATED_SPEED_KRPM (3.0f) //额定速度KRPM
    
    #define USER_MOTOR1_FREQ_MIN_HZ (9.0f) //频率最小赫兹 Hz
    #define USER_MOTOR1_FREQ_MAX_HZ (600.0f) //频率最大 Hz
    
    #define USER_MOTOR1_FREQ_LOW_HZ (5.0f) //频率低 Hz
    #define USER_MOTOR1_FREQ_HIGH_HZ (800.0f) //频率高 Hz
    #define USER_MOTOR1_VOLT_MIN_V (12.0f) //电压最小值 Volt
    #define USER_MOTOR1_VOLT_MAX_V (50.0f) //电压最大值 Volt
    
    #define USER_MOTOR1_FORCE_DELTA_A (0.05f) //力增量 A
    #define USER_MOTOR1_ALIGN_DELTA_A (0.01f) //对齐增量 A
    #define USER_MOTOR1_FLUX_CURRENT_A (0.5f) //磁通电流 A
    #define USER_MOTOR1_ALIGN_CURRENT_A (1.5f) //对齐电流 A
    #define USER_MOTOR1_STARTUP_CURRENT_A (2.5f) //启动电流 A 电机额定电流的30-100%
    #define USER_MOTOR1_TORQUE_CURRENT_A (2.0f) //转矩电流 A
    #define USER_MOTOR1_OVER_CURRENT_A (2.8f) // 过电流 A 电机额定电流的50-150 %
    
    #define USER_MOTOR1_BRAKE_CURRENT_A (1.0f) //制动器电流 A
    #define USER_MOTOR1_BRAKE_TIME_DELAY (12000U) //制动延时 60s/5ms

    Is there any error in the parameters?

  • Which build level the customer is working on?

    Try to increase the value of these two parameters below.

    #define USER_MOTOR1_MAX_CURRENT_A (2.5f)

    #define USER_MOTOR1_OVER_CURRENT_A (2.8f)

  • Hi Yanming:

    According to customer feedback, when DMC_BUILDLEVEL is set to DMC_LEVEL_1, the test result matches the value of the document annotation.

    In addition, it can run normally under the condition of F28027F+8323RS LAB5.

    Is there anything else to be aware of when changing DMC_BUILDLEVEL from DMC_LEVEL_1 to DMC_LEVEL_4?

  • Follow the lab guide to run in level 2 to level 4. And to identify or set the right motor parameter for running the motor in level 4.

  • Hi Yanming:

    Customer had tried the below configuration:

    #define USER_MOTOR1_MAX_CURRENT_A (15.0f)

    #define USER_MOTOR1_OVER_CURRENT_A (20.0f)

    After these two parameters are changed to the maximum value, the test is performed on the basis of level1, and the results are the same.

    Description in user's guide:

    Customer's testing result:

    Do you have any suggestions?

  • Check if the sensing dc bus voltage is correct, if yes, try to run the follow the lab guide to run the other build levels 2, 3, and then 4.

    BTW, please ask the customer to post their questions directly, so we can know more information about the customer like what company, what applications, and so on.