This thread has been locked.

If you have a related question, please click the "Ask a related question" button in the top right corner. The newly created question will be automatically linked to this question.

TMS320F280039C: Serial Flash Programmer

Part Number: TMS320F280039C
Other Parts Discussed in Thread: C2000WARE

Hello, 

I am currently attempting to program to flash a modified blinky led program using the serial flash programmer in the C2000Ware SDK but am having issues. These are the steps I'm following:

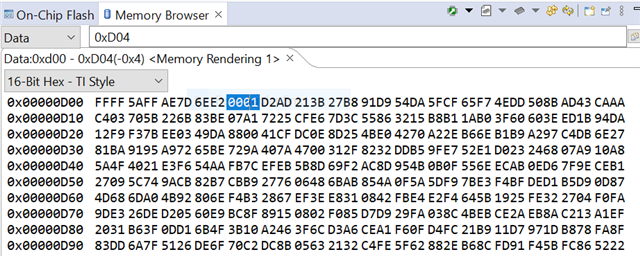
1) While running a program in RAM, I enter the (hopefully correct) values into the 0xD00 emulation boot register, hit the CPU reset button, and then hit run again. 
(I've admittedly have had trouble understanding how to set the right boot mode previously, so I wanted to make sure these were correct first)

2) In the command prompt, after getting to the right directory, I then enter the following command:      serial_flash_programmer.exe -d f28003x -k serial_flash_kernel.txt -a blinky_66.txt -b 9600 -p COM5 -v

This is what the command prompt says after:

I assume what comes next is the part where it asks for user input (like DFU and Erase) as I read in the README.txt file, but I have no idea what it means by 'A' and what's supposed to be echoed back.

Other info: I used the hex2000 utility to convert the .out file of the flash kernel into a text file, and I've used the blinky program to download to flash via CAN previously, so I was pretty confident I could use it here too.

My current set-up is just the launchpad plugged into the computer via USB cable.

Any more information I could provide that might be helpful? 

Thanks for any ideas!

Best,

Emma 

  • Hi Emma,

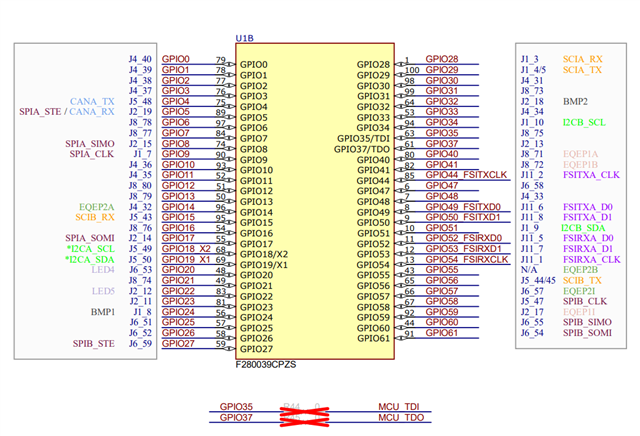
    1) I see you are using the SCI  bootdef value for 0x61 (GPIO2 and GPIO3) correct? If using this alternate definition you may need to have jumper wires from SCIA_RX/SCIA_TX to the respective pins and to set the device routing to use the Booster Pin (BP) headers. If you wish to use standard SCI (GPIO28 and GPIO29) then the emulation mode is not requried and you can set the boot mode switch to be 0 and 1 (GPIO24, GPIO32) for SCI communication. Including some photos from the board schematic. 

    2) For what is occurring is when the 'A' is seen, there is a communication between the host programmer and the ROM bootloader code for SCI. The host will send hex 0x41 and receive confirmation if it's ok to proceed with downloading the kernel. Since the boot mode was changed in emulation to 0x61, it is sending the acknowlegement but not receiving a response. 

    Once resolved, it will download the kernel and proceed to list of commands that the user wants to do (DFU, Erase, etc.). 

    Converting the .out file to .txt using the Hex2000 utility is fine as well.

    Thanks and regards,

    Charles

  • Hi Charles, 

    Thank you for the information.

    I think using the standard SCI looks easier for me at the moment, I think I'll try that first. 

    I believe I found the boot switch and set GPIO24 to 0 and GPIO32 to 1, but after I reset the CPU CCS won't allow me to press run. 

    If I choose to enter the SCI boot mode this way, am I missing additional steps?

    Many thanks,

    Emma

  • Hi Emma,

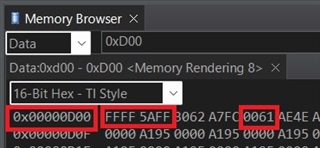
    After the reset, it won't allow for the run as the emulation boot mode for SCI was not entered. I should clarify that the above comment for 1) is intended for standalone SCI boot mode. Using CCS, below is what settings are needed in order to press run. 

    Thanks,

    Charles

  • Hi Charles,

    This resolved my issue. I was able to use the serial update function for both stand alone and emulation mode using the jumper wires.

    Thanks for your help!

    Emma