Part Number: LAUNCHXL-F2800157
Other Parts Discussed in Thread: C2000WARE, SYSCONFIG

This thread has been locked.
If you have a related question, please click the "Ask a related question" button in the top right corner. The newly created question will be automatically linked to this question.
Hi,
Please have a look at the LED blinky example in the C2000Ware SDK V5.02.
The boardinit() function has the necessary GPIO configuration required for the blinky example.
You can change the build configuration to CPU1_LAUNCHXL_ while building.
Thanks
Aswin
Hi,
Can you try making the GPIO changes using syscfg?
Also if you need to run the example in a Launchpad, you need to update the board configuration in sysconfig -> boards -> switch option.
Can you please update the build configuration and try again?
Also have you made the necessary pinmux configurations? Can you please sent your main.c file for further debug?
Thanks
Aswin
I have deleted syscfg! I want to configure GPIO pinmux register myself.here's my main.c
//#############################################################################
//
// Included Files
//
#include "f28x_project.h"
#include "driverlib.h"
#include "device.h"
//#include "board.h"
//#include "c2000ware_libraries.h"
#include "gpio_init.h"
//
// Main
//
void main(void)
{
EALLOW;
//
// Initialize device clock and peripherals
//
Device_init();
//
// Disable pin locks and enable internal pull-ups.
//
Device_initGPIO();
// gpio_init();
//
// Initialize PIE and clear PIE registers. Disables CPU interrupts.
//
// Interrupt_initModule();
//
// Initialize the PIE vector table with pointers to the shell Interrupt
// Service Routines (ISR).
//
// Interrupt_initVectorTable();
//
// PinMux and Peripheral Initialization
//
// Board_init();
GPIO_writePin(49, 0);
GPIO_setPadConfig(49, GPIO_PIN_TYPE_STD);
GPIO_setQualificationMode(49, GPIO_QUAL_ASYNC);
GPIO_setDirectionMode(49, GPIO_DIR_MODE_OUT);
GPIO_setPinConfig(GPIO_49_GPIO49);
//
// C2000Ware Library initialization
//
// C2000Ware_libraries_init();
//
// Enable Global Interrupt (INTM) and real time interrupt (DBGM)
//
EINT;
ERTM;
EDIS;
// while(1)
for(;;)
{
EALLOW;
// GpioDataRegs.GPBCLEAR.bit.GPIO35 = 1;
GpioDataRegs.GPBDAT.bit.GPIO49 = 1;
// GPIO_writePin(49, 0);
// GPIO_writePin(LED, 0);
// GpioDataRegs.GPBCLEAR.bit.GPIO49 = 1;
// GpioDataRegs
DEVICE_DELAY_US(500000);
// GpioDataRegs.GPBSET.bit.GPIO35 = 1;
GpioDataRegs.GPBDAT.bit.GPIO49 = 0;
// GPIO_writePin(LED, 1);
// GPIO_writePin(49, 1);
// GpioDataRegs.GPBSET.bit.GPIO49 = 1;
DEVICE_DELAY_US(500000);
}
}
//
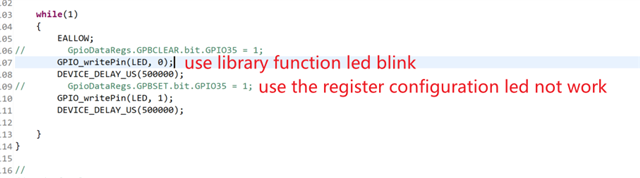
I have tried single step-in inside the for loop and checked the register view to check the register value not change when I use GpioDataRegs.GPBDAT.bit.GPIO49 = 1 to configure GPIO output level; but the led can blink when I use GPIO_writePin(49, 0) to configure GPIO output level.
Hi,
We already have bitfield example in the device_support folder. Have you tried them?
Also can you use the GpioDataRegs.GPBSET.bit.GPIO49 = 1; instruction to set the bit instead of using GPBDAT register.
Use the below instructions to toggle and let me know the results -
for(;;)
{
EALLOW;
GpioDataRegs.GPBSET.bit.GPIO49 = 1;
DEVICE_DELAY_US(500000);
GpioDataRegs.GPBSET.bit.GPIO49 = 0;
DEVICE_DELAY_US(500000);
}
Regards
Aswin
I tried to toggle the led using the instructions you suggested to me.But it still didn't work.
for(;;)
{
EALLOW;
// GpioDataRegs.GPBCLEAR.bit.GPIO35 = 1;
// GpioDataRegs.GPBDAT.bit.GPIO49 = 1;
// GPIO_writePin(49, 0);//can use
// GPIO_writePin(LED, 0);
// GpioCtrlRegs.GPBCR.bit.GPIO49 = 0;
// GpioDataRegs.GPBCLEAR.bit.GPIO49 = 1;
// GpioCtrlRegs.GPBCR.bit.GPIO49 = 1;
GpioDataRegs.GPBSET.bit.GPIO49 = 1;
// GpioDataRegs
DEVICE_DELAY_US(500000);
// GpioDataRegs.GPBSET.bit.GPIO35 = 1;
// GpioDataRegs.GPBDAT.bit.GPIO49 = 0;
// GPIO_writePin(LED, 1);//can use
// GPIO_writePin(49, 1);
// GpioCtrlRegs.GPBCR.bit.GPIO49 = 0;
GpioDataRegs.GPBSET.bit.GPIO49 = 0;
// GpioCtrlRegs.GPBCR.bit.GPIO49 = 1;
DEVICE_DELAY_US(500000);
}
Hi,
I have tried to blink the LED from the same code that you posted and i was able to blink it. Have you tried out in control card with changes in the GPIO number?
#include "f28x_project.h"
#include "driverlib.h"
#include "device.h"
//#include "board.h"
//#include "c2000ware_libraries.h"
//#include "gpio_init.h"
//
// Main
//
void main(void)
{
EALLOW;
//
// Initialize device clock and peripherals
//
Device_init();
//
// Disable pin locks and enable internal pull-ups.
//
Device_initGPIO();
// gpio_init();
//
// Initialize PIE and clear PIE registers. Disables CPU interrupts.
//
// Interrupt_initModule();
//
// Initialize the PIE vector table with pointers to the shell Interrupt
// Service Routines (ISR).
//
// Interrupt_initVectorTable();
//
// PinMux and Peripheral Initialization
//
// Board_init();
GPIO_writePin(23, 0);
GPIO_setPadConfig(23, GPIO_PIN_TYPE_STD);
GPIO_setQualificationMode(23, GPIO_QUAL_ASYNC);
GPIO_setDirectionMode(23, GPIO_DIR_MODE_OUT);
GPIO_setPinConfig(GPIO_23_GPIO23);
//
// C2000Ware Library initialization
//
// C2000Ware_libraries_init();
//
// Enable Global Interrupt (INTM) and real time interrupt (DBGM)
//
EINT;
ERTM;
EDIS;
// while(1)
for(;;)
{
EALLOW;
// GpioDataRegs.GPBCLEAR.bit.GPIO35 = 1;
GpioDataRegs.GPADAT.bit.GPIO23 = 1;
// GPIO_writePin(23, 0);
// GPIO_writePin(LED, 0);
// GpioDataRegs.GPBCLEAR.bit.GPIO23 = 1;
// GpioDataRegs
DEVICE_DELAY_US(500000);
// GpioDataRegs.GPBSET.bit.GPIO35 = 1;
GpioDataRegs.GPADAT.bit.GPIO23 = 0;
// GPIO_writePin(LED, 1);
// GPIO_writePin(23, 1);
// GpioDataRegs.GPBSET.bit.GPIO23 = 1;
DEVICE_DELAY_US(500000);
}
}
I have tried this in a different board and it was working fine for me. I have used F28004x_launchpad . And the instructions were correct, i was able to blink the LED.
Thanks
Aswin
Can you try F280015x_Launchpad? I tried it here but it didn't work and the compilation will come with the warning(#10247-D creating output section "GpioCtrlRegsFile" without a SECTIONS specifiaction). Looks like I'm missing some configuration.
Why didn't you have this warning? or do you also have this warning,but you can run it successfully?
Hi,
Please link f280015x_globalvariabledefs.c file into the project at location - C2000Ware_5_02_00_00\device_support\f280015x\headers\source
You can also use the empty bitfield driverlib example present in the SDK and modify the main.c file in the example - C2000Ware_5_02_00_00\device_support\f280015x\examples\empty_projects . This example already has the globalvardefs already lonked in the example.
Thanks
Aswin