This thread has been locked.

If you have a related question, please click the "Ask a related question" button in the top right corner. The newly created question will be automatically linked to this question.

TMDSCNCD28P65X: Code flashing issue into FLASH for CPU2

Part Number: TMDSCNCD28P65X


Tool/software:

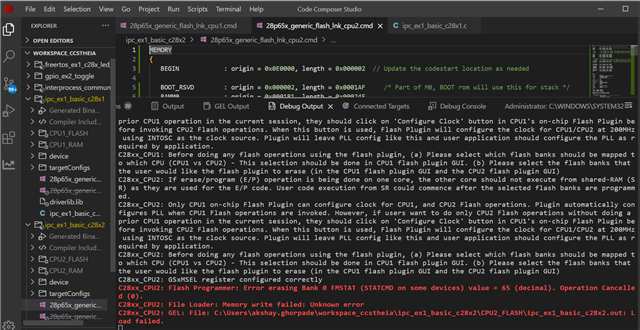
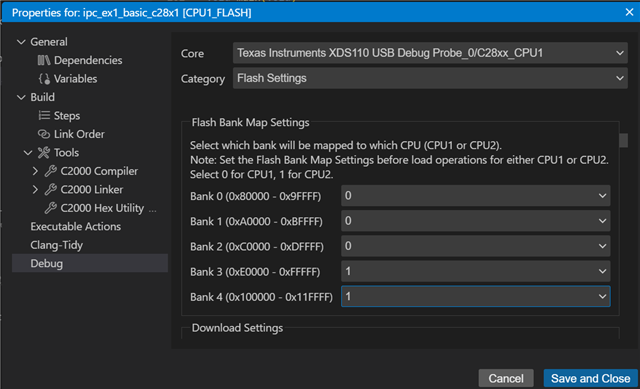
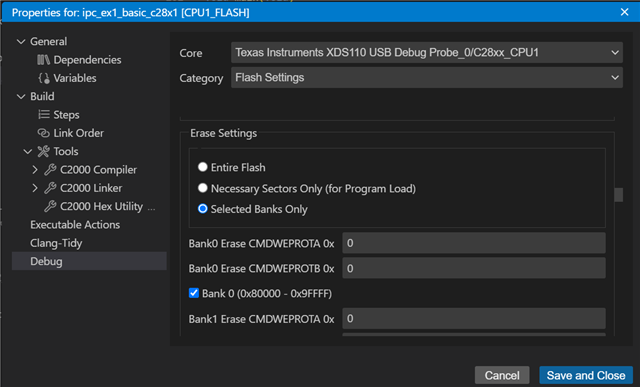
I'm having an issue flashing CPU2. I have already set the CPU flash settings and configured the clock for CPU1. The flashing process for CPU1 was successful; however, I'm encountering a problem while attempting to flash CPU2. I am receiving the following error while trying to flash the IPC Ex1 code into the EVM TMDSCNCD28P65X. I have attached a screenshot for your reference. I also tried changing the flash sector to FLASH BANK 2, but that didn't work either. Could you please let me know what I am missing?

  • Hi Akshay,

    The flashing process for CPU1 was successful; however, I'm encountering a problem while attempting to flash CPU2.

    Can you please walk me through the steps you are taking to flash the program on both CPU1 and CPU2?

    Did you change anything in the project?

    Best Regards,

    Marlyn

  • No, I haven't made any changes to the project.

    The following steps I have taken to flash the project:

    1. The build configuration has been updated: it is now set to CPU1_FLASH for the CPU1 code and CPU2_FLASH for the CPU2 code.

    2. FLASH Bank Map setting: CPU1 selects Bank0, Bank1, and Bank2; CPU2 selects Bank3 and Bank4. It is the same in a CMD file.

    3. In the erase setting for CPU1 and CPU2, I selected "Selected Banks Only" and chose Bank0, Bank1, and Bank2 for CPU1, while selecting Bank3 and Bank4 for CPU2.

    4. For CPU1, I selected the option to configure the clock settings.

    5. Lastly, I flashed the CPU2. That's when I encountered the issue.

  • Hi Akshay,

    The build configuration has been updated: it is now set to CPU1_FLASH for the CPU1 code and CPU2_FLASH for the CPU2 code

    You should not need to modify the build configuration.

    Can you please do another fresh import of the project? Build both CPU1 and CPU2 projects. Then within one of the project's 'targetConfigs' folder, right-click on the ccxml file and select 'Start Project-less Debug'.


    This should open the debug view for which you can connect to both CPU1 and CPU2 on the Threads pane. After you connect to both cores, configure the flash settings as you have described in steps 2 and 3. You can get to the flash settings by right-clicking on any of the connected CPUs and selecting Properties. NOTE: Make sure you change the 'Core' option when configuring the settings for CPU2. 

    After you configure the Flash settings you can load the .out for CPU1 by going to Run -> Load -> Load Program and selecting the .out that corresponds to CPU1 via your workspace. Run the application on CPU1. Then, load the .out for CPU2, similar steps as loading for CPU1. Run the application of CPU2. 

    Please let me know if you face any issues using the method described or you have any questions.

    Best Regards,

    Marlyn