This thread has been locked.

If you have a related question, please click the "Ask a related question" button in the top right corner. The newly created question will be automatically linked to this question.

MSP432E401Y: Sleep Mode Power Consumption.

Part Number: MSP432E401Y
Other Parts Discussed in Thread: MSP-EXP432E401Y, ENERGYTRACE

Hi ,

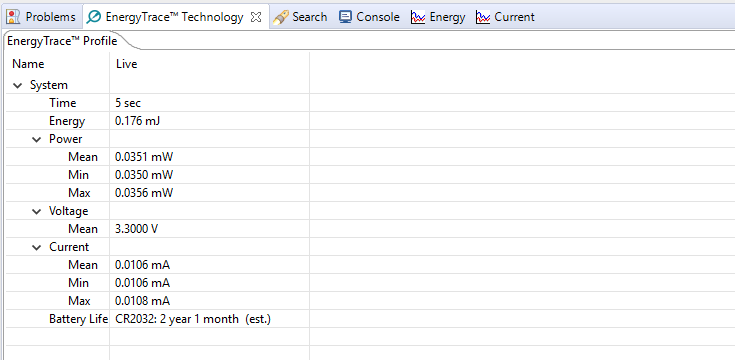
We are trying to check the power consumption of MCU MSP432E401Y development board in the sleepmode by using the example code "sysctl_deepsleepmode_gpiowake_MSP_EXP432E401Y_nortos_ccs" and "hibernate_vdd3on_wakepin_MSP_EXP432E401Y_nortos_ccs".

As per my understanding and according to datasheet it should be few mili Amps to micro amps.

But its measuring the current of 5.33mA in deep sleep mode to 0.43mA in hibernation..

We are using 73202 multimeter , " https://cdn.tmi.yokogawa.com/IM73201E.pdf

  • Hi,

    debug probe is disconnected during current measurement?
  • Hi,

    Yes,the debugger is removed and all the jumpers also removed..

    Thank you!!

    BINDU

  • Removed all jumpers and power was given by power supply and ammeter is connected to measure the current as shown in the below diagrams ....

    Sleep Mode.

    Running Mode

    Could you please reproduce the connection or check why the MCU is draining somuch of current..

    Could you please find out max of how much current is consuming in sleep mode

    Thank you!!

    Bindu

  • Bindu,

       In the description of the launchpad the following statements are made: The Ethernet LaunchPad

    development kit can achieve microcontroller current consumption modes under 2 µA using hibernate

    VDD3ON mode. Hibernation with VDD3ON mode is not supported on this board.

     see page 20.  

    I will attempt to find some clarification on these statements.

    Regards,

    Chris

    Additional finding:

    Remove ethenet pullup resistors per TRM:

  • Hi ,

    Thanks for your response.

    In our design we don't have any external control over the VDD, wch is directly connected to VBAT and no control to switch it off.

    We understood that even the launch pad doesn't have any external control for VDD , then it should support the process to put the MCU into Hibernation with VDD3ON mode with a current consumption of 2uA.

    Since we are using the launch pad as reference , we need the MCU to put in hibernation mode with VDD3ON mode with 2uA current consumption ...

    So please.. guide us a way to achieve this hibernation VDD3ON mode with current consumption of 2uA ..


    And still even after switching off the Ethernet rails R1,R2,R3 and R4 the current consumption is not reduced , its consuming the same current as before..

    So need a proper guidance to put into low power mode with less current consumption...

    Thank you!!

    Bindu

  • On the launchpad the ethernet resistors are R21-R24.  If these are the resistors that were removed and resulted in no change, then I suspect that there is an issue with the device as we are not able to reproduce the issue here.

    Regards,

    Chris  

  • Hi Chris,
    Thanks for your response..
    Yes those R21-R24 only removed.

    So, is current consumption in sleep mode or hibernation mode is very few micro to mili amps using the above mentioned examples?

    If so let me try it with another board and get you back ,if it succeeded..

    Thank you
  • I have not been able to resolve this with the launchpad. I have tried to remove the ethernet pullups and configured all of the IO as output low as well as inputs pulled down. I cannot get anything less than 350uA in the hybernate mode. I will attempt on another platform (internal test board) and see if I can discern the reason for the larger current consumption.

    Regards,
    Chris
  • Hi Chris,

    We would like to know if there is any update to the above issues. It is become very critical for us to resolve the issue as the battery life is determined from the sleep current of the controller. Based on the datasheet we had theoretically calculated the life of the device at 2years. This would effect the battery life significantly. Kindly do the needful ASAP for solution on the same.

    Regards,

    Muruga

  • Hello,

       I have been able to get the current down to 10uA making the following modifications to the MSP-EXP432E401Y Launchpad.

    (1) Remove all pullup resistors on Ethernet lines, R21-R24

    (2) Remove the pullup resistors on JTAG lines, R1, R2

    (3) Remove Ethernet electromagnetics, U10

    (4) Power is applied at 'MCU' of JP2. GND is connected at GND on J101

    (5) Remove all jumpers

    I also updated the code with the attached.

    /* --COPYRIGHT--,BSD
     * Copyright (c) 2017, Texas Instruments Incorporated
     * All rights reserved.
     *
     * Redistribution and use in source and binary forms, with or without
     * modification, are permitted provided that the following conditions
     * are met:
     *
     * *  Redistributions of source code must retain the above copyright
     *    notice, this list of conditions and the following disclaimer.
     *
     * *  Redistributions in binary form must reproduce the above copyright
     *    notice, this list of conditions and the following disclaimer in the
     *    documentation and/or other materials provided with the distribution.
     *
     * *  Neither the name of Texas Instruments Incorporated nor the names of
     *    its contributors may be used to endorse or promote products derived
     *    from this software without specific prior written permission.
     *
     * THIS SOFTWARE IS PROVIDED BY THE COPYRIGHT HOLDERS AND CONTRIBUTORS "AS IS"
     * AND ANY EXPRESS OR IMPLIED WARRANTIES, INCLUDING, BUT NOT LIMITED TO,
     * THE IMPLIED WARRANTIES OF MERCHANTABILITY AND FITNESS FOR A PARTICULAR
     * PURPOSE ARE DISCLAIMED. IN NO EVENT SHALL THE COPYRIGHT OWNER OR
     * CONTRIBUTORS BE LIABLE FOR ANY DIRECT, INDIRECT, INCIDENTAL, SPECIAL,
     * EXEMPLARY, OR CONSEQUENTIAL DAMAGES (INCLUDING, BUT NOT LIMITED TO,
     * PROCUREMENT OF SUBSTITUTE GOODS OR SERVICES; LOSS OF USE, DATA, OR PROFITS;
     * OR BUSINESS INTERRUPTION) HOWEVER CAUSED AND ON ANY THEORY OF LIABILITY,
     * WHETHER IN CONTRACT, STRICT LIABILITY, OR TORT (INCLUDING NEGLIGENCE OR
     * OTHERWISE) ARISING IN ANY WAY OUT OF THE USE OF THIS SOFTWARE,
     * EVEN IF ADVISED OF THE POSSIBILITY OF SUCH DAMAGE.
     * --/COPYRIGHT--*/
    /******************************************************************************
     * MSP432E4 example code for Hibernate VDD3ON wake-up with Wake Pin.
     *
     * Description: The example puts the device in hibernate VDD3ON mode with wake
     * up from the dedicated WAKE_N pin. The device in active state switched the
     * LED D2 ON. To put the device in hibernate the user must press the USR_SW1
     * which turns the LED D2 OFF and puts the device into hibernate state. To
     * wakeup the device from hibernate the User must press the WAKE_SW. When the
     * wake from Hibernate is detected the LED D1 is switched ON. The status can
     * be cleared by pressing USR_SW2.
     *
     *                MSP432E401Y
     *             ------------------
     *         /|\|                  |
     *          | |               PJ1|<--USR_SW2
     *          --|RST            PJ0|<--USR_SW1
     *            |                  |
     *            |               PN1|-->LED D1
     *            |               PN0|-->LED D2
     *            |                  |
     *            |            WAKE_N|<--WAKE_SW4
     *            |                  |
     *            |                  |
     * Author: Amit Ashara
    *******************************************************************************/
    /* DriverLib Includes */
    #include <ti/devices/msp432e4/driverlib/driverlib.h>
    
    /* Standard Includes */
    #include <stdint.h>
    #include <stdbool.h>
    
    volatile bool setHibEntry = false;
    
    void HIBERNATE_IRQHandler(void)
    {
        uint32_t getIntStatus;
    
        /* Get the Hibernate Interrupt Status*/
        getIntStatus = MAP_HibernateIntStatus(true);
    
        /* If wakeup is due to a pin the set the LED D1 ON */
        if(getIntStatus == HIBERNATE_INT_PIN_WAKE)
        {
            MAP_HibernateIntClear(HIBERNATE_INT_PIN_WAKE);
    
            /* Switch the LED D1 ON */
            MAP_GPIOPinWrite(GPIO_PORTN_BASE, GPIO_PIN_1, GPIO_PIN_1);
        }
    }
    
    void GPIOJ_IRQHandler(void)
    {
        uint32_t getIntStatus;
    
        /* Get the interrupt status from the GPIO and clear the status */
        getIntStatus = MAP_GPIOIntStatus(GPIO_PORTJ_BASE, true);
    
        if((getIntStatus & GPIO_PIN_0) == GPIO_PIN_0)
        {
            MAP_GPIOIntClear(GPIO_PORTJ_BASE, getIntStatus);
    
            /* Switch the LED D2 OFF */
            MAP_GPIOPinWrite(GPIO_PORTN_BASE, GPIO_PIN_0, 0);
    
            setHibEntry = true;
        }
    
        if((getIntStatus & GPIO_PIN_1) == GPIO_PIN_1)
        {
            MAP_GPIOIntClear(GPIO_PORTJ_BASE, getIntStatus);
    
            /* Switch the LED D1 OFF */
            MAP_GPIOPinWrite(GPIO_PORTN_BASE, GPIO_PIN_1, 0);
        }
    }
    
    
    int main(void)
    {
        uint32_t systemClock;
    
        /* Configure the system clock for 120 MHz */
    //    systemClock = MAP_SysCtlClockFreqSet((SYSCTL_XTAL_25MHZ | SYSCTL_OSC_MAIN |
    //                                          SYSCTL_USE_PLL | SYSCTL_CFG_VCO_480),
    //                                          120000000);
    
    //    systemClock = 3000000;
    
    //    systemClock = MAP_SysCtlClockFreqSet((SYSCTL_XTAL_25MHZ | SYSCTL_OSC_MAIN |
    //                                          SYSCTL_USE_PLL | SYSCTL_CFG_VCO_480),
    //                                          120000000);
    
        systemClock = MAP_SysCtlClockFreqSet((SYSCTL_OSC_INT),16000000);
    
        /* Enable the clock to the GPIO Port N and wait for it to be ready */
        MAP_SysCtlPeripheralEnable(SYSCTL_PERIPH_GPION);
        while(!(MAP_SysCtlPeripheralReady(SYSCTL_PERIPH_GPION)))
        {
        }
    
        /* Configure the GPIO PN0-PN1 as output and switch it LED D2 ON */
        MAP_GPIOPinTypeGPIOOutput(GPIO_PORTN_BASE, (GPIO_PIN_0 | GPIO_PIN_1));
        MAP_GPIOPinWrite(GPIO_PORTN_BASE, (GPIO_PIN_0 | GPIO_PIN_1), GPIO_PIN_0);
    
    
        MAP_GPIOPinTypeGPIOOutput(GPIO_PORTN_BASE, (GPIO_PIN_2 | GPIO_PIN_3| GPIO_PIN_4 | GPIO_PIN_5));
        //GPION->PDR |= (GPIO_PIN_2 | GPIO_PIN_3| GPIO_PIN_4 | GPIO_PIN_5);
        MAP_GPIOPinWrite(GPIO_PORTN_BASE, (GPIO_PIN_2 | GPIO_PIN_3| GPIO_PIN_4 | GPIO_PIN_5), 0);
    
        /* Enable the clock to the GPIO Port N and wait for it to be ready */
        MAP_SysCtlPeripheralEnable(SYSCTL_PERIPH_GPIOA);
        while(!(MAP_SysCtlPeripheralReady(SYSCTL_PERIPH_GPIOA)))
        {
        }
    
        /* Configure the GPIO PJ0-PJ1 as input with internal pull up enabled.
         * Configure the PJ0-PJ1 for a falling edge interrupt detection */
        MAP_GPIOPinTypeGPIOOutput(GPIO_PORTA_BASE, (0xFF));
    //    GPIOA->PDR |= (0xFF);
        MAP_GPIOPinWrite(GPIO_PORTA_BASE, (0xFF), 0);
    
        /* Enable the clock to the GPIO Port N and wait for it to be ready */
        MAP_SysCtlPeripheralEnable(SYSCTL_PERIPH_GPIOB);
        while(!(MAP_SysCtlPeripheralReady(SYSCTL_PERIPH_GPIOB)))
        {
        }
    
        /* Configure the GPIO PJ0-PJ1 as input with internal pull up enabled.
         * Configure the PJ0-PJ1 for a falling edge interrupt detection */
        MAP_GPIOPinTypeGPIOOutput(GPIO_PORTB_BASE, (0xFF));
    //    GPIOB->PDR |= (0xFF);
        MAP_GPIOPinWrite(GPIO_PORTB_BASE, (0xFF), 0);
    
        /* Enable the clock to the GPIO Port C and wait for it to be ready */
        MAP_SysCtlPeripheralEnable(SYSCTL_PERIPH_GPIOC);
        while(!(MAP_SysCtlPeripheralReady(SYSCTL_PERIPH_GPIOC)))
        {
        }
        MAP_GPIOPinTypeGPIOOutput(GPIO_PORTC_BASE, (0xF0));
    //    GPIOC->PDR |= (0xF0);
        MAP_GPIOPinWrite(GPIO_PORTC_BASE, (0xF0), 0);
    
        /* Enable the clock to the GPIO Port D and wait for it to be ready */
        MAP_SysCtlPeripheralEnable(SYSCTL_PERIPH_GPIOD);
        while(!(MAP_SysCtlPeripheralReady(SYSCTL_PERIPH_GPIOD)))
        {
        }
        MAP_GPIOPinTypeGPIOOutput(GPIO_PORTD_BASE, (0xFF));
    //    GPIOD->PDR |= (0xFF);
        MAP_GPIOPinWrite(GPIO_PORTD_BASE, (0xFF), 0);
    
        /* Enable the clock to the GPIO Port E and wait for it to be ready */
        MAP_SysCtlPeripheralEnable(SYSCTL_PERIPH_GPIOE);
        while(!(MAP_SysCtlPeripheralReady(SYSCTL_PERIPH_GPIOE)))
        {
        }
        MAP_GPIOPinTypeGPIOOutput(GPIO_PORTE_BASE, (0xFF));
    //    GPIOE->PDR |= (0xFF);
        MAP_GPIOPinWrite(GPIO_PORTE_BASE, (0xFF), 0);
    
        /* Enable the clock to the GPIO Port F and wait for it to be ready */
        MAP_SysCtlPeripheralEnable(SYSCTL_PERIPH_GPIOF);
        while(!(MAP_SysCtlPeripheralReady(SYSCTL_PERIPH_GPIOF)))
        {
        }
        MAP_GPIOPinTypeGPIOOutput(GPIO_PORTF_BASE, (0xFF));
    //    GPIOF->PDR |= (0xFF);
        MAP_GPIOPinWrite(GPIO_PORTF_BASE, (0xFF), 0);
    
        /* Enable the clock to the GPIO Port G and wait for it to be ready */
        MAP_SysCtlPeripheralEnable(SYSCTL_PERIPH_GPIOG);
        while(!(MAP_SysCtlPeripheralReady(SYSCTL_PERIPH_GPIOG)))
        {
        }
        MAP_GPIOPinTypeGPIOOutput(GPIO_PORTG_BASE, (GPIO_PIN_0 | GPIO_PIN_1));
    //    GPIOG->PDR |= (GPIO_PIN_0 | GPIO_PIN_1);
        MAP_GPIOPinWrite(GPIO_PORTG_BASE, (GPIO_PIN_0 | GPIO_PIN_1), 0);
    
        /* Enable the clock to the GPIO Port H and wait for it to be ready */
        MAP_SysCtlPeripheralEnable(SYSCTL_PERIPH_GPIOH);
        while(!(MAP_SysCtlPeripheralReady(SYSCTL_PERIPH_GPIOH)))
        {
        }
        MAP_GPIOPinTypeGPIOOutput(GPIO_PORTH_BASE, (0x0F));
    //    GPIOH->PDR |= (0x0F);
        MAP_GPIOPinWrite(GPIO_PORTH_BASE, (GPIO_PIN_0 | GPIO_PIN_1), 0);
    
        /* Enable the clock to the GPIO Port K and wait for it to be ready */
        MAP_SysCtlPeripheralEnable(SYSCTL_PERIPH_GPIOK);
        while(!(MAP_SysCtlPeripheralReady(SYSCTL_PERIPH_GPIOK)))
        {
        }
        MAP_GPIOPinTypeGPIOOutput(GPIO_PORTK_BASE, (0xF0));
    //    GPIOK->PDR |= (0xF0);
        MAP_GPIOPinWrite(GPIO_PORTK_BASE, (0xF0), 0);
    
        /* Enable the clock to the GPIO Port L and wait for it to be ready */
        MAP_SysCtlPeripheralEnable(SYSCTL_PERIPH_GPIOL);
        while(!(MAP_SysCtlPeripheralReady(SYSCTL_PERIPH_GPIOL)))
        {
        }
        MAP_GPIOPinTypeGPIOOutput(GPIO_PORTL_BASE, (0xC0));
    //    GPIOL->PDR |= (0xC0);
        MAP_GPIOPinWrite(GPIO_PORTL_BASE, (0xC0), 0);
    
        /* Enable the clock to the GPIO Port M and wait for it to be ready */
        MAP_SysCtlPeripheralEnable(SYSCTL_PERIPH_GPIOM);
        while(!(MAP_SysCtlPeripheralReady(SYSCTL_PERIPH_GPIOM)))
        {
        }
        MAP_GPIOPinTypeGPIOOutput(GPIO_PORTM_BASE, (0xFF));
    //    GPIOM->PDR |= (0xFF);
        MAP_GPIOPinWrite(GPIO_PORTM_BASE, (0xFF), 0);
    
        /* Enable the clock to the GPIO Port Q and wait for it to be ready */
        MAP_SysCtlPeripheralEnable(SYSCTL_PERIPH_GPIOQ);
        while(!(MAP_SysCtlPeripheralReady(SYSCTL_PERIPH_GPIOQ)))
        {
        }
        MAP_GPIOPinTypeGPIOInput(GPIO_PORTQ_BASE, (0x1F));
    //    GPIOQ->PDR |= (0x1F);
        MAP_GPIOPinWrite(GPIO_PORTQ_BASE, (0x1F), 0);
    
        /* Enable the clock to the GPIO Port J and wait for it to be ready */
        MAP_SysCtlPeripheralEnable(SYSCTL_PERIPH_GPIOJ);
        while(!(MAP_SysCtlPeripheralReady(SYSCTL_PERIPH_GPIOJ)))
        {
        }
    
        /* Configure the GPIO PJ0-PJ1 as input with internal pull up enabled.
         * Configure the PJ0-PJ1 for a falling edge interrupt detection */
        MAP_GPIOPinTypeGPIOInput(GPIO_PORTJ_BASE, (GPIO_PIN_0 | GPIO_PIN_1));
        GPIOJ->PUR |= (GPIO_PIN_0 | GPIO_PIN_1);
        MAP_GPIOIntTypeSet(GPIO_PORTJ_BASE, (GPIO_PIN_0 | GPIO_PIN_1),
                                             GPIO_FALLING_EDGE);
        MAP_GPIOIntEnable(GPIO_PORTJ_BASE, (GPIO_INT_PIN_0 | GPIO_INT_PIN_1));
    
        MAP_IntEnable(INT_GPIOJ);
    
        /* Enable the clock to the Hibernate and wait for it to be ready */
        MAP_SysCtlPeripheralEnable(SYSCTL_PERIPH_HIBERNATE);
        while(!(MAP_SysCtlPeripheralReady(SYSCTL_PERIPH_HIBERNATE)))
        {
        }
    
        /* Configure Hibernate for VDD3ON Mode with Pin Wakeup if Hibernate
         * module has not been configured */
        if(!MAP_HibernateIsActive())
        {
            MAP_HibernateClockConfig(HIBERNATE_OSC_LFIOSC);
            MAP_HibernateEnableExpClk(systemClock);
            MAP_HibernateWakeSet(HIBERNATE_WAKE_PIN);
    //        HIB->CTL |= HIB_CTL_VDD3ON;
        }
    
        MAP_HibernateIntEnable(HIBERNATE_INT_PIN_WAKE);
        MAP_IntEnable(INT_HIBERNATE);
    
        /* Wait for the Hibernate entry flag to be set */
        while(!setHibEntry)
        {
        }
    
        MAP_HibernateRequest();
    
        while(1)
        {
        }
    }
    

    Regards,

    Chris

  • Hi Chris,

    How to enable the Energy Trace Technology for MSP432E401Y Ethernet board?

    Thank you!!

  • Hi Chris,

    I have tried as per the modifications said by you , which reduced the current consumption from 0.43mA to 75.3uA  but still I am not able to achieve the current consumption to 10UA (as said by you).

    The below figure shows the connections made to measure the power consumption.I've powered on the board through JTAG XDS terminal on the board.

    Please let me know if any further modifications to be done on the board,to reduce the current consumption further from 75uA to least as possible and let me know how you are measuring or tracing the power consumption through ENERGY TRACE TECHNOLOGY with this board.

  • I did not have a meter readily available, so I used the energyTrace platform found on the MSP-EXP432P401R Launchpad.

    Regards,
    Chris
  • Hi,

    Can I know the procedure to use the energy trace technology supporting on MSP432P401R , to use it for MSP432E401Y launch pad

    Thank you!!

    Regards ,

    BUNDU

**Attention** This is a public forum