This thread has been locked.

If you have a related question, please click the "Ask a related question" button in the top right corner. The newly created question will be automatically linked to this question.

data from the DRV8312-C2-Kit

Other Parts Discussed in Thread: DRV8312, CONTROLSUITE, DRV8302, INSTASPIN-BLDC, DRV8301

Hello ,

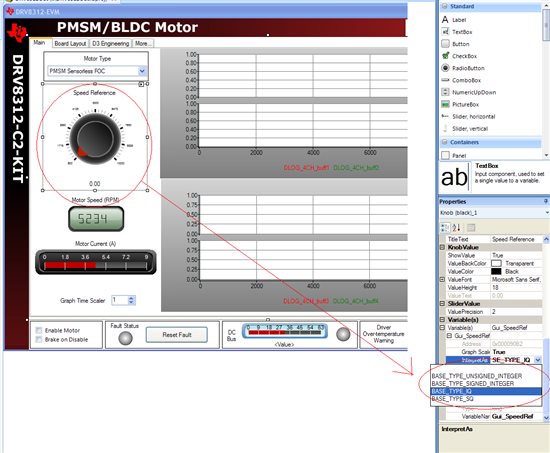
I am working with DRV8312-C2-Kit (just started).

We are going to make some test application for motor, by using other motor with its driver as dinamic load.

In order to receive some useful data for comparison, we need to collect data from the driver.

Is it possible to collect data about:

1. hall sensors,

2. current

3. to set turn direction

4. to set motion profile - such as, move at "x" speed, then increase for "y" time, then stop and again with cycles - is it possible to define?


if it is possible, can you please recommend some guide?

thank you very much,

have a great day

Yulya


  • Yulya,

    The DRV8312-C2-Kit allows you to monitor the hall sensors and current. If you would like to change the direction and motion profile you can edit the GUI source code that is attached in the Files section of my Profile.  The defines for the motor and the motion profile can be found starting at line 464 in the DRV8312_Main.c file.

    As for actually recording the data instead of just viewing graphs, you can program the CAN or SCI (Serial) protocols to transfer data to a program like LabView or MatLab (code must be written). The GUI program for the kit uses SCI/UART communication and the related functions contain the variable name "crosshairs" in them. The functions can be found in DRV8312_Main.c and there communication protocols in the Commros files. SCI is going to be easier to implement and will connect with more applications. Examples of both can be found at http://www.ti.com/litv/zip/sprc892.

    Hope this guides you in the right direction.

    LT

  • Small correction, the GUI uses SCI/UART communications.

  • Hello LT Thomas,

    few questions:

    1. Is there a difference between 2 zip packages of GUI project codes?

    2. I am not quit understand how does things work and maybe i am asking something very stupid so i am sorry for the this question : You say that i can transfer data through SCI protocol - this interface is placed on the main board - Do you mean that it is possible to transfer data without any interface of CPU?

    3. I also saw the  GUI and corresponding CPU code were developed by using Chrosshairs Embedded - this is different kind of software if i understand correctly , but i see at the GUI package .C files. If we want to expand the GUI or read the data and make our manipulation\decisions about motor movement - What is the best way to do it? (i am not familiar with Crosshairs Interface and i actually never wrote such things before - i am a board designer, not a software engineer).

    Thank you very much for help and explanations.

    Sincerely

    Yulya


  • Yulya,

    1. Is there a difference between 2 zip packages of GUI project codes?

    No they are the same, I uploaded it twice and the server will not let me delete one.

    2. I am not quit understand how does things work and maybe i am asking something very stupid so i am sorry for the this question : You say that i can transfer data through SCI protocol - this interface is placed on the main board - Do you mean that it is possible to transfer data without any interface of CPU?

    There is no such thing as a stupid question. So the Serial Communication Interface (SCI) on the C2000 controlCARD has been designed to emulate a COM port (Serial Port) on your computer through a USB port. So under Control Panel -> System -> Device Manager -> Ports( COM & LPTs) you will see a device named  USB Serial Port ( COM__). Using the C2000 to send data to the computer is used the same way as the SCI examples provided in the Piccolo F28035 sample code, since the same ports on the MCU are being used. So to run Example_2803xSci_Echoback.c (in SPRC892), You can connect with this example on your computer by using the HyperTerminal under program->accessories, and entering in the COM port above along with 8 data bits, 1 stop bit, no flow control, no parity bit, and speed 115200 bauds. This example shows how the SCI works, but needs to be modified to send data the way you would like. Crosshairs has nice functions that allow you to monitor ports and a 30day trial can be downloaded from there site http://crosshairsembedded.com/.

    3. I also saw the  GUI and corresponding CPU code were developed by using Chrosshairs Embedded - this is different kind of software if i understand correctly , but i see at the GUI package .C files. If we want to expand the GUI or read the data and make our manipulation\decisions about motor movement - What is the best way to do it? (i am not familiar with Crosshairs Interface and i actually never wrote such things before - i am a board designer, not a software engineer).

    I'm going to see if I can get the Original Crosshairs GUI for you, so I will give you more information on this tomorrow.

    Hope this helps you get started,

    LT

  • Yulya,

    DRV8312 Crosshairs GUI source code link.

    LT

  • Hello Thomas,

    First of all thank you for your answers.

    But i still have question. I had a webinar today with someone from Crosshairs Embedded, which was very usefull.

    The important thing, amoung other that i understood, is that the Serial communication to the Microcontroller performed as virtual serial connection on USB port

    and the device responsible for this connection is FT2232. I asked about the protocol, and i was told that this is a Proprietary communication and if i want to expand the

    possibilities of GUI - i can do it with the Crosshairs software, but if i want to read raw data through the same protocol - i can't.

    How TI works with this CPU - how can i read the data ? Should i write a driver for SPI port or something? Do you maybe have some option that already exists,  so i'll not need to invent the wheel again?


    Another question is about sample project of Sensored BLDC - I saw that the file that has been preloaded of CPU flash, is the GUI project that includes all needed sources. In Control Suite, there is sample project of Sensored BLDC - is it possible to use it (and change in order to add more parameters) and then download it to flash. What is the communication in this case? ( i don't see any comros functions their, so it should be something else?)


    thank you very much for help

    Regards

    Yulya

    Proprietary


  • Yulya,

    I think you can get what you want from running the examples like Sensored_BLDC.c  under C:\TI\controlSUITE\development_kits\DRV8312-C2-KIT_v1.2\~Docs you will see a document called DRV8312-C2-KIT_HowToRunGuide.pdf starting on page 10 the guide goes through the steps to set up each individual project and run the 7 test, along with this you can view the graphs in the debugging mod of CCS, you then can right click on the graph and export all of the graph data in a comma seperated file format.

    The GUI project is the only one that uses the UART/SCI protocol, but you will not need to do this with the method described in the document I just described. You can modify the Sensored/Sensorless BLDC/PM Sensorless.c files to meet your needs.

    LT

  • LT, hello,


    I am working with the document you reccomended and i have few questions:

    1. In "active Build Configuration" tab in BLDC_sensored project - there is no Flash option, so how it is possible at the end to download it to Flash? (there is only F2803x_RAM and F2806x_RAM).

    2. I am trying to build Level 1, and #14 tab at the document talk about confirmation of Datalog buffers. It is written that they should point to "right variables" - What are these right variables? I went through the code and i didn't saw any definition of DlogCh at  Level 1. Is this correct or i should add the definition at Level 1?

    3. you wrote that i can export the variables to .scv file, but if i understand correctly , this is performed only after finishing the operation. If i want to read the data using kind of real-time mode (there can be a slight delay), What is the correct way to do it? Do you have some API that explains the Protocol the data can be read?


    Thank you very much for help

    and sorry for so many multiple questions

    Regards

    Yulya

  • Yuyla,

    I will be able to answer all your questions by the end of the week, sorry this response is taking so long to answer.

    LT 


  • Yulya,

    1. F28035_RAM_BLDC_Sensorless.CMD is the reason only RAM is offered. the .CMD file tells the program where to store itself within the C2000s memory. RAM runs much faster then Flash and since all the code can fit on the RAM side it was left there. If you would like to build a Flash option this file would need to be changed.

    2. You should add the DlogCh into level 1,  for example you could do something like this.

    DlogCh1 = (int16)_IQtoIQ15(pid1_spd.term.Ref);

    DlogCh2 = (int16)_IQtoIQ15(pid1_spd.term.Fdb);

    DlogCh3 = (int16)_IQtoIQ15(pid1_idc.term.Ref);

    DlogCh4 = (int16)_IQtoIQ15(pid1_idc.term.Fdb);

    Im having trouble with the graphs right now so I will have to get back to you on that Tuesday.

    3. What program do you plan on reading the data in with? The best solution for reading data like the back emf or phase currents would be to use an scope that can measure and record data instantly. The reason Crosshairs updates the data in chunks is because at 1152000 bauds you can only accurately transmit one signal in real time thats less then 3000Hz, so to avoid alliasing Crosshairs uses the fast write buffers to store 4 signals accurately then send them to the computer as fast as it can. But if your only able to use the C2000 then http://www.ti.com/tool/sprc183 is a link to the Communications Drivers. c28\DSP2803x\v121\DSP2803x_examples\sci_echoback\Example_2803xSci_Echoback.c contains the protocal similar to the GUI, the GUI transmist at 115,200 bauds instead of 9600. You can add function in Commros_user.c and .h to transmit data in the format you would like to recieve it.


    LT 


  • LT,

    thank you for your reply,

    2. ok, i'll wait for your answer.

    3. We are using this driver (or we want to use, because until now i wasn't able to make any needed changes) for driving brushless motor, whose load is also motor with its own driver. in order to control both motors, we are building GUI (our own) that will need to:

        a. Set motor speed (the upper limit is 28000rpm - i still don't know how to change it. I downloaded the crosshairs designer and tried to change it from there but also without success).

      b. set motor direction

     c. read motor speed

     d. read hall sensors

     e. read current

     f. read phase voltage.


    I had a webinar session with crosshair specialist, who showed me a little bit how to use it and also said that their protocol is proprietary and if i need to read data to some other GUI, i need to write a protocol by myself. So as a result that i don't have enough time to learn how to write protocol ( i am not a software person), i decided to try using their interface and even then, once i opened a project, the current consumption raised so high, that i didn't know what was the reason. I need to work with 6V  motor and not 24V. I found this parameter in software, but after i changed it, to other minimum (because GUI is not working, unless the voltage is above 19v) - the driver was not able to drive it correctly.

    Can you propose some solution that will allow me to read\write the parameters i wrote above and the possibility to work with 6v motor running at 28000rpm speed.?


    thank you very much,

    Best regards

    Yulya

  • Yulya,

    One reason the current shot so high is because the GUI has been set up to run between 19.2V and 28V, in line 120-121 you can change these values to 400 = 4V for the min and 800 for the max. Another reason the Current may have shot so high is the type of variable Speed Reference and Motor Speed(RPM) default to on the Crosshairs GUI. They both default to Integers but should be changed to BASE_TYPE_IQ as seen below. I am still working on the faster speeds. More code needs to be written to do the direction, right now the way the program is implemented the motor can only move in one direction. When you run the GUI are you running the Sensored motor type or the Sensorless?


    LT


    .


  • Hello LT,

    to your question, i am running sensored motor type as i have brushless motor with halls.

    I'll try to see if your suggestions work for me and let you know.

    thank you.

    Yulya

  • Yulya,

    While I am still figuring out this problem but in the meantime you should do a ControlSuite update and check out the GUI we added for our new software, It will allow you to run your motor at maximum speed without attaching the hall sensors and also change directions and do some speed profiling.

    LT


  • LT,

    This software is build for different motor if i understand correctly , and i guess i need to reflash the CPU with other file.Which one should i use:

    InstaSPIN-BLDC_GUI_DRV8302_v100.out or InstaSPIN-BLDC_GUI_DRV8301_v100.out?

    otherwise i have connection but all the LEDs on the GUI are grey and not green.

    What do you think?

    thank you

    Yulya


  • Yula,

    you need to re-flash the controlCARD with the .out for the DRV8312

    C:\ti\controlSUITE\development_kits\DRV8312-C2-KIT_v123\~GUI\InstaSPIN-BLDC_GUI_DRV8312_v100.out

    This is easy to do using the free CCSv4 you received with the kit.

    Instructions are here

    C:\ti\controlSUITE\development_kits\DRV8312-C2-KIT_v123\~GUI\CCSv4HowToFlashcontrolCARDS.txt

    for your first question, to do a motion profile you will have to write your own code for a state machine with a timer. This state machine will keep a speedref setting for X ticks, then change it and any acceleration variables as you need. it's not difficult, but you do need to write your own code.


  • Hi Chris,

    AS far as i understand, in order to load new .out file, first i need to build active configuration in CCS and only than enter to the Debug mode.

    In this case, i only have new .out file without its CCS project, so the instructions on the file you talked about are not very helpful.

    It sais: "delete all other projects (right click, delete)" - all other project means that something should be left open.

    What is the correct project i should work with? The regular GUI project?

    or you changed it and didn't put into the Control SUITE?


    Another question is about the voltage. As i said i need to work with 6v motor. You pointed me to the lines , i actually found before. Does the new GUI supports lower voltages? or i need to enter Chrosschair environment and change it as you proposed?


    thanks a lot for help

    have a nice day

    Yulya

  • yula,

    You mis-understand.


    You do not need to compile the project at all.

    Power DRV8312 board, plug in isolated USB

    1. Open CCS

    2. View --> Target Configurations --> Verify or create one for XDS100v1 and F28035

    3. Launch this Target Configuration to connect to the emulator on the isolated F28035 controlCARD

    4. Connect to Target to connect to F28035

    5. Load Program, select C:\ti\controlSUITE\development_kits\DRV8312-C2-KIT_v123\~GUI\InstaSPIN-BLDC_GUI_DRV8312_v100.out to re-flash F28035 with this new code.

    6. Once complete, Target --> Terminate all

    Pull power and USB.

    Power DRV8312, plug in isolated USB

    Run C:\ti\controlSUITE\development_kits\DRV8312-C2-KIT_v123\~GUI\InstaSPIN-BLDC_GUI_DRV83xx_v100.exe

    GUI will auto-connect. Click Enable to spin your motor.


    The DRV8312 supports 8-50V DC-bus.

    The MCU and software could support anything.


  • a bit more clarification

    The DRV8312 kit ships with a 24v power supply, so the GUI is set to throw faults if not in the +/- 10% range.

    The DRV830x kit does not ship with a power supply, so the GUI is set to work across the operation range.


    8312:  is 19.2 – 28.8

    8301:  is 8v to 60v


    #if defined(DRV8312)

                    Gui.Max_VDC = 2880;

                    Gui.Min_VDC = 1920;

    #endif

    #if defined(DRV8301) || defined(DRV8302)

                    Gui.Max_VDC = 6000;

                    Gui.Min_VDC = 800;

  • Hi Chris,

    This is something new,

    Are you sure that the minimum Voltage is 8v?

    I was all the time told (and by the way i also didn't see any information regarding the minimum voltage) that PVDD can be any voltage between 0-52V.

    If you say that there is a minimum of 8V, i have a problem running 6V brushless motor.


    thanks

    Yulya

  • Hello Chris,

    thank you very much for all explanations.


    Does this mean that with the new GUI i can work with lower voltage? or it still recognizes my kit as DRV8312 and sets the limit for voltage?

    Another thing i noticed (after i finally downloaded the program with your kind help), that the minimum poles allowed at the GUI is 4poles.

    This is the parameter that actually participates in scaling PU for motor speed. Our motor is only 1 pole motor, so i guess mu calculations will be wrong.

    Am i right?


    thank you very much,

    best Regards

    Yulya

  • yulya,

    apparently I am confused and the PVDD (DC-BUS) is fine down below 5 volts.  However, the GUI for the 8312 is set to only work with 24V (it will trip with over or under).

    You could use the 8301, however note that the sensing for the voltage and current are all scaled to a certain range (60V, 82.5A), so with a small low voltage / low current motor the digitization of those small signals over a large range, digitized into 12b will give pretty poor resolution.  You would be better off re-working the sense circuits to scale between your maxes.

    1 pole pair, right? 1 pole would be an interesting control challenge :)

  • 8301 is 8 to 60 (charge pump)

    8312 is 0 to 52 with +12V gate drive supply


  • 3157.Modified8312.zipYuyla,

    I attached a modified GUI for the 8312 Insta-Spin.  Go to the settings tab and change the Min Voltage to 400. I also put in a option under poles for 1 pole. You can give this a try, hopefully it works.

    LT


  • waw, thank you!!!

    I'll try and let you know

    have a nice day

    Yulya

  • Hi yulay dikalov,

    was your effort successful?

    Yesterday  I unpacked my DRV8312EVM Low voltage BLDC Kit. I conneced it to the USB socked and opened the GUI out from Control Suite "DRV8312GUIv2.exe".
    The connection established and the Motor was spinning.

    After that I wanted to try the "InstaSPIN-BLDC_GUI_DRV83xx_v100.exe"

    I started composer studio, closed all my current projects (normally I'm working with TMDS2MTRPFCKIT) and tryed to flash the "InstaSPIN-BLDC_GUI_DRV8312_v100.out" file.
    After trying to connect to the target I was getting the following Error Code:


    Trying to connect to the XDS100v2 target result to the same Error.

    After installing the FTDI driver from the USB stick that is shipped with the DRV8312 Kit , no change at all.
    Normally I can work with the F28035 ControlCards, but maybe there is something special with the Isolated F28035 Card that is shipped with the DRV8312EVM kit.

    Do you know some special tricks to flash the Card.
    Have you ever tried to reprogramm the ISO ControlCard that was shipped with the DRV8312 Kit?

    Thanks in advance and regards,

    Roland

  • Roland,

    The Isolation card must be plugged into the powered baseboard in order to program. Also SW3 must have the switchin to the ON postion which is down. under TI\controlSUITE\development_kits\DRV8312-C2-KIT_v123\~Docs the DRV8312-C2-KIT_HowToRunGuide.pdf tells you how to set up the connect to flash the card. You should be using XDS100v1

    LT

  • Dear Thomas,


     thats it!

    Just switching the SW3 Switch to off while programming. Putting back the switch to off after programming and doing a ControlCard-Reset.

    Now the "InstaSPIN-BLDC_GUI_DRV83xx_v100.exe" GUI is working.

    Great!

    Thanks