This thread has been locked.

If you have a related question, please click the "Ask a related question" button in the top right corner. The newly created question will be automatically linked to this question.

MCT8329EVM: SPEED INPUT - PWM MODE

Part Number: MCT8329EVM
Other Parts Discussed in Thread: MSP430FR2355, MCT8329A, , MCF8329A

Tool/software:

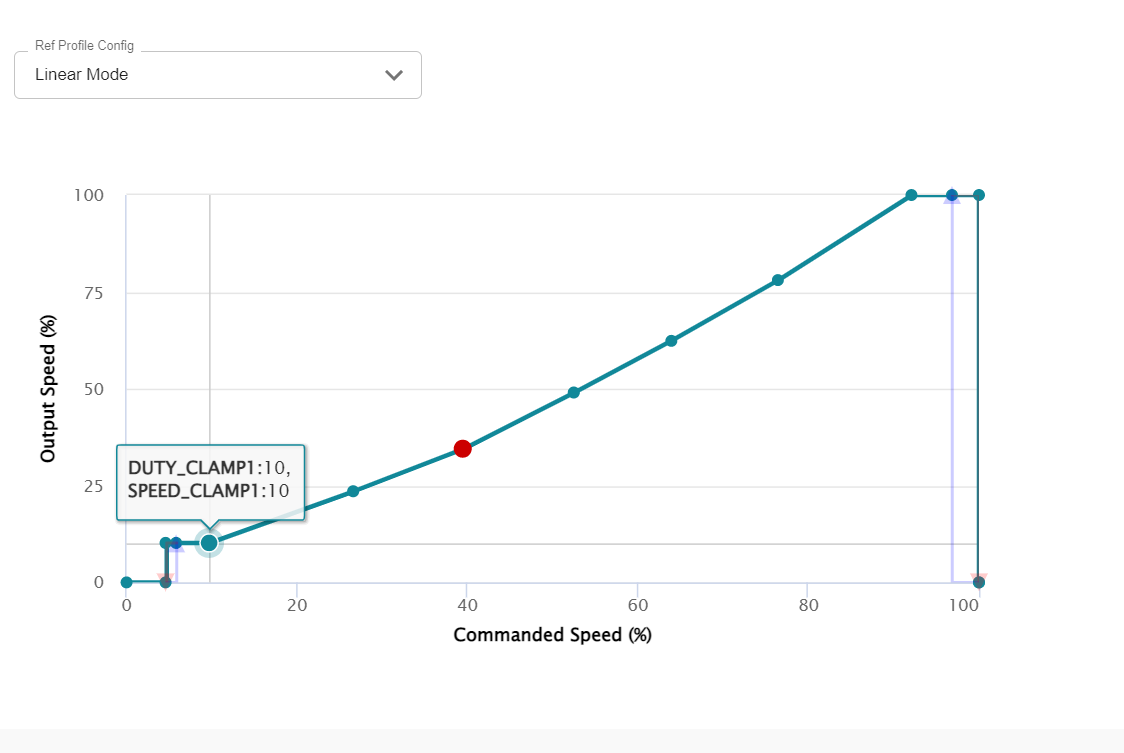
I want to control the speed input using RC transmitter. I tried with that, but it is not going to the maximum speed as like I2C. In GUI maximum frequency for speed input is like 10Hz to 325Hz. How to get the maximum speed? 

  • Hi Babji,

    Can you check the current setting of the INPUT_MAX_FREQUENCY bit field (bit 30-16), register Device Config (0xAA)? This bit field sets the PWM frequency which equals 100% duty cycle and is used to determine what lower PWM values equal what duty cycle %.

    Also the PWM frequency speed range can be adjusted to 325 Hz to 95 kHz is you are using frequencies above 325 Hz for speed commands.

    You can also check the value of CURRENT_DUTY (0x512) to see what the current duty cycle % value is to see what the current speed command is.

    Regards,

    Joshua

  • Hi Joshua,

    Thanks for the reply. 

    There is no CURRENT_DUTY option showing in the GUI.

    And also, I want to keep the speed from zero to maximum in PWM mode speed input as like I2C. I want to use this for drone applications. And also can i change the firmware for beeping like power on, calibration and error conditions by setting some frequency to the motor? If i do any modifications is there any errors occur from the driver?

  • Hi Babji,

    There is no CURRENT_DUTY option showing in the GUI.

    You are correct, register is not shown in the GUI. You could map the CURRENT_DUTY variable to output on the DACOUT pin although this require a bit of tuning to get the DACOUT to display the variable correctly.

    can i change the firmware for beeping like power on, calibration and error conditions by setting some frequency to the motor? If i do any modifications is there any errors occur from the driver?

    Is the intent to modify the firmware which is provided for the EVM to communicate with the GUI? The MCT8329A's internal algorithm cannot be modified, but any modifications to the firmware of an external MCU (such as an MSP430FR2355) can be made and will not affect the MCT8329A's ability to drive the motor.

    Regards,

    Joshua

  • I want to map the PWM vales which are coming from the flight controller to the MCT8329EVM to get the desired vales for controlling the speed. Can you please help me to edit the code? If i edit the code, it is not replicating to the EVM. But It is uploading. If I change the code in arduuno, reading the PWM vales and giving it to the PWM pin to the EVM it is working good. I want to change the same code in the MSP430. Please help me.

    The application is drone.

  • Hi Babji,

    I can try and make the modifications if you provide me with the Arduino code. Although this task may be better suited for our MSP430 to do but I will see if I can get it done quickly.

    How are you currently proving the PWM values to the Arduino?

    Regards,

    Joshua

  • Hi Joshua,

    I am providing the PWM vales from the flight controller. Because i am using for drone applications.

    Here is the arduino code. This code includes the ESC calibration (generally used for drone) and also the PWM. Please make these modifications in the MSP430 (which is included in the MCT8329EVM).

    // Constants
    const int pwmInputPin = 2; // Pin for reading PWM signal
    const int pwmOutputPin = 9; // Pin for writing PWM signal
    const int maxDutyCycle = 255; // Maximum value for PWM (8-bit)
    const unsigned long readDelay = 100; // Delay between reads in milliseconds
    int maxvalue = 1980;
    int minvalue = 1050;

    void setup() {
    Serial.begin(9600); // Start serial communication
    pinMode(pwmInputPin, INPUT); // Set the PWM input pin as INPUT
    pinMode(pwmOutputPin, OUTPUT); // Set the PWM output pin as OUTPUT
    }

    void loop() {
    // Read the PWM signal duration
    unsigned long pulseDuration = pulseIn(pwmInputPin, HIGH);
    if (pulseDuration == 0){
    while (1){
    unsigned long pulseDuration = pulseIn(pwmInputPin, HIGH);

    Serial.print("test: ");
    Serial.println(pulseDuration);


    if (pulseDuration >= 1980){
    while (1){
    unsigned long pulseDuration = pulseIn(pwmInputPin, HIGH);
    Serial.print("in: ");
    Serial.println(pulseDuration);
    if (pulseDuration > maxvalue){
    maxvalue = pulseDuration;
    Serial.print("maxnumber: ");
    Serial.println(maxvalue);
    }
    else if(pulseDuration < minvalue){
    minvalue = pulseDuration;
    Serial.print("minnumber: ");
    Serial.println(minvalue);
    break;
    }}

    }
    else if(pulseDuration > 900 && pulseDuration < 1010){
    // minvalue = pulseDuration;
    Serial.print("minnumber: ");
    Serial.println(minvalue);
    break;

    }
    }
    }
    else{

    // Calculate the PWM duty cycle percentage
    float dutyCycle = (pulseDuration / 20.0) * 100.0; // Assuming a 20 ms period
    int pwmValue = map(pulseDuration, 1000, 2000, 0, maxDutyCycle); // Map the pulse duration to PWM range

    // Write the PWM value to the output pin
    analogWrite(pwmOutputPin, pwmValue);

    // Print the duty cycle and output value to the Serial Monitor
    Serial.print("out Cycle: ");
    Serial.print(pulseDuration);
    Serial.print(" Maxvalue: ");
    Serial.print(maxvalue);
    Serial.print(" Minvalue: ");
    Serial.println(minvalue);

    delay(readDelay); // Delay before the next reading
    }

    }

  • Hi Babji,

    Please allow me some time to review the code to see if I can modify it. I will get back with you by Monday of next week at the latest.

    Regards,

    Joshua

  • Ok. I will wait for your reply.

  • Hi Joshua,

    I am waiting for your reply.

  • Hi Babji,

    Joshua has moved to a different team within TI, please give me two days to look at the code and I will provide a reply.

    Thanks and regards,

    Sachin S

  • Hi Sachin,

    I am waiting for your reply.

  • Hi Babji,

    Could you please explain me what the code exactly does? And what do we want to achieve? apologies, I am not able to understand the intent with reading the above messages.

    Thanks and regards,

    Sachin S

  • Hi Sachin,

    We plan to use this evaluation board for drone applications, where it will receive PWM signals from the flight controller. Typically, the flight controller's minimum PWM value is around 1050 (ranging from 1000 to 2000), so the motor is not reaching zero speed. We need to map these PWM values from the flight controller accordingly.

    Since the maximum and minimum PWM values can vary between flight controllers, most electronic speed controllers (ESCs) include a procedure to remap these values, which are then stored in the ESC's EEPROM. We aim to integrate a similar feature into the MCT8329EVM board.

  • Hi Babji,

    Please correct me if I'm wrong on these points, these are my understandings:

    1. You are reading pulse durations from a PWM source into the arduino, then mapping the range of values you get from the PWM source to values between (1000 and 2000) on the arduino.

    2. The value 1000 corresponds to zero duty output on the arduino? and the value 2000 corresponds to 100% duty?

    3. The output of the arduino is given to the SPEED pin on the MCT8329A?  

    Thanks and regards,

    Sachin S

  • Hi Sachin,

    You are absolutely correct. I want to implement these changes in the evalution board (MCT8329EVM). 

  • Hi Babji,

    Thanks for confirming. I will need to look at the firmware code, edit and test these changes. Please give me time till next week to update this.

    Regards,

    Sachin S

  • Hi Sachin,

    I hope you are working on this.

  • Hi Babji,

    I am off this week for a couple of days, if I can get you the firmware code of the EVM, would you be able to make changes? Else I can ask someone else on the team to help out during my leave. 

    Thanks and regards,

    Sachin S

  • Hi Sachin,

    Are you referring to the firmware code already available on the website, or is it a different one?


    Regarding the editing part of the EVM firmware, we are not very familiar with making the required changes. We might need your support to implement these modifications.

  • Hi Babji,

    Sachin is out of office for next couple of days. I will review this thread and respond to you by Wednesday.

    Thanks and Best Regards

    Venkatadri S

  • Hi Venkatadri,

    I hope you understand the above concept and working on it.

  • Hi Babji,

    I looked at past discussion,

    If you are looking for firmware example of EVM, we can download from ti.com

    About PWM based speed control use can configure duty based (frequency can be 10Hz to 95KHz).

    I want to understand why motor not able to spin for max duty in PWM mode and I2C mode yoou are able to do so.

    Please make sure the selection ins SPD_PWM_RANGE_SELECT is appropriate for the PWM frequency you are providing.

    Thanks and Best Regards

    Venkatadri S

  • Hi Venkatadri,

    Please review the previous conversations thoroughly. You have misunderstood the question, as this is not the actual issue.

  • Hi Babji,

    Regarding this requirement we can use Reference profile configuration.

    Reference profile configuration has four types (refer to the chapter "Input Control Signal Profiles" ).

    We can use Linear mode, apply minimum duty / command up to which speed is zero and linearly increases as shown below.

    Thanks and Best Regards

    Venkatadri S

  • Hi Venkatadri,

    Thanks for the response.

    In PWM-mode motor control, to make the speed zero when the PWM signal at SPEED pin stays < VIL for longer than tEN_SB_PWM. In the datasheet, it is mentioned that VIL is 0.8V. But from the flight controller it is coming 1.13V. So that is why the speed is not coming to zero. 

    So, I think we can't change the VIL. So, that is why we are mapping those values (from the flight controller) in the code through arduino (in the above conversation). Is there any option to do that. Or can we change the same code through MSP430 which is there in the MCT8329EVM. 

  • Hi Babji,

    Apologies, I had to go on sudden personal leave. I will follow up on this conversation from now. Please give me a day or two to work on this, if the solution is too complicated to present here, lets connect on mail and proceed from there.

    Thanks and regards,

    Sachin S

  • Hi Babji,

    MSP430 on the EVM is for GUI interface.

    In order to map the duty and speed we have to use Ref profile feature .

    I will try to share some example to you today.

    Thanks and Best Regards

    Venkatadri S

  • Hi Venkatadri,

    Thanks for the response. I hope you understand the actua issue. I will wait for your next reply.

  • Hi Babji,

    Venkatadri is giving a valuable suggestion to use the speed profile, let me discuss with him on how we can implement your query without actually modifying the firmware code.

    Regards,
    Sachin S

  • Hi Venkatadri,

    Could you please share me the example.

  • Hi Babji,

    We will respond tomorrow with example .

    Thanks and Best Regards

    Venkatadri S

  • Hi venkatadri,

    Thanks for the reply. I will be waiting for your reply.

  • Hi Babji,

    Thanks for your patience, we are currently working on it. Give us another day. Apologies for a lot of delays here.

    Thank you,

    Sachin

  • Hi Sachin, 

    I am waiting for your reply.

  • Hi Babji,

    We have a feature called "reference profile" both in MCT8329 and MCF8329A, I have used the latest GUI for MCF832A to come up with a profile for your application. This feature is mainly used in cases where we need a customized output speed vs input command. 

    For your window of (1050, 2000), I inferred that your minimum duty is 5%. I have built a reference profile where for input <5%, the output speed is zero. 

    Please configure MAX_SPEED and the below values in their respective fields:

    You should get a reference profile which performs as shown below (from MCF GUI):

    If you observe the plot, the output speed is 0 for input duty <5%, and gradually increases linearly till 100%. Let me know if the solution is in the right direction for you and we can modify further if needed.

    Thanks,

    Sachin S

  • Hi Sachin,

    Thank you for your valuable response.

    I’ll test it and share the results with you. Additionally, I noticed you mentioned using a 10% speed command to start the motor. Did you observe any sudden movement, jerk, vibration, or noise during startup? If so, how can we ensure a smoother acceleration to prevent such abrupt behavior when applying a speed command?

  • Hi Babji,

    Could you send me the following register settings, startup issues are usually due to high acceleration rates, current slew rates etc. If you could share the settings, I could guide you on tweaking them to resolve the issue.

    Thanks and regards,

    Sachin S

  • Hi Sachin,

    Thanks for your valuable response. 

    The reference profile registers you have provided is working, we are making few changes and experimenting it for our use case scenario. If we have any issues will come back to you about that. 

    We had some issue with the inial starting (initial jerk). For your reference, i am attaching the register settings.

  • Great to hear its working! I will review the register settings and provide feedback, please give me a day.

    Thanks and regards,

    Sachin S

  • Hi Babji,

    Can you please share your .json file, I'll make modifications and send it back.

    Thanks and regards,

    Sachin S

  • Hi Sachin,

    I am attaching the .json file in the drive link. Please check and modify the smooth startup.

    https://drive.google.com/file/d/1L1FCXfNKZWJW69mz4b3Uujyk6heUz2wj/view?usp=sharing

  • Hi Sachin,

    Its a 7 pole pair motor, max speed 8300 rpm.

  • Hi sachin,

    I tried to smoothen it. I am attaching the .json file in the drive link. Please check and modify the much more smooth startup if possible.

    https://drive.google.com/file/d/1TCETiNRuk70AEggEfMaWlIEoQrRRQemB/view?usp=sharing

  • Hi Babji,

    You can directly attach the file here in this comment.

    Thanks and regards,

    Sachin S

  • Hi Sachin,

    Here is the .json file.  Please check and modify the smooth startup if possible.

    {
      "signature": "oneui-register-data",
      "data": [
        [
          {
            "idx": 0,
            "id": "isd_config",
            "value": "0x77404C06"
          },
          {
            "idx": 1,
            "id": "motor_startup1",
            "value": "0x6810620E"
          },
          {
            "idx": 2,
            "id": "motor_startup2",
            "value": "0x33630200"
          },
          {
            "idx": 3,
            "id": "closed_loop1",
            "value": "0x29247200"
          },
          {
            "idx": 4,
            "id": "closed_loop2",
            "value": "0x0FA1A40D"
          },
          {
            "idx": 5,
            "id": "closed_loop3",
            "value": "0x34C92005"
          },
          {
            "idx": 6,
            "id": "closed_loop4",
            "value": "0x001AC953"
          },
          {
            "idx": 7,
            "id": "const_speed",
            "value": "0x30010000"
          },
          {
            "idx": 8,
            "id": "const_pwr",
            "value": "0x20D00640"
          },
          {
            "idx": 9,
            "id": "150_deg_two_ph_profile",
            "value": "0x24DB7200"
          },
          {
            "idx": 10,
            "id": "150_deg_three_ph_profile",
            "value": "0x48DB6946"
          },
          {
            "idx": 11,
            "id": "ref_profiles1",
            "value": "0x21E18328"
          },
          {
            "idx": 12,
            "id": "ref_profiles2",
            "value": "0x46586A3C"
          },
          {
            "idx": 13,
            "id": "ref_profiles3",
            "value": "0x1FBFFF58"
          },
          {
            "idx": 14,
            "id": "ref_profiles4",
            "value": "0x000D1E2C"
          },
          {
            "idx": 15,
            "id": "ref_profiles5",
            "value": "0x1F67F1F8"
          },
          {
            "idx": 16,
            "id": "ref_profiles6",
            "value": "0x007FFFC2"
          }
        ],
        [
          {
            "idx": 0,
            "id": "algo_ctrl1",
            "value": "0x00000000"
          },
          {
            "idx": 1,
            "id": "device_ctrl",
            "value": "0x00008000"
          }
        ],
        [
          {
            "idx": 0,
            "id": "ana_trim3",
            "value": "0x48004800"
          },
          {
            "idx": 1,
            "id": "ana_trim4",
            "value": "0xC00000000"
          },
          {
            "idx": 2,
            "id": "ana_trim5",
            "value": "0x0000000C"
          },
          {
            "idx": 3,
            "id": "ana_trim6",
            "value": "0x00000000"
          },
          {
            "idx": 4,
            "id": "ana_trim7",
            "value": "0x00000000"
          },
          {
            "idx": 5,
            "id": "ana_trim8",
            "value": "0x00000AF2"
          },
          {
            "idx": 6,
            "id": "ana_trim9",
            "value": "0x0091B71A"
          },
          {
            "idx": 7,
            "id": "ana_trim10",
            "value": "0x5370E03C"
          }
        ],
        [
          {
            "idx": 0,
            "id": "fault_config1",
            "value": "0x71183604"
          },
          {
            "idx": 1,
            "id": "fault_config2",
            "value": "0x7684000A"
          }
        ],
        [
          {
            "idx": 0,
            "id": "gate_driver_fault_status",
            "value": "0x00000000"
          },
          {
            "idx": 1,
            "id": "controller_fault_status",
            "value": "0x00000000"
          }
        ],
        [
          {
            "idx": 0,
            "id": "gd_config1",
            "value": "0x000000FC"
          },
          {
            "idx": 1,
            "id": "gd_config2",
            "value": "0x00000000"
          }
        ],
        [
          {
            "idx": 0,
            "id": "pin_config1",
            "value": "0x20600002"
          },
          {
            "idx": 1,
            "id": "pin_config2",
            "value": "0x3E0020AA"
          },
          {
            "idx": 2,
            "id": "device_config",
            "value": "0x27100003"
          }
        ],
        [
          {
            "idx": 0,
            "id": "sys_status1",
            "value": "0x00A30000"
          },
          {
            "idx": 1,
            "id": "sys_status2",
            "value": "0x60010000"
          },
          {
            "idx": 2,
            "id": "sys_status3",
            "value": "0x00000000"
          }
        ]
      ]
    }

  • Hi Babji,

    Thank you, will share by today.

    Regards,

    Sachin S

  • Hi Babji,

    Can you try this json file. I have made all the accelerations a bit conservative, you can slowly increase once its starts working. I have changed the startup method to IPD

    {
      "signature": "oneui-register-data",
      "data": [
        [
          {
            "idx": 0,
            "id": "isd_config",
            "value": "0x77404C04"
          },
          {
            "idx": 1,
            "id": "motor_startup1",
            "value": "0x6810620E"
          },
          {
            "idx": 2,
            "id": "motor_startup2",
            "value": "0x33261114"
          },
          {
            "idx": 3,
            "id": "closed_loop1",
            "value": "0x27247200"
          },
          {
            "idx": 4,
            "id": "closed_loop2",
            "value": "0x0FA1A40D"
          },
          {
            "idx": 5,
            "id": "closed_loop3",
            "value": "0x34C92005"
          },
          {
            "idx": 6,
            "id": "closed_loop4",
            "value": "0x001AC953"
          },
          {
            "idx": 7,
            "id": "const_speed",
            "value": "0x30010001"
          },
          {
            "idx": 8,
            "id": "const_pwr",
            "value": "0x20D00640"
          },
          {
            "idx": 9,
            "id": "150_deg_two_ph_profile",
            "value": "0x24DB7200"
          },
          {
            "idx": 10,
            "id": "150_deg_three_ph_profile",
            "value": "0x48DB6946"
          },
          {
            "idx": 11,
            "id": "ref_profiles1",
            "value": "0x21E18328"
          },
          {
            "idx": 12,
            "id": "ref_profiles2",
            "value": "0x46586A3C"
          },
          {
            "idx": 13,
            "id": "ref_profiles3",
            "value": "0x1FBFFF58"
          },
          {
            "idx": 14,
            "id": "ref_profiles4",
            "value": "0x000D1E2C"
          },
          {
            "idx": 15,
            "id": "ref_profiles5",
            "value": "0x1F67F1F8"
          },
          {
            "idx": 16,
            "id": "ref_profiles6",
            "value": "0x007FFFC2"
          }
        ],
        [
          {
            "idx": 0,
            "id": "algo_ctrl1",
            "value": "0x00000000"
          },
          {
            "idx": 1,
            "id": "device_ctrl",
            "value": "0x00008000"
          }
        ],
        [
          {
            "idx": 0,
            "id": "ana_trim3",
            "value": "0x48004800"
          },
          {
            "idx": 1,
            "id": "ana_trim4",
            "value": "0xC00000000"
          },
          {
            "idx": 2,
            "id": "ana_trim5",
            "value": "0x0000000C"
          },
          {
            "idx": 3,
            "id": "ana_trim6",
            "value": "0x00000000"
          },
          {
            "idx": 4,
            "id": "ana_trim7",
            "value": "0x00000000"
          },
          {
            "idx": 5,
            "id": "ana_trim8",
            "value": "0x00000AF2"
          },
          {
            "idx": 6,
            "id": "ana_trim9",
            "value": "0x0091B71A"
          },
          {
            "idx": 7,
            "id": "ana_trim10",
            "value": "0x5370E03C"
          }
        ],
        [
          {
            "idx": 0,
            "id": "fault_config1",
            "value": "0x71183604"
          },
          {
            "idx": 1,
            "id": "fault_config2",
            "value": "0x7684000A"
          }
        ],
        [
          {
            "idx": 0,
            "id": "gate_driver_fault_status",
            "value": "0x00000000"
          },
          {
            "idx": 1,
            "id": "controller_fault_status",
            "value": "0x00000000"
          }
        ],
        [
          {
            "idx": 0,
            "id": "gd_config1",
            "value": "0x000000FC"
          },
          {
            "idx": 1,
            "id": "gd_config2",
            "value": "0x00000000"
          }
        ],
        [
          {
            "idx": 0,
            "id": "pin_config1",
            "value": "0x20600002"
          },
          {
            "idx": 1,
            "id": "pin_config2",
            "value": "0x3E0020AA"
          },
          {
            "idx": 2,
            "id": "device_config",
            "value": "0x27100003"
          }
        ],
        [
          {
            "idx": 0,
            "id": "sys_status1",
            "value": "0x00A30000"
          },
          {
            "idx": 1,
            "id": "sys_status2",
            "value": "0x60010000"
          },
          {
            "idx": 2,
            "id": "sys_status3",
            "value": "0x00000000"
          }
        ]
      ]
    }

    Thanks and regards,

    Sachin S

  • Hi Sachin,

    Thanks for your valuable information.

    We tested your register settings and made some adjustments to the acceleration and deceleration values, which allowed us to achieve a smoother startup.

    We have a few questions regarding the power rating of this driver. On the product page, it mentions support for up to 1 kW. I am considering using it for more than 1 kW. To achieve this, I am thinking of connecting MOSFETs in parallel. Would this approach work, or are there better alternatives you would recommend?

  • Hi Babji,

    If there are no related queries with respect to the original question, can we discuss this in a new thread and close this? 

    Meanwhile I will check with the team on how we can enable >1kW. How much more than 1kW are you targeting?

    Thanks and regards,

    Sachin S