This thread has been locked.

If you have a related question, please click the "Ask a related question" button in the top right corner. The newly created question will be automatically linked to this question.

programming TI DRV8821/DRV8823 EVM

Other Parts Discussed in Thread: DRV8823, DRV8821, MSP430F1612, DRV8821EVM, DRV8823EVM, DRV8825

Hi

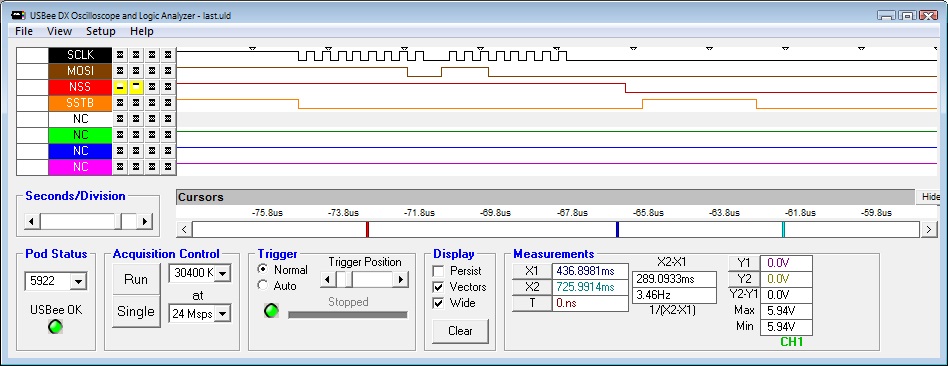
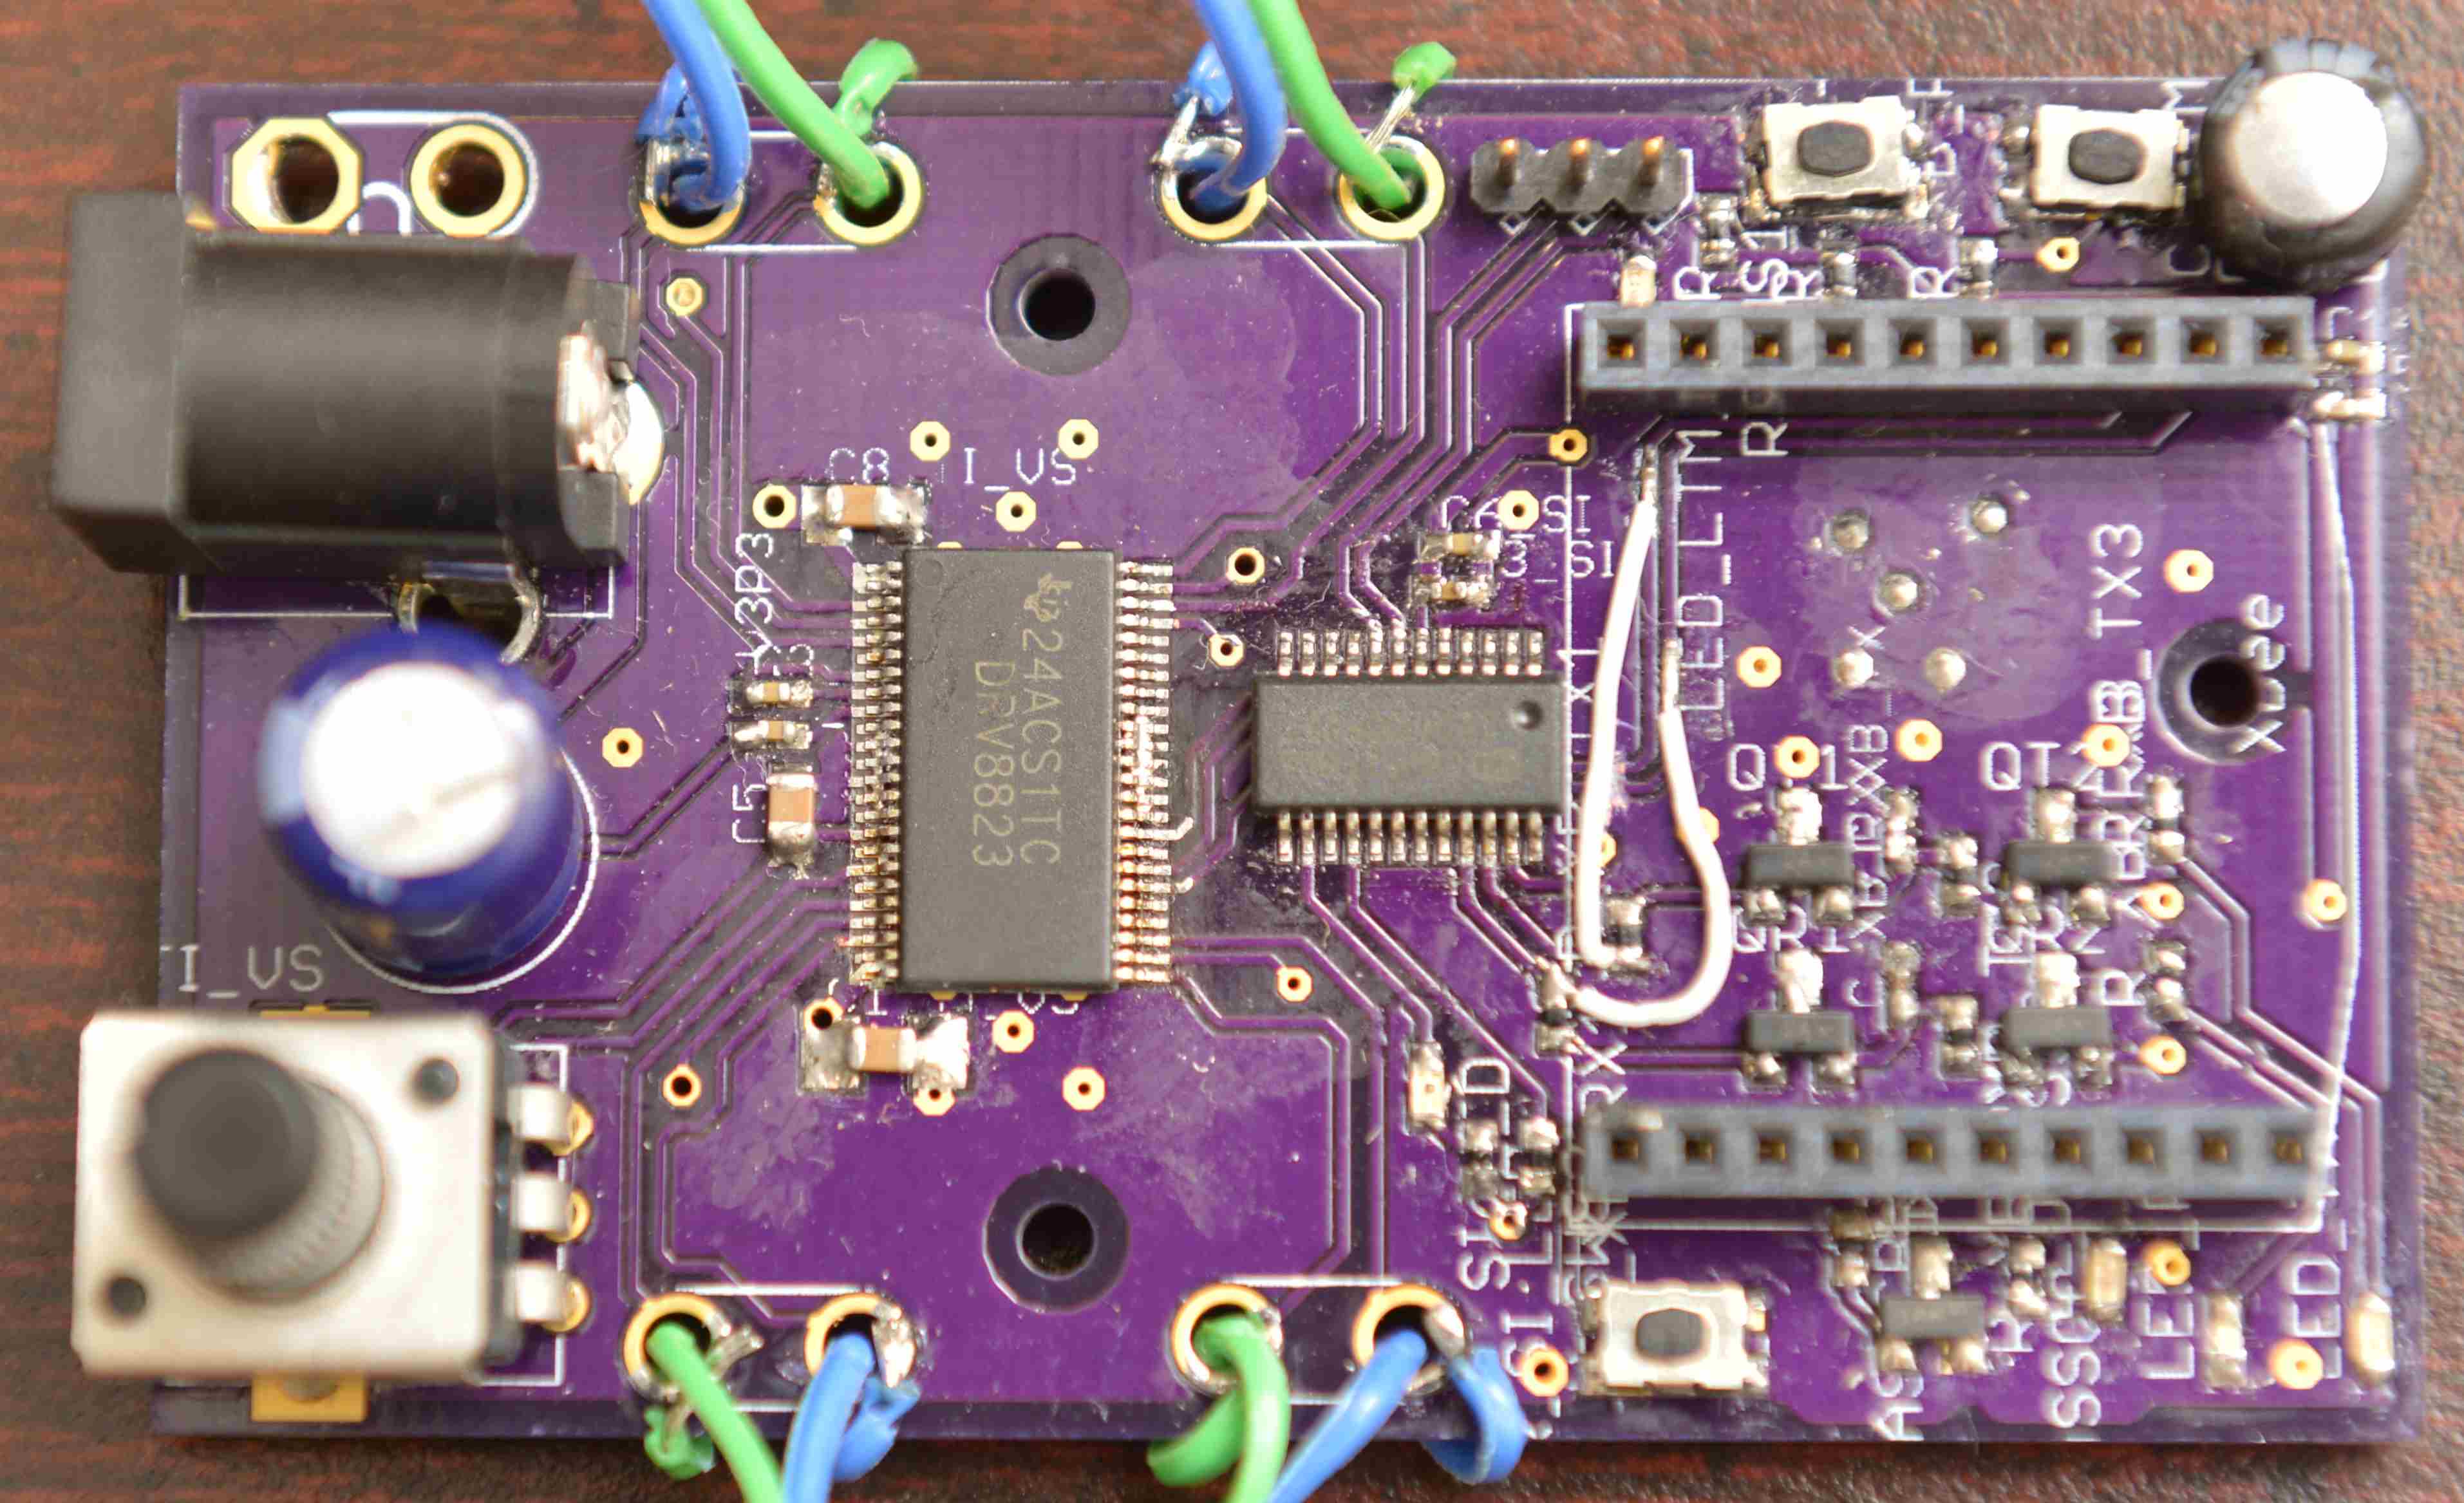
I am presently using spectrum digital 816x/389 evm. I want to integrate TI DRV8821/DRV8823 EVM  to the board . for that i need to program the board for i2c/spi.
but i am unable to program the board. The application that come with the board is working fine. But if i want to program the board or even if i try to run simple program its is giving a message like USB-FET NOT FOUND. I am using the usb cable that come with the board. when i plugged the cable , in the output of the dmesg i got the message like (on ubuntu 10.04)

FTDI USB SERIAL DEVICE CONVERTOR NOW ATTACHED TO THE TTYUSB0.

this shows that the driver for the usb - ftdi is installed correctly.

Do i need some jtag emmulator along with the usb cable to program my TI DRV8821/DRV8823 EVM or The usb cable acts as a programmer?

please help me out.

  • Hi Vineet

    If I get it correctly, you want to use 816x/389 EVM as the upper host to control DRV8821/DRV8823 EVM via the USB bus, and running stepper motors, right? 

    But even if you can connect to the USB convertor but still you can't get the DRV GUI running on ubuntu system.

    The structure of our DRV EVM is FTDI(USB to Uart convertor) + MCU + DRV parts. The MCU receive and send data through TX and RX as UART data, then, translate the commands as the control inputs to DRV part. The FTDI parts just as the USB convertor to similate a COM port for Windows system.

    So, if the 816x/389 EVM has UART interface, you can bypass the USB section, and directly controll the MCU via TX/RX. But still you need to fully understand the commands GUI sent and the MCU firmware, or you just make a totally new one with your own translation way.

    Or, if you are using DRV8823 and the 816x/389 EVM has SPI interface, you can directly control the DRV8823 through the SPI bus.

    Thanks.

    Regards.


  • Hi Wilson

    thanks for the reply. There are few questions that i would like to ask.

    1) Are we programming TI DRV8821/DRV8823 EVM using FTDI?

    2) what i need to do if i don't want to use the windows application , In this case how i am going to program the controller?

    3)Do i need some other hardware or jtag interface to program MSP430F1612 controller present on board(TI DRV8821/8823 EVM)?

    As you have mentioned that i can use UART AND SPI for the controlling of the baord. In case of uart you have mentioned about understanding microcontroller firmware details. Would you please share any link or documents that help me in understanding the firmware details .

    In case of SPI ,i think again i need to program MSP430F1612 controller for the SPI so that the communication can happen between the boards.

  • Hi Vineet,

    Before I answer your questions, please understand that it may be difficult to modify the board as you desire.

    The EVM was intended to provide a basic understanding of the DRV882x operation. The FTDI device translates USB commands from the host to UART commands read by the MSP430. Once the UART command is read at the MSP430, it is converted into the proper signals required to operate the DRV8823x.

    If you desire to create your own UART commands by reprogramming the MSP430, please read the answers below. If you desire to bypass the FTDI device and interface directly with the MSP430, you may find that difficult. This is because the UART pins are tied to the FTDI device, and the SPI pins have no traces on them.

    Answers to your questions.

    1) No, programming the EVM is performed through the JTAG connector (J7). The FTDI device is used to communicate from the GUI to the MSP430, converting USB commands on the GUI into UART commands understood by the MSP430.

    2) and 3) are similar.  To program the device, you need a compiler (Code Composer Studio is one). You also need additional hardware to program the MSP430F1612 on the board. An example of this hardware is http://www.ti.com/tool/msp-fet430uif . Once you have the compiler and the hardware to re-program the MSP430F1612, connecting the MSP430-FETUIF to the JTAG connector J7 will allow re-programming.

    If you have not seen the link to the schematics and source code of the EVM, it is available at www.ti.com/litv/zip/slvc423

  • When you replied to Vineet below, you indicated that the file slvc423.zip could be found at the lnk provided. The link seems to be broken. Could I get the file from you? My email is kos@boulder.nist.gov. Thanks a lot for your help. Tony

    Rick Duncan said:

    Hi Vineet,

    Before I answer your questions, please understand that it may be difficult to modify the board as you desire.

    The EVM was intended to provide a basic understanding of the DRV882x operation. The FTDI device translates USB commands from the host to UART commands read by the MSP430. Once the UART command is read at the MSP430, it is converted into the proper signals required to operate the DRV8823x.

    If you desire to create your own UART commands by reprogramming the MSP430, please read the answers below. If you desire to bypass the FTDI device and interface directly with the MSP430, you may find that difficult. This is because the UART pins are tied to the FTDI device, and the SPI pins have no traces on them.

    Answers to your questions.

    1) No, programming the EVM is performed through the JTAG connector (J7). The FTDI device is used to communicate from the GUI to the MSP430, converting USB commands on the GUI into UART commands understood by the MSP430.

    2) and 3) are similar.  To program the device, you need a compiler (Code Composer Studio is one). You also need additional hardware to program the MSP430F1612 on the board. An example of this hardware is http://www.ti.com/tool/msp-fet430uif . Once you have the compiler and the hardware to re-program the MSP430F1612, connecting the MSP430-FETUIF to the JTAG connector J7 will allow re-programming.

    If you have not seen the link to the schematics and source code of the EVM, it is available at www.ti.com/litv/zip/slvc423

  • Hi Anthony,

    Sorry about the broken link. It has changed to www.ti.com/litv/zip/slvc423a. Sometimes the base link points to the new revision automatically and other times a revision letter must be appended.

    You can always find the latest version by searching for the DRV8xxxEVM, and scrolling down to find Software under Related Products. This link is kept current.

  • Hi Rick,

    Thanks a lot for your reply - I was able to get the file. Unfortunately I was hoping that I could access the serial commands which the windows user GUI sends to the DRV8821EVM. The included source code is for the micro. Is it possible to get the code for windows app, or a list of the serial commands? I am trying to setup a prototype of a motor control system where the DRV8821 is located separately from an embedded CPU, but connected via serial comm.

    Thanks a lot for your help.

    Tony

    Anthony Kos said:

    When you replied to Vineet below, you indicated that the file slvc423.zip could be found at the lnk provided. The link seems to be broken. Could I get the file from you? My email is kos@boulder.nist.gov. Thanks a lot for your help. Tony

  • Hi Tony,

    I am investigating your request, and should have an answer by Monday.

  • Hi Tony,

    A quick update: I have not been able to locate the source code, but will keep trying. I will send it to you once located.

  • Rick - thanks for all your help. The file you sent was helpful and I already have a simple prototype working. Thanks a lot!

    Tony

  • Tony,

    I'm glad to hear that you were able to get it working quickly. 

    Let us know if there is anything else you need.

  • Rick,

    can you send me the source code file as well?  

    I am using the DRV-8823 via SPI to a Silabs C8051F806 MCU.  I hard wired the ResetN and SleepN pins to high at VM, so I don't know why my DC motors are not spinning.  I probed the SCLK, SCS, SDATA, and SSTB with a logic analyzer, and I verified the message is being sent from the Silabs MCU.   

    I verified that the SCLK period is within spec, at 330ns and I made sure I manually toggle the SCS and SSTB signal as drawn in the DRV-8823 datasheet.  I am attaching the readout from my logic analyzer.

    Kim

  • Hi Kim,

    From the logic analyzer, it is difficult to determine if SSTB goes high before SCS goes low. Can you confirm that SSTB goes high at least one clock prior to SCS going low? If SCS goes low prior to SSTB going high, it is possible that the transfer of data did not occur.

    The code can be found on the website. Search for DRV8823EVM at the TI website. Then select the part number DRV8823EVM or the TI Tool Folder. Once there, scroll down to the Related Products, Software, and download the CD Image. Under the Board files folder, you will find the CPG003_DRV8821-23_MSP430F1612_Firmware_LMD_TI. This is the source code that is loaded into the MSP430, and communicates with the DRV8823.


  • Rick,

    Thank you for the quick response.  I changed my code to allow the SCS to go low prior to SSTB going high.  However, my motors are still not spinning.  Can you suggest a pair of Hex numbers I should send?  I sent 0x17 follow by 0xDF in the screenshot attached.

    Kim

  • Hi Kim,

    The command sent is to address 1111, which is not a valid address in the DRV8823.

    First, let's activate the outputs with no motor. The simplest way to do this is to send 0x0fff to ADDR0. If successful, this command will set the AOUT1 and BOUT1 to VM, and AOUT2 and BOUT2 to GND. This will confirm that the SPI commands are working.

    Now to the task of turning the motor. This requires multiple commands in a specific sequence. The DRV8823 code  provided with the EVM handles this sequence for the user. If porting to another micro, the code can be used for reference. A simple example of how to change the current and direction is shown in the DRV8825 datasheet. Look at the full step currents in Table 3. Start with the currents at step 1. To advance the motor send the SPI commands for step 2, then 3, then 4, and finally back to 1. For reverse, send the sequence in reverse.

  • Rick, 

    Thank you for your instructions.  I have read the source code, and after many days, I understood the code and have copied written this code to my own Silabs microcontroller to implement software SPI.  I see that I send the LSB to the DRV first.  I am able to write whatever 16bit messages I want, but I cannot get the motor to spin.

     I am attaching a screen capture of my logic analyzer verifying the 0x07DF word I sent to the DRV chip.  This message was suppose to activate Motors A and B in forward direction at full power without decay, in compliance with Table 1. on DRV8823 datasheet.  

    I tested my four DC motor and they all work.  

    Right now, I have 4 DC motors connected to the DRV8823Q, so I do not need to implement a stepping routine.  I thought that I could simply send a 16 bit word to the DRV8823 chip and have it execute.  I am very discouraged at the moment and I am contemplating cutting my two months loss trying to get this TI chip to work and looking for a different chip vendor.

  • Hi Kim,

    I am sorry to hear that you are still having trouble.

    What was the result when you sent the 0x0fff command to ADDR0 without the motor connected? Did the outputs enable properly?

    What is the result when you send the 0x07DF word above? Did the motors attempt to turn? What is the motor parameters/ part number?

    Do you have a bulk capacitor and decoupling capacitors on your board? The DRV8823 EVM can be used for reference.
    What is the value of Risense and Vref? Is the the powerpad soldered to GND? Would you send your schematic and layout?

    Thank you.

  • The motor terminals read 0v when I sent 0x0fff command. I am attaching a screen capture of the logic analyzer readout.  

    The motor would not spin at all when I sen 0x07df.  The motor came out of a portable fan that runs on 2 AA.  

    I incorporated as many capacitor as the EVM showed.  I am attaching a photo of my board, schematic, and layout.

    I measured the VREF to be 2.8v.  PowerPad is soldered to GND.

      8267.E1_Schematic4Ti.pdf

    2804.E1_Layout4Ti.pdf

  • Hi Kim,

    Thank you for the detailed information. Knowing that you have 0V after sending the command, and seeing your schematic have been very helpful.

    It appears as though the device is still in sleep/reset mode. Please note that both SLEEPn and RESETn must be a logic high for the outputs of the device to be enabled. By default, there are pulldowns on the two inputs. You can confirm that the device is in sleep/reset mode by measuring VCP. If in sleep/reset mode, VCP will be much less than VM + 12V. 

    If VCP is not VM + 12V, the outputs are not enabled. This must be corrected prior to sending the enable motor command. Assuming VDD is >2V and < 5.5V, please connect SLEEPn and RESETn to VDD. This should enable the charge pump to operate at VM + 12V. Please report the results after connecting SLEEPn and RESETn to VDD. Did VCP increase to the expected value?

    If VCP increased to the expected value, please resend the command to enable the outputs without the motor connected. Please report these results.

    Thank you.


  • Rick,

    I am currently using 8 AA batteries giving me 10.35V for VM.  I soldered SLEEPn and RESETn pins together and then connect it to a port on my MCU.  my MCU is powered by 3.3V VCC.  I command my MCU to send HI to SLEEPn and RESETn, but I only measure 10.35V on VCP.  I measured my MCU output port and it was much less than 3.3v, I forgot the exact number, but it was around 0.7v.  (on hindsight, I think I did not enable Push-Pull on that port, but left it at open drain)

    I then soldered the SLEEPn and RESETn directly to VCC source, and I was able to measure it at 3.3v.  Immediately, VCP now measures 20.38V.  I was then able to send the 0x0fff to Motor A and Motor B spun up.   I then sent commands to Motors C and D and was able to turn it on and off.  '

    Rick, thank you so much for your help.  I wished the Datasheet would have said that  SLEEPn and RESTn are by default pulled down and that the DRV8823 would not run unless these pins are set driven high.  I interpreted the statement "Active low input disables outputs and charge pump" as "when driven low, disables outputs and charge pump", so I did not think it was necessary to connect them.

    Thanks again for your help.

  • Hi Kim,

    It is good to hear your board is now working.

    Thank you for the comments regarding the datasheet on. I will pass them on so that any updates will include them.

    The datasheet does provide the necessary information, although it must be combined. Figure 1 shows the input structure containing a pulldown. Also in the "Electrical Characteristics" sections, the pulldown value can be calculated to be >33kOhm.