This thread has been locked.

If you have a related question, please click the "Ask a related question" button in the top right corner. The newly created question will be automatically linked to this question.

LP5562: LP5562: current register setting not changing luminous intensity of LED

Part Number: LP5562

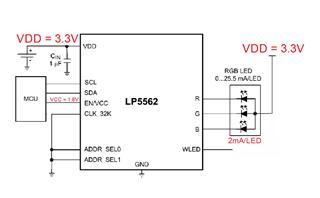
I am testing a system with LP5562.  During a testing I wrote the current setiting in address 5,6,7,and f to 0.  I then write PWM setting 2,3,4 and E to 0xFF.  The LEDs remain active even though the current setting is 0.  

Any idea what might be causing the current settings not to work in LP5562?

  • Hi Anthony,

    One the needs your help is please read the data from registers 5/6/7/F after you set them to 0 which will help to check the communication between device and MCU. If it is convenient for you, capture the waveform of writing and reading instruction.

    Best Regard

    Monet Xu 

  • Hi Monet Xu

    We confirmed the I2C operations with a logic analyzer

    We won't be able to implement read back until next week,

    but the logic analyzer result shows it is sent and received. Also we are able to write other registers like pwm.

  • Hi Zhovnirovsky,

    By using logic analyzer,

    1. could you confirm the communication working normally?
    2. when write register, does the LED driver return ACK signal?
    3. Is value read from register 5/6/7/F same with write value?

    Best Regard

    Monet Xu

  • Hi Monet,

    Please see I2C trace below (can't figure out how to upload a file in this site). We can confirm that what we are writing is what is written into the registers. Setting the current to zero still has the LEDs light up. 

    We also tried

    • write current register 1 by 1, blue, then green, then red, then white (didn't help)
    • writing reset to FF and the back to 00

    But that didn't help either

    Here is the I2C Trace:

    Time [s], Analyzer Name, Decoded Protocol Result
    2.803205600000000,I2C,Setup Write to [0x60] + ACK
    2.803245240000000,I2C,0x00 + ACK
    2.803284840000000,I2C,0xC0 + ACK
    2.803370640000000,I2C,Setup Write to [0x84] + ACK
    2.803410320000000,I2C,0xFD + ACK
    2.803457880000000,I2C,Setup Read to [0x85] + ACK
    2.803498000000000,I2C,0x00 + ACK
    2.803533720000000,I2C,0x00 + NAK
    2.804516000000000,I2C,Setup Write to [0xD4] + ACK
    2.804555680000000,I2C,0x00 + ACK
    2.804603280000000,I2C,Setup Read to [0xD5] + ACK
    2.804638960000000,I2C,0x03 + ACK
    2.804674640000000,I2C,0x40 + ACK
    2.804710280000000,I2C,0x80 + NAK
    2.804780800000000,I2C,Setup Write to [0xD4] + ACK
    2.804820440000000,I2C,0x0A + ACK
    2.804867960000000,I2C,Setup Read to [0xD5] + ACK
    2.804903640000000,I2C,0x78 + NAK
    2.805003760000000,I2C,Setup Write to [0xA4] + ACK
    2.805043400000000,I2C,0x1B + ACK
    2.805090960000000,I2C,Setup Read to [0xA5] + ACK
    2.805126600000000,I2C,0xA3 + ACK
    2.805162280000000,I2C,0xDB + ACK
    2.805197960000000,I2C,0xE4 + ACK
    2.805233600000000,I2C,0x60 + NAK
    2.805325320000000,I2C,Setup Write to [0x60] + ACK
    2.805364960000000,I2C,0x08 + ACK
    2.805404600000000,I2C,0x01 + ACK
    2.805494560000000,I2C,Setup Write to [0xD4] + ACK
    2.805534200000000,I2C,0x05 + ACK
    2.805573800000000,I2C,0x2C + ACK
    2.806700200000000,I2C,Setup Write to [0xA4] + ACK
    2.806739840000000,I2C,0x0A + ACK
    2.806787400000000,I2C,Setup Read to [0xA5] + ACK
    2.806823040000000,I2C,0xFF + ACK
    2.806858720000000,I2C,0x0F + ACK
    2.806894400000000,I2C,0xEF + ACK
    2.806930040000000,I2C,0x00 + NAK
    2.807025960000000,I2C,Setup Write to [0x60] + ACK
    2.807065640000000,I2C,0x70 + ACK
    2.807105280000000,I2C,0x00 + ACK
    2.807206400000000,I2C,Setup Write to [0xA4] + ACK
    2.807246040000000,I2C,0x1B + ACK
    2.807293560000000,I2C,Setup Read to [0xA5] + ACK
    2.807329240000000,I2C,0xA3 + ACK
    2.807364880000000,I2C,0xDB + ACK
    2.807400560000000,I2C,0xE4 + ACK
    2.807436240000000,I2C,0x60 + NAK
    2.807534680000000,I2C,Setup Write to [0x60] + ACK
    2.807574360000000,I2C,0x05 + ACK
    2.807614000000000,I2C,0x00 + ACK
    2.807653640000000,I2C,0x00 + ACK
    2.807693320000000,I2C,0x08 + ACK
    2.807784200000000,I2C,Setup Write to [0x60] + ACK
    2.807823840000000,I2C,0x05 + ACK
    2.807871440000000,I2C,Setup Read to [0x61] + ACK
    2.807907120000000,I2C,0x00 + ACK
    2.807942800000000,I2C,0x00 + ACK
    2.807978480000000,I2C,0x08 + NAK
    2.808078840000000,I2C,Setup Write to [0x60] + ACK
    2.808118480000000,I2C,0x0F + ACK
    2.808158160000000,I2C,0x00 + ACK
    2.808247920000000,I2C,Setup Write to [0x60] + ACK
    2.808287560000000,I2C,0x02 + ACK
    2.808327200000000,I2C,0xFF + ACK
    2.808366840000000,I2C,0xFF + ACK
    2.808406520000000,I2C,0xFF + ACK

  •  A bit of an update. We have it working. However, it is never going to zero. We can dim and brighten it but never get it to zero or close to it. 

    I would attach a video but not sure there is a way to do it in this form?

  • Hi, our expert is OoO since personal reason, she will return and reply you within this week.

  • Here is the video. We are sending the following sequence for each color:
    0, 2, 0, 4, 0, 6, 0, 8 etc...
    It should go dark on every zero but as you can see it doesn't


  • For clarity... here is our setup.

    We are using these LEDs: 
    www.kingbrightusa.com/.../APHF1608LSEEQBDZGKC.pdf

  • Hi Yuri,

    Could help to explain the following instruction?

    2.803205600000000,I2C,Setup Write to [0x60] + ACK
    2.803245240000000,I2C,0x00 + ACK
    2.803284840000000,I2C,0xC0 + ACK

    what does [0x60], [0x00], [0xC0] means? register address or data?

    Best Regard

  • Hi Monet,

    0x60 is the 8-bit version of the LP5562 device address.  (our ADDR_SEL pins are both 0)
    0x00 is the register address of the Enable register
    0xC0 is the value written to the Enable register.. LOG_EN = 1, CHIP_EN=1, ENG1_EXEC=0, ENG2_EXEC=0, ENG3_EXEC=0
    The long numbers at the beginning are timestamps

    The ACK indicates the operation was acknowledged.  (Every byte has a ACK/NACK step in I2C)

    -Yuri

  • Hi,

    Yuki when you power on the system and just enable the CHIP_EN/enable internal CLK/set LED_MAP to zero, will the LEDx be on?

    If the LEDs are off, set address 02 to 0xff then set it to zero. If the blue LED can not off, set 0x00 to register 0D and feedback the result.

    in addition, test the VOUT_R/G/B when blue LED is on or off.

    Best Regard

    Monet Xu

    • when PWM == 0, led is off
    • after Reset, led is off
    • only problem is when PWM=FF and CURRENT=0, BLUE LED is BRIGHT BRIGHT BRIGHT, which does not match 0 uA
  • Hi Monet,

    Here are the measurements using the green LED:

    Green current is set to zero
    PWM is set to 0xff
    VDD is 3.3V

    • Voltage between Green and VDD => 2.25V
    • Voltage between Green and GND => 1.03V
    • Voltage between Green and VDD => 2.25V
    • Current is 0.4mA

    Thanks
    -Yuri

  • Hi Yuri,

    I have check it on my board and there is some issues in our device. So if you want to close the output channel you'd better configurate the PWM registers.

    Best Regard

    Monet Xu

  • Hi Monet,

    On your board, if you set the current to 0.1mA via the registers what do you actually measure?

    Thanks
    -Yuri

  • Hi Monet,

    We are trying to understand what your message means. Are you saying this chip line is defective and can't support current control at all? Seems odd that TI would sell a defective chip?

    It would be helpful to understand the way the chip fails? Are there work arounds? Is there another part in your line up that does work correctly?

    Using PWM to limit current is obviously possible but that will limit the range of the PWM. So it is not ideal. 

    Thanks
    -Yuri

  • Hi Yuri,

    When using device in 0x00 output by current control, there has a bias. For example when setting current register to 0 and pwm register to oxFF the offset current is not low enough due to the current control. So the output channel can not be closed.

    So you can use the current control and pwm control when the LED is not off. If you want to closed the LED, both set the PWM and Current register to 0.

    BR

    Monet Xu

  • Hi Monet,

    Where can we find the bias current in the datasheet?
    Seems like a 0.4mA bias is pretty significant for a part that has 0.1 mA current steps.
    Thanks
    -Yuri
  • Hi Yuri,

    The datasheet doesn't show the bias current.

    So we suggest to configurate the current by PWM dimming in low grayscale.

    BR

    Monet Xu

  • Hi Monet,

    Can you share what we should expect for the bias current? 0.5mA seems awfully high. Are you measuring the same on your board?

  • Monet please help on this case.

  • Hi Yuri,

    We do not have the detail data. So we suggest to use pwm control in low grayscale to avoid the bias current.

    BR 

    Monet Xu