This thread has been locked.

If you have a related question, please click the "Ask a related question" button in the top right corner. The newly created question will be automatically linked to this question.

TLC6C5748-Q1: Most frequent stand-off value

Part Number: TLC6C5748-Q1

Hello TI team,

Please let me raise one question regarding stand-off value of this package.

Currently, datasheet says it's 0.05 to 0.15mm, but can you identify the most frequent value in the range? If not is there any internal target value of it? 

Purpose of this question is to define proper stencil thickness in our factory.

Thank you for your support.

Panasonic Automotive Europ

Daisuke Hara

  • Hi Daisuke,

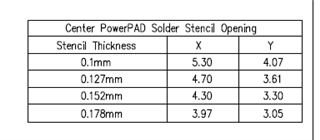
    pls refer to this table to decide the stencil thickness:

    It's related to the stencil opening.

    As for the stand-off value, I am not quite sure. Where do you get the value 0.05-0.15mm?

    BR, Gracie

  • Hello Gracie,


    I’m sorry for my slow response in replying.

    Thank you for the information regarding recommended combinations of stencil thickness and its opening. We’ll refer the table you shared.

    The stand-off value can be seen in the datasheet. Sorry I could not attach the image in this replay, but it's been mentioned at page 48 of file "tlc6c5748-q1.pdf". Our CAD section creates symbol, pad shape and stencil shape according to our rule by checking information provided by suppliers, and normally it tends to deviate from recommended shape from suppliers.

    If possible, we prefer to use most frequent stand-off value instead of the table, to define appropriate shape of the pad under our rule.

    Thanks.

    Daisuke Hara

  • Hi Daisuke,

    I need to ask factory about the detailed information. It may take some time for the reply. Thanks for understanding.

    BR, Gracie

  • Hi Gracie,

    OK. I will survive for the moment. Hope the factory section replies soon.

    Thanks for your continued support.

    Daisuke Hara

  • Hi Daisuke,

    I would keep you updated when I get the reply from factory. Sorry for keep you waiting.

    Gracie

  • Hi Daisuke,

    Note that stand off values have variations depending on the tool used and various other factors as well. Thus the value provided should not be used as the defining spec in customer process considering the variation as mentioned. The allowable tolerance in TI process is as mentioned between 0.05 to 0.15mm. Nevertheless, based on your request the internal target value is 3.5mils (0.0889mm).

    BR, Gracie

  • Hi Gracie,

    Thank you so much for your support on this topic.
    Well noted that the stand-off value will variate in the mentioned range, and should not use one value to define something.
    I will share this feedback with our CAD section.
    Then, thank you for sharing the internal target value, it will help them to proceed. I will also share the value, but as just a reference.

    Thank you!

    Daisuke Hara