This thread has been locked.

If you have a related question, please click the "Ask a related question" button in the top right corner. The newly created question will be automatically linked to this question.

BQ24610: BOM Discrepancies for HPA422 - SLUU396A Documentation

Part Number: BQ24610
Other Parts Discussed in Thread: TPS3701

Hello,

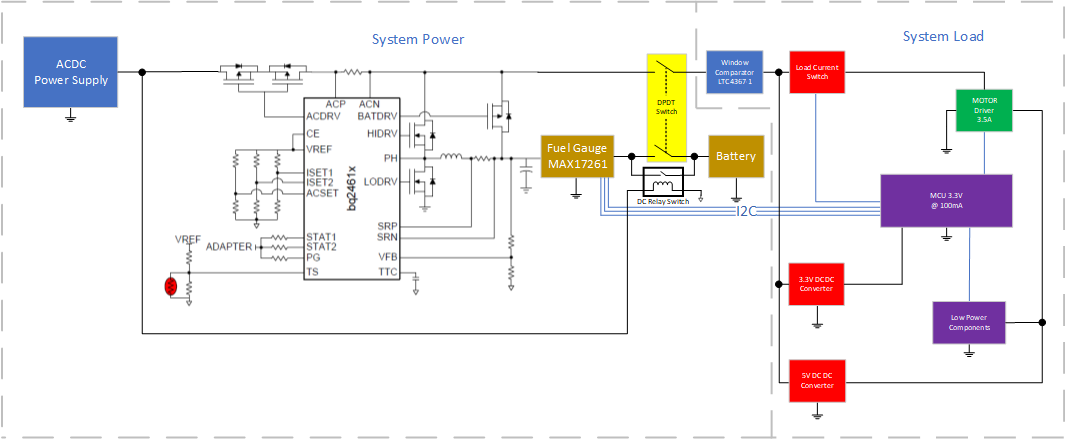
Im going through the BOM and started with building components for the MOSFETs, my first issue I encounter is the description issue for Q1, Q2, Q5 it mentions see note 5 I search the PDF the is no note 5, 

Also, When Seraching fo the part SI4401BDY-T1-GE, the closest part I could find is from Digikey (SI4401BDY-T1-E3CT-ND) is SI4401BDY-T1-E3 but the description mentions 'P-Channel 40V 8.7A (Ta) 1.5W (Ta) Surface Mount 8-SO'

Whereby the TI description mentions 'MOSFET, PChan, -40V, -18A, 9.2millohm'

Further to this, the second part mentioned is the FDS4141 again on Digikey (FDS4141-F085CT-ND) the part comes as described as 'MOSFET P-CH 40V 10.8A 8-SOIC'

Please advise what part would be best to use and if the TI description can be updated to fix this.

Best regards

Mo

  • Hello further to this the part for Q6, Q8, Q9 named 2N7002DICT is not readily available would an alternative such as 2N7002K-7DICT-ND from digikey be ok to use?

    Best regards

    Mo
  • Or 2N7002W-7-F (digikey code 2N7002W-FDICT-ND)
  • Hello,

    Further to this the zener diodes used are now obsolete BZX84C7V5 please can you advise alternatives for this.

    Best regards

    Mo
  • Hi Mo,

    Regarding the diodes, D2, D9, D10, and D11 are not needed. In the schematic, parts with no value are not used, and the BOM confirms this.

    I'm still checking on alternative MOSFETs, so I'll let you know once I have a more definitive answer on that.

    Best Regards,

    Angelo Zhang

    Applications Engineer | Battery Charging Products

  • Hello,

    I was wondering would I be able to uniform the 10k and 100k to 0603 packages?

    There is available for 10k CR0603-FX-1002HLF (Digikey part number CR0603-FX-1002HLFCT-ND)

    and for the 100k  CRG0603F100K (Digikey part number A106046CT-ND)

    This is intended to unify for 10k's : R29, R30 and R16

    for 100k's: R3, R20, R32, R33, R37, R38 with R15, RR6, R11, R23, R28

    The power is increased for R29, R30 and R3, R20, R32, R33, R37, R38 but puts them into all 0603 packages.

    Would you say this is ok without any issues?

    Mo

  • Hello,

    Further to this For the Following:

    C3 : Had to be changed to a larger package to accomodate the specification requirments (Parts number C0805C104J4RACTU was chosen degikey part number 399-11163-1-ND)

    C10,C11,C20,,C23,C28,C29: TI Descrption requires Capacitor, Ceramic, 50V, Y5V,-20/+80% this is not available from digikey the closest I could do was 10µF 50V Ceramic Capacitor X5R 1206 digikey part number: 1276-2876-1-ND Part model code: CL31A106KBHNNNE

    Would these be acceptable options ?


    Best regards

    Mo
  • Hi Mo,

    The resistors and capacitors you suggested will work fine.

    As for the MOSFETs, what are you designing your battery charge current to be? The EVM circuit schematic is only designed for a max charge current of 8 A, so I just wanted to make sure you're not exceeding that.

    That would also explain the BOM description for Q1, Q2, and Q5. It should say -40 V and -8 A, not -40 V and -18 A. Therefore, either of the suggested MOSFETs (S14401BDY and FDS4141) will work fine because they can withstand >8 A of drain current.

    As for Q6, Q8, and Q9, your suggested alternatives will also work.

    Best Regards,

    Angelo Zhang

    Applications Engineer | Battery Charging Products

  • The power supply will only provide 6A at 18.5V to 24V

    And the system/load will require 4A from 18.5V to 24V.

    So when the system /load is running I would want the battery to charge at 2A or provide all power to the system and let it self trickle the charge,when the system is not ON, the charge can go between 1A to 6A depending on the battery inserted.

    We will have two types of batteries a 4 cell 14.6V Li-Ion with capacity of 3450mAh.

    And the second battery option is a 4s4p battery at 14.6V Li-Ion with capacity of 13800mAh

    I would not want the charge to be 1C but reduced to the increase longevity of the batteries.

    Best regards

    Mo 

  • Hi Mo,

    Thanks for the extra information about your application.

    However, the max input current for the EVM circuit is 4.5 A. Your power supply provides 6 A, which is higher than this.
    Your input voltage (18.5-24 V) is fine since the input operating voltage range is 5-28 V, but your input current is too high. I would recommend lowering the input current so that it is within the recommended operating range, even if this means you increase your input voltage slightly.

    Best Regards,
    Angelo Zhang
    Applications Engineer | Battery Charging Products
  • Hello Angelo,

    Would there be any way to increase the input current for the charger, without changing the charging rates?

    Because the system requires around 4A, 4.5A doesn't give too much to the charging of the battery if the system is ON (only 0.5A), so if there is a way to pass 4A to the system while also giving the charging 2A would be useful.

    Also, if the input provides up to 6A wouldn't the charger just limit itself to 4.5A and only take what it needs and leave the rest untapped?

    I saw when reading the datasheet it says the charger could handle up to 10A.

    Also, I was wondering another question the LED's circuits used on the EVAL, how would you interface them to a microcontroller as well? My Microcontroller can handle only up to 3.3V input.

    I would like to have the LED's for visual display but then send the 'on or off' of the LED's to the microcontroller so then I can display on an LCD display in detail what is happening.

    Would you be able to show a circuit diagram of how?

    Mo

  • Hi Mo,

    You're correct that the bq24610 can handle adapter currents up to Iac = 10 A, but the EVM circuit was designed with only Iac = 4 A in mind. If you want your adapter to supply 6 A of current, then you will need to change the ACSET resistor divider values according to the following formula.

    For example, with the default value of Rac = 10 mΩ, then your Vacset should be 1.2 V to set Idpm = 6 A. Therefore, one possible resistor combination would be R6 = 100 kΩ and R7 = 57 kΩ in the picture below.

    This would set IDPM to 6 A, which would allow up to 6 A to be drawn from your adapter. If the system and battery try to draw more than 6 A from the adapter, then the bq24610 will prevent this by reducing the battery charge current in order to stop the adapter from crashing.

    Similarly, keep in mind that you will need to change the ISET1 resistor divider values in order to set your battery charge current to 2 A. You may also need to change the ISET2 resistor divider values depending on your desired pre-charge current.

    As for the LEDs, please refer to the pictures below. On the EVM, JP2 and JP3 are jumpers which are connected such that VREF supplies LEDPWR. By placing or removing JP2, you can either enable or disable the LEDs. If you want the LEDs to always be enabled, then you can simply connect VREF directly to LEDPWR, and you can then use the PG, STAT1, and STAT2 pins to communicate with your microcontroller. Since VREF = 3.3 V, your microcontroller would be able to handle these voltages.


    Best Regards,

    Angelo Zhang

    Applications Engineer | Battery Charging Products

  • Ah I see so working out using resistor divider calculations to get as close to 1.2V with R6 and R7, this makes sense now thank you. The closest Resistor value I have found for R7 is 56.2k ohms this works out about 5.935A output which I am happy with.

    As for the LED's, PG, STAT1 and STAT2, I can connect directly to the MCU without any components, but for the CHGEN, ACDRV and BATDRV could I connected that one directly too?

    Also, I have attached simple diagram would you say I can connect the MCU as shown on the image or need to get the connection from else where?

    Also Reading on the datasheet of the BQ24610 on page 16 it mentions battery voltage regulation which connects to the VFB pin, on the EVAL board we have 909k (R25) and 100k (R28) from the formula 

    VABT= 2.1V * [1 + (R2/R1) ]

    With the values, we have that would equal 21.189 for VBAT

    I know that the battery we are using is a 4 cell in series so that would make the voltage around 14.8V nominal but when fully charged 16.8V

    Would I leave these resistors as it is or change it?

    If I fixed R1(which is R28 on the eval board) to 100k then rearranging the formula that would give R2 (Which is R25 on the eval board) 704.76k Ohms closest real resistor value would be 715k Ohms.

    Best regards

    Mo

  • Hi Mo,

    CHGEN is directly connected to VREF = 3.3 V (unless you want to include an external jumper to enable/disable charging manually), so yes, you can directly connect the MCU to CHGEN.

    However, this is not the case for ACDRV and BATDRV. When an adapter is not detected, ACDRV is pulled up to VCC. On the other hand, when the adapter is connected to the system, then BATDRV is pulled up to ACN. These voltages are well above 3.3 V, so they are higher than what your MCU can handle, and you would not be able to connect ACDRV and BATDRV to the MCU without any components.

    Instead, please take a look at the circuit below (also part of the EVM schematic). Rather than measuring ACDRV and BATDRV directly, you can measure the voltages at pin 3 of Q8 and Q9 (between the LED and the MOSFET). This will still tell the MCU whether ACDRV and BATDRV are high or low without the MCU seeing a voltage above 3.3 V (since LEDPWR = VREF = 3.3 V).

    Regarding your diagram, yes that connection would work since the voltage at the MCU pin would not exceed 3.3 V.

    As for setting the battery regulation voltage, yes, you will definitely need to change these resistor values. If you leave the resistors as is, then VBAT = 21.189 V, like you said, which would significantly overcharge your battery.

    16.8 V is standard for 4-cell battery charging, so if you want to fix R1 to 100 kΩ, then R2 = 700 kΩ. However, when choosing the closest real resistor value, I would err on the side of R2 being slightly below 700 kΩ rather than slightly above 700 kΩ. For example, if you used R2 = 715 kΩ, as you suggested, then the battery regulation voltage would be 17.115 V, or 4.279 V/cell. Compared to the standard 4.2 V/cell, this would harm your battery cycle life. Please see Figure 5 here for a graph which illustrates this issue:

    Best Regards,

    Angelo Zhang

    Applications Engineer | Battery Charging Products

  • Hello Angelo,

    Thank you for that explanation and adviseI have now implemented these into the battery charger, for the R2 I have used 698k Ohms Resistor 0805 0.125W with 0.1%+- tolerance and the R1 I have the same but in a 100k ohms resistor.

    I have attached images of the connections to the MCU for ACDRV, CHGEN and BATDRV andput at the end of each of them _MCU to identify that it will connect to the MCU directly at that point, do you think this is correct?

    Also, I was thinking of ways to protect the battery for undervoltage, from my understanding the BQ24610 has undervoltage protection on the AC input to the charger and protect the battery from over charging. But when the unit is used as a portable the battery is used and the AC is unconnected, am I correct that there is no undervoltage protection on the charger, from protecting it from over discharging the battery?

    If so what would be the best thing to implement at the battery side to protect the battery?

    (Already the battery themselves have PCM which provides protection from under and over voltage and current, but the manufactures have warned us that it is not to be used at the primary protection and would require second line of protection in order to improve life of the battery)

    One idea I was thinking of was using a TPS3701 (Voltage Supervisor) and have the warning pins connected to a back-to-back P-Channel MOSFETs, but I'm unsure on the components to choose for the P-Channels MOSFETS to handle the battery current and voltage.

    The other way was for a for a fuel gauge to be connected and the alert to be sent to the MCU and MCU would then try to disable everything, the Issue I see here is that it would require programming and I would prefer the analog option of protecting without any MCU involvement.

    This then leads me to my other question, how to turn off the charger and turn on the charger? I was thinking of having the ability to turn off and on the charger so it disconnects the battery to save the battery usage when its not being used.

    Also, if I turn off the charger, would it disconnect the input to the charger and disconnect the battery so it uses very minimal current? At best if shutdown of the charger is not a good idea, is there a way to put it onto standyby?


    Thank you

    Best regards

    Mo

  • Hello,

    I was wondering for placing a DPST or DPDT switch at the input of the power supply section and at the battery connection point. Would this have any issues with the BQ24610?

    I have attached a simple diagram for your convenience. 

    Please can you let me know in your earliest convinece as we have to start developing the board design this week.

    Best regards

    Mo

  • Hello Mo,

    Can you please recap on what is the purpose of DPDT switch?  It looks like you are connecting the power supply directly to the battery.

  • The  DPDT or DPST Switch is going to be used for the user to manually switch off the whole system so that the battery doesn't get drained by any of the system components when not used, also its used, to disable the charger even if its connected to the ACDC it makes sure that the system doesn't turn on from either the battery or the ACDC. Both points would be isolated from each other but will turn on or off at the same time with a single switch.

  • based on your diagram in your previous post, the DPDT does not disconnect the battery from the system load. The system load is still connected to the battery through the body diode of the battery FET. You might want to add the DPDT at the left side of the window comparator in your diagram to disconnect the load.
  • I have attached the image do you mean this?

    Are there other ways to turn off the charger? so that system can be shutdown?

  • Sorry I think my last two questions might not have come out properly and very sorry about that.

    For the settings of the unit we would have two switches one to turn on/off the entire system and the other to turn on/off the motor:

    Ideally, we want to make sure that the battery doesn't get drained (much) when left on standby or unused.

    So the physical switches we want the patient to use would be one (rocker type) switch for switching the system ON/OFF including the motor.

    So when the system is used in portable mode (battery only mode and ACDC disconnected) we would want the system with the rocker switch to turn off the battery so no power is consumed. But when the patient wants to use the system they will turn on the rocker switch to use the system.

    When the System gets connected to an ACDC (mains) power Supply we would want the unit to charge even when the system rocker switch is set to off.

    I have come up with another idea (this time I had sleep to think about this) What do you think of this option when includes using a Relay Switch which goes in parallel to the (DPDT Switch) rocker switch.

    I would like to ask you option what would be a cheaper alternative to a relay switch which I could implement?

    Best regards

    Mohammed Al-Amin

  • Your configuration should work. However, I am not sure what is the impedance of those switches. During charging, there might be a large voltage drop across the switch on the charging path. This might cause not fully charge the battery as the battery voltage sensed by the charger is higher than the voltage of the actual battery.

    Since you want to implement a physical switch, your implementation is probably the easiest. You can use an NFET with body diode facing the battery to replace the relay switch. Use inverted /PG signal to drive the gate of the NFET.

  • Since there's no activity for a while, we are assuming that the thread is solved and closed. Thanks!
  • Hello,

    The Mechanical Rocker Switch is stated to have a contact resistance from 10 mOhms to 50 mOhms, and the Relay switch has a max contact resistance of 100 mOhms.

    The switch would be wired to the PCB but the length of the wire would be no more than max of 100mm long

    Would you think that will have a big impact on voltage levels?

    On running a quick simulation on Multisim results for 100mOhms and 50mOhms as parallel resistors came out to be about 300pV to 500pV drop. Would you think that is too much?


    Best regards

    Mohammed Al-Amin

  • The input current can be set up to 10A. Please refer to page 16 of the d/s 9.3.3 Input Adapter Current Regulation for more details. Thanks!