

Part Number: 66AK2E05
Hi,
How to build and run the platform test on K2E EVM ?

This thread has been locked.
If you have a related question, please click the "Ask a related question" button in the top right corner. The newly created question will be automatically linked to this question.
How to build and run the platform test on K2H EVM ?
Pre-requisite :
1. Download and install PROCESSOR-SDK-RTOS-K2E 06_03_00_106 from http://software-dl.ti.com/processor-sdk-rtos/esd/K2E/latest/index_FDS.html
( Please install the SDK in the recommended path: C:\ti\)
2. Download and install CCS 9.3 , https://www.ti.com/tool/download/CCSTUDIO/9.3.0.00012
( Please install in the recommended path: C:\ti\)
3. Rebuild the PDK and SDK which in turn will build all the necessary CSL library components etc. Follow the steps given below.
Step1: Check the Platform-test source code after installation
a) Platform-test source code will become available once the " processor_sdk_rtos_k2e_6_03_00_106 " package (above-step) is installed.
b) "Platform-Lib" is a dependency for Platform-test.
c) The location of source code of Platform-test and platform-lib is at
C:\ti\pdk_k2e_4_0_16\packages\ti\platform\evmc6657l\platform_test\src
C:\ti\pdk_k2e_4_0_16\packages\ti\platform\evmc6657l\platform_lib\src
d) Open the platform.c located at C:\ti\pdk_k2e_4_0_16\packages\ti\platform\evmk2h\platform_lib\src\platform.c
Go to line number : 530 comment the initialization and configuration code of serdes and SGMII
/*
if (p_flags->phy) {
configSerdes();
Init_SGMII(0);
//Init_SGMII(1);
}
*/
e) save and close.
Step 2: Import the "Platform test example" into CCS 9.3 and re-build
Please follow the video attached and do the steps given below for ease of use.
a) Import the "Platform-Lib" CCS project located at "C:\ti\pdk_k2e_4_0_16\packages\ti\platform\evmk2h\platform_lib" into CCS and rebuild
b) Import the "Platform-Lib" CCS project located at "C:\ti\pdk_k2e_4_0_16\packages\ti\platform\evmk2h\platform_test" into CCS and rebuild
If face any error in building the platform lib or platform test, please follow the steps given in the below FAQs.
Step 3: Run the "Platform test " on the C6657 EVM
In your evmkEh - board ----> You should put the DIP Switch settings in "No boot mode" to connect to the CCS.
That is ------> DIP SW1 : 1 1 1 1
Connection details:
================
1. Power cord
2. XDS- Emulator - Mini usb cable between usb port - J3 - k2H EVM and PC-running Windows-10

Please follow the video attached and do the steps given below for ease of use.
1. Open CCS
2. Launch the target configuration file for evmK2E . ( If new to this, Follow this FAQ )
3. Do "Connect target and run gel file " ( If new to this, Follow this FAQ :
4. Load the platform_test_evmk2h.out into core0 of k2E-evm -- ( FOLLOW THE STEPS IN THE VIDEO BELOW )
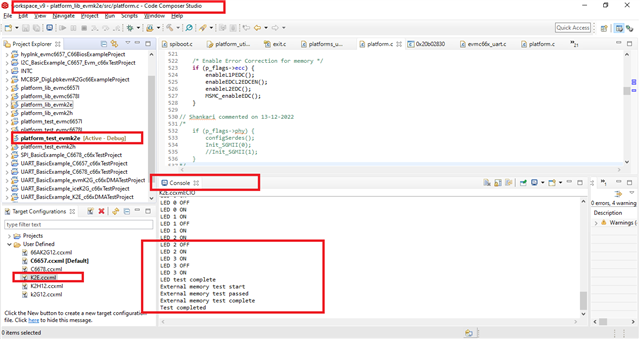
5. Run and observe the output messages, as per the video below.
Console output messages in CCS
==========================
[C66xx_0] p_info->version	= 3.00.00.09
p_info->cpu.core_count	= 1
p_info->cpu.name	= TCI6636K2E
p_info->cpu.id	= 21
p_info->cpu.revision_id	= 0
p_info->cpu.silicon_revision_major	= 0
p_info->cpu.silicon_revision_minor	= 0
p_info->cpu.megamodule_revision_major	= 9
p_info->cpu.megamodule_revision_minor	= 3
p_info->cpu.endian	= 0
p_info->board_name	= TMDXEVM6636K2E
p_info->frequency	= 1000
p_info->board_rev	= 0
p_info->led[PLATFORM_USER_LED_CLASS].count	= 4
p_info->led[PLATFORM_SYSTEM_LED_CLASS].count	= 0
p_info->emac.port_count	= 2
EMAC port 0 connected to the PHY.
MAC Address = b4:99:4c:09:60:28
EMAC port 1 connected to the PHY.
MAC Address = b4:99:4c:09:60:28

NAND Device:
p_device->device_id	= 172
p_device->manufacturer_id	= 44
p_device->width	= 8
p_device->block_count	= 4096
p_device->page_count	= 64
p_device->page_size	= 2048
p_device->spare_size	= 64
p_device->column	= 2048
p_device->handle	= 11484
p_device->flags	= 0
p_device->bboffset	= 5
Bad Block Table (only bad block numbers shown):

NOR Device:
p_device->device_id	= 47896
p_device->manufacturer_id	= 32
p_device->width	= 8
p_device->block_count	= 256
p_device->page_count	= 256
p_device->page_size	= 256
p_device->spare_size	= 0
p_device->handle	= 47896
p_device->flags	= 0
p_device->bboffset	= 0

EEPROM Device (@ 0x50):
p_device->device_id	= 80
p_device->manufacturer_id	= 1
p_device->width	= 8
p_device->block_count	= 1
p_device->page_count	= 1
p_device->page_size	= 65536
p_device->spare_size	= 0
p_device->handle	= 80
p_device->flags	= 0
p_device->bboffset	= 0

EEPROM Device (@ 0x51):
p_device->device_id	= 81
p_device->manufacturer_id	= 1
p_device->width	= 8
p_device->block_count	= 1
p_device->page_count	= 1
p_device->page_size	= 65536
p_device->spare_size	= 0
p_device->handle	= 81
p_device->flags	= 0
p_device->bboffset	= 0
Current core id is 0
User switch 1 state is OFF
EEPROM test start
test_eeprom: passed
EEPROM test complete
NAND test start
test_nand: passed
NAND test complete
NOR test start
test_nor: passed
NOR test complete
LED test start
LED 0 ON
LED 0 OFF
LED 0 ON
LED 1 ON
LED 1 OFF
LED 1 ON
LED 2 ON
LED 2 OFF
LED 2 ON
LED 3 ON
LED 3 OFF
LED 3 ON
LED test complete
External memory test start
External memory test passed
External memory test complete
Regards
Shankari G
