This thread has been locked.

If you have a related question, please click the "Ask a related question" button in the top right corner. The newly created question will be automatically linked to this question.

RTOS/TDA2EVM5777: QSPI flashing through SBL

Part Number: TDA2EVM5777

Tool/software: TI-RTOS

Hi ,

I am trying to flash my application in to QSPI flash and boot through SBL ,I have followed the SBL user guide steps and tried to load the images in to core A-15

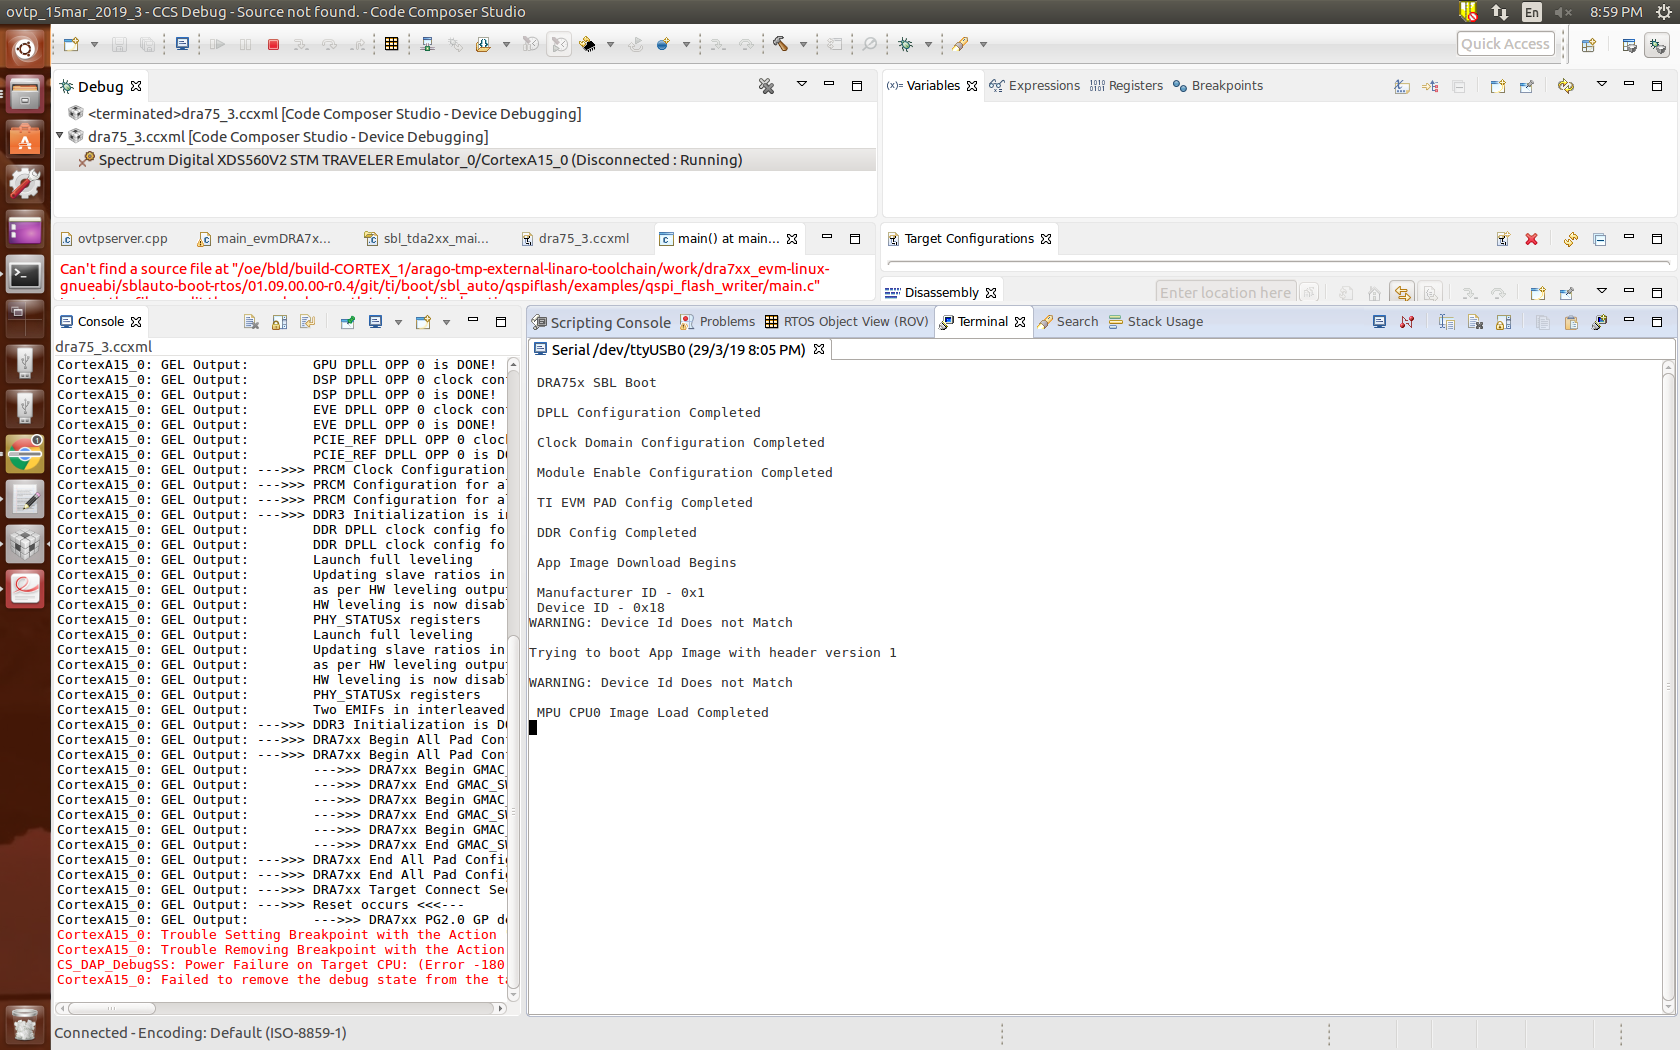
Please find the attached console and terminal logs and let me know why my application prints are not coming 

steps I have followed 

1. connect A15 and load the qspi flash writer binary from this location -- /ti/pdk_dra7xx_1_0_10/packages/ti/boot/sbl_auto/prebuilt_binaries/sbl/qspi_flash_writer/evmDRA75x/qspi_flash_writer_ipu1_0_release.xem4

2. After flashing to the qspi flash (please find the attached logs ) changed the switch setting to qspi mode 

3  In terminal log i could see only sbl prints 

==================SBL and App image generation steps===========================

1. SBL image from the default path- -/home/tstone10/ti/pdk_dra7xx_1_0_10/packages/ti/binary/sbl/qspi/opp_nom/evmDRA75x/sbl_qspi_opp_nom_a15_0_release.tiimage

2./out2rprc.exe NIMU_BasicExample_evmDRA75x_armExampleproject.out nimu.bin

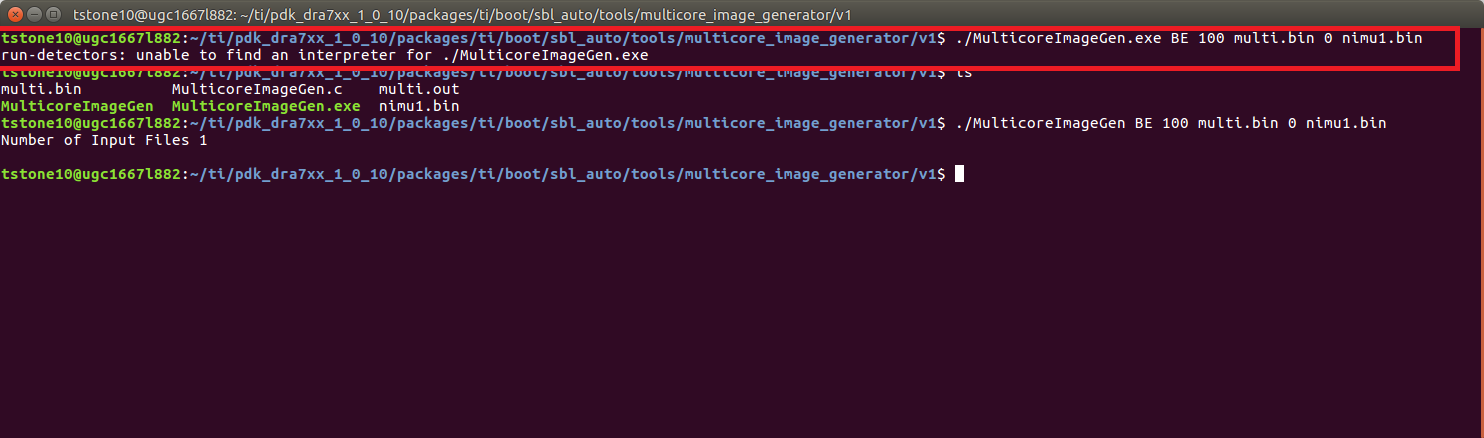
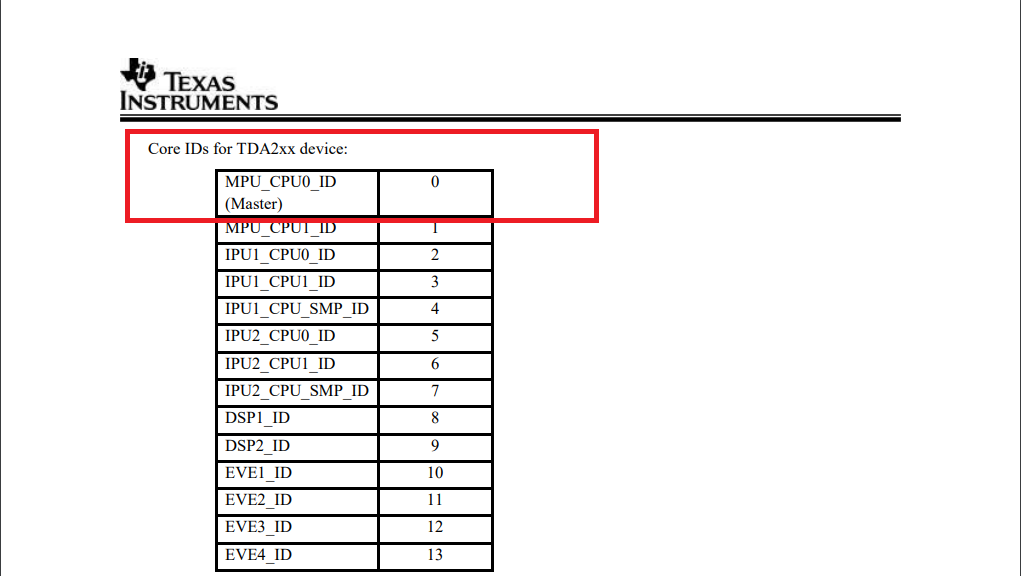
3 ./MulticoreImageGen BE 101 Multi.out 0 nimu.bin

[CortexA15_0] 
QSPI Flash writer application
Enter Device type to use                
1 - 1 bit read from flash                
2 - 4 bit (Quad) read from flash                
$ > 1

MID - 1
DID - 18
Enter 0 for Erase-Only (without flashing any image)
Note : File size should be less than 33554432 Bytes.
Enter the file path to flash: /home/tstone10/ti/pdk_dra7xx_1_0_10/packages/ti/binary/sbl/qspi/opp_nom/evmDRA75x/sbl_qspi_opp_nom_a15_0_release.tiimage
Enter the Offset in bytes (HEX): 0x00
Erase Options:
---------------
    0 -> Erase Only Required Region
    1 -> Erase Whole Flash
    2 -> Skip Erase 
Enter Erase Option: 
1
Load Options:
-------------
    0 -> fread using code (RTS Library)
    1 -> load raw using CCS (Scripting console)
Enter Load Option: 
1
Use below command in CCS scripting console...
loadRaw(0x80500000, 0, "/home/tstone10/ti/pdk_dra7xx_1_0_10/packages/ti/binary/sbl/qspi/opp_nom/evmDRA75x/sbl_qspi_opp_nom_a15_0_release.tiimage", 32, false);
Kindly use '/' (forward slash) in the file path
Enter any alpha-numeric key once loadraw is complete...
1

 QSPI whole chip erase in progress

 QSPI Erase completed

 QSPI file write started 
file size to write: 99720 Bytes 

 QSPI file write completed. Verifying 

 ************QSPI flash completed sucessfully************** 

QSPI Flash writer application
Enter Device type to use                
1 - 1 bit read from flash                
2 - 4 bit (Quad) read from flash                
$ > 1

MID - 1
DID - 18
Enter 0 for Erase-Only (without flashing any image)
Note : File size should be less than 33554432 Bytes.
Enter the file path to flash: /home/tstone10/ti_29mar/pdk_dra7xx_1_0_10/packages/ti/boot/sbl_auto/tools/multicore_image_generator/v1/multi.bin
Enter the Offset in bytes (HEX): 0x80000
Erase Options:
---------------
    0 -> Erase Only Required Region
    1 -> Erase Whole Flash
    2 -> Skip Erase 
Enter Erase Option: 
0
Load Options:
-------------
    0 -> fread using code (RTS Library)
    1 -> load raw using CCS (Scripting console)
Enter Load Option: 
1
Use below command in CCS scripting console...
loadRaw(0x80500000, 0, "/home/tstone10/ti_29mar/pdk_dra7xx_1_0_10/packages/ti/boot/sbl_auto/tools/multicore_image_generator/v1/multi.bin", 32, false);
Kindly use '/' (forward slash) in the file path
Enter any alpha-numeric key once loadraw is complete...


12

 QSPI Erase started

 QSPI Erase completed

 QSPI file write started 
file size to write: 971732 Bytes 

 QSPI file write completed. Verifying 

 ************QSPI flash completed sucessfully************** 


  • Hi Swati,

    You should follow the below steps to debug:
    1. Keep the board in debug mode.
    2. As you have already flashed the AppImage you don't need to flash anything.
    3. Remove gel and load SBL elf using CCS.
    4. Do a single step and then you will be able to find out the reason for A15 hang during/after app image load.

    Regards,
    Rishabh
  • Swati,

    One more point. Multi core image generation command mentioned above is not correct.

    Can you check the SBL user guide and update the command.

    MulticoreImageGen.exe <ENDIAN> <Dev Id> <App out file> <Core Id 1> <RPRC in file for Core Id 1> [<Core Id n> <RPRC in file for Core Id n> ...]

    Regards,

    Rishabh

  • Hi Rishabh,

    Above command is not working . Please find the attached screenshot.

    so i have used the below command to generate the multicore out file

    ./MulticoreImageGen BE 101 Multi.out 0 nimu.bin

    MulticoreImageGen <BE> <Random number> <Multi.out> <0(as in the userguide for tda2xx ,please find the attached )> <nimu.bin>

    nimu.bin is generated from the following command - ./out2rprc.exe NIMU_BasicExample_evmDRA75x_armExampleproject.out nimu.bin

  • Hi Rishabh,

    In the above reply please let me know anything i have missed to generate the multicore app image.

    Thanks,
    Swati
  • Swati,

    There is no <Random number> in multicore image gen command. It is actually device id.
    SBL throws a warning message if device id is not correct.
    Can you try the debug steps as mentioned in my first reply.

    Regards,
    Rishabh
  • Hi Rishabh,

    I am using "TDA2xx - DRA74x/DRA75x" board ,can you tell me the device id for this hardware

     In the SBL user guide dev Id definition is as below :

    Dev Id: This is the device Id. Still the Device Ids of the supported devices are not populated & random values
    are chosen. In the present implementation of the SBL, only warning is printed on UART console if the device id
    doesn’t match and the boot is not aborted.

    Its urgent ,we are dependent on this.

    Thanks,

    Swati


  • Swati,

    Device Id should be 55 for TDA2xx.
    Anyway as it generates just the warning, you can ignore it for now.
    Wrong device id will not cause the boot to abort.
    You need to debug to see the reason of crash/hang.

    Regards,
    Rishabh
  • Hi Rishabh,

    Thanks for reply.

    I have tried debug steps of your first reply:

    You should follow the below steps to debug:

    1. Keep the board in debug mode.

    2. As you have already flashed the AppImage you don't need to flash anything.

    3. Remove gel and load SBL elf using CCS.

    4. Do a single step and then you will be able to find out the reason for A15 hang during/after app image load.

    Please find the below log in debug mode

    =========================================================

    DRA75x SBL Boot

    DPLL Configuration Completed

    Clock Domain Configuration Completed

    Module Enable Configuration Completed

    TI EVM PAD Config Completed

    DDR Config Completed

    App Image Download Begins

    Manufacturer ID - 0x1
    Device ID - 0x18
    WARNING: Device Id Does not Match

    Trying to boot App Image with header version 1

    WARNING: Device Id Does not Match

    MPU CPU0 Image Load Completed

    App Image Download Completed

    ===========================================================================

    After this I have changed the switch settings to the qspi mode and reset the board

    Below is the log

    =========================================================================================


    DRA75x SBL Boot

    DPLL Configuration Completed

    Clock Domain Configuration Completed

    Module Enable Configuration Completed

    TI EVM PAD Config Completed

    DDR Config Completed

    App Image Download Begins

    Manufacturer ID - 0x1
    Device ID - 0x18
    WARNING: Device Id Does not Match

    Trying to boot App Image with header version 1

    WARNING: Device Id Does not Match

    MPU CPU0 Image Load Completed

    ================================================================================

    In debug mode i could see app image is getting downloaded ,In qspi mode i could not see the app image getting downloaded

    let me know what i have missed.

    Thanks,

    Swati


  • Swati,

    Is the application working fine in debug mode? SBL should send more prints after loading app image.
    Is this the complete log?

    Regards,
    Rishabh
  • Rishabh,

    Yes, the application works as expected in debug mode (if you need we can provide the entire run-time logs here).
    SBL prints only that much during boot-up sequence.

    In this Application, functional requirement is to update data into Flash memory and after re-boot, based on the updated content in flash, additional operations are performed. So we need to run without debugger/emulator for non-volatile operations and data updates.

    Herewith listed the approach & steps planned & results observed so far :-
    1) Flash the SBL & App image to the target (debug mode) ---> completed
    2) Re-boot the target (QSPI flash mode) --> stuck here because the APP seems not fully loaded into and run from SDRAM (DDR) - logs shared in earlier messages here.
    3) The App runs (QSPI flash mode) and executes all functional steps (updates specific content into Flash) --> to be done
    4) Re-boot (QSPI flash mode) the target after all steps before reboot are completed) --> to be done
    5) The App runs again (QSPI flash mode), verifies the specific content in Flash and performs additional operation --> to be done
    6) Re-boot the target (QSPI flash mode) and all steps based prints can be observed in the runtime logs --> to be done

    A - Kindly provide your suggestions reg. the above approach/steps and correct if any step/approach needs change
    B - Will it help to build the application in Release mode and use in this approach ?? (now we are building in Debug mode only)
    C - Is there any option to enable debug logs in SBL and also any debug logs in sources of default driver / service layers (e..g., BOOT, NDK, QSPI) ??

    Thanks,
    Swati

  • Swati,

    Release build will not help. Also there is no single option to enable debug prints as there are different software involved.
    As per the description given above it seems that the application is overwriting the SBL contents, which should not be the case.

    You can use "Save memory" option from CCS to store flash memory contents after running application the first time and then do a comparison with SBL tiimage.

    Regards,
    Rishabh
  • As far as we understand, the "Save memory" is NOT linked with Flash NVM. Kindly check.
  • Rishabh,

    Herewith provided the boot UART Terminal logs for these flashing steps followed :
    - SBL ELF is built in sd mode
    - SBL TIIMAGE created with 0x40300000 as load address
    - in CCS SBL ELF (sd mode) & QSPI Flash writer could NOT be run - as per steps vi) and vii) in Page 14 of SBL user guide
    - so in CCS SBL ELF (qspi mode) & QSPI Flash writer programs are loaded and rest all followed as per steps i) to xiv)
    ========
    DRA75x SBL Boot

    DPLL Configuration Completed

    Clock Domain Configuration Completed

    Module Enable Configuration Completed

    TI EVM PAD Config Completed

    DDR Config Completed

    App Image Download Begins

    SD Boot - File open fails

    Valid App Image is not Available

    Putting MPU CPU1 in Off mode

    EVE MMU configuration completed

    EVE MMU configuration completed

    EVE MMU configuration completed

    EVE MMU configuration completed

    *****************************************************************

    PMCCNTR counts once every 64 clock cycles, multiple by 64 to get actual CPU cycles

    SBL Initial Config Cycles - 146609 (12.51 ms)
    SOC Init Cycles - 226004 (19.28 ms)
    DDR Config Clock Cycles - 57703 (4.92 ms)
    App Image Load Cycles - 357624 (30.51 ms)
    Slave Core Bootup Cycles - 276604 (23.60 ms)
    SBL Boot-up Cycles - 1065775 (90.94 ms)
    Time at which SBL started IPU1_0 - 5162 (0.44 ms)
    *****************************************************************

    Putting MPU in Retention...
    ===========

    -- Do you see any issues and can you suggest any correction steps ?!
    -- Should we place SBL (sd mode) files in SD card and place in the target for the Flash boot to pass ?!

    Regards,
    Swati
  • Hi Swati,

    QSPI memory is mapped at 0x5c000000. SBL is flashed at the same location.
    Hence you can use CCS to save the memory contents after running SBL in order to make sure that your app is not overwriting SBL.
    Make sure you have set QSPI to memory mapped mode before saving memory.

    Regards,
    Rishabh
  • Hi Rishabh,

    1) Please share the appropriate document or code reference or literature in website - 0x5C000000 looks a magic & non-understandable number now.

    2) If App overwrites SBL area or SBL overwrites the App area, do you think those initial boot-up logs (after setting in QSPI flash boot mode) will appear?? Looks you are missing something fundamentally, and guiding us in wrong directions at this crucial juncture... and "Save memory" looks irrelevant for now.

    3) QSPI write operation needs Config mode - as per what we understand from some other E2E threads and as per TI Wiki for QSPI flash. Through our application we do erase, write & read all three QSPI flash memory operations. So is it possible to set QSPI mode once in the application and differently for the "Save memory" option - I ask this to generally know, though this "Save memory" option looks irrelevant for now.

    Thanks,
    Sathiyan

  • Hi Rishabh ,

    This did not resolve based on the above reply.

    Thanks,
    Swati

  • Hi,

    Sharing different logs is not very useful.
    You should spend some time hands on trying to debug the issue.

    I would suggest you to read the literature i.e. TRM before jumping to any conclusions.
    0x5c000000 is the QSPI flash's memory address.
    The idea is to make sure that SBL is not getting overwritten by the application.
    Entire image does not needs to be overwritten for crash/hang.
    Even a single bit change is enough to do the same.

    QSPI flash can be accessed via two modes: memory mapped and cfg.
    Save memory should be done in memory mapped mode.

    Regards,
    Rishabh
  • Ok Rishabh, as per your explanation it looks that our Application needs change to align with the SBL (addresses, access mode, etc.,).. so as to get the combined Boot from Flash (i.e., SBL & APP together) working. We'll check this and get back if needed.
  • Ok. I am closing this thread for now.
    You can post a reply here if you face any issues or start a new thread in case this one has locked due to timeout.

    Regards,
    Rishabh