AM6442: AM64x EVM – Error loading .out file to R5F0_0 with UniFlash

Part Number: AM6442
Other Parts Discussed in Thread: UNIFLASH,

Hi Team,

Why AM64x Doesn’t Show in UniFlash GUI?

image.png

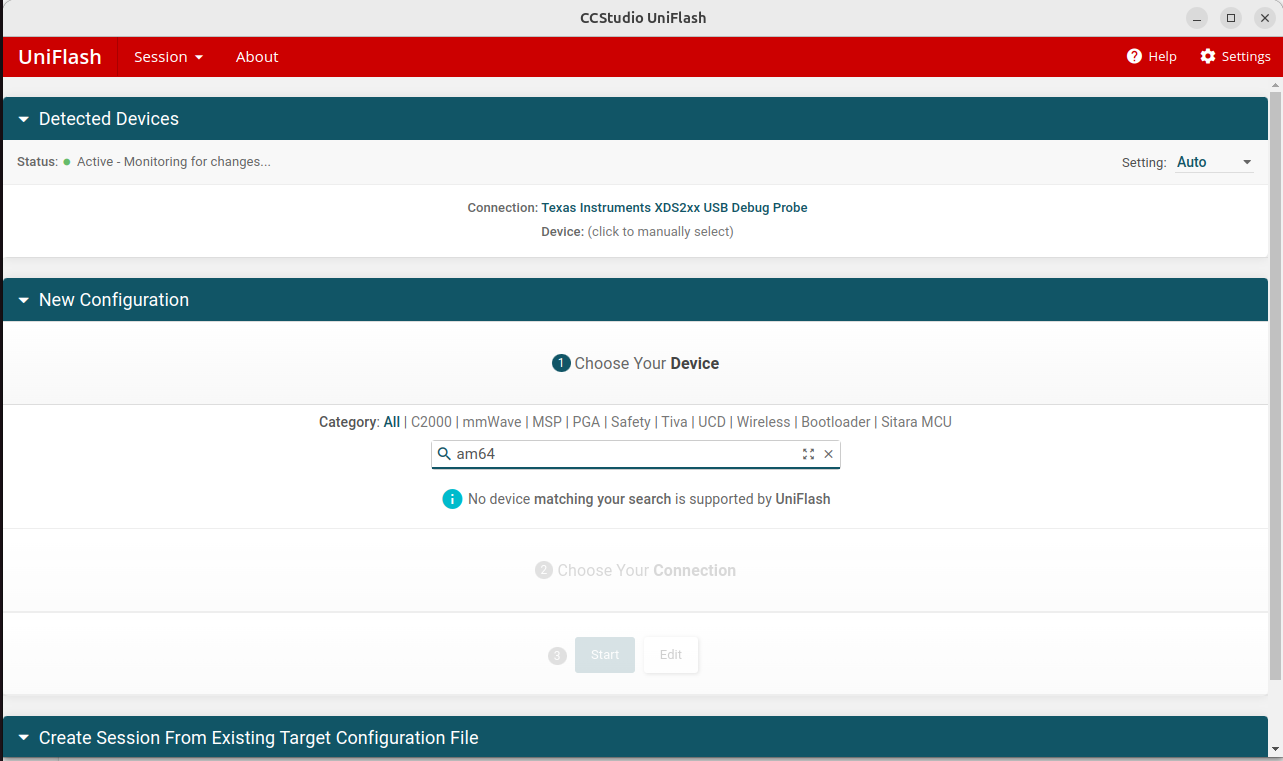
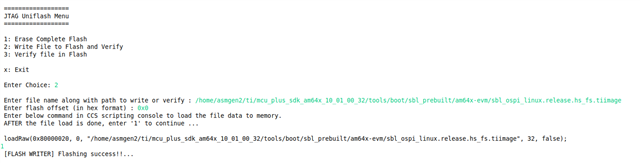
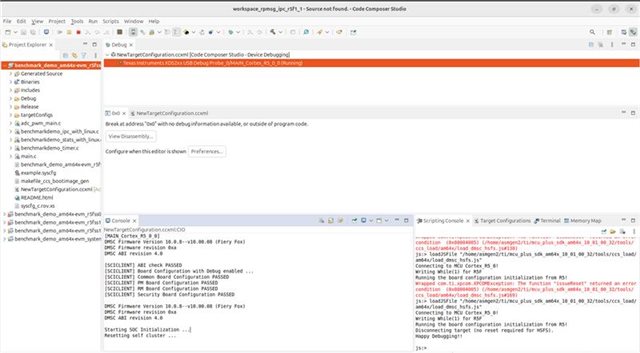
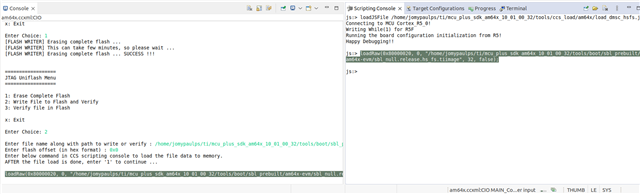
I am working with the AM6442 EVM and need guidance on flashing my application to the R5F0_0 core.

Environment:

AM6442 EVM

MCU+ SDK 10.01.00.32

CCS 12.8

Boot mode: Dev boot mode

image.png

What is the correct procedure to flash an application to the R5F0_0 core on AM64x?

Thanks & Regards,
Ravilla Dinesh.

  • Hi Dinesh,

    The AM64x device family is typically programmed using the MCU+ SDK tools rather than directly through the global UniFlash.

    For flashing an application to the R5F0_0 core on AM64x, please follow the official step-by-step guide available in the MCU+ SDK documentation. Specifically, refer to the UART UniFlash section in the link below:

    Flashing Tools

    Regards,
    Jomy

  • Hi Jomy,

    JTAG UniFlash is my requirement.

    https://software-dl.ti.com/mcu-plus-sdk/esd/AM64X/latest/exports/docs/api_guide_am64x/EXAMPLES_DRIVERS_SBL_JTAG_UNIFLASH.html -> refered this.

    On CCS debug option the console prints are visible in CCS window, But while doing ospi flashing process we are not getting any terminal prints and don't know how to validate.

    JTAG Uniflash Menu -> sbl_ospi_linux.release.hs_fs.tiimage boot from OSPI.


    JTAG Uniflash Menu -> benchmark_demo_am64x-evm.appimage user build application.

    [FLASH WRITER] Application exited !!! All tests have passed!!

    After flashing powered off the board and changed the boot switches to OSPI boot and powering on the board. But image booting is not happening. 

    baud rate - 115200

    Thanks & Regards,

    Ravilla Dinesh.

  • Hi Dinesh,

    I will test this on my setup and get back to you with an update.

    Regards,

    JOMY

  • Hi Jomy,

    Any update on this.

    Thanks & Regards,
    Ravilla Dinesh.

  • Hi Dinesh,

    Are you facing this issue with all the prebuilt images, or only with a specific one?

    I was able to reproduce the issue on my side and can see the debug logs from UART.

    Did you run the following command in the CCS scripting console, or did you press ‘1’ to continue?

    loadRaw(0x80000020, 0, "/home/asmgen2/ti/mcu_plus_sdk_am64x_10_01_00_32/tools/boot/sbl_prebuilt/am64x-evm/sbl_ospi_linux.release.hs_fs.tiimage", 32, false);

    Regards,

    JOMY

  • Hi Jomy,

    1) After loading the SBL JTAG Uniflash application into Code Composer Studio (CCS) using:

    Run → Load → Load Program →
    /home/asmgen2/ti/mcu_plus_sdk_am64x_10_01_00_32/examples/drivers/boot/sbl_jtag_uniflash/am64x-evm/r5fss0-0_nortos/ti-arm-clang/sbl_jtag_uniflash.debug.out

    and then executing the program by pressing F8 (Run), the SBL JTAG Uniflash firmware starts running on the R5F0_0 core.

    2) After the firmware is running, the following command can be executed from the CCS scripting console:

    loadRaw(0x80000020, 0,"/home/asmgen2/ti/mcu_plus_sdk_am64x_10_01_00_32/tools/boot/multicoreImageGen/benchmark_demo_am64x-evm.appimage",32,false);


    This command successfully loads the benchmark_demo appimage into memory at address 0x80000020. The changes can be verified in the Memory Browser view inside CCS.

    No debug print output is observed in the CCS console.

    3) Give me the complete procedure to flash permanently.

    4) sbl_ospi_linux.release.hs_fs.tiimage flash to OSPI using this to boot the image. If need to see the console prints its completely bare metal code with out Linux also flashed ( sbl_ospi.release.hs_fs.tiimage) but no booting started.


    Thanks & Regards,

    Ravilla Dinesh.

  • Hi Dinesh,

    I think a few steps might be missing in your flow. Let me outline the complete procedure to avoid the issue:

    1. Connect the target configuration in CCS.
    2. If you are using Linux, update the path in:
      load_dmsc_hsfs.js
    3. Ensure the board is in Dev Boot Mode.
    4. Run the DMSC load script (for HS-FS device): 
      loadJSFile "home/user/ti/mcu_plus_sdk_{soc}_{sdk version}/tools/ccs_load/am64x/load_dmsc_hsfs.js" (HS-FS device)
    5. In CCS:

      • Go to Run → Load → Load Program
      • Load the SBL JTAG binary:
        Run → Load → Load Program →
        /home/asmgen2/ti/mcu_plus_sdk_am64x_10_01_00_32/examples/drivers/boot/sbl_jtag_uniflash/am64x-evm/r5fss0-0_nortos/ti-arm-clang/sbl_jtag_uniflash.debug.out
    6. Run the code 
    7. select the 1st option to erase the flash 
    8. Select the second option and provide the path to the prebuilt .tiimage (boot image) with offset 0x0
    9. The console will generate a CMD—run that in scripting console
    10. Type 1 to continue 
    11. Use the third option to verify the flashed contents.
    12. Change boot mode to OSPI Boot Mode.
    13. Power cycle the EVM.
    14. Check the UART output on the dedicated port (dev/ttyUSB0)

    loadRaw(0x80000020, 0,"/home/asmgen2/ti/mcu_plus_sdk_am64x_10_01_00_32/tools/boot/multicoreImageGen/benchmark_demo_am64x-evm.appimage",32,false);

    you should NOT use .appimage here.
    Instead, use the .tiimage file. The load address 0x80000020 is correct.

    This sequence should resolve the loading/boot issue.

    If you are still facing the issue after following the above steps, please feel free to reach out to me. I’ll be happy to help you debug this further.

    Regards,

    JOMY

  • Hi JOMY,

    1) Connect the target configuration in CCS.

    2) If you are using Linux, update the path in:

    updated the paths.


    3)Ensure the board is in Dev Boot Mode.
    Dev boot mode only.

    4)Run the DMSC load script (for HS-FS device): 

    js:> loadJSFile "/home/asmgen2/ti/mcu_plus_sdk_am64x_10_01_00_32/tools/ccs_load/am64x/load_dmsc_hsfs.js"
    Connecting to MCU Cortex_R5_0!
    Writing While(1) for R5F
    Running the board configuration initialization from R5!
    Disconnecting target (no reset required for HSFS).
    Happy Debugging!!


    5) In CCS:

    • Go to Run → Load → Load Program
    • Load the SBL JTAG binary: /home/asmgen2/ti/mcu_plus_sdk_am64x_10_01_00_32/examples/drivers/boot/sbl_jtag_uniflash/am64x-evm/r5fss0-0_nortos/ti-arm-clang/sbl_jtag_uniflash.debug.out

    6) Run the code.

    ==================
     JTAG Uniflash Menu
     ==================
     
     1: Erase Complete Flash
     2: Write File to Flash and Verify
     3: Verify file in Flash
     
     x: Exit

    7)select the 1st option to erase the flash.

    Enter Choice: 1
     [FLASH WRITER] Erasing complete flash ... 
     [FLASH WRITER] This can take few minutes, so please wait ... 
     [FLASH WRITER] Erasing complete flash ... SUCCESS !!!

    8)Select the second option and provide the path to the prebuilt .tiimage (boot image) with offset 0x0


    /home/asmgen2/ti/mcu_plus_sdk_am64x_10_01_00_32/tools/boot/sbl_prebuilt/am64x-evm/sbl_ospi.debug.hs_fs.tiimage


    9 & 10)The console will generate a CMD—run that in scripting console & Type 1 to continue .

    Enter file name along with path to write or verify :

    /home/asmgen2/ti/mcu_plus_sdk_am64x_10_01_00_32/tools/boot/sbl_prebuilt/am64x-evm/sbl_ospi.debug.hs_fs.tiimage


     Enter flash offset (in hex format) : 0x0
     Enter below command in CCS scripting console to load the file data to memory.
     AFTER the file load is done, enter '1' to continue ...

     loadRaw(0x80000020, 0, "/home/asmgen2/ti/mcu_plus_sdk_am64x_10_01_00_32/tools/boot/sbl_prebuilt/am64x-evm/sbl_ospi.debug.hs_fs.tiimage", 32, false);
    1
     [FLASH WRITER] Flashing success!!... 

    11) Use the third option to verify the flashed contents.
    [FLASH WRITER] Verifying success!!...

    12)Change boot mode to OSPI Boot Mode (xspi).
    changed boot mode. (sw2- 11001111 sw3-01000000 )

    13 & 14) Power cycle the EVM. & Check the UART output on the dedicated port (dev/ttyUSB0).

    After changing the boot mode to OSPI it's not booting up.

    So, we tried with linux.tiimage also.
    /home/asmgen2/ti/mcu_plus_sdk_am64x_10_01_00_32/tools/boot/sbl_prebuilt/am64x-evm/sbl_ospi_linux.debug.hs_fs.tiimage

    same progress.


    Thanks & Regards,
    Ravilla Dinesh.

  • Hi JOMY,

    1) Connect the target configuration in CCS.

    2) If you are using Linux, update the path in:

    updated the paths.


    3)Ensure the board is in Dev Boot Mode.
    Dev boot mode only.

    4)Run the DMSC load script (for HS-FS device): 

    js:> loadJSFile "/home/asmgen2/ti/mcu_plus_sdk_am64x_10_01_00_32/tools/ccs_load/am64x/load_dmsc_hsfs.js"
    Connecting to MCU Cortex_R5_0!
    Writing While(1) for R5F
    Running the board configuration initialization from R5!
    Disconnecting target (no reset required for HSFS).
    Happy Debugging!!


    5) In CCS:

    • Go to Run → Load → Load Program
    • Load the SBL JTAG binary: /home/asmgen2/ti/mcu_plus_sdk_am64x_10_01_00_32/examples/drivers/boot/sbl_jtag_uniflash/am64x-evm/r5fss0-0_nortos/ti-arm-clang/sbl_jtag_uniflash.debug.out

    6) Run the code.

    ==================
     JTAG Uniflash Menu
     ==================
     
     1: Erase Complete Flash
     2: Write File to Flash and Verify
     3: Verify file in Flash
     
     x: Exit

    7)select the 1st option to erase the flash.

    Enter Choice: 1
     [FLASH WRITER] Erasing complete flash ... 
     [FLASH WRITER] This can take few minutes, so please wait ... 
     [FLASH WRITER] Erasing complete flash ... SUCCESS !!!

    8)Select the second option and provide the path to the prebuilt .tiimage (boot image) with offset 0x0


    /home/asmgen2/ti/mcu_plus_sdk_am64x_10_01_00_32/tools/boot/sbl_prebuilt/am64x-evm/sbl_ospi.debug.hs_fs.tiimage


    9 & 10)The console will generate a CMD—run that in scripting console & Type 1 to continue .

    Enter file name along with path to write or verify :

    /home/asmgen2/ti/mcu_plus_sdk_am64x_10_01_00_32/tools/boot/sbl_prebuilt/am64x-evm/sbl_ospi.debug.hs_fs.tiimage


     Enter flash offset (in hex format) : 0x0
     Enter below command in CCS scripting console to load the file data to memory.
     AFTER the file load is done, enter '1' to continue ...

     loadRaw(0x80000020, 0, "/home/asmgen2/ti/mcu_plus_sdk_am64x_10_01_00_32/tools/boot/sbl_prebuilt/am64x-evm/sbl_ospi.debug.hs_fs.tiimage", 32, false);
    1
     [FLASH WRITER] Flashing success!!... 

    11) Use the third option to verify the flashed contents.
    [FLASH WRITER] Verifying success!!...

    12)Change boot mode to OSPI Boot Mode (xspi).
    changed boot mode. (sw2- 11001111 sw3-01000000 )

    13 & 14) Power cycle the EVM. & Check the UART output on the dedicated port (dev/ttyUSB0).

    After changing the boot mode to OSPI it's not booting up.

    where to load my application benchmark_demo_am64x-evm_r5fss0-0_nortos_ti-arm-clang.out file?

    I have flashed my application benchmark_demo_am64x-evm_r5fss0-0_nortos_ti-arm-clang.out to the flash.

    For reference:- 

    ==================
     JTAG Uniflash Menu
     ==================
     
     1: Erase Complete Flash
     2: Write File to Flash and Verify
     3: Verify file in Flash
     
     x: Exit
     
     Enter Choice: 2

     Enter file name along with path to write or verify : /home/asmgen2/workspace_rpmsg_ipc_r5f1_1/benchmark_demo_am64x-evm_r5fss0-0_nortos_ti-arm-clang/Debug/benchmark_demo_am64x-evm_r5fss0-0_nortos_ti-arm-clang.out
     Enter flash offset (in hex format) : 0x080000
     Enter below command in CCS scripting console to load the file data to memory.
     AFTER the file load is done, enter '1' to continue ...

     loadRaw(0x80000020, 0, "/home/asmgen2/workspace_rpmsg_ipc_r5f1_1/benchmark_demo_am64x-evm_r5fss0-0_nortos_ti-arm-clang/Debug/benchmark_demo_am64x-evm_r5fss0-0_nortos_ti-arm-clang.out", 32, false);
    1
     [FLASH WRITER] Flashing success!!... 
     
     
     ==================
     JTAG Uniflash Menu
     ==================
     
     1: Erase Complete Flash
     2: Write File to Flash and Verify
     3: Verify file in Flash
     
     x: Exit
     
     Enter Choice: 3

     Enter file name along with path to write or verify : /home/asmgen2/workspace_rpmsg_ipc_r5f1_1/benchmark_demo_am64x-evm_r5fss0-0_nortos_ti-arm-clang/Debug/benchmark_demo_am64x-evm_r5fss0-0_nortos_ti-arm-clang.out
     Enter flash offset (in hex format) : 0x080000
     Enter below command in CCS scripting console to load the file data to memory.
     AFTER the file load is done, enter '1' to continue ...

     loadRaw(0x80000020, 0, "/home/asmgen2/workspace_rpmsg_ipc_r5f1_1/benchmark_demo_am64x-evm_r5fss0-0_nortos_ti-arm-clang/Debug/benchmark_demo_am64x-evm_r5fss0-0_nortos_ti-arm-clang.out", 32, false);
    1
     [FLASH WRITER] Verifying success!!... 

    So, we tried with linux.tiimage also.
    /home/asmgen2/ti/mcu_plus_sdk_am64x_10_01_00_32/tools/boot/sbl_prebuilt/am64x-evm/sbl_ospi_linux.debug.hs_fs.tiimage

    same progress.


    Thanks & Regards,
    Ravilla Dinesh.

  • Hi Dinesh,

    In the 9th step, have you executed this script in the scripting console?

    loadRaw(0x80000020, 0, "/home/asmgen2/ti/mcu_plus_sdk_am64x_10_01_00_32/tools/boot/sbl_prebuilt/am64x-evm/sbl_ospi.debug.hs_fs.tiimage", 32, false);

    I’m sharing the actual output :

    Step 9:

    Step 14:

    where to load my application benchmark_demo_am64x-evm_r5fss0-0_nortos_ti-arm-clang.out file?

    you can flash the appimage on top of the bootloader accordingly.

    You can also refer to the config files to understand how the images are stacked:

    /home/jomypaulps/ti/mcu_plus_sdk_am64x_11_00_00_18/tools/boot/sbl_prebuilt/am64x-evm
    

    So, we tried with linux.tiimage also.
    /home/asmgen2/ti/mcu_plus_sdk_am64x_10_01_00_32/tools/boot/sbl_prebuilt/am64x-evm/sbl_ospi_linux.debug.hs_fs.tiimage

    The same logic applies here as well. If you want to flash an appimage on top of this, you can refer to:

    SBL OSPI Linux

    Thanks,

    JOMY

  • Hi JOMY,

    1) Flashed the image NULL sbl file : /home/asmgen2/ti/mcu_plus_sdk_am64x_10_01_00_32/tools/boot/sbl_prebuilt/am64x-evm/sbl_null.debug.hs_fs.tiimage  

    From terminal /dev/ttyUSB0 prints :

    2) Flashed the image : 

    OSPI sbl image : /home/asmgen2/ti/mcu_plus_sdk_am64x_10_01_00_32/tools/boot/sbl_prebuilt/am64x-evm/sbl_ospi.debug.hs_fs.tiimage

    Enter file name along with path to write or verify : /home/asmgen2/ti/mcu_plus_sdk_am64x_10_01_00_32/tools/boot/sbl_prebuilt/am64x-evm/sbl_ospi.debug.hs_fs.tiimage
     Enter flash offset (in hex format) : 0x0

    application : /home/asmgen2/ti/mcu_plus_sdk_am64x_10_01_00_32/tools/boot/multicoreImageGen/benchmark.appimage

    Enter file name along with path to write or verify : /home/asmgen2/ti/mcu_plus_sdk_am64x_10_01_00_32/tools/boot/multicoreImageGen/benchmark.appimage
    Enter flash offset (in hex format) : 0x080000


    3) Checked hexdump of application from Linux hostside :
    /home/asmgen2/ti/mcu_plus_sdk_am64x_10_01_00_32/tools/boot/multicoreImageGen/benchmark_demo_am64x-evm.appimage


    4) After flashing images into the OSPI memory.

    Changed the boot switches to OSPI mode (SW2 - 11001111 SW3-01000000) & power up.

    From terminal /dev/ttyUSB0 prints :

    5) OSPI flash memory checking through SD card booting and stopped at u-boot & checking the particular address where my application file was sitting inside the memory.


    Application invoke is not happening through OSPI booting.

    How to invoke?


    Thanks & Regards,
    Ravilla Dinesh.

  • Hi Dinesh,

    Good to know you finally got the UART logs.

    From terminal /dev/ttyUSB0 prints :

    From the /dev/ttyUSB0 terminal output, the CPU initialization logs are not showing and the boot process seems to be failing.

    Could you please try this with the latest SDK (11.02.00.24)

    Application invoke is not happening through OSPI booting.

    How to invoke?

    Once the initialization is completed, it should jump to the AppImage.

    Thanks,

    JOMY

  • Hi JOMY,

    From terminal /dev/ttyUSB0 prints : 

    DMSC Firmware Version 10.0.8--v10.00.08 (Fiery Fox)
    DMSC Firmware revision 0xa
    DMSC ABI revision 4.0

    Some tests have failed!!

    Loading the OSPI sbl image :

    /home/asmgen2/ti/mcu_plus_sdk_am64x_10_01_00_32/tools/boot/sbl_prebuilt/am64x-evm/sbl_ospi.debug.hs_fs.tiimage  to boot the R5F0_0 independently from OSPI memory.

    application : /home/asmgen2/ti/mcu_plus_sdk_am64x_10_01_00_32/tools/boot/multicoreImageGen/benchmark.appimage

    Enter file name along with path to write or verify : /home/asmgen2/ti/mcu_plus_sdk_am64x_10_01_00_32/tools/boot/multicoreImageGen/benchmark.appimage
    Enter flash offset (in hex format) : 0x080000

    Please give me some inputs to work on it.

    Either my application will in which format:
    /home/asmgen2/ti/mcu_plus_sdk_am64x_10_01_00_32/tools/boot/multicoreImageGen/benchmark.appimage
    (or) 
    benchmark_demo_am64x-evm_r5fss0-0_nortos_ti-arm-clang.appimage.hs_fs


    Thanks & regards,
    Ravilla Dinesh.

  • Hi JOMY,

    From the /dev/ttyUSB0 terminal output, the CPU initialization logs are not showing and the boot process seems to be failing.

    Could you please try this with the latest SDK (11.02.00.24)


    CCS console:

    script console : loadJSFile "/home/asmgen2/ti/mcu_plus_sdk_am64x_11_02_00_24/tools/ccs_load/am64x/load_dmsc_hsfs.js"

    [MAIN_Cortex_R5_0_0] 
    DMSC Firmware Version 11.0.6--v11.00.06 (Fancy Rat)
    DMSC Firmware revision 0xb
    DMSC ABI revision 4.0

    [SCICLIENT] ABI check PASSED 
    [SCICLIENT] Board Configuration with Debug enabled ...
    [SCICLIENT] Common Board Configuration PASSED 
    [SCICLIENT] PM Board Configuration PASSED 
    [SCICLIENT] RM Board Configuration PASSED 
    [SCICLIENT] Security Board Configuration PASSED 

    DMSC Firmware Version 11.0.6--v11.00.06 (Fancy Rat)
    DMSC Firmware revision 0xb
    DMSC ABI revision 4.0

    Starting SOC Initialization ...
    Resetting self cluster ...


    In CCS:

    • Go to Run → Load → Load Program
    • Load the SBL JTAG binary: /home/asmgen2/ti/mcu_plus_sdk_am64x_11_02_00_24/examples/drivers/boot/sbl_jtag_uniflash/am64x-evm/r5fss0-0_nortos/ti-arm-clang/sbl_jtag_uniflash.debug.out

    ==================
     JTAG Uniflash Menu
     ==================
     
     1: Erase Complete Flash
     2: Write File to Flash and Verify
     3: Verify file in Flash
     
     x: Exit
     
     Enter Choice: 2

     Enter file name along with path to write or verify : /home/asmgen2/ti/mcu_plus_sdk_am64x_11_02_00_24/tools/boot/sbl_prebuilt/am64x-evm/sbl_ospi.debug.hs_fs.tiimage
     Enter flash offset (in hex format) : 0x0
     Enter below command in CCS scripting console to load the file data to memory.
     AFTER the file load is done, enter '1' to continue ...

     loadRaw(0x80000020, 0, "/home/asmgen2/ti/mcu_plus_sdk_am64x_11_02_00_24/tools/boot/sbl_prebuilt/am64x-evm/sbl_ospi.debug.hs_fs.tiimage", 32, false);
    1
     [FLASH WRITER] Flashing success!!... 


    ==================
     JTAG Uniflash Menu
     ==================
     
     1: Erase Complete Flash
     2: Write File to Flash and Verify
     3: Verify file in Flash
     
     x: Exit
     
     Enter Choice: 2

     Enter file name along with path to write or verify : /home/asmgen2/ti/mcu_plus_sdk_am64x_11_02_00_24/tools/boot/multicoreImageGen/benchmark.appimage
     Enter flash offset (in hex format) : 0x80000
     Enter below command in CCS scripting console to load the file data to memory.
     AFTER the file load is done, enter '1' to continue ...

     loadRaw(0x80000020, 0, "/home/asmgen2/ti/mcu_plus_sdk_am64x_11_02_00_24/tools/boot/multicoreImageGen/benchmark.appimage", 32, false);
    1
     [FLASH WRITER] Flashing success!!... 

    After flashing to OSPI memory and changed the boot switches to OSPI.


    DMSC Firmware Version 11.2.5--v11.02.05 (Fancy Rat)
    DMSC Firmware revision 0xb
    DMSC ABI revision 4.0

    Some tests have failed!!

    My application hex dump: 


    OSPI flash memory checking through SD card booting and stopped at u-boot & checking the particular address where my application file was sitting inside the memory:


    Thanks & regards,
    Ravilla Dinesh.

  • Hi Dinesh,

    Could you please try this with the latest SDK (11.02.00.24)

    I will try this on my side using the new SDK.

    Additionally, could you please try the UartUniflash method to confirm whether the issue is occurring only with the JTAG Uniflash?

    Thanks,

    JOMY

  • HI JOMY,

    Additionally, could you please try the UartUniflash method to confirm whether the issue is occurring only with the JTAG Uniflash?

    JTAG Uniflash is wokring.


    Flashing this image (.appimag) :

    1) /home/asmgen2/ti/mcu_plus_sdk_am64x_11_02_00_24/tools/boot/sbl_prebuilt/am64x-evm/sbl_ospi.debug.hs_fs.tiimage. offset - 0x0

    2) /home/asmgen2/ti/mcu_plus_sdk_am64x_11_02_00_24/tools/boot/multicoreImageGen/benchmark.appimage. offset - 0x80000

    DMSC Firmware Version 11.2.5--v11.02.05 (Fancy Rat)
    DMSC Firmware revision 0xb
    DMSC ABI revision 4.0

    Some tests have failed!!

    Flashing this image (.appimage.hs_fs) :

    1) /home/asmgen2/ti/mcu_plus_sdk_am64x_11_02_00_24/tools/boot/sbl_prebuilt/am64x-evm/sbl_ospi.debug.hs_fs.tiimage. offset - 0x0 

    2) /home/asmgen2/workspace_11sdk_ipc/benchmark_demo_am64x-evm_r5fss0-0_nortos_ti-arm-clang/Debug/benchmark_demo_am64x-evm_r5fss0-0_nortos_ti-arm-clang.appimage.hs_fs. offset - 0x80000

    DMSC Firmware Version 11.2.5--v11.02.05 (Fancy Rat)
    DMSC Firmware revision 0xb
    DMSC ABI revision 4.0

    KPI_DATA: [BOOTLOADER_PROFILE] CPU Clock        : 800.000 MHz 
    KPI_DATA: [BOOTLOADER_PROFILE] Boot Media       : NOR SPI FLASH 
    KPI_DATA: [BOOTLOADER_PROFILE] Boot Media Clock : 166.667 MHz 
    KPI_DATA: [BOOTLOADER_PROFILE] Boot Image Size  : 103 KB 
    KPI_DATA: [BOOTLOADER_PROFILE] Cores present    : 
    r5f0-0
    KPI_DATA: [BOOTLOADER PROFILE] SYSFW init                       :      11316us 
    KPI_DATA: [BOOTLOADER PROFILE] System_init                      :     363236us 
    KPI_DATA: [BOOTLOADER PROFILE] Drivers_open                     :       1699us 
    KPI_DATA: [BOOTLOADER PROFILE] Board_driversOpen                :    1039533us 
    KPI_DATA: [BOOTLOADER PROFILE] Sciclient Get Version            :       9999us 
    KPI_DATA: [BOOTLOADER PROFILE] CPU Load                         :      33718us 
    KPI_DATA: [BOOTLOADER PROFILE] SBL End                          :       2226us 
    KPI_DATA: [BOOTLOADER_PROFILE] SBL Total Time Taken             :    1461728us 

    Image loading done, switching to application ...

    Booting has started, but the application prints are not visible. Please test with some example code to verify whether the prints appear and share the results.

    Thanks & regards,
    Ravilla Dinesh.

  • Hi Dinesh,

    Good to know you successfully completed the boot process.

    Booting has started, but the application prints are not visible. Please test with some example code to verify whether the prints appear and share the results.

    For the example, you can use
    mcu_plus_sdk_am64x_10_01_00_32/examples/benchmarks/coremark_benchmark/am64x-evm/r5fss0-0_nortos/ti-arm-clang/coremark_benchmark.release.appimage.hs_fs as the appimage (it includes UART prints).

    Thanks,

    JOMY

  • Hi Dinesh,

    If the solution has resolved your issue, please close the ticket. This will help others in the community who may encounter the same problem in the future.

    Thanks,

    JOMY

  • Hi Jomy,

    Yes, this issue is resolved.

    Thanks & Regards,

    Ravilla Dinesh.

  • Hi Dinesh,

    Thank you for your confirmation.

    Thanks

    JOMY