This thread has been locked.

If you have a related question, please click the "Ask a related question" button in the top right corner. The newly created question will be automatically linked to this question.

Big Newbie problem with CCS v6 and Olimex TMS320 XDS100 v3

Other Parts Discussed in Thread: TMS320F28016, CONTROLSUITE, SPRC191

Hello dear guys,

first of all, i wanna excuse my bad english. So i hope you guys understand my problem.

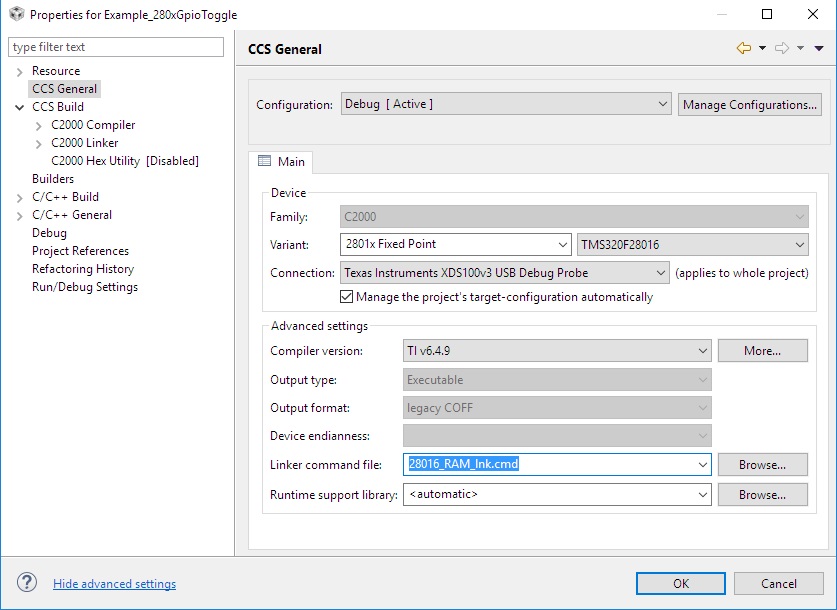
I wanna run a Olimex TMS320 XDS100 V3 with the CCS v6.

I got a user's manual here: https://www.olimex.com/Products/DSP/Emulators/TMS320-XDS100-V3/resources/TMS320-XDS100v3_UM.pdf


On the page 8 they say that i have to install the EmuPack with XDS100v3 support. But this option is for CCS v5, but i got the CCS v6. My first question: With CCS v6, is the EmuPack with XDS100v3 necessary? Somewhere i read that CCS v6 has that EmuPack with XDS100v3-feature automatically.


So now i connected the Olimex TMS320 XDS100 V3 with my computer, and startet CCS v6. But when you open a new project, there is no option to use Olimex TMS320 XDS100 V3 as a target. Can someone help me with this? Thanks so much!
Best regards from Germany

Hien

  • Hello Hien,

    Hien Nguyen50 said:
    My first question: With CCS v6, is the EmuPack with XDS100v3 necessary? Somewhere i read that CCS v6 has that EmuPack with XDS100v3-feature automatically.

    CCSv6 comes with XDS100v3 support. As long as you did not disable XDS100 support when you installed CCSv6, it should be there already.

    Hien Nguyen50 said:
    there is no option to use Olimex TMS320 XDS100 V3 as a target.

    All XDS100 debug probes use the same xds100 driver. Hence the option you should use is "Texas Instruments XDS100v3 USB Debug Probe"

    Thanks

    ki

  • Hey Ki,
    thanks so much for your answer! Unfortunally, there os no ""Texas Instruments XDS100v3 USB Debug Probe" option to choose in CCS v6.
    Hien
  • Hey,
    now i downloaded CCS v5.5 and there is still no option for the XDS100 v3...
  • What device are you using?
  • Oh, damn, my bad. I finally found it. The right option to choose is:


    "Connection" > "Texas Instruments XDS100v3 USB Emulator" (in CCS v5.5)

    i got one more question: I also use the development board, Olimex TMS320-P28016....it has the TI chip TMS320-F28016 on it...

    Does it mean, that i i have to choose :
    "Family" > "C2000"
    "Variant " > " 2801x Fixed Point" > "TMS320F28016" ?

    Because i don't know if the TMS320-F28016 belongs to the C2000-family or the 2801x Fixed Point-family....hope you can help me...
    Thanks so much !!
    Hien
  • HI,

    That is correct.

    Thanks

    ki

  • Hey Ki,

    it's me again. I wanna use the Blinking_LED template, but there is no such a templetae in CCS v5.5.

    Do you know where i can find it?

    Hien

  • Most C2000 examples come with ControlSUITE. However, I didn't see any examples in ControlSUITE for 2801x in my installation. I suggest asking in the C2000 forums where the experts there can help you best.

    Thanks
    ki
  • Hey Ki,
    it's me again, i found some examples here:
    www.olimex.com/.../

    I dowloaded "Blink LED". But i don't know how to use them with CCS v5.5.
    Can you help me again?
    Thank you so much! You are the best!
    H
  • That project on Olimex's site is for an old CCS version (CCSv3.3).

    I migrated it to CCSv5.5 for you and zipped and attached it to my post.

    TMS320-P28016-Blinking-LED-CCSv5.zip

    You can import the project in .\TMS320-P28016-Blinking-LED\Blinking_LED\DSP280x_examples\Blinking_LED\Blinking_LED

    When you import, make sure you DISABLE the option to copy the project into the workspace.

    Thanks

    ki

  • Thanks so much. I did that, bt then a screen pops up:
    "Unrecognized product of type 'com.ti.rtsc.XDAIS' is required by project 'Blinking_LED' - please install at least one product of this type before building this project."

    What is the problem?
  • also 2 warnings pop up:
    Description: Build variable 'XDAIS_CG_ROOT' cannot be resolved. Resource :Blinking_LED
    Path:- Location: properties Type: Problems

    Description: Invalid project path: Include path not found (\packages\ti\xdais).
    Resource :Blinking_LED Path: - Location: pathentry Tyep: Path Entry Problem
  • Do you have XDAIS in your CCSv5.5 installation? You can check in your workspace preferences:

  • No, the whole "Discoverd tools" section is empty....
  • ok. Looking at the example, it doesn't seem like it uses XDAIS anyway so I don't know why the project has a dependency for it. Close CCS and please download the attached file .cproject and copy it into .\TMS320-P28016-Blinking-LED\Blinking_LED\DSP280x_examples\Blinking_LED\Blinking_LED (overwrite the one that is in there). then try again.

    https://e2e.ti.com/cfs-file/__key/communityserver-discussions-components-files/81/.cproject

  • When i download the ".cproject" file, it appears on my computer as "cproject", that means the dot is missing. And when i try to change the name and add the dot, then it says that i should give it a name. Is there something wrong?
  • Wow, i handled it, now i re-opened CCS and there is only 1 warning left (XDAIS_CG_ROOT cannot be resolved).
    I got a question: When i open CCS, it tries to add new products, also the XDAIS. When i click "finish", there are another problems, the details says:

    "Operation details
    Cannot complete the install because one or more required items could not be found.
    Software being installed: RTSC/XDCtools (IDE Client) 3.31.0.24 (org.eclipse.rtsc.xdctools.product.ui.feature.group 3.31.0.24)
    Missing requirement: Model Plug-in 3.31.0.24 (org.eclipse.rtsc.xdctools.model 3.31.0.24) requires 'bundle org.eclipse.rtsc.xdctools.buildDefinitions.XDC.minimal 0.0.0' but it could not be found
    Cannot satisfy dependency:
    From: RTSC/XDCtools (IDE Client) 3.31.0.24 (org.eclipse.rtsc.xdctools.product.ui.feature.group 3.31.0.24)
    To: org.eclipse.rtsc.xdctools.model [3.31.0.24]"

    Can i just ignore to add these new products, or do i need them?
  • I'm not sure what is going on with your environment. I'm going to guess that you installed CCSv5 and v6 in the same directory 9along with some other components and that is causing conflict.

    As for can you ignore the new products... yes.. .for now. But maybe later on down the road you'll want to use TI-RTOS and you'll need those components. So I rather have you clean up your environment now.

    If you will only be using CCSv5, I would rather have you remove all your existing versions of CCS (v5 and 6) and any other components that was installed with them and start clean and reinstall CCSv5. The CCSv5 installer comes with BIOS, XDC and XDAIS so I suggest you make sure to install those (at least XDC and XDAIS)
  • Note that I tend to install each CCS version in a dedicated version as shown below:

    Note that when I installed CCS, I chose to install everything so I have installations of XDAIS and XDCTOOLS also.

  • This could be true. How can i add pictures here like you did?
  • Here, i made a screenshot, as you can see, i got everything like you:
    img5.fotos-hochladen.net/.../screenshotux8yv0kl7e.png
  • Also i made a screenshot of the programs i got:
    img5.fotos-hochladen.net/.../screenshot25v10j9e7gr.png

    This is german, so you cannot read it, but the files from 11.01.16. are the from the instalation of CCSv5.5.


    The files from 09.01.16. are the from the instalation of CCSv6. Should i remove them also? I only removed CCSc6 directly, but did not know that i gotta remove the other files, too. Note: "Treiberpacket" means "driver package".
  • How to compile and upload blinking LED to Olimex TMS320-P28016 using Olimex TMS320-XDS100-V3 emulator under Code Composer Studio 6.1.2?

    A couple of important hardware configurations before attempting the connection:

    a) The three jumpers of TMS320-P28016 called "GPIO18", "GPIO29", and "GPIO34" should all be set to position "1" (which means that the board would boot from flash).

    b) The jumper ARM_JTAG_E of the emulator TMS320-XDS100-V3 should be set to open position (not connected). This jumper should be closed only when connecting to ARM targets (not the case with the TMS320 board).

    The rest of the jumpers of the both boards should be left as per default.

    c) The TMS320-P28016 board needs power supply - use either the power jack or the USB type B connector to supply power.


    After a); b) and c) are set, proceed with the software setting:

    1. Download and install Code Composer Studio v6.1.2 (during the installation make sure to select and install all packages related to XDS100, TMS320, and C2000 boards). I would also recommend keeping the default install path. By the time of writing this document, download locations of CCS can be found here: processors.wiki.ti.com/.../Download_CCS

    2. Download and extract the archive called sprc191.zip which contains examples for TMS320F2801x targets. The archive contains examples suitable for CCS v3.3.x and CCS v4.x.x. By the time of writing this document download location can be found here: http://www.ti.com/tool/sprc191

    3. Install setup_DSP280x_v170.exe (located inside sprc191.zip) - I recommend you to keep the default installation directory again.

    4. Start CCS v6.1.2 and select any workspace folder.

    5. Select Project -> Import Legacy CCSv3.3 Projects...

    6. Click the "Browse" button at the top-right corner of the window that pops-up and point to C:\tidcs\c28\DSP280x\v170\DSP280x_examples\gpio_toggle\Example_280xGpioToggle.pjt - select "Open" and then "Next" and "Finish".

    7. Ignore any warnings and messages - click "OK".

    8. Right-click over the top level of the project in the explorer (at the left side of the CCS GUI) and select "Properties". A new menu would appear. You need to edit several things here (all are very important if you have some errors remember to return here):

    8.1. in the "Variant" drop-down select "2801x Fixed Point"

    8.2. in the field next to "Variant" select "TMS320F28016"

    8.3. in the field "Connection" select "Texas Instruments XDS100v3 USB Debug Probe"

    8.4. in the field "Linker command file:" select "28016_RAM_lnk.cmd". This is very important step since the original "2808_eZdsp_RAM_lnk.cmd" of the project is not working properly with the newest compiler.


    Refer to picture to see the options set. After you are done click "OK".

    9. Right-click over "2808_eZdsp_RAM_lnk.cmd" and select "Exclude from Build" (you can also delete it). If you forget to do this you would have a lot of errors and warnings later since there would be two cmd files and duplicate memory definitions in the project.

    10. Right-click over the top level of the project in the explorer (at the left side of the CCS GUI) and select "Properties" again. Navigate to the sub-menu "C2000 Compiler" and click on "Include Options" delete the search path for "xdais" - refer to the picture below. Click "OK". This fixes two warnings related to the "xdais" library which is included in the project but not really used.


    11. At this point you can compile the project successfully (with one warning - "entry-point symbol other than "_c_int00" specified: "code_start" ", which you can also fix if you want - it is related to the memories and requires some reading). You can also debug the code on the board via the XDS100v3 emulator. Yet, you will probably think that this is not a real blinking LED since the LED appears to be constantly turned on. This is because it blinks very fast. To fix it we do the following:

    11.1 Double-click over the main file "Example_280xGpioToggle.c".

    11.2 Navigate to line 140 where you see delay_loop() function. This is the function we need to edit in order to get a better blink. Originally it looks like this:

    void delay_loop()

    {
    short i;
    for (i = 0; i < 1000; i++) {}
    }

    We should edit it to look like this:

    {
    long int i;
    for (i = 0; i < 1000000; i++) {}
    }

    12. Build the project and debug it. Use the buttons at the top to "Resume" or "Pause" the executing of the code or inspect with "Step Into" or "Step Over". Refer to picture below. The on-board LED should blink when you have pressed F8.