This thread has been locked.

If you have a related question, please click the "Ask a related question" button in the top right corner. The newly created question will be automatically linked to this question.

CCS/TMS320F28379D: Problems in dual-core programming at CCS 8.0

Part Number: TMS320F28379D
Other Parts Discussed in Thread: LAUNCHXL-F28379D, C2000WARE,

Tool/software: Code Composer Studio

Dear friends,

I am having some problems to load a dual-core program on my LAUNCHXL-F28379D via CCS 8.0. I've already searched a lot, but the solutions doesn't appear to be possible on the newest CCS version. To make things easier, I will describe what I am doing:

1) In "Resource Explorer" > "Software" > "C2000Ware - v:1.00.04.00" > "Devices" > "F2837xD" > "F28379D" > "Examples" > "Bitfield" > "Dual", I import the "blinky_dc_cpu01" and the "blinky_dc_cpu02" projects.

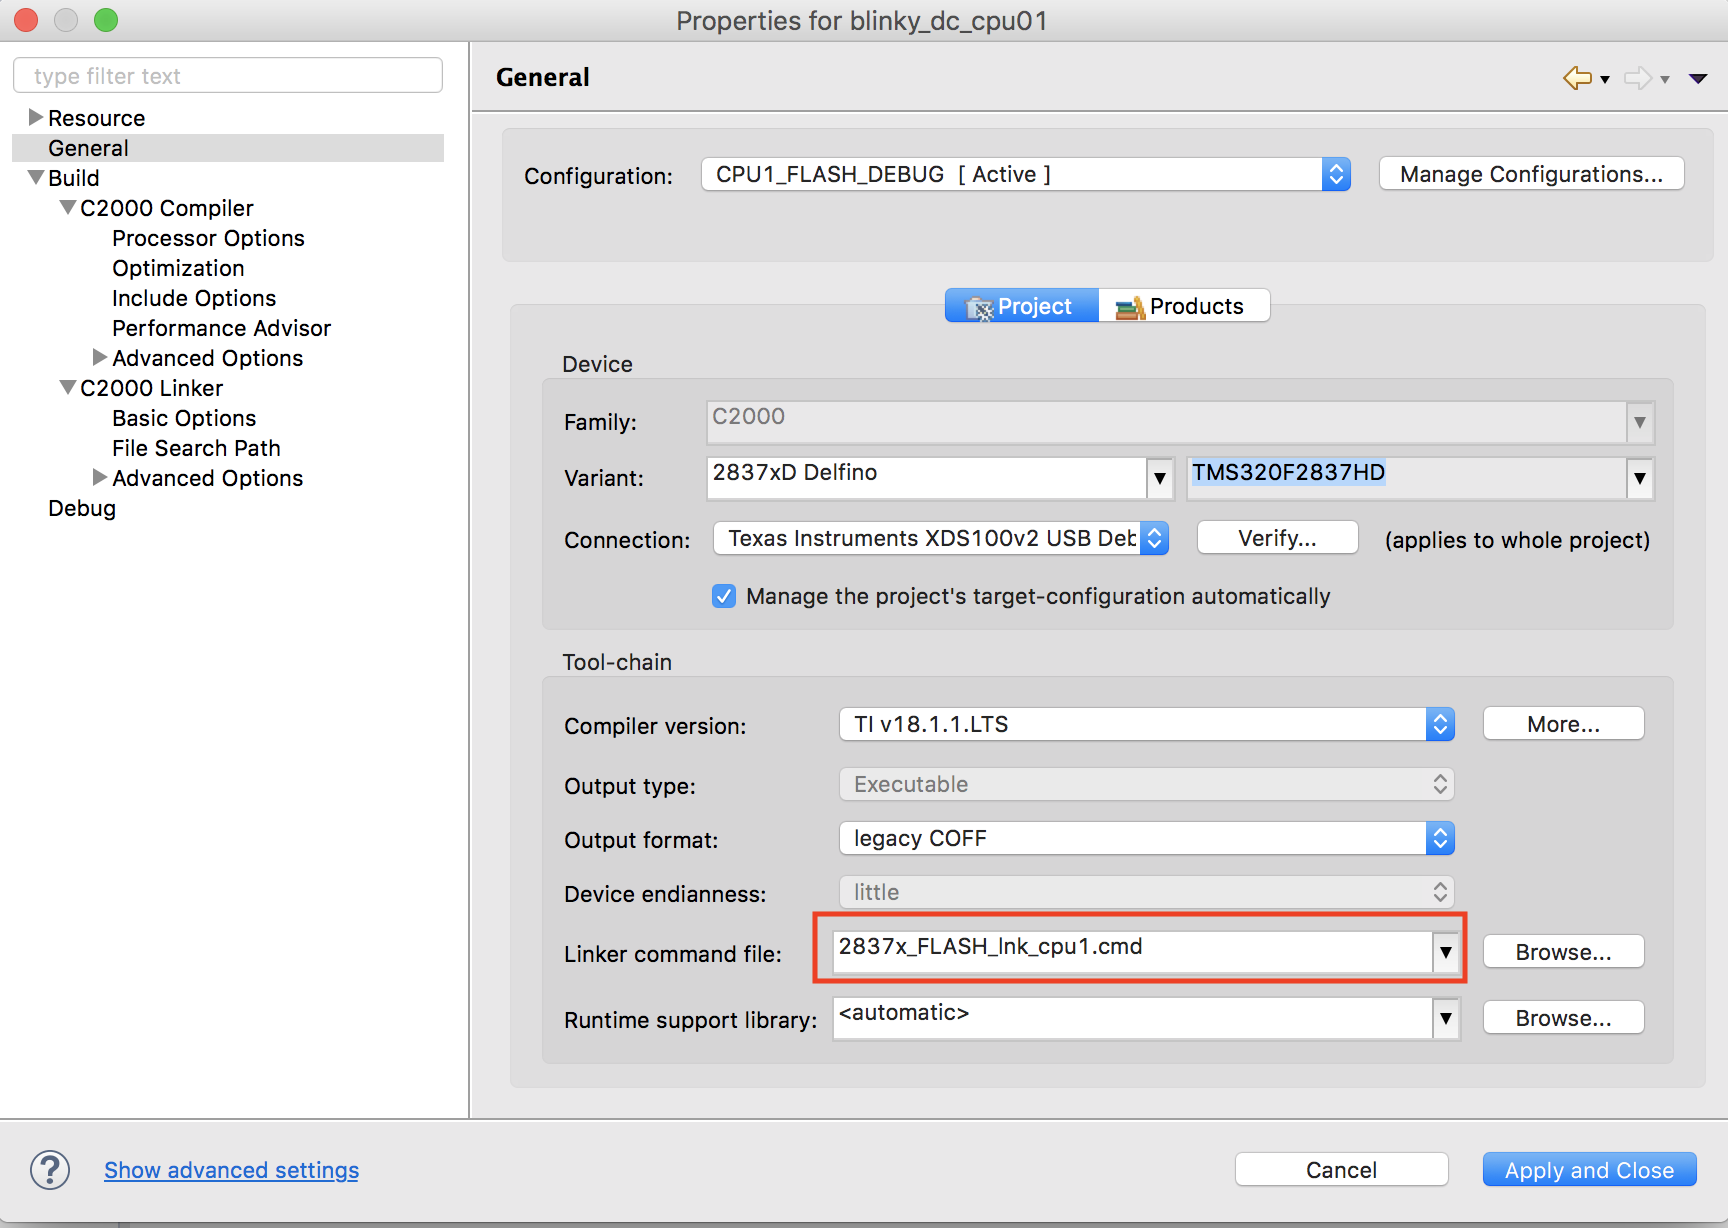
2) In "blinky_dc_cpu01" > "Properties" > "General" > "Configuration", I change from "CPU1_RAM_DEBUG" to "CPU1_FLASH_DEBUG" (since I want to load the program on flash, not on RAM)

3) In "blinky_dc_cpu01" > "Properties" > "General" > "Project", I select the TMS320F28379D device, the XDS100v2 debugger and the and put "<none>" in "Link commander file" (since leaving the 2837x_FLASH_lnk_cpu1.cmd will cause a lot of errors). Apply and close.

4) Do the steps 2) and 3) for the "blinky_dc_cpu02" project.

5) Build both projects, so I can have the "blink_dc_cpu01.out" and "blinky_dc_cpu02.out" files.

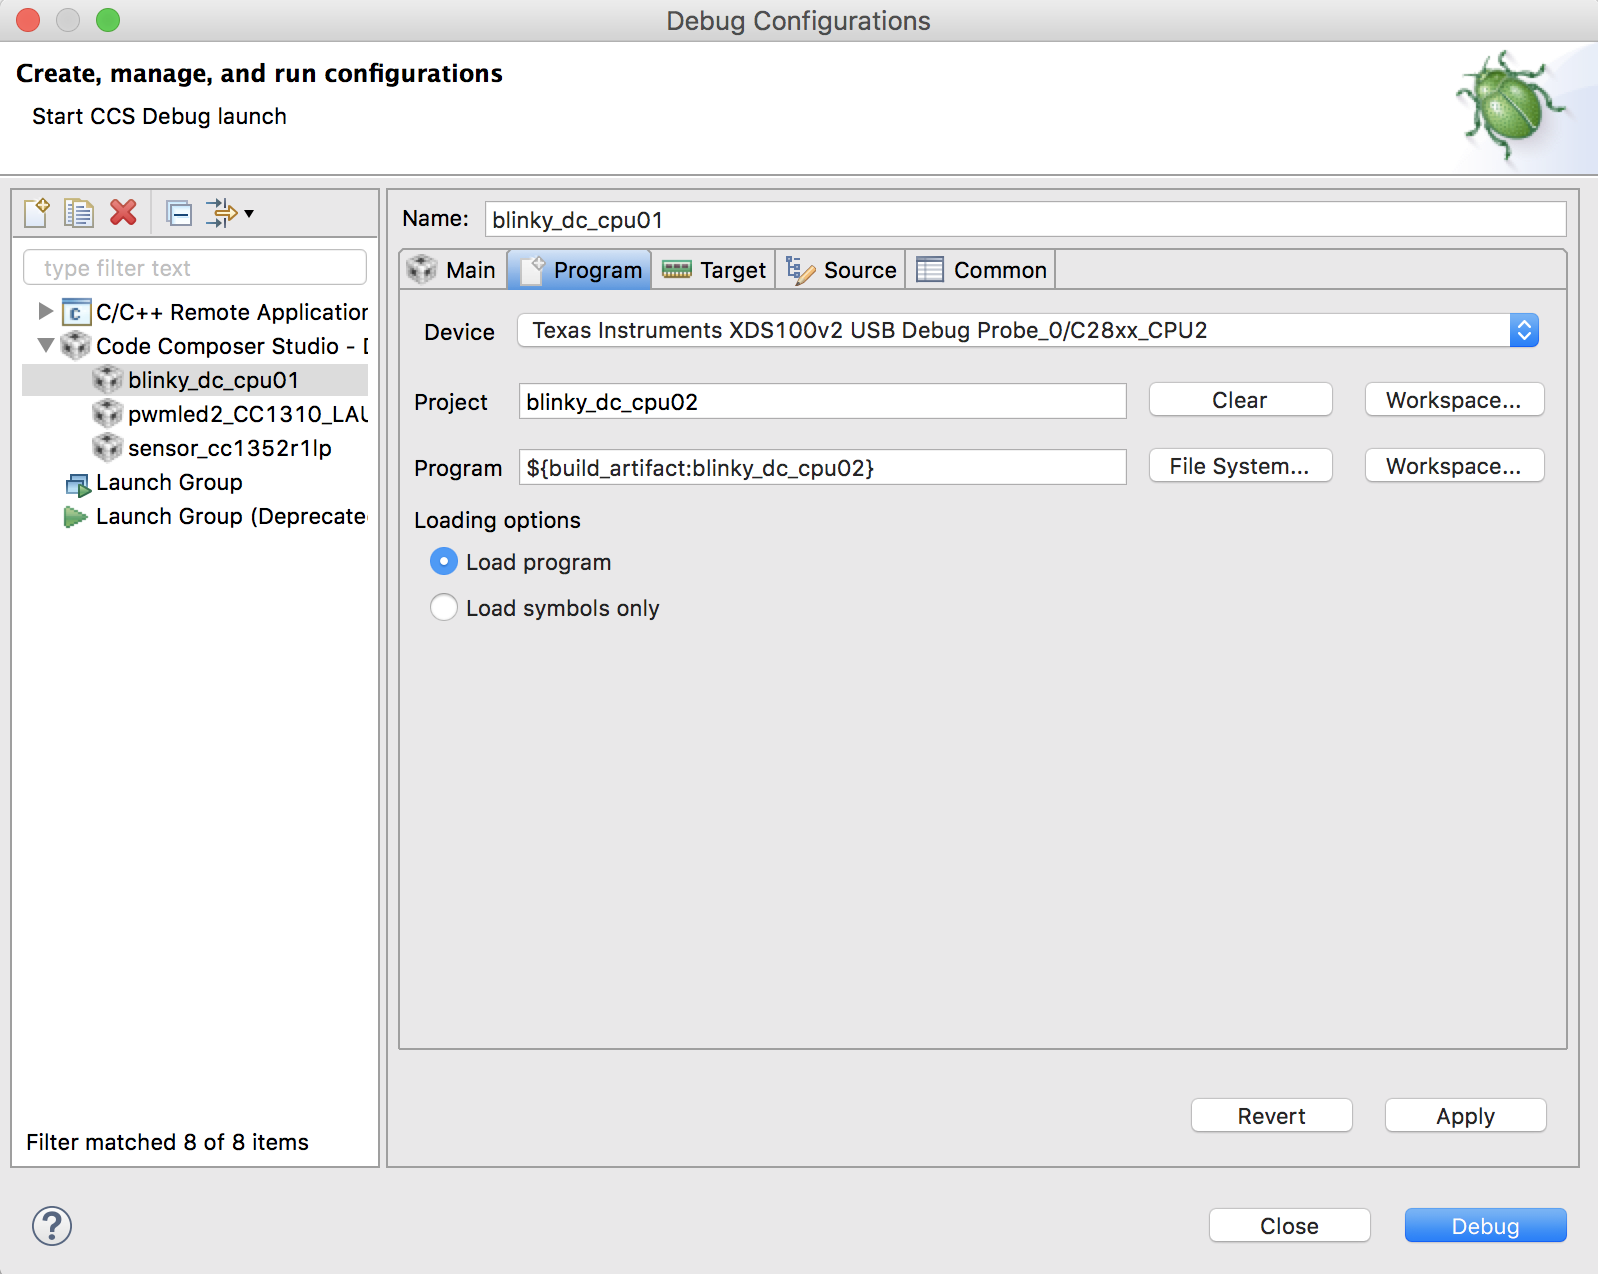
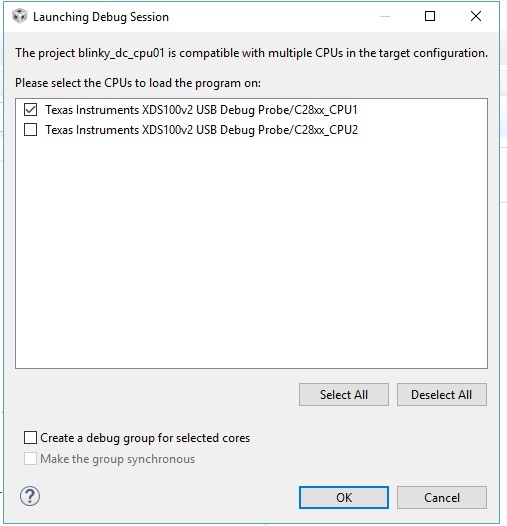
6) Debug "blinky_dc_cpu01" and select to load it just on CPU 1 (following image). Wait for the program to load, and, when it finishes, now on CCS Debug window, do not "Resume" it.

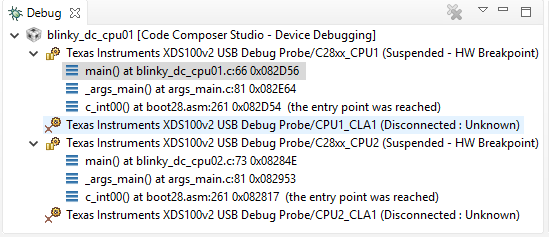
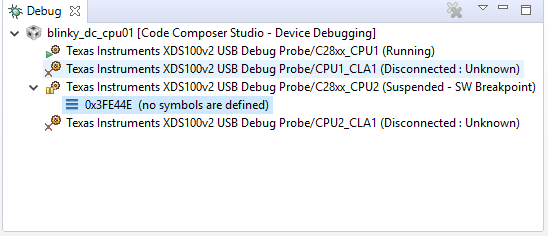
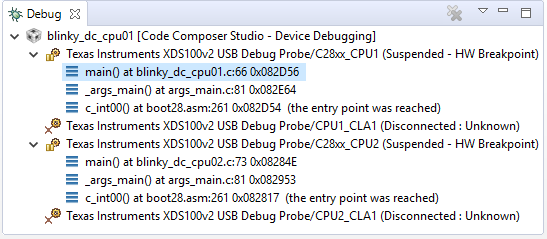
7) In the Debug window, select CPU 2 (Texas Instruments XDS100v2 USB Debug Probe/C28xx_CPU2) and "Connect Target". Its status goes from "Disconnected" to "Suspended". While it is selected, go in "Run" > "Load" > "Load Program" and select "blinky_dc_cpu02.out". Now, apparently, both cores have their respective programs (following image).


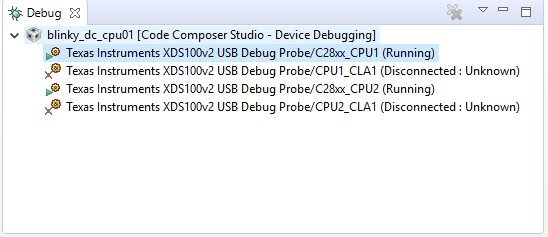
8) Select CPU 1 (Texas Instruments XDS100v2 USB Debug Probe/C28xx_CPU1) and "Resume". Blue LED (GPIO 31) starts to blink, meaning that the CPU 1 is doing what it was supposed to. Select CPU 2 and resume. Red LED (GPIO 34) starts to blink, meaning that the CPU 2 is working, while the Blue LED is still blinking. Both cores are working. Not synchronized, since the "blinking pattern" depends on the time that I press "Resume" on CPU 2... but both are running.

9) Terminate debug session. Both LEDs are still blinking.

10) Press "Reset" button on the Launchpad, to synchronize both CPUs. Now just the Blue LED is blinking. Disconnect the Launchpad from the USB (turning it off), and reconnect. Just the Blue LED is blinking...

So, after almost getting it, just the CPU 1 is alive. The Red LED is always on, meaning the GPIO 34 is always on low-level logic. So, CPU 2 is not working.

Observation: if I right-click on the .ccmxl file, there is no "Launch Selected Configuration" option, as oposed to the Original Question.

I would like to ask: what am I doing wrong? In which one of these 10 steps presented things start to go south? And what can I do to program both cores on flash?

Since now, thank you.
Gabriel

  • Gabriel,

    As to why the program on CPU2 is not running after reset I am going to have to forward that to someone on the C2000 team as it is likely some sort of config issue.

    However I will do my best to answer your tools questions.

    In step 2 was it this box that you were clearing?

    If so that is ok.  What happens is that when you select a device in the project properties it adds the default linker command file.  In your case the project is already referencing linker command files via the linker options (vs having the file directly in the project) and thus you would get build errors without clearing this.

    Technically you don't have to do step 2 as the project already has a target configuration file in the targetConfigs folder.  You could just double click on that and change the device there.

    These projects are setup in a slightly odd way.  Anyway what you did should be fine.

    As to the question regarding the "Launch Selected Configuration".  That is available via the Target Configurations view and not the Project Explorer.  If you right click on the file in the project explorer you will not see that option.  You have to do it here:

    One other thing that you can do which will make the debug launch process easier is to edit the debug configuration to load the appropriate program on each core at launch.

    Go to the little arrow beside the bug button and select Debug Configurations.

    Once the dialog box opens select Blinky_dc_cpu01 in the tree on the left.  The click on the program tab on the right.  Select CPU2 in the drop down box.  Click on the workspace button beside the Project field and select the project for CPU2.  This will automatically fill in the project field and the Program field.

    Now when you launch it will load both of the cores.

    Regards,

    John

  • Hi John,

    Thanks for the aid! It is really good to know why I am doing some stuff instead of just doing it and hoping for the best, like clearing the Linker commander file.

    Also, my mistake! I thought I could see the "Launch Selected Configuration" in the Project Explorer. But as soon as I opened the proper tab, I could see and operate it.

    And configuring the debug options to launch both cores at the same time sure saved me a lot of time. Soon I will develop my own board with the TMS320F28379D, and debug it lots of times. Saving me 20s each time will make a huge difference in my overall developing time... and patience!

    But the CPU 2 not holding the code problem still persists.

    Launching both cores at once is working as a charm:

    And running/debugging them individually also:

    But as soon as I hit the reset button, the code on CPU 2 is gone:

    I will wait for the C2000 team come to the rescue.

    Thanks for your answer!

    Best regards,
    Gabriel

  • Gabriel

    For the CPU1 Blinky example, you need to build the "CPU1_FLASH_STANDALONE" configuration. This enables the link in the CPU1 example that tells CPU2 to boot to flash and start running.

    Best regards
    Chris
  • Hi Chris,

    Thank you! It seems that the answer was right there the whole time. Now, after powering the board off and then on again, both LEDs starts to blink synchronized. Good! I think that it was related to this following piece of code (from lines 68 to 80 from the CPU 1 code), isn't it?

    #ifdef _STANDALONE
    #ifdef _FLASH
    //
    // Send boot command to allow the CPU2 application to begin execution
    //
    IPCBootCPU2(C1C2_BROM_BOOTMODE_BOOT_FROM_FLASH);
    #else
    //
    // Send boot command to allow the CPU2 application to begin execution
    //
    IPCBootCPU2(C1C2_BROM_BOOTMODE_BOOT_FROM_RAM);
    #endif
    #endif

    But now I face a new situation. After clicking on the bug button, and entering the Debug view, the debug session seems to not work. If I click "Resume" in any CPU, the LEDs do not blink. But if I close the debug session and power down/up the board, they start to blink as planned.

    So, basically, do I have to choose between loading the code on flash to CPU 2 and debugging the MCU? It is not possible to do both? 

    Bonus question: CPU 2 just works after powering the board off then on. If I just press the reset button after closing the debug session (that didn't work for debug), just the CPU 1 (represented in this example by the blue LED) works. Is that normal?

    Thank you,

    Gabriel.

  • Gabriel

    Yes, that is the related code that is changed when switching the build configuration.
    You can choose to switch between the build configs (easier option in my opinion) or follow the steps below to emulate standalone with debugger connected:
    1. This flow assumes both CPUs are already flashed with the program
    2. Reset CPU1 (CPU reset, not restart)
    3. Set EMUBOOT to flash on CPU1
    4. Reset (CPU reset, not restart) CPU2
    5. Run CPU2 (Don't set bootmode to flash, for this typoe of scenario don't use the gel scripts, you want it to go to wait boot)
    6. Run CPU1
    7. CPU1 will then boot to flash, while CPU2 is waiting for BOOT IPC command
    8. CPU1 app will send IPC to boot CPU2 to flash
    9. CPU2 will boot to flash and run

    Not sure I follow what you're describing that you are doing in the bonus question.

    Best regards
    Chris