This thread has been locked.

If you have a related question, please click the "Ask a related question" button in the top right corner. The newly created question will be automatically linked to this question.

Importing TI Pspice models into OrCAD 16.3

Other Parts Discussed in Thread: INA333, LM2903

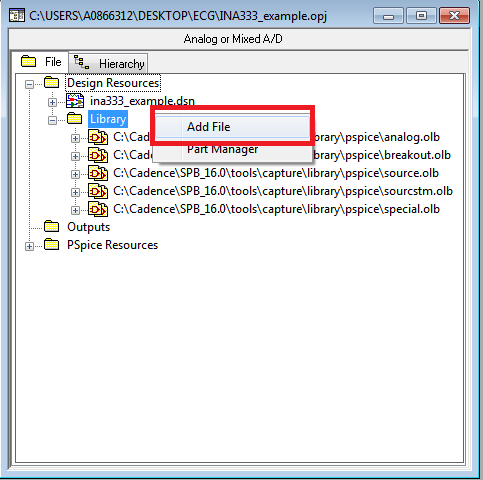
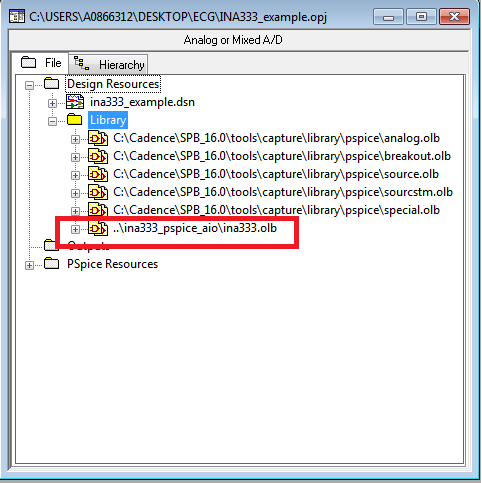
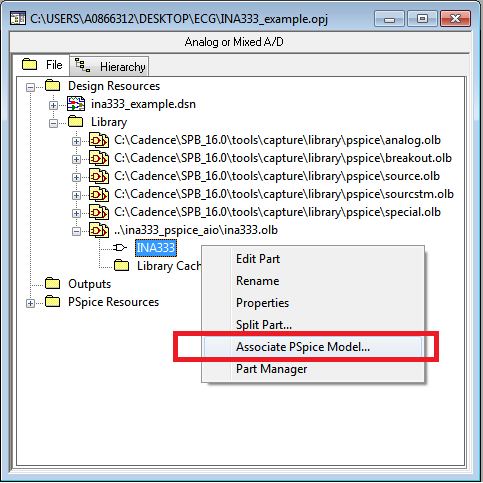
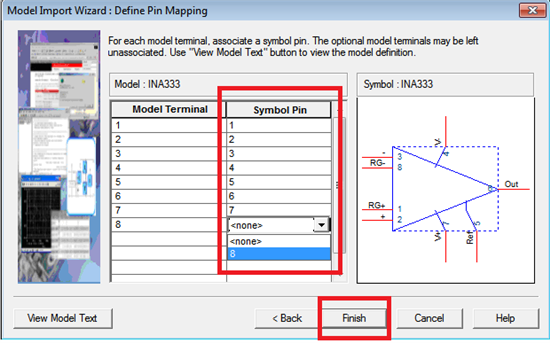
I need a step by step guide of importing the Pspice models from Ti into OrCAD 16.3.  I am particularly interested in the INA333 as for a project we are building an ECG machine.  I need to run simulation of the circuit containing this Instrumental Amplifier as part of the project.  My knowledge of Pspice is pretty basic.

Any help would be appreciated

Thanks

David

  • David,

            STEP 1. In order to use the model provided in the web first you need to create a new analog and mixed AD project. Ignore this if you already have a project. See image below.

    If asked to create the project based on an existing project, you can select the AnalogGNDSymbol.opj. This will include the most common used blocks to your project. e.g. voltage sources, analog components (i.e. resistors, caps, inductors, etc.), ground symbols, etc.

    STEP 2. In the project manager go to the folder named "library" under "Design Resources", right click and press add file as depicted below.

            The folder contains two files named INA333.lib and INA333.OLB which are the model and symbol libraries respectively. Add the .OLB file to the library folder. After you are done it should look like the following.


    STEP 3. Expand the tree entry for the .OLB you just included, select the INA333 entry, right click and select Associate PSpice Model as depicted above on right.

    STEP 4. The window depicted below on left should appear. Press the browse button as highlighted in the red box. Search and select the INA333.lib file this should populate the first entry under "matching models" query. Select the INA333, hit next, and the window below on right should appear. Using the pull down menus match each model terminal to its corresponding symbol pin and press finish.

    You should get a dialog message saying "PSpice model "INA333" attached sucessfully to symbol "INA333"."

    STEP 5. Edit your simulation profile. See image below.

    After pressing the edit "Simulation Profile" button highlighted red in the image shown above, the following dialog will appear. Now follow the following steps

    1. Select the "Configuration Files" tab.

    2. Select "library" from the Category list box.

    3. Browse for and select the "INA333.lib" file.

    4. Add the library to the design by pressing "Add to Design".

    Now the symbol and the model have been sucessfully added to your project and you should be able to add the INA333 from the part search in the PSpice environment.

    At this point you should be able to include the amp to your design. When you close and open your project always repeat this last step to make sure that the library INA333.lib is included in the simulation library files. For some reason sometimes it gets dropped from the simulation libraries and you will get an error message saying that it can't file a model find the model file for the INA333 symbol. If this happens just add the INA333.lib to your design by pressing "Add to Design"

    I hope this answers your question. Should you have any concerns please feel free to reply to this post. I did this using Orcad 16.0 but the steps should be similar.

    -Marcos.


  • David,

    Attached is a tutorial for pspice. On the chapter #3 of this document,
    it explains how to create a symbol from a netlist. It's basically
    importing process.
    6874.PSpice Tutorial for Customer.doc

    BTW, I am not sure if you're aware that we already have INA333 imported
    in Pspice: http://www.ti.com/litv/zip/sbom382c

    The link above is .zip and if you extract it, it has .lib file which is basically
    the pspice netlist/file. Once you extract the .zip and if you double click the .opj
    (assuming you have already installed ORCAD into your computer), it
    should open the entire environment including the test benches, the test
    fixtures and the entire schematic ready for click and run a simulation.
    Then you can modify the test bench schematic to whatever you want it
    to be. Again if you have basic question on how to run the simulation, you
    can refer to the attached Pspice Tutorial, especially chapter #1.

    Let me know if you still have questions.
    Herman

  • Many thanks for all your help.

    David

  • Hi,

    Do you have any idea how to obtain PSPice Model for LM2903M/NOPB. I can't find one on website.Also if I use LM2903 instead,I can't find .lib file to be added to associate PSPice ...

    Can you pls guide?

  • Actually .lib file is just a text file. It can be renamed as .MOD, .TXT or any kind of naming (with or without

    extension)

    When you download the .zip from the website, it will give you LM2903.5_1 but you can rename it

    to LM2903.5_1.TXT or LM2903.5_1.LIB and open it with notepad for instance. This file is a model 

    for LM2903 and can be used for simulation.

  • Still not able to associate the file.It doesn't show up model.

    I understand after adding lib file we proceed as given in this post : 

    http://e2e.ti.com/support/development_tools/webench_design_center/f/234/p/91420/1055130.aspx#1055130

    Pls correct if I'm doing something wrong.

  • I am bit confused where you're stuck at.

    1. You can rename the file on the .zip as LM2903.LIB from LM2903.5_1 if you want to

    2. I am not 100% clear what you meant by "still not able to associate the file. It doesn't show up model".

        I need more details on this. You might want to follow the direction shows on this manual:

    http://e2e.ti.com/cfs-file.ashx/__key/CommunityServer-Discussions-Components-Files/234/6874.PSpice-Tutorial-for-Customer.doc

    3. If this is your first time of creating symbol, associating symbol with model file, and run simulation, make sure

    you read the manual (.doc) a bit slower/carefully since there are many details there

    4. Assuming that you're not first time user, there is a step there concerning model associating with

    symbol (page 20 to 21, step #20 to #23). If you can't do it and if you're using windows 7, make sure

    when you open your OrCad 16.3, you right click your mouse and open as administrator. This might

    help due to various Windows 7 issues etc...