This thread has been locked.

If you have a related question, please click the "Ask a related question" button in the top right corner. The newly created question will be automatically linked to this question.

LP-EM-CC2340R53: Bootloader settings and source code

Part Number: LP-EM-CC2340R53
Other Parts Discussed in Thread: SYSCONFIG, CC2340R5

Tool/software:

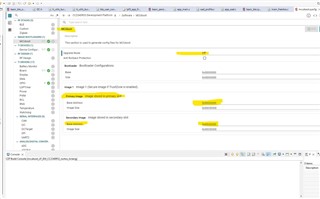
I remember during TI CC2340R53 workshop while demonstrating BLE OAD , they used the following bootloader binaries  from SDK/examples/rtos/LP_EM_CC2340R53/ble5stack/hexfiles as shown below.

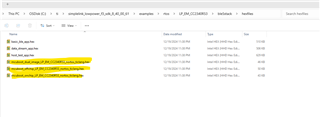
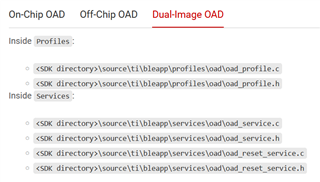
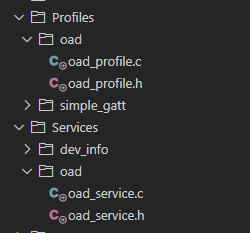
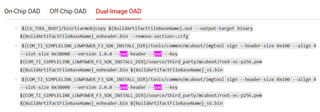
Only hex files are shared, where we can get the source code to generate mcuboot_dual_image_LP_EM_CC2340R53_nortos_ticlang.hex , mcuboot_offchip_LP_EM_CC2340R53_nortos_ticlang.hex and  mcuboot_onchip_LP_EM_CC2340R53_nortos_ticlang.hex .


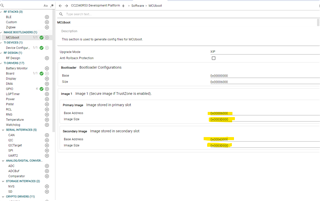
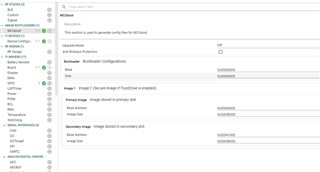
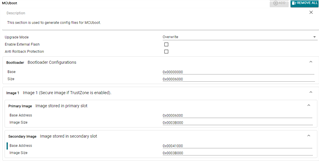
 If the same example code "mcuboot_LP_EM_CC2340R53_nortos_ticlang" is used then can you provide the corresponding configurations settings to do  generate mcuboot_dual_image_LP_EM_CC2340R53_nortos_ticlang.hex , mcuboot_offchip_LP_EM_CC2340R53_nortos_ticlang.hex and mcuboot_onchip_LP_EM_CC2340R53_nortos_ticlang.hex .

With Regards

Ilanchezhian T

  • Hi !

    You can find the instructions on how to reproduce this workshop in our SimpleLink Academy about BLE OAD (link).

    To quote this SLA :

    MCUboot is an open source project that supports hardware-independent secure bootloader for 32-bit MCUs. In the context of OAD, MCUboot serves the same purpose as the Boot Image Manager (BIM), which is to verify and boot into the new image once downloaded. Implementation details can be found in the public MCUboot Documentation. The code is maintained on the MCUboot GitHub Repository.

    While you can find the official source code in the MCUboot GitHub Repository, for the instructions on how to build the project for the CC2340R53, you can use the MCUBOOT project (link). If you have the LOWPOWER F3 SDK installed on your machine, the example is located at :
    C:\ti\simplelink_lowpower_f3_sdk_8_40_02_01\examples\nortos\LP_EM_CC2340R53\mcuboot\mcuboot

    To build the other hex files (mcuboot_dual_image_LP_EM_CC2340R53_nortos_ticlang,hex, mcuboot_offchip_LP_EM_CC2340R53_nortos_ticlang.hex and mcuboot_onchip_LP_EM_CC2340R53_nortos_ticlang.hex), you can follow the instructions of the SLA about BLE OAD on the CC2340R53 (link)

    Kind regards,
    Maxence

  • Sorry I could not find the information regarding To build the other hex files (mcuboot_dual_image_LP_EM_CC2340R53_nortos_ticlang,hex, mcuboot_offchip_LP_EM_CC2340R53_nortos_ticlang.hex and mcuboot_onchip_LP_EM_CC2340R53_nortos_ticlang.hex) in the  follow the instructions of the SLA about BLE OAD on the CC2340R53 (link

    MCU BOOT SETTINGS

    My query lies around this settings, As there are different OAD types , i do expect separate configuration in MCU boot for each one of those. This is what i am interested in. I hope the varions different mcuboot oad bootloader images are generated from the project " mcuboot_LP_EM_CC2340R53_nortos_ticlang" 

    More over for the first phase of our project  we are not going to implement firmware upgrade rather we need only secure boot ( Firmware authentication part alone using our generated public key stored in the external hardware secure storage (TPM) , Do you think this customization is possible  with existing example MCU bootloader ? 

    Another question , we do want to have separate NVM region for storing our user data in specified memory region. What I have in mind is to  create seperate NVM as shown in the last picture , Will this approach work ?? 


    I need to  make the new changes accordingly in the MCUBoot , I  think for memory partition ? , Do you have some idea how to do this. 

    Regards

    Ilan  

  • Hi Team, any update posted on our last query 3 days ago

  • Hi, I'm currently looking into it and trying to answer your question, sorry for the delay

  • Hi,

    1 - The mcuboot_LP_EM_CC2340R53_nortos_ticlang project is responsible for creating the different types of MCUboot (on-chip, off-chip, dual-image), but you have to manually make changes to reflect those settings. The default project uses MCUBoot on-chip, but if you want to use off-chip memory for one of your image slots, you have to change the XIP setting to Overwrite in MCUBoot, and check the Enable external flash checkbox. This will make MCUBoot look for the secondary image in the external flash at the address 0x00000000 by default.

    2 - MCUBoot allows for Secure Boot by comparing the hash of the image with the hash in the header of the image once unencrypted with the public key of the developper. If you only want Secure Boot with no firmware upgrade, there is no need for a permanent image or adding OAD to your BLE project, you can just follow the SLA by adding only your project as the user application in the primary slot. As for the usage of a TPM of HSM for your encryption needs, the MCUBoot github project has multiple open issues that mention those (see link and link), but none of them show signs of official support from the MCUboot team yet. As such, we cannot guarantee that you'll be able to use your TPM with MCUboot.

    3 - Splitting the NVM should be possible by adding a second NVM node in sysconfig just like you did. Instead of pointer as a region type, you could use generate for both, and reduce the size of the other NVM so that they don't overlap.

    Kind regards,
    Maxence

  • Thanks  for your response , I am yet to go through your response  mean time , I have few more query with regards to this ,

    Query 1:

    In the Basic BLE OAD application linker file I am seeing macro defined as "SECURE_BOOT", and I could see that from the system memory map in the linker file, this macro is not defined if the bootloader is selected as MCU Bootloader and present in the No MCU Boot option. So, in this case what does the SECURE_BOOT is used for?


    Query 2: 

    Also for the SECURE_BOOT option , the FLASH Size macro is set to value "0xE8000" , which is more than the CC2340R53 FLASH memory capacity (512 KB), Could you provide us more information regarding this? - Please refer the information i formulated in the table below [ see SECURE BOOT ]  

    EXCERPT FROM "BASIC BLE OAD APPLICATION " 
    MACROS  used in Linker file  SECURE BOOT  NON SECURE BOOT  OAD Type 
    FLASH SIZE  0xE8000  0x80000 OAD_APP_ONCHIP [OR] OAD_PERSISTENT
    NVS_SIZE 0x4000 0x4000 OAD_APP_OFFCHIP [OR] OAD_PERSISTENT [OR] OAD_APP_ONCHIP [OR]  OAD_DUAL_IMAGE
    NVS_BASE (= FLASH_SIZE - NVS_SIZE) 0xE4000 0x7c000  
    MCU_HDR_SIZE 0x80 0x100  
    MCUBOOT_BASE 0x00 0x00  
    MCUBOOT_SIZE 0x6000 0x6000  
    APP_HDR_BASE 0x32000 0x32000 OAD_APP_ONCHIP [OR] OAD_PERSISTENT [ Project defined LINKER VARIABLE - APP_HDR_ADDR ]
    0x6000 0x6000 OAD_APP_OFFCHIP   [ Project defined  LINKER VARIABLE - APP_HDR_ADDR ]
    0x6000 0x6000 OAD_DUAL_IMAGE  [ Project defined LINKER VARIABLE - APP_HDR_ADDR ]
    APP_BASE (APP_HDR_BASE  + MCU_HDR_SIZE) 0x32080 0x32100 OAD_APP_ONCHIP [OR] OAD_PERSISTENT
    0x6080 0x6100 OAD_APP_OFFCHIP  
    0x6080 0x6100 OAD_DUAL_IMAGE  
    PERSISTENT_HDR_BASE 0x00 0x6000  
    PERSISTENT_BASE (PERSISTENT_HDR_BASE + MCU_HDR_SIZE) 0x80 0x6100  
    APP_SIZE (FLASH_SIZE - APP_BASE - NVS_SIZE) 0xB5B80 49F00 OAD_APP_ONCHIP [OR] OAD_PERSISTENT
    APP_SIZE (FLASH_SIZE - APP_BASE - NVS_SIZE) 0xDDF80 0x75F00 OAD_APP_OFFCHIP  
    APP_SIZE ((FLASH_SIZE - NVS_SIZE)/2 - MCU_HDR_SIZE) 0x71F80 NA OAD_DUAL_IMAGE   - SECURE 
    APP_SIZE ((FLASH_SIZE - NVS_SIZE - MCUBOOT_SIZE)/2 - MCU_HDR_SIZE) NA 0x3AF00 OAD_DUAL_IMAGE   - NON SECURE 

    Regards, 

    Ilan 

  • Hi ,  I imported the "mcuboot_LP_EM_CC2340R53_nortos_ticlang " application and see the default settings as in the below picture . 

    According to me I see this default setting could be meant for Dual image can you please confirm on this, also here the size of the bootloader is mentioned as 0x6000 , size of the primary slot is 0x3D000 and size of the secondary slot is also 0x3D000. So maximum size of bootloader + primary image + secondary image  =  0x6000 + 0x3D000 + 0x3D000 = 0x80000 ( 512 KB) . But in the linker NVS region size is 0x4000. so effective flash memory reserved for user is 496 KB which is (0x00 to 0x7C000), so how come this configuration works . 

  • Hi Maxence, 

    Based out of my understanding ,  I have  provided my settings below , could you please confirm whether the settings are correct. ? 

      Dual Image OAD  Configuration  On Chip OAD Configuration OFF Chip OAD Configuration
    Bootloader Base  0x00000000 0x00000000 0x00000000
    Bootloader Size   0x00006000 0x00006000 0x00006000
    Primary Image Base Address  0x00006000 0x00032000 0x00006000
    Primary Image Size  0x0003B000 0x0004A000 0x00076000
    Secondary Image Base Address  0x00041000 0x00006000 0x00000000
    Secondary Image Size  0x0003B000 0x0002C000 0x00076000
    Upgrade Mode  XIP  XIP  Overwrite 
    Enable External Flash  NA  NA  Selected 

    Regards Ilan 

  • Hi,

    The off-chip and dual-image OAD configuration are correct, assuming you don't need an NVS space.

    The on-chip OAD configuration you describe is the one given in the SLA (size of 0x0004A000 for primary slot and 0x0002C000 for the secondary slot) and not the default sysconfig one (size of 0x0003B000 for both, just like the Dual Image OAD configuration).

    I think both the configuration recommended by the SLA and sysconfig are correct. The only problem could be that 0x0002C000 is not enough for the permanent image has enough space to live in. If you face problems later on, you can try using 0x0003B000 as the size for both images.

    I'm also looking for answers for your other question, I have not forgotten don't worry.

    Kind regards,
    Maxence

  • Hi,

    After looking at the user guide from the F2 SDK, there is an entire section about the Trusted Firmware-M implementation and how secure boot is implemented. Since this is not mentioned anywhere in the F3 SDK user guide, I would assume that the SECURE_BOOT macro should not be used.

    This section also mentions that Secure Boot is implemented through MCUboot, so I would recommend to implement secure boot through the regular usage of MCUboot.

    Kind regards,
    Maxence

  • Hi Maxence, my changes in the MCU boot for the dual image is not working with application image " basic_ble_oad_dual_image_LP_EM_CC2340R53_freertos_ticlang", I could see only last flashed image is running and new image uploaded is not.

    I am attaching my MCU boot modified for Dual Boot project for your reference. and below image is the memory partition configuration

    mcuboot_dualOAD_LP_EM_CC2340R53_nortos_ticlang.zip   

    What is working for me is the Dual Image pre compiled hex file and application image " basic_ble_oad_dual_image_LP_EM_CC2340R53_freertos_ticlang" , is working for upgrading i am using the Simplink connect mobile APP provided sample dual boot v2 binary (ble5_basic_ble_oad_dual_image_peripheral_cc2340r5_ticlang_FlasOnly_Release_v2.bin) . 

    Could you provide the correct MCU dual boot project tested at your end. So that I can verify example application <basic_ble_oad_dual_image_LP_EM_CC2340R53_freertos_ticlang> works for me. Thanks

    Regards

    Ilan

  • Hi,

    I am able to reproduce the issue on my end with your code. The image seems to be uploaded and stored correctly, but MCUBoot choses not to boot on the v2 version. I assume it is because MCUBoot does not accept accept the signature of the new image sent through OTA, or maybe because the version is not the expected one. I will try to find what the cause it and I'll get back to you

    Kind regards,
    Maxence

  • Thanks that helps me to move forward, I am also sharing my sample code Which is the BASIC BLE example application with changes required for DUAL IMAGE OAD for your reference.

    6663.Ilan_basic_ble_freertos_dualchip_OAD.zip

    Please look for my generated .bin for current firmware (Ilan_basic_ble_freertos_dualchip_OAD\Release\Ilan_basic_ble_freertos_dualchip_OAD_v1_ILAN-DUAL_OAD_v1.bin)  and firmware to be updated (Ilan_basic_ble_freertos_dualchip_OAD\Release\Ilan_basic_ble_freertos_dualchip_OAD_v2_ILAN-DUAL_OAD_v2.bin) under the compiled release folder in .zip file . The change in 2 .bins is the BLE name change  and Bootloader header version change

    Regards

    Ilan  

  • Hi !

    I can confirm you that the image is being uploaded correctly at the right address (0x41000) using your version of MCUboot dual image and the basic_ble_oad_dual_image project.

    You can see that 0x6000 and 0x41000 contain a MCUboot image because it starts with the magic word 0x96f3b83d. The version number is also higher, and the keys are correct (if they weren't, no image would be accepted)

    Maybe the problem is that in Dual Image, MCUboot only uses the secondary slot as a download space, and always boots the primary slot (if the signature check out), so MCUboot effectively ignores the 2nd image. I need to find a way to replace the first image with the with the second image on a successful OAD and when the version is higher. I'm continuing to investigate and I'll get back to you.

    Kind regards,
    Maxence

  • Hi !

    Great news, I was right in my last message ! The problem was that Overwrite needs to be set instead of XIP as the upgrade mode in sysconfig. This tells MCUboot to overwrite the primary slot with the secondary slot if the right conditions are met (version is higher and the signature checks out).


    Here's my sysconfig where upgrading through OAD worked :

    Kind regards,
    Maxence

  • Yes Maxence,

    I do changed my mcuboot sysconfig to overwrite mode and tested with TI provided  example "basic_ble_oad_dual_image_LP_EM_CC2340R53_freertos_ticlang" example it works.  After update I have read the memory content from flash I could see that in primary slot version 2 bin file updated and also in the secondary slot starting at address 0x00041000 till 0x00041800 it has been erased. I think it is the expected behavior. 

    Now what is not working, is that the one I have made changes relevant to the  dual image oad upon the  reference TI example " basic_ble_LP_EM_CC2340R53_freertos_ticlang" . You can find my ported project in "6663.Ilan_basic_ble_freertos_dualchip_OAD.zip , please refer in this thread posted 19 hours ago. 

    It would be helpful if you can tell us what the issue is with the one I changed. 

    The image tool provided by the mcu boot is used as part of the post build steps in the project to create different version v1 and v2 and while compare with hex compare tool, I  could see some difference in how the images between the v1 and v2 generated, i do noticed some change while packing  according to the format as needed by the MCUBOOT, But not sure this is a problem or not. 

    Please find the attached zip file containing .bin files of both my application and TI generated one, and also few screenshot of the hex comparison made by me to see the difference. 

    Images.zip

    With Regards, 

    Ilanchezhian T 

  • Hi,

    The hex difference between your v1 and v2 files look normal. The only difference in the header is the version number (from 1 to 2) and the end of the file is the signature of the firmware, use to verify the authenticity of the firmware.

    The last difference in TI's v1 and v2 files look like a false positive from your software, because there is no difference.

    While I try to look for the problem in your dual image project, can you tell me from which project did you start and what changes did you do to end up to your dual image project ?

    Also what's the use case for what you're doing, why aren't you simply using the dual image template provided by TI ?

    Kind regards,
    Maxence

  • Hi Maxence , 

    As i described above , I have taken basic ble example and modified as per your mentioned in your previous thread : https://e2e.ti.com/support/wireless-connectivity/bluetooth-group/bluetooth/f/bluetooth-forum/1510448/lp-em-cc2340r53-application-not-getting-loaded-via-mcuboot/

    [ exact steps on how to add BLE OAD to a project (for example Basic_BLE), you can follow the SimpleLink Academy about OAD (link). ] 

    My project gets working after i change the post build steps as below. 

    Ilan post build steps:

    ${COM_TI_SIMPLELINK_LOWPOWER_F3_SDK_INSTALL_DIR}/tools/common/crc_tool/crc_tool patch-image --elf ${BuildArtifactFileBaseName}.out --symbol-prefix ti_utils_build_GenMap_sym_CRC_CCFG -o ${BuildArtifactFileBaseName}.out
    ${CG_TOOL_ROOT}/bin/tiarmobjcopy -O ihex ${BuildArtifactFileBaseName}.out ${BuildArtifactFileBaseName}.hex
    ${CG_TOOL_ROOT}/bin/tiarmobjcopy ${BuildArtifactFileBaseName}.out --output-target binary ${BuildArtifactFileBaseName}_noheader.bin --remove-section=.ccfg
    ${COM_TI_SIMPLELINK_LOWPOWER_F3_SDK_INSTALL_DIR}/tools/common/mcuboot/imgtool sign --header-size 0x100 --align 4 --slot-size 0x3B000 --version 1.0.0 --pad-header --key ${COM_TI_SIMPLELINK_LOWPOWER_F3_SDK_INSTALL_DIR}/source/third_party/mcuboot/root-ec-p256.pem ${BuildArtifactFileBaseName}_noheader.bin ${BuildArtifactFileBaseName}_v1.bin
    ${COM_TI_SIMPLELINK_LOWPOWER_F3_SDK_INSTALL_DIR}/tools/common/mcuboot/imgtool sign --header-size 0x100 --align 4 --slot-size 0x3B000 --version 2.0.0 --pad-header --key ${COM_TI_SIMPLELINK_LOWPOWER_F3_SDK_INSTALL_DIR}/source/third_party/mcuboot/root-ec-p256.pem ${BuildArtifactFileBaseName}_noheader.bin ${BuildArtifactFileBaseName}_v2.bin

    TI post build steps:

    ${CG_TOOL_ROOT}/bin/tiarmobjcopy ${BuildArtifactFileBaseName}.out --output-target binary ${BuildArtifactFileBaseName}_noheader.bin --remove-section=.ccfg
    ${COM_TI_SIMPLELINK_LOWPOWER_F3_SDK_INSTALL_DIR}/tools/common/mcuboot/imgtool sign --header-size 0x100 --align 4 --slot-size 0x3B000 --version 1.0.0 --pad-header --pad --key ${COM_TI_SIMPLELINK_LOWPOWER_F3_SDK_INSTALL_DIR}/source/third_party/mcuboot/root-ec-p256.pem ${BuildArtifactFileBaseName}_noheader.bin ${BuildArtifactFileBaseName}_v1.bin
    ${COM_TI_SIMPLELINK_LOWPOWER_F3_SDK_INSTALL_DIR}/tools/common/mcuboot/imgtool sign --header-size 0x100 --align 4 --slot-size 0x3B000 --version 2.0.0 --pad-header --pad --key ${COM_TI_SIMPLELINK_LOWPOWER_F3_SDK_INSTALL_DIR}/source/third_party/mcuboot/root-ec-p256.pem ${BuildArtifactFileBaseName}_noheader.bin ${BuildArtifactFileBaseName}_v2.bin

    May by the difference I see is this alone, I am not sure what does the  I think the below command is causing some issue, i am not sure what it does.

    ${COM_TI_SIMPLELINK_LOWPOWER_F3_SDK_INSTALL_DIR}/tools/common/crc_tool/crc_tool patch-image --elf ${BuildArtifactFileBaseName}.out --symbol-prefix ti_utils_build_GenMap_sym_CRC_CCFG -o ${BuildArtifactFileBaseName}.out 

    Regards

    Ilan T 

  • Hi,

    I'm going to spend some time today to debug your project, i'll get back to you as soon as possible once I found the issue.

    Kind regards,
    Maxence

  • Hi,

    I had no luck making your project work, no matter if I used TI post build steps or your build steps.

    I noticed multiple problems with your project.
    The first is that you did not include the oad_reset_service as the SLA recommended :

    The second problem I could find was that you removed the --pad flag from the post-build steps. This padding is actually important because it adds trailer magic and copy flags, which is required in dual image OAD and in off-chip OAD because the memory is set as "overwrite" and not "execute in place".


    You can read more about image tool from MCUboot here.

    I advise you to restart the SLA from zero, and to be careful of always selecting Dual-Image when choosing a step.

    Kind regards,
    Maxence

  • Hi Maxene , your are correct that i missed  flag --pad in my application I shared earlier . 

    after I copied the post build step commands from the reference application "basic_ble_oad_dual_image_LP_EM_CC2340R53_freertos_ticlang" project, which already has flag --pad hence it got worked (sorry my mistake which I have forgot to notice in SLA) . This is the only thing missed and application after having this change my application worked as expected. 

    Also I noticed either with or without including oad_reset_service my application is working and moreover just for my reference when I referred to the "basic_ble_oad_dual_image_LP_EM_CC2340R53_freertos_ticlang" project it also not including the oad_reset_service and it worked.. 

    One last question to close this thread. 

    Dual Image OAD  Configuration  On Chip OAD Configuration OFF Chip OAD Configuration
    Bootloader Base  0x00000000 0x00000000 0x00000000
    Bootloader Size   0x00006000 0x00006000 0x00006000
    Primary Image Base Address  0x00006000 0x00032000 0x00006000
    Primary Image Size  0x0003B000 0x0004A000 0x00076000
    Secondary Image Base Address  0x00041000 0x00006000 0x00000000
    Secondary Image Size  0x0003B000 0x0002C000 0x00076000
    Upgrade Mode  XIP  Overwrite Overwrite 
    Enable External Flash  NA  NA  Selected 

    Could you check  MCU boot configuration for OFF chip OAD with external memory  is correct,  most notable on the Secondary image size should be 1MB or 0x0007600 & Secondary Image Base Address  - 0x00000000. 

    Thanks 

    Ilan    

  • Hi !

    According to the User Guide about OAD (link), you primary image size should be your device flash size - NV space - MCUboot space.

    In the case of the CC2340R53 with 512KB of flash, this amounts to 0x00080000 - 0x00004000 - 0x00006000 = 0x00076000.

    The secondary image base address is 0x00000000, because only the image is stored here, no need to make space for MCUboot's bootloader.

    Kind regards,
    Maxence